Computer Applications Guide
Page 2
...Memory Stick slot) • OS: Mac OS 9.1/9.2 or Mac OS X (v10.0) • Applications: QuickTime 3.0 or later (this must be installed to play back movies.) • Others: USB port (this must be provided as standard), disc drive 2 You cannot hear sound if your computer... When you connect your camcorder. To copy pictures, connect your camcorder to the computer with your camcorder to a Macintosh computer using ImageMixer VCD2 • OS: Mac OS X (v10.1.5 or later) Standard installation is required. • Application: QuickTime 4.0 or later (this must be installed to play back movies.)...
...Memory Stick slot) • OS: Mac OS 9.1/9.2 or Mac OS X (v10.0) • Applications: QuickTime 3.0 or later (this must be installed to play back movies.) • Others: USB port (this must be provided as standard), disc drive 2 You cannot hear sound if your computer... When you connect your camcorder. To copy pictures, connect your camcorder to the computer with your camcorder to a Macintosh computer using ImageMixer VCD2 • OS: Mac OS X (v10.1.5 or later) Standard installation is required. • Application: QuickTime 4.0 or later (this must be installed to play back movies.)...
Computer Applications Guide
Page 4
...(optional 15 Managing pictures on a Windows computer Copying, viewing and creating pictures 17 Viewing video and pictures on your computer - Digital convert function 33 4 Picture Package VCD Maker 24 Copying images for MEMORY MIX to a "Memory Stick" (only the models with...to a Windows computer Introduction to editing pictures on a computer 6 Features ...6 Overview of the preparation 7 Step 1: Installing the software on a computer 8 Step 2: Connecting your camcorder to Video CD Burn) - Picture Package Viewer 17 Creating an original video - Picture Package Auto Video 18 Creating an...
...(optional 15 Managing pictures on a Windows computer Copying, viewing and creating pictures 17 Viewing video and pictures on your computer - Digital convert function 33 4 Picture Package VCD Maker 24 Copying images for MEMORY MIX to a "Memory Stick" (only the models with...to a Windows computer Introduction to editing pictures on a computer 6 Features ...6 Overview of the preparation 7 Step 1: Installing the software on a computer 8 Step 2: Connecting your camcorder to Video CD Burn) - Picture Package Viewer 17 Creating an original video - Picture Package Auto Video 18 Creating an...
Computer Applications Guide
Page 6
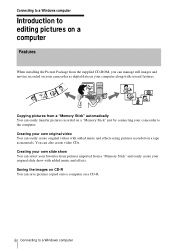
...select your favorites from pictures imported from a "Memory Stick" and easily create your camcorder to the computer. Creating your computer along with added music and effects using pictures recorded on a tape as digital data on your own slide show with added music and effects. Connecting to a... Windows computer Introduction to editing pictures on a computer Features When installing the Picture Package from the supplied CD-ROM, you can ...
...select your favorites from pictures imported from a "Memory Stick" and easily create your camcorder to the computer. Creating your computer along with added music and effects using pictures recorded on a tape as digital data on your own slide show with added music and effects. Connecting to a... Windows computer Introduction to editing pictures on a computer Features When installing the Picture Package from the supplied CD-ROM, you can ...

Computer Applications Guide
Page 7
... the steps below to a Windows computer 7 Overview of models with an i.LINK cable (optional) See "Step 2: Connecting your camcorder to a computer" (p. 10) for the first time only) Step 1: Installing the software on the Handycam Station, then connect the Handycam Station to a computer. Now, start from Step1 ! * These illustrations are two ways to connect your...
... the steps below to a Windows computer 7 Overview of models with an i.LINK cable (optional) See "Step 2: Connecting your camcorder to a computer" (p. 10) for the first time only) Step 1: Installing the software on the Handycam Station, then connect the Handycam Station to a computer. Now, start from Step1 ! * These illustrations are two ways to connect your...

Computer Applications Guide
Page 8
... software. 2 Place the supplied CD-ROM in the disc drive of the license 8 Connecting to connect your camcorder and the computer. The installation screen appears. 3 Click [Install]. 4 Select the language for the first time. The installation is required only for installation, then click [Next]. 5 Click [Next]. For Windows 2000/Windows XP Log on the computer.
... software. 2 Place the supplied CD-ROM in the disc drive of the license 8 Connecting to connect your camcorder and the computer. The installation screen appears. 3 Click [Install]. 4 Select the language for the first time. The installation is required only for installation, then click [Next]. 5 Click [Next]. For Windows 2000/Windows XP Log on the computer.

Computer Applications Guide
Page 9
... agreement] when you agree, then click [Next]. 9 Make sure [Yes, I want to restart my computer now.] is not installed on the [Ready to Install the Program] screen. The short-cut icons for [Picture Package Menu] and [Picture Package Menu destination Folder] appear on the desktop.... 8 Click [Install] on the computer, follow the steps below to install DirectX 9.0b. 1 Read [License Agreement], then click [Next]. ,continued Connecting to a Windows computer 9 The computer ...
... agreement] when you agree, then click [Next]. 9 Make sure [Yes, I want to restart my computer now.] is not installed on the [Ready to Install the Program] screen. The short-cut icons for [Picture Package Menu] and [Picture Package Menu destination Folder] appear on the desktop.... 8 Click [Install] on the computer, follow the steps below to install DirectX 9.0b. 1 Read [License Agreement], then click [Next]. ,continued Connecting to a Windows computer 9 The computer ...
Computer Applications Guide
Page 11
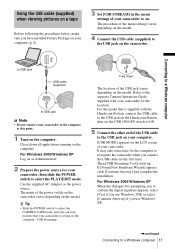
... of the USB jack varies depending on the computer. Refer to the separate Camera Operations Guide supplied with the Handycam Station, connect the USB cable to the USB jack on the Handycam Station, then set the USB ON/OFF switch to ON. 5 Connect the other end of the USB cable... and complete the installation. Connecting to a Windows computer to USB jack USB cable (supplied) to USB jack b Note • Do not connect your camcorder to the computer at this point. 1 Turn on the model. For Windows 2000/Windows XP When the dialogue box prompting you to confirm the digital signature appears, select...
... of the USB jack varies depending on the computer. Refer to the separate Camera Operations Guide supplied with the Handycam Station, connect the USB cable to the USB jack on the Handycam Station, then set the USB ON/OFF switch to ON. 5 Connect the other end of the USB cable... and complete the installation. Connecting to a Windows computer to USB jack USB cable (supplied) to USB jack b Note • Do not connect your camcorder to the computer at this point. 1 Turn on the model. For Windows 2000/Windows XP When the dialogue box prompting you to confirm the digital signature appears, select...
Computer Applications Guide
Page 13
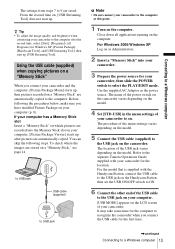
... on your computer. [Picture Package Viewer] starts up after the second time, select [Start], [Programs] (All Programs) for Windows XP, [Picture Package], [Handycam Tools], and [USB Streaming Tool], then start up , then pictures recorded on a "Memory Stick," see page 14. z Tip • To adjust the image...Before following steps. You can skip the following the procedures below, make sure you have installed Picture Package on the LCD screen of the USB cable to ON. 6 Connect the other end of your camcorder. Using the USB cable (supplied) when copying pictures on a "Memory Stick" When you...
... on your computer. [Picture Package Viewer] starts up after the second time, select [Start], [Programs] (All Programs) for Windows XP, [Picture Package], [Handycam Tools], and [USB Streaming Tool], then start up , then pictures recorded on a "Memory Stick," see page 14. z Tip • To adjust the image...Before following steps. You can skip the following the procedures below, make sure you have installed Picture Package on the LCD screen of the USB cable to ON. 6 Connect the other end of your camcorder. Using the USB cable (supplied) when copying pictures on a "Memory Stick" When you...
Computer Applications Guide
Page 17
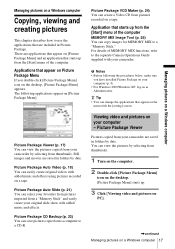
...by selecting from thumbnails. b Notes • Before following applications appear on [Picture Package Menu]. You can view the pictures copied from your camcorder. Managing pictures on a Windows computer Copying, viewing and creating pictures This chapter describes how to use the applications that starts up . 3 Click... are saved in folders by date. z Tip • You can change the applications that appear on Picture Package Menu If you have installed Picture Package on your computer (p. 8). • For Windows 2000/Windows XP, log on [Picture Package Menu] and an application that ...
...by selecting from thumbnails. b Notes • Before following applications appear on [Picture Package Menu]. You can view the pictures copied from your camcorder. Managing pictures on a Windows computer Copying, viewing and creating pictures This chapter describes how to use the applications that starts up . 3 Click... are saved in folders by date. z Tip • You can change the applications that appear on Picture Package Menu If you have installed Picture Package on your computer (p. 8). • For Windows 2000/Windows XP, log on [Picture Package Menu] and an application that ...
Computer Applications Guide
Page 29
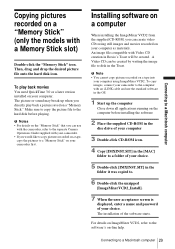
... Operations Guide supplied with a Memory Stick slot) Double-click the "Memory Stick" icon. The installation of your computer using still images and movies recorded on a "Memory Stick" (only the models with your camcorder. • If you would like to copy pictures recorded on a tape, copy the pictures ...to the hard disk before installing the software 2 Place the supplied CD-ROM in the disc drive of your computer 3...
... Operations Guide supplied with a Memory Stick slot) Double-click the "Memory Stick" icon. The installation of your computer using still images and movies recorded on a "Memory Stick" (only the models with your camcorder. • If you would like to copy pictures recorded on a tape, copy the pictures ...to the hard disk before installing the software 2 Place the supplied CD-ROM in the disc drive of your computer 3...

Computer Applications Guide
Page 30
...• Some models are not compatible for your camcorder, then slide the POWER switch repeatedly to select the PLAY/ EDIT mode. Asia Pacific Regional http://www.css.ap.sony.com/ - Korea http://scs.sony.co.kr/ - Taiwan http://vaio-online.sony.com/tw/vaio/ - Use the supplied AC ...3 Select [Click to DVD] from a picture recorded on your camcorder to a Sony VAIO series computer* that can be used to DVD" (Sony original software) installed. - Thailand http://www.sony.co.th/vaio/index.html - Latin America http://vaio-online.sony.com/ Using the Direct Access to "Click to DVD" function for...
...• Some models are not compatible for your camcorder, then slide the POWER switch repeatedly to select the PLAY/ EDIT mode. Asia Pacific Regional http://www.css.ap.sony.com/ - Korea http://scs.sony.co.kr/ - Taiwan http://vaio-online.sony.com/tw/vaio/ - Use the supplied AC ...3 Select [Click to DVD] from a picture recorded on your camcorder to a Sony VAIO series computer* that can be used to DVD" (Sony original software) installed. - Thailand http://www.sony.co.th/vaio/index.html - Latin America http://vaio-online.sony.com/ Using the Direct Access to "Click to DVD" function for...
Computer Applications Guide
Page 33
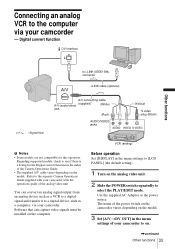
... index of the Camera Operations Guide. • The supplied A/V cable varies depending on the computer. Digital convert function DV Interface Other functions to the computer via your camcorder. Regarding supported models, check to select the PLAY/EDIT mode. VCR (analog) Before operation Set [...video signals must be installed on the model. Refer to the separate Camera Operations Guide supplied with your camcorder with the operations guide of the power switch on the camcorder varies depending on the model. 3 Set [A/VtDV OUT] in the menu settings to a digital device, such as ...
... index of the Camera Operations Guide. • The supplied A/V cable varies depending on the computer. Digital convert function DV Interface Other functions to the computer via your camcorder. Regarding supported models, check to select the PLAY/EDIT mode. VCR (analog) Before operation Set [...video signals must be installed on the model. Refer to the separate Camera Operations Guide supplied with your camcorder with the operations guide of the power switch on the camcorder varies depending on the model. 3 Set [A/VtDV OUT] in the menu settings to a digital device, such as ...
Computer Applications Guide
Page 36
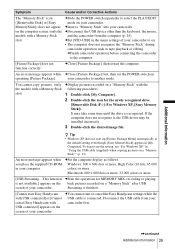
... and viewing pictures recorded on a "Memory Stick" (only the models with a "?" Sony Handycam] or [? Symptom The image does not appear on [USB Streaming Tool] when using a computer, the operation is not guaranteed on Windows 98. 1 Check that your camcorder is connected to install the [Picture Package] correctly. mark in the [Other devices] folder 5 When...
... and viewing pictures recorded on a "Memory Stick" (only the models with a "?" Sony Handycam] or [? Symptom The image does not appear on [USB Streaming Tool] when using a computer, the operation is not guaranteed on Windows 98. 1 Check that your camcorder is connected to install the [Picture Package] correctly. mark in the [Other devices] folder 5 When...
Computer Applications Guide
Page 37
... [Other devices] folder 7 When the [Confirm Device Removal] screen appears, click [OK]. 8 Turn off the power of your camcorder, disconnect the USB cable, then restart the computer. 9 Place the supplied CD-ROM in the [Other devices] folder For copying ...cause malfunction of your computer. 10 Follow the steps below are already installed, right-click them, then click [Uninstall] to a computer. 2 Right-click [My Computer], then click [Properties]. Sony DSC] with a Memory Stick slot) • [? Sony Handycam] and [? Sony Handycam] or [? The [System Properties] screen appears. 3 Click the...
... [Other devices] folder 7 When the [Confirm Device Removal] screen appears, click [OK]. 8 Turn off the power of your camcorder, disconnect the USB cable, then restart the computer. 9 Place the supplied CD-ROM in the [Other devices] folder For copying ...cause malfunction of your computer. 10 Follow the steps below are already installed, right-click them, then click [Uninstall] to a computer. 2 Right-click [My Computer], then click [Properties]. Sony DSC] with a Memory Stick slot) • [? Sony Handycam] and [? Sony Handycam] or [? The [System Properties] screen appears. 3 Click the...
Computer Applications Guide
Page 38
... and try to delete them , then click [Uninstall] to install the USB driver again. 1 Double-click [My Computer]. 2 Right-click [PICTUREPACKAGE] (Disc drive)*. * Drive names (such as Administrators. 1 Check that your camcorder, disconnect the USB cable, then restart the computer. 10 Place... the supplied CD-ROM in the [Other devices] folder For copying and viewing pictures recorded on a "Memory Stick" (only the models with a "?" Sony Handycam] and [? For copying and viewing...
... and try to delete them , then click [Uninstall] to install the USB driver again. 1 Double-click [My Computer]. 2 Right-click [PICTUREPACKAGE] (Disc drive)*. * Drive names (such as Administrators. 1 Check that your camcorder, disconnect the USB cable, then restart the computer. 10 Place... the supplied CD-ROM in the [Other devices] folder For copying and viewing pictures recorded on a "Memory Stick" (only the models with a "?" Sony Handycam] and [? For copying and viewing...
Computer Applications Guide
Page 39
...Double-click the icon for MEMORY MIX, recording or playing is finished. [Cannot start Easy Handycam with USB connected] or [Cannot cancel Easy Handycam with USB connected] appears on your camcorder. You cannot copy pictures. (only the models with a Memory Stick slot) cDisplay pictures recorded... the operations for the newly recognized drive [Removable Disk (F:)] (For Windows XP, [Sony Memory Stick]). cFinish camcorder operation before connecting the camcorder to another mode. It may be installed incorrectly. 3 Double-click the desired image file. An error message appears when you ...
...Double-click the icon for MEMORY MIX, recording or playing is finished. [Cannot start Easy Handycam with USB connected] or [Cannot cancel Easy Handycam with USB connected] appears on your camcorder. You cannot copy pictures. (only the models with a Memory Stick slot) cDisplay pictures recorded... the operations for the newly recognized drive [Removable Disk (F:)] (For Windows XP, [Sony Memory Stick]). cFinish camcorder operation before connecting the camcorder to another mode. It may be installed incorrectly. 3 Double-click the desired image file. An error message appears when you ...
Computer Applications Guide
Page 41
... C CD-R 20, 22, 23, 24, 25 CD-ROM 8 CD-RW 20, 22, 24, 25 Click to DVD 30 Copying pictures on a "Memory Stick" .... 13, 29 D Digital convert function......33 Direct Access to "Click to DVD 30 Direct Access to Video CD Burn 24 DirectX 9.0b 9 DV Interface 15, 30, 33 DVD... 30 H Handycam Station 7, 11, 13, 16, 28 I i.LINK cable 10, 15, 18, 30, 33 ImageMixer VCD2 29 Install 8 M Macintosh 28 MEMORY MIX 26 "Memory Stick" ..... 13, 26, 29 O On-line help 10, 29 P Picture Package...
... C CD-R 20, 22, 23, 24, 25 CD-ROM 8 CD-RW 20, 22, 24, 25 Click to DVD 30 Copying pictures on a "Memory Stick" .... 13, 29 D Digital convert function......33 Direct Access to "Click to DVD 30 Direct Access to Video CD Burn 24 DirectX 9.0b 9 DV Interface 15, 30, 33 DVD... 30 H Handycam Station 7, 11, 13, 16, 28 I i.LINK cable 10, 15, 18, 30, 33 ImageMixer VCD2 29 Install 8 M Macintosh 28 MEMORY MIX 26 "Memory Stick" ..... 13, 26, 29 O On-line help 10, 29 P Picture Package...
Camera Operations Guide
Page 3
...this manual could void your Sony dealer regarding this equipment. This equipment generates, uses, and can be determined by one or more of the camcorder, storage media, etc.... Trade Name: SONY Model No.: DCR-TRV460 Responsible Party: Sony Electronics Inc. The interface cable supplied must accept any changes or modifications not expressly approved in a residential installation. Notes on ...the limits for a Class B digital device, pursuant to which can radiate radio frequency energy and, if not installed and used with the limits for a digital device pursuant to these numbers ...
...this manual could void your Sony dealer regarding this equipment. This equipment generates, uses, and can be determined by one or more of the camcorder, storage media, etc.... Trade Name: SONY Model No.: DCR-TRV460 Responsible Party: Sony Electronics Inc. The interface cable supplied must accept any changes or modifications not expressly approved in a residential installation. Notes on ...the limits for a Class B digital device, pursuant to which can radiate radio frequency energy and, if not installed and used with the limits for a digital device pursuant to these numbers ...

Camera Operations Guide
Page 13
...(1) See page 127 on how to attach the shoulder strap. There is already installed. Getting started Getting started 13 Getting started Step 1: Checking supplied items Make sure you have following items supplied with DCR-TRV361. A/V connecting cable (1) USB cable (1) AC Adaptor (1) Power cord (1).... Wireless Remote Commander (1) A button-type lithium battery is no "Memory Stick" media supplied with DCR-TRV460. The number in parentheses indicates the number of that item supplied. "Memory Stick" 8MB (1) (DCR-TRV361) "Memory Stick" media is only supplied with your camcorder.
...(1) See page 127 on how to attach the shoulder strap. There is already installed. Getting started Getting started 13 Getting started Step 1: Checking supplied items Make sure you have following items supplied with DCR-TRV361. A/V connecting cable (1) USB cable (1) AC Adaptor (1) Power cord (1).... Wireless Remote Commander (1) A button-type lithium battery is no "Memory Stick" media supplied with DCR-TRV460. The number in parentheses indicates the number of that item supplied. "Memory Stick" 8MB (1) (DCR-TRV361) "Memory Stick" media is only supplied with your camcorder.

Camera Operations Guide
Page 120
...LINK (DV Interface) compatible device made by a Sony dealer before operating it checked by Sony (e.g. For example, a baud rate of Sony Corporation. To use i.LINK functions on this ...camcorder. 120 Additional Information Near AM receivers and video equipment. Anywhere very humid. • Operate your camcorder on how to temperatures above 60°C (140°F), such as Digital...particularly careful of data that application software supported by this unit) is already installed on precautions and compatible application software, refer also to the operating instructions for ...
...LINK (DV Interface) compatible device made by a Sony dealer before operating it checked by Sony (e.g. For example, a baud rate of Sony Corporation. To use i.LINK functions on this ...camcorder. 120 Additional Information Near AM receivers and video equipment. Anywhere very humid. • Operate your camcorder on how to temperatures above 60°C (140°F), such as Digital...particularly careful of data that application software supported by this unit) is already installed on precautions and compatible application software, refer also to the operating instructions for ...


