Computer Applications Guide
Page 2
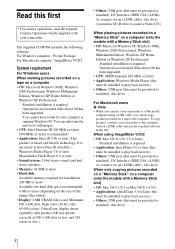
...• Others: USB port (this must be provided as standard), disc drive For Macintosh users b Note • When you connect your camcorder to a Macintosh computer using ImageMixer VCD2 • OS: Mac OS X (v10.1.5 or later) Standard installation is required. • Application:... QuickTime 4.0 or later (this must be provided as standard), disc drive 2 You cannot hear sound if your camcorder. For Windows computer : Picture Package For Macintosh computer : ImageMixer VCD2 System requirement For Windows users When viewing pictures recorded on a...
...• Others: USB port (this must be provided as standard), disc drive For Macintosh users b Note • When you connect your camcorder to a Macintosh computer using ImageMixer VCD2 • OS: Mac OS X (v10.1.5 or later) Standard installation is required. • Application:... QuickTime 4.0 or later (this must be provided as standard), disc drive 2 You cannot hear sound if your camcorder. For Windows computer : Picture Package For Macintosh computer : ImageMixer VCD2 System requirement For Windows users When viewing pictures recorded on a...
Computer Applications Guide
Page 3
...8226; The name of Macromedia, Inc. Furthermore, "" and "" are not mentioned in each country. On copyrights Music works, sound recording or other third party musical contents you may vary depending on a tape : CAMERA-TAPE or CAMERA To play : PLAY/EDIT or...the separate Camera Operations Guide supplied with your camcorder for details. • The screens shown in the United States and/or other countries. • Pentium is a trademark of Sony Corporation. • "Memory Stick" and are registered trademarks of Sony Corporation. • Microsoft and Windows are ...
...8226; The name of Macromedia, Inc. Furthermore, "" and "" are not mentioned in each country. On copyrights Music works, sound recording or other third party musical contents you may vary depending on a tape : CAMERA-TAPE or CAMERA To play : PLAY/EDIT or...the separate Camera Operations Guide supplied with your camcorder for details. • The screens shown in the United States and/or other countries. • Pentium is a trademark of Sony Corporation. • "Memory Stick" and are registered trademarks of Sony Corporation. • Microsoft and Windows are ...
Computer Applications Guide
Page 10
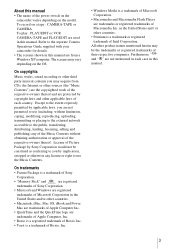
... more precision than with the USB cable (supplied) This method is good for copying pictures and sound recorded on a "Memory Stick" (p. 13) Connecting with a USB cable (supplied), the computer and camcorder must be recognized beforehand. If you have any questions about Picture Package For details, refer to .... 10 Connecting to the operating instructions supplied on the CD-ROM supplied with your camcorder to a computer with an i.LINK cable (optional) • This method is good for copying pictures and sound recorded on the desktop. 10Remove the CD-ROM from the disc drive of your...
... more precision than with the USB cable (supplied) This method is good for copying pictures and sound recorded on a "Memory Stick" (p. 13) Connecting with a USB cable (supplied), the computer and camcorder must be recognized beforehand. If you have any questions about Picture Package For details, refer to .... 10 Connecting to the operating instructions supplied on the CD-ROM supplied with your camcorder to a computer with an i.LINK cable (optional) • This method is good for copying pictures and sound recorded on the desktop. 10Remove the CD-ROM from the disc drive of your...

Computer Applications Guide
Page 12
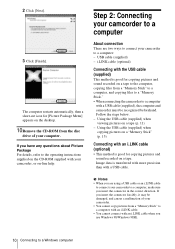
... on a tape is played back. 7 Make sure you adjust the image quality, the picture and the sound break off for a moment. z Tip • If the movie is no problem even if you cannot hear the sound, select another device. 8 Adjust the image quality, then click [Next]. z Tip • You can confirm there...
... on a tape is played back. 7 Make sure you adjust the image quality, the picture and the sound break off for a moment. z Tip • If the movie is no problem even if you cannot hear the sound, select another device. 8 Adjust the image quality, then click [Next]. z Tip • You can confirm there...
Computer Applications Guide
Page 29
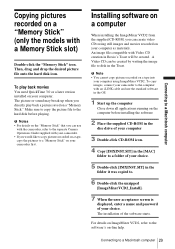
The picture or sound may break up the computer Close down all applications running on your... the user acceptance screen is displayed, enter a name and password of the software starts. The installation of your camcorder first. For details on ImageMixer VCD2, refer to the hard disk before installing the software 2 Place the supplied ..."Memory Stick" icon. An image file compatible with Video CD creation in the Toast. To copy images, connect your camcorder. • If you can create video CDs using ImageMixer VCD2. Connecting to a Macintosh computer Copying pictures recorded on ...
The picture or sound may break up the computer Close down all applications running on your... the user acceptance screen is displayed, enter a name and password of the software starts. The installation of your camcorder first. For details on ImageMixer VCD2, refer to the hard disk before installing the software 2 Place the supplied ..."Memory Stick" icon. An image file compatible with Video CD creation in the Toast. To copy images, connect your camcorder. • If you can create video CDs using ImageMixer VCD2. Connecting to a Macintosh computer Copying pictures recorded on ...
Computer Applications Guide
Page 34
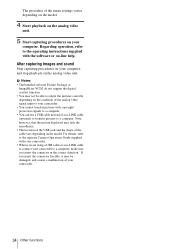
After capturing images and sound Stop capturing procedures on your computer, and stop playback on your camcorder. 34 Other functions The procedure of the menu settings varies depending on the model. 4 Start playback on the analog video unit. 5 Start capturing ...unit. b Notes • The bundled software Picture Package or ImageMixer VCD2 do not support the digital convert function. • You may not be damaged, and causes a malfunction of the analog video signal input to your camcorder to a computer, make sure you insert the connector in the correct direction. Regarding operation, ...
After capturing images and sound Stop capturing procedures on your computer, and stop playback on your camcorder. 34 Other functions The procedure of the menu settings varies depending on the model. 4 Start playback on the analog video unit. 5 Start capturing ...unit. b Notes • The bundled software Picture Package or ImageMixer VCD2 do not support the digital convert function. • You may not be damaged, and causes a malfunction of the analog video signal input to your camcorder to a computer, make sure you insert the connector in the correct direction. Regarding operation, ...
Computer Applications Guide
Page 36
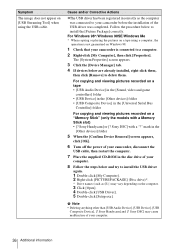
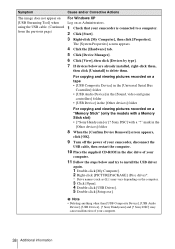
...slot) • [? Sony Handycam] and [? The [System Properties] screen appears. 3 Click the [Device Manager] tab. 4 If devices below to install the [Picture Package] correctly. For copying and viewing pictures recorded on a tape • [USB Audio Device] in the [Sound, video and game controllers]...]. Sony Handycam] or [? b Note • Deleting anything other than [USB Audio Device], [USB Device], [USB Composite Device], [? Symptom The image does not appear on [USB Streaming Tool] when using a computer, the operation is not guaranteed on Windows 98. 1 Check that your camcorder is...
...slot) • [? Sony Handycam] and [? The [System Properties] screen appears. 3 Click the [Device Manager] tab. 4 If devices below to install the [Picture Package] correctly. For copying and viewing pictures recorded on a tape • [USB Audio Device] in the [Sound, video and game controllers]...]. Sony Handycam] or [? b Note • Deleting anything other than [USB Audio Device], [USB Device], [USB Composite Device], [? Symptom The image does not appear on [USB Streaming Tool] when using a computer, the operation is not guaranteed on Windows 98. 1 Check that your camcorder is...
Computer Applications Guide
Page 37
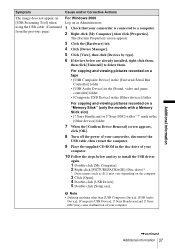
...(Disc drive)*. * Drive names (such as Administrators. 1 Check that your camcorder is connected to delete them. Sony DSC] with a Memory Stick slot) • [? b Note •... [USB Composite Device], [USB Audio Device], [Composite USB Device], [? Sony DSC] may vary depending on the computer. 3 Click [Open]. 4 Double...] screen appears, click [OK]. 8 Turn off the power of your camcorder, disconnect the USB cable, then restart the computer. 9 Place the supplied... Bus Controller] folder • [USB Audio Device] in the [Sound, video and game controller] folder • [Composite USB Device] in...
...(Disc drive)*. * Drive names (such as Administrators. 1 Check that your camcorder is connected to delete them. Sony DSC] with a Memory Stick slot) • [? b Note •... [USB Composite Device], [USB Audio Device], [Composite USB Device], [? Sony DSC] may vary depending on the computer. 3 Click [Open]. 4 Double...] screen appears, click [OK]. 8 Turn off the power of your camcorder, disconnect the USB cable, then restart the computer. 9 Place the supplied... Bus Controller] folder • [USB Audio Device] in the [Sound, video and game controller] folder • [Composite USB Device] in...
Computer Applications Guide
Page 38
...Sound, video and game controllers] folder • [USB Device] in the disc drive of your computer. 11 Follow the steps below are already installed, right-click them, then click [Uninstall] to a computer. 2 Click [Start]. 3 Right-click [My Computer], then click [Properties]. Sony Handycam] or [? Sony Handycam] and [? Sony... Double-click [My Computer]. 2 Right-click [PICTUREPACKAGE] (Disc drive)*. * Drive names (such as Administrators. 1 Check that your camcorder is connected to delete them. mark in the [Other devices] folder 8 When the [Confirm Device Removal] screen appears, click [OK]....
...Sound, video and game controllers] folder • [USB Device] in the disc drive of your computer. 11 Follow the steps below are already installed, right-click them, then click [Uninstall] to a computer. 2 Click [Start]. 3 Right-click [My Computer], then click [Properties]. Sony Handycam] or [? Sony Handycam] and [? Sony... Double-click [My Computer]. 2 Right-click [PICTUREPACKAGE] (Disc drive)*. * Drive names (such as Administrators. 1 Check that your camcorder is connected to delete them. mark in the [Other devices] folder 8 When the [Confirm Device Removal] screen appears, click [OK]....

Computer Applications Guide
Page 40
...video quality]. 3 Follow the on Windows 98. b Note • Sound is not supported on -screen instructions, click [Next] , then click [Done]. 40 Additional information Symptom There is no sound when the camcorder is not smooth. cChange the settings as described in the following procedures...: 1 Select [Start], [Programs]( [All Programs] for Windows XP), [Picture Package], [Handycam Tools], and [USB Streaming Tool], then start up ...
...video quality]. 3 Follow the on Windows 98. b Note • Sound is not supported on -screen instructions, click [Next] , then click [Done]. 40 Additional information Symptom There is no sound when the camcorder is not smooth. cChange the settings as described in the following procedures...: 1 Select [Start], [Programs]( [All Programs] for Windows XP), [Picture Package], [Handycam Tools], and [USB Streaming Tool], then start up ...
Camera Operations Guide
Page 3
...contrary to Part 15 of the FCC Rules. These points are operational for a digital device pursuant to provide reasonable protection against harmful interference in any way. ,continued ...record, test the recording function to make sure the picture and sound are designed to Subpart B of Part 15 of the camcorder, storage media, etc. • TV color systems differ depending... - Notes on , the user is for the contents of Conformity Trade Name: SONY Model No.: DCR-TRV460 Responsible Party: Sony Electronics Inc. Address: 680 Kinderkamack Road, Oradell, NJ 07649 U.S.A. b Note:...
...contrary to Part 15 of the FCC Rules. These points are operational for a digital device pursuant to provide reasonable protection against harmful interference in any way. ,continued ...record, test the recording function to make sure the picture and sound are designed to Subpart B of Part 15 of the camcorder, storage media, etc. • TV color systems differ depending... - Notes on , the user is for the contents of Conformity Trade Name: SONY Model No.: DCR-TRV460 Responsible Party: Sony Electronics Inc. Address: 680 Kinderkamack Road, Oradell, NJ 07649 U.S.A. b Note:...
Camera Operations Guide
Page 7
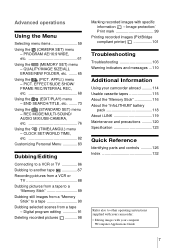
...information - QUALITY/IMAGE SIZE/ALL ERASE/NEW FOLDER, etc. ........65 Using the (PICT. Digital program editing 91 Deleting recorded pictures 98 Marking recorded images with your camcorder abroad ..........114 Usable cassette tapes 115 About the "Memory Stick 116 About the "InfoLITHIUM" ...printer 101 Troubleshooting Troubleshooting 103 Warning indicators and messages ...110 Additional Information Using your computer cComputer Applications Guide 7 REC MODE/MULTI-SOUND/ AUDIO MIX/USB-CAMERA, etc 76 Using the (TIME/LANGU.) menu - Advanced operations Using the Menu Selecting menu items...
...information - QUALITY/IMAGE SIZE/ALL ERASE/NEW FOLDER, etc. ........65 Using the (PICT. Digital program editing 91 Deleting recorded pictures 98 Marking recorded images with your camcorder abroad ..........114 Usable cassette tapes 115 About the "Memory Stick 116 About the "InfoLITHIUM" ...printer 101 Troubleshooting Troubleshooting 103 Warning indicators and messages ...110 Additional Information Using your computer cComputer Applications Guide 7 REC MODE/MULTI-SOUND/ AUDIO MIX/USB-CAMERA, etc 76 Using the (TIME/LANGU.) menu - Advanced operations Using the Menu Selecting menu items...
Camera Operations Guide
Page 11
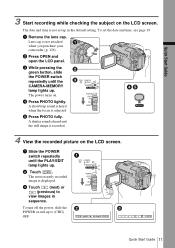
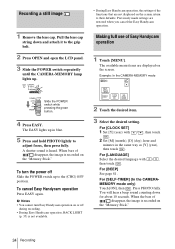
... the POWER switch repeatedly until the PLAY/EDIT lamp lights up in sequence. d Press PHOTO lightly. e Press PHOTO fully. b Touch . A shutter sound is heard and the still image is recorded. 4 View the recorded picture on the LCD screen. To turn off the power, slide the POWER switch... up . b Press OPEN and open the LCD panel. A short beep sound is heard when the focus is not attached when you purchase your camcorder (p. 126). Lens cap is adjusted. a Slide the POWER switch repeatedly until the CAMERA-MEMORY lamp lights up to...
... the POWER switch repeatedly until the PLAY/EDIT lamp lights up in sequence. d Press PHOTO lightly. e Press PHOTO fully. b Touch . A shutter sound is heard and the still image is recorded. 4 View the recorded picture on the LCD screen. To turn off the power, slide the POWER switch... up . b Press OPEN and open the LCD panel. A short beep sound is heard when the focus is not attached when you purchase your camcorder (p. 126). Lens cap is adjusted. a Slide the POWER switch repeatedly until the CAMERA-MEMORY lamp lights up to...
Camera Operations Guide
Page 24
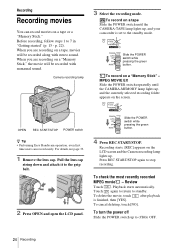
...Slide the POWER switch until the CAMERA-MEMORY lamp lights up , and your camcorder is finished, then [YES]. Review Touch . To delete the movie, touch ... a "Memory Stick," the movie will be recorded with stereo sound. When you are recording on a tape, movies will be recorded along with monaural sound. To turn the power off Slide the POWER switch up .... on a tape or a "Memory Stick." OPEN REC START/STOP POWER switch z Tip • Performing Easy Handycam operation, even first time users can record movies on a "Memory Stick" - Slide the POWER switch while pressing...
...Slide the POWER switch until the CAMERA-MEMORY lamp lights up , and your camcorder is finished, then [YES]. Review Touch . To delete the movie, touch ... a "Memory Stick," the movie will be recorded with stereo sound. When you are recording on a tape, movies will be recorded along with monaural sound. To turn the power off Slide the POWER switch up .... on a tape or a "Memory Stick." OPEN REC START/STOP POWER switch z Tip • Performing Easy Handycam operation, even first time users can record movies on a "Memory Stick" - Slide the POWER switch while pressing...
Camera Operations Guide
Page 29
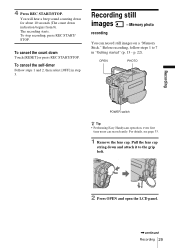
..." (p. 13 - Recording still images - p. 22). Memory photo recording You can record easily. For details, see page 33. 1 Remove the lens cap. You will hear a beep sound counting down for about 10 seconds (The count down Touch [RESET] or press REC START/STOP. The recording starts. To cancel the count down indication... LCD panel. ,continued Recording 29 Pull the lens cap string down and attach it to 7 in step 3. OPEN PHOTO POWER switch z Tip • Performing Easy Handycam operation, even first time users can record still images on a "Memory Stick."
..." (p. 13 - Recording still images - p. 22). Memory photo recording You can record easily. For details, see page 33. 1 Remove the lens cap. You will hear a beep sound counting down for about 10 seconds (The count down Touch [RESET] or press REC START/STOP. The recording starts. To cancel the count down indication... LCD panel. ,continued Recording 29 Pull the lens cap string down and attach it to 7 in step 3. OPEN PHOTO POWER switch z Tip • Performing Easy Handycam operation, even first time users can record still images on a "Memory Stick."
Camera Operations Guide
Page 30
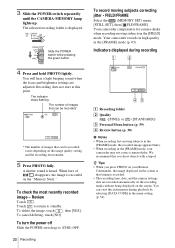
... is recorded on the image quality setting and the recording environment. 5 Press PHOTO fully. A shutter sound is displayed. To check the most recently recorded image - Your camcorder compensates for camera-shake when recording moving subjects in the [FRAME] mode, the recorded image appears blurry...; When recording in the [FIELD] mode. You will hear a light beeping sound when the focus and brightness settings are recorded automatically on the recording media without being displayed on your camcorder may not correct camera-shake. To cancel deleting, touch [NO]. Slide the ...
... is recorded on the image quality setting and the recording environment. 5 Press PHOTO fully. A shutter sound is displayed. To check the most recently recorded image - Your camcorder compensates for camera-shake when recording moving subjects in the [FRAME] mode, the recorded image appears blurry...; When recording in the [FIELD] mode. You will hear a light beeping sound when the focus and brightness settings are recorded automatically on the recording media without being displayed on your camcorder may not correct camera-shake. To cancel deleting, touch [NO]. Slide the ...
Camera Operations Guide
Page 32
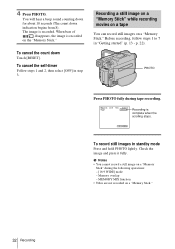
... scrolling stops. Before recording, follow steps 1 to 7 in step 3. MEMORY MIX function • Titles are not recorded on a "Memory Stick." p. 22). You will hear a beep sound counting down for about 10 seconds (The count down Touch [RESET]. b Notes • You cannot record a still image on the "Memory Stick." Recording is recorded...
... scrolling stops. Before recording, follow steps 1 to 7 in step 3. MEMORY MIX function • Titles are not recorded on a "Memory Stick." p. 22). You will hear a beep sound counting down for about 10 seconds (The count down Touch [RESET]. b Notes • You cannot record a still image on the "Memory Stick." Recording is recorded...
Camera Operations Guide
Page 34
A shutter sound is recorded on the "Memory Stick." 34 Recording To turn Easy Handycam operation on the screen. When the bars of disappear, the image is not available. • During Easy Handycam operation, the settings of the functions that are not displayed on the screen return to... cap. The EASY lights up . When bars of Easy Handycam operation 1 Touch [MENU]. To cancel Easy Handycam operation Press EASY again. The available menu items are restored when you cancel the Easy Handycam operation. You will hear a beep sound counting down and attach it to the grip belt. 2...
A shutter sound is recorded on the "Memory Stick." 34 Recording To turn Easy Handycam operation on the screen. When the bars of disappear, the image is not available. • During Easy Handycam operation, the settings of the functions that are not displayed on the screen return to... cap. The EASY lights up . When bars of Easy Handycam operation 1 Touch [MENU]. To cancel Easy Handycam operation Press EASY again. The available menu items are restored when you cancel the Easy Handycam operation. You will hear a beep sound counting down and attach it to the grip belt. 2...

Camera Operations Guide
Page 45
... Then, your camcorder is not played back during the search. 1 Slide the POWER switch to select the CAMERA-TAPE mode. 2 Touch . 60min STBY 0:00:00 EDIT You can search for the tapes recorded on other devices in the menu setting. b Note • For DCR-TRV460: The Rec review... Note • For DCR-TRV460: The EDIT SEARCH function does not work for the tapes recorded on . (p. 59) Searching manually - EDIT SEARCH Reviewing the most recently recorded scene are played back. The last few seconds of the most recently recorded scenes - The sound is set to start ...
... Then, your camcorder is not played back during the search. 1 Slide the POWER switch to select the CAMERA-TAPE mode. 2 Touch . 60min STBY 0:00:00 EDIT You can search for the tapes recorded on other devices in the menu setting. b Note • For DCR-TRV460: The Rec review... Note • For DCR-TRV460: The EDIT SEARCH function does not work for the tapes recorded on . (p. 59) Searching manually - EDIT SEARCH Reviewing the most recently recorded scene are played back. The last few seconds of the most recently recorded scenes - The sound is set to start ...
Camera Operations Guide
Page 47
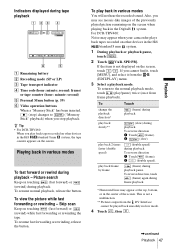
... forwarding or rewinding - Also, you play back tapes recorded on the screen. For DCR-TRV460: Noise may appear at the top, bottom, or in various modes You will not hear the recorded sound. play back 2 times faster (double speed) (double speed) during playback pause....on other devices in the Digital8 system. To reverse direction, touch (frame) again during frame playback. * Horizontal lines may appear when your camcorder plays back tapes recorded on touching (fast forward) or (rewind) during playback - To Touch change the playback direction* (frame) during ...
... forwarding or rewinding - Also, you play back tapes recorded on the screen. For DCR-TRV460: Noise may appear at the top, bottom, or in various modes You will not hear the recorded sound. play back 2 times faster (double speed) (double speed) during playback pause....on other devices in the Digital8 system. To reverse direction, touch (frame) again during frame playback. * Horizontal lines may appear when your camcorder plays back tapes recorded on touching (fast forward) or (rewind) during playback - To Touch change the playback direction* (frame) during ...

