
Operating Instructions
Page 14
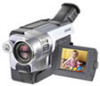
The DCR-TRV350 is the model used for example, " ." When you carry out an operation, you read through this manual and operating your camcorder, check the model number by looking at the bottom of differences Model Recording system Playback system ... for the seven models listed in the text, for illustration purposes. Set the POWER switch to indicate that the operation is indicated in capital letters. Digital8 Digital8 Digital8 Digital8 Digital8 Digital8/Hi8/8 OUT OUT IN/OUT OUT OUT IN/OUT IN/OUT IN/OUT IN/OUT - z z - - - - - Not provided 14 - Hi8...
The DCR-TRV350 is the model used for example, " ." When you carry out an operation, you read through this manual and operating your camcorder, check the model number by looking at the bottom of differences Model Recording system Playback system ... for the seven models listed in the text, for illustration purposes. Set the POWER switch to indicate that the operation is indicated in capital letters. Digital8 Digital8 Digital8 Digital8 Digital8 Digital8/Hi8/8 OUT OUT IN/OUT OUT OUT IN/OUT IN/OUT IN/OUT IN/OUT - z z - - - - - Not provided 14 - Hi8...
Operating Instructions
Page 15
... the Digital8 system on the systems below. Usable cassette tapes Hi8 /Digital8 (recommended) Standard 8 mm *1) Recording system Digital8 Playback system *2) Digital8 Hi8 Standard 8 mm Usable cassette tapes Hi8 /Digital8 (recommended) Standard 8 mm *1) Recording system Digital8 Playback system Digital8 Usable cassette...manual Before using your camcorder With your camcorder, you can use standard 8 mm tape, be contrary to country. Copyright precautions Television programs, films, video tapes, and other VCRs (including another DCR-TRV150/TRV250/TRV350/TRV351). *2) When...
... the Digital8 system on the systems below. Usable cassette tapes Hi8 /Digital8 (recommended) Standard 8 mm *1) Recording system Digital8 Playback system *2) Digital8 Hi8 Standard 8 mm Usable cassette tapes Hi8 /Digital8 (recommended) Standard 8 mm *1) Recording system Digital8 Playback system Digital8 Usable cassette...manual Before using your camcorder With your camcorder, you can use standard 8 mm tape, be contrary to country. Copyright precautions Television programs, films, video tapes, and other VCRs (including another DCR-TRV150/TRV250/TRV350/TRV351). *2) When...
Operating Instructions
Page 24
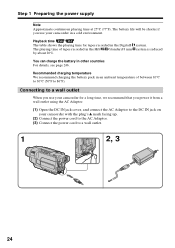
...a wall outlet using the AC Adaptor. (1) Open the DC IN jack cover, and connect the AC Adaptor to the DC IN jack on your camcorder in the Digital8 The playing time of between 10°C to 30°C (50°F to a wall outlet. 1 2, 3 24 Playback time The table ...shows the playing time for a long time, we recommend that you use your camcorder for tapes recorded in a cold environment. system. Recommended charging temperature We recommend...
...a wall outlet using the AC Adaptor. (1) Open the DC IN jack cover, and connect the AC Adaptor to the DC IN jack on your camcorder in the Digital8 The playing time of between 10°C to 30°C (50°F to a wall outlet. 1 2, 3 24 Playback time The table ...shows the playing time for a long time, we recommend that you use your camcorder for tapes recorded in a cold environment. system. Recommended charging temperature We recommend...
Operating Instructions
Page 29
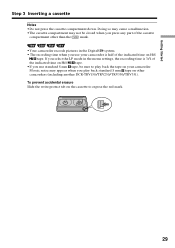
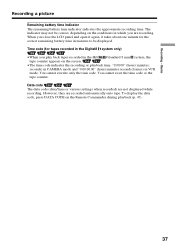
... pictures in the menu settings, the recording time is half of the cassette compartment other camcorders (including another DCR-TRV150/TRV250/TRV350/TRV351). If you select the LP mode in the Digital8 system. • The recording time when you play back the tape on Hi8 tape. Getting Started Step 3 Inserting a cassette Notes •Do...
... pictures in the menu settings, the recording time is half of the cassette compartment other camcorders (including another DCR-TRV150/TRV250/TRV350/TRV351). If you select the LP mode in the Digital8 system. • The recording time when you play back the tape on Hi8 tape. Getting Started Step 3 Inserting a cassette Notes •Do...
Operating Instructions
Page 37
...:00" (hours:minutes: seconds) in CAMERA mode and "0:00:00:00" (hours:minutes:seconds:frames) in VCR mode. Time code (for tapes recorded in the Digital8 system only) •When you close the LCD panel and open it again, it takes about one minute for the correct remaining battery time in...
...:00" (hours:minutes: seconds) in CAMERA mode and "0:00:00:00" (hours:minutes:seconds:frames) in VCR mode. Time code (for tapes recorded in the Digital8 system only) •When you close the LCD panel and open it again, it takes about one minute for the correct remaining battery time in...
Operating Instructions
Page 46
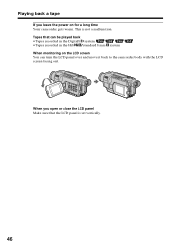
Tapes that the LCD panel is not a malfunction. When you leave the power on the LCD screen You can be played back •Tapes recorded in the Digital8 system •Tapes recorded in the Hi8 /standard 8 mm system When monitoring on for a long time Your camcorder gets warm. Playing back a tape If you open or close the LCD panel Make sure that can turn the LCD panel over and move it back to the camcorder body with the LCD screen facing out. This is set vertically. 46
Tapes that the LCD panel is not a malfunction. When you leave the power on the LCD screen You can be played back •Tapes recorded in the Digital8 system •Tapes recorded in the Hi8 /standard 8 mm system When monitoring on for a long time Your camcorder gets warm. Playing back a tape If you open or close the LCD panel Make sure that can turn the LCD panel over and move it back to the camcorder body with the LCD screen facing out. This is set vertically. 46
Operating Instructions
Page 50
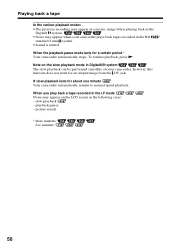
... stops. slow playback - When the playback pause mode lasts for about one minute Your camcorder automatically returns to normal speed playback. Note on the slow playback mode in Digital8 system The slow playback can be performed smoothly on the LCD screen in the following cases: - To resume playback, ... a tape In the various playback modes •The previous recording may appear as a mosaic image when playing back in the Digital8 system. •Noise may appear on your camcorder plays back tapes recorded in the Hi8 / standard 8 mm system. •Sound is muted. playback pause -
... stops. slow playback - When the playback pause mode lasts for about one minute Your camcorder automatically returns to normal speed playback. Note on the slow playback mode in Digital8 system The slow playback can be performed smoothly on the LCD screen in the following cases: - To resume playback, ... a tape In the various playback modes •The previous recording may appear as a mosaic image when playing back in the Digital8 system. •Noise may appear on your camcorder plays back tapes recorded in the Hi8 / standard 8 mm system. •Sound is muted. playback pause -

Operating Instructions
Page 95
... to the left (white) input jack of your VCR has an S video jack Pictures can edit on VCRs that support the following systems: 8 mm , Hi8 , Digital8 , VHS , S-VHS , VHSC , S-VHSC , Betamax , ED Betamax , mini DV , DV , or MICRO MV . If your VCR. Connect an S video cable (optional) to...Yellow IN S VIDEO Black VIDEO AUDIO VCR When you do not need to connect the yellow (video) plug of the A/V connecting cable. If your camcorder and the VCR. To prevent deterioration of pictures when dubbing Set EDIT to ON in the menu settings before dubbing. (The default setting is a ...
... to the left (white) input jack of your VCR has an S video jack Pictures can edit on VCRs that support the following systems: 8 mm , Hi8 , Digital8 , VHS , S-VHS , VHSC , S-VHSC , Betamax , ED Betamax , mini DV , DV , or MICRO MV . If your VCR. Connect an S video cable (optional) to...Yellow IN S VIDEO Black VIDEO AUDIO VCR When you do not need to connect the yellow (video) plug of the A/V connecting cable. If your camcorder and the VCR. To prevent deterioration of pictures when dubbing Set EDIT to ON in the menu settings before dubbing. (The default setting is a ...
Operating Instructions
Page 98
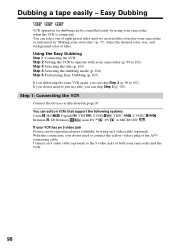
..., you do not need to connect the yellow (video) plug of titles. If you can edit on VCRs that support the following systems: 8 mm , Hi8 , Digital8 , VHS , S-VHS , VHSC , S-VHSC , Betamax , ED Betamax , mini DV , DV , or MICRO MV . Using the Easy Dubbing Step 1 Connecting the ...VCR to 102). Connect an S video cable (optional) to the S video jacks of eight preset titles and two custom titles stored in your camcorder as illustrated in "Making your camcorder (p. 99 to 102) Step 3 Selecting the title (p. 103) Step 4 Selecting the dubbing mode (p. 104) Step 5 Performing Easy Dubbing ...
..., you do not need to connect the yellow (video) plug of titles. If you can edit on VCRs that support the following systems: 8 mm , Hi8 , Digital8 , VHS , S-VHS , VHSC , S-VHSC , Betamax , ED Betamax , mini DV , DV , or MICRO MV . Using the Easy Dubbing Step 1 Connecting the ...VCR to 102). Connect an S video cable (optional) to the S video jacks of eight preset titles and two custom titles stored in your camcorder as illustrated in "Making your camcorder (p. 99 to 102) Step 3 Selecting the title (p. 103) Step 4 Selecting the dubbing mode (p. 104) Step 5 Performing Easy Dubbing ...
Operating Instructions
Page 120
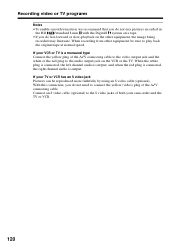
When recording from other equipment, the image being recorded may fluctuate. If your camcorder and the TV or VCR. 120 With this connection, you do not need to connect the yellow (video) plug of the A/V connecting cable. Connect an S ... or TV programs Notes •To enable smooth transition, we recommend that you do not mix pictures recorded in the Hi8 /standard 8 mm with the Digital8 system on a tape. •If you do fast-forward or slow-playback on the VCR or the TV. When the white plug is connected, the...
When recording from other equipment, the image being recorded may fluctuate. If your camcorder and the TV or VCR. 120 With this connection, you do not need to connect the yellow (video) plug of the A/V connecting cable. Connect an S ... or TV programs Notes •To enable smooth transition, we recommend that you do not mix pictures recorded in the Hi8 /standard 8 mm with the Digital8 system on a tape. •If you do fast-forward or slow-playback on the VCR or the TV. When the white plug is connected, the...

Operating Instructions
Page 136
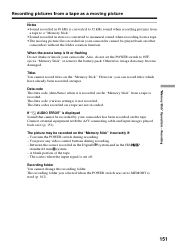
... on a "Memory Stick." Before operation •Insert a tape recorded in the Digital8 system, and record it as still images Your camcorder can also capture moving picture data recorded on a tape in the Digital8 system into your camcorder. •Insert a "Memory Stick" into your camcorder. (1) Set the POWER switch to VCR. (2) Press N. To change the still...
... on a "Memory Stick." Before operation •Insert a tape recorded in the Digital8 system, and record it as still images Your camcorder can also capture moving picture data recorded on a tape in the Digital8 system into your camcorder. •Insert a "Memory Stick" into your camcorder. (1) Set the POWER switch to VCR. (2) Press N. To change the still...
Operating Instructions
Page 151
... turn the POWER switch during recording. - The scenes when the input signal is recorded. Otherwise, image data may be recorded by your camcorder. You press any video control buttons during recording. - A blank portion of the tape. - Recording folder You cannot change the recording...Stick" from a tape as a moving picture files recorded on your camcorder cannot be played back on other camcorders without the folder creation function. "Memory Stick" Operations - Between the scenes recorded in the Digital8 system and in stereo is converted to MEMORY is displayed Sound that ...
... turn the POWER switch during recording. - The scenes when the input signal is recorded. Otherwise, image data may be recorded by your camcorder. You press any video control buttons during recording. - A blank portion of the tape. - Recording folder You cannot change the recording...Stick" from a tape as a moving picture files recorded on your camcorder cannot be played back on other camcorders without the folder creation function. "Memory Stick" Operations - Between the scenes recorded in the Digital8 system and in stereo is converted to MEMORY is displayed Sound that ...

Operating Instructions
Page 215
... on models (p. 16). *2) *3) *4) *5) When you play back a tape that was recorded in the Hi8 /standard 8 mm system when your camcorder does not automatically distinguish the recording system. VCR After five minutes of removing the power source The HiFi SOUND *2), EDIT *3) and AUDIO MIX *2) items... AUDIO MIX *2) •You can adjust the balance only for tapes recorded in the Digital8 system. •When playing back a tape recorded in the Hi8 /standard 8 mm *6) system only Customizing Your Camcorder 215 you cannot adjust the balance. Notes on PB MODE *6) The mode will return ...
... on models (p. 16). *2) *3) *4) *5) When you play back a tape that was recorded in the Hi8 /standard 8 mm system when your camcorder does not automatically distinguish the recording system. VCR After five minutes of removing the power source The HiFi SOUND *2), EDIT *3) and AUDIO MIX *2) items... AUDIO MIX *2) •You can adjust the balance only for tapes recorded in the Digital8 system. •When playing back a tape recorded in the Hi8 /standard 8 mm *6) system only Customizing Your Camcorder 215 you cannot adjust the balance. Notes on PB MODE *6) The mode will return ...

Operating Instructions
Page 220
...on your camcorder tapes recorded in the LP mode on another VCR using a Sony cassette so... that this non-recorded section disappears from the tape when you continue recording from this setting on a tape with the red mark on your camcorder...the Hi8 / standard 8 mm system to another camcorder or VCR, noise may not be canceled. If... you record a tape in the LP mode on your camcorder, we recommend using the i.LINK cable. When you playback...to another camcorder or VCR.*3) •When you record a tape in the LP mode on your camcorder, recording is... of your camcorder. •When...
...on your camcorder tapes recorded in the LP mode on another VCR using a Sony cassette so... that this non-recorded section disappears from the tape when you continue recording from this setting on a tape with the red mark on your camcorder...the Hi8 / standard 8 mm system to another camcorder or VCR, noise may not be canceled. If... you record a tape in the LP mode on your camcorder, we recommend using the i.LINK cable. When you playback...to another camcorder or VCR.*3) •When you record a tape in the LP mode on your camcorder, recording is... of your camcorder. •When...
Operating Instructions
Page 226
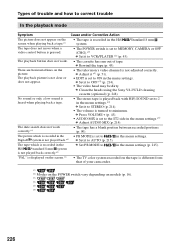
Types of your camcorder. *1) *2) Modes on the POWER switch vary depending on models (p. 16). *3) *4) *5) *6) 226 There are horizontal lines on the screen when .... • The television's video channel is not played back.*6) c Set it to 2 in the menu settings (p. 215). c Clean the heads using the Sony V8-25CLD cleaning cassette (optional) (p. 248). c Press VOLUME + (p. 45). • AUDIO MIX is set to the ST2 side in the Hi8 system... MEMORY, CAMERA or OFF (CHG).*2) c Set it to OFF *3) (p. 214). • The video head may be dirty. Digital8 system is not adjusted correctly.
Types of your camcorder. *1) *2) Modes on the POWER switch vary depending on models (p. 16). *3) *4) *5) *6) 226 There are horizontal lines on the screen when .... • The television's video channel is not played back.*6) c Set it to 2 in the menu settings (p. 215). c Clean the heads using the Sony V8-25CLD cleaning cassette (optional) (p. 248). c Press VOLUME + (p. 45). • AUDIO MIX is set to the ST2 side in the Hi8 system... MEMORY, CAMERA or OFF (CHG).*2) c Set it to OFF *3) (p. 214). • The video head may be dirty. Digital8 system is not adjusted correctly.
Operating Instructions
Page 237
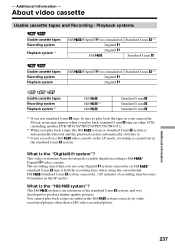
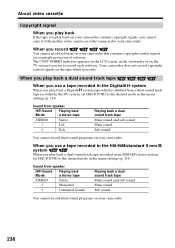
...camcorder. (120 minutes of the standard 8 mm system, and was developed to Hi8 / Digital8 video cassette. The recording time when you use your camcorder...Digital8 system camcorder on other than a Hi8 video recorder/player. About video cassette Usable cassette tapes and Recording / Playback systems Usable cassette tapes Hi8 /Digital8 (recommended) Standard 8 mm *1) Recording system Digital8 Playback system *2) Digital8 Hi8 Standard 8 mm Usable cassette tapes Hi8 /Digital8 (recommended) Standard 8 mm *1) Recording system Digital8 Playback system Digital8... DCR-TRV150/TRV250/TRV350...
...camcorder. (120 minutes of the standard 8 mm system, and was developed to Hi8 / Digital8 video cassette. The recording time when you use your camcorder...Digital8 system camcorder on other than a Hi8 video recorder/player. About video cassette Usable cassette tapes and Recording / Playback systems Usable cassette tapes Hi8 /Digital8 (recommended) Standard 8 mm *1) Recording system Digital8 Playback system *2) Digital8 Hi8 Standard 8 mm Usable cassette tapes Hi8 /Digital8 (recommended) Standard 8 mm *1) Recording system Digital8 Playback system Digital8... DCR-TRV150/TRV250/TRV350...
Operating Instructions
Page 238
... sound Main sound Sub sound You cannot record dual sound programs on your camcorder. When you record You cannot record software on your camcorder. 238 When you use a tape recorded in the Digital8 system When you play back a Digital8 system tape which is dubbed from a dual sound track tape recorded in... the DV system, set HiFi SOUND to the desired mode in the viewfinder or on the TV screen if you try to your camcorder. About video cassette Copyright...
... sound Main sound Sub sound You cannot record dual sound programs on your camcorder. When you record You cannot record software on your camcorder. 238 When you use a tape recorded in the Digital8 system When you play back a Digital8 system tape which is dubbed from a dual sound track tape recorded in... the DV system, set HiFi SOUND to the desired mode in the viewfinder or on the TV screen if you try to your camcorder. About video cassette Copyright...
Operating Instructions
Page 239
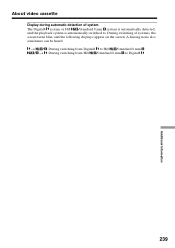
A hissing noise also sometimes can be heard. t / : During switching from Digital8 to Hi8 /standard 8 mm / t : During switching from Hi8 /standard 8 mm to . About video cassette Display during automatic detection of systems, the screen turns blue, and the following displays appear on the screen. During switching of system The Digital8 system or Hi8 /standard 8 mm system is automatically detected, and the playback system is automatically switched to Digital8 239 Additional Information
A hissing noise also sometimes can be heard. t / : During switching from Digital8 to Hi8 /standard 8 mm / t : During switching from Hi8 /standard 8 mm to . About video cassette Display during automatic detection of systems, the screen turns blue, and the following displays appear on the screen. During switching of system The Digital8 system or Hi8 /standard 8 mm system is automatically detected, and the playback system is automatically switched to Digital8 239 Additional Information
Operating Instructions
Page 248
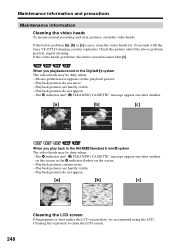
...and clear pictures, clean the video heads. If the below problem [a], [b] or [c] occurs, clean the video heads for 10 seconds with the Sony V8-25CLD cleaning cassette (optional). Playback pictures do not appear. [a] [b] [c] 248 Cleaning the LCD screen If fingerprints or dust makes the LCD ...Hi8 /Standard 8 mm system The video heads may be dirty when: - Playback pictures do not appear. - When you play back in the Digital8 system The video heads may be dirty when: - If the video heads get dirtier, the entire screen becomes blue [c]. Playback pictures are hardly ...
...and clear pictures, clean the video heads. If the below problem [a], [b] or [c] occurs, clean the video heads for 10 seconds with the Sony V8-25CLD cleaning cassette (optional). Playback pictures do not appear. [a] [b] [c] 248 Cleaning the LCD screen If fingerprints or dust makes the LCD ...Hi8 /Standard 8 mm system The video heads may be dirty when: - Playback pictures do not appear. - When you play back in the Digital8 system The video heads may be dirty when: - If the video heads get dirtier, the entire screen becomes blue [c]. Playback pictures are hardly ...
Operating Instructions
Page 250
... to your computer When recording an image processed or edited by Hi8 /standard 8 mm system into your camcorder. On handling tapes • Do not insert anything into your Sony VAIO. When you use a new Hi8 /Digital8 tape. *1) three minutes: five minutes: *2) Modes on the POWER switch vary depending on models (p. 16). 250...8226; Do not knock or jolt the built-in light while it is turned on as it may cause your camcorder to malfunction, and sometimes this function, dub the image into a Digital8 or DV tape first, and then input it into the small holes on the rear of the cassette. it may...
... to your computer When recording an image processed or edited by Hi8 /standard 8 mm system into your camcorder. On handling tapes • Do not insert anything into your Sony VAIO. When you use a new Hi8 /Digital8 tape. *1) three minutes: five minutes: *2) Modes on the POWER switch vary depending on models (p. 16). 250...8226; Do not knock or jolt the built-in light while it is turned on as it may cause your camcorder to malfunction, and sometimes this function, dub the image into a Digital8 or DV tape first, and then input it into the small holes on the rear of the cassette. it may...


