
Operating Instructions
Page 4
...TRV418 : DCR-TRV150 : DCR-TRV250 : DCR-TRV350 : DCR-TRV351 : Instructions with icons are for all models. USB Streaming (p. 183) •Capturing images on your computer from your camcorder on your computer Instructions with no icons are for the indicated models only. Before you start reading this manual, camcorder-shape ... (p. 163) •Viewing moving pictures (p. 166) Main Features •Viewing pictures recorded on a tape or live from your camcorder using the USB cable (p. 197) •Viewing images recorded on a "Memory Stick" using the USB cable (p. 185) •Converting an ...
...TRV418 : DCR-TRV150 : DCR-TRV250 : DCR-TRV350 : DCR-TRV351 : Instructions with icons are for all models. USB Streaming (p. 183) •Capturing images on your computer from your camcorder on your computer Instructions with no icons are for the indicated models only. Before you start reading this manual, camcorder-shape ... (p. 163) •Viewing moving pictures (p. 166) Main Features •Viewing pictures recorded on a tape or live from your camcorder using the USB cable (p. 197) •Viewing images recorded on a "Memory Stick" using the USB cable (p. 185) •Converting an ...
Operating Instructions
Page 5
...(p. 79) Functions for giving images more impact •Digital zoom (p. 34) The default setting is OFF. (To zoom greater than 20×, select the digital zoom power in D ZOOM in the menu settings.) &#...8226;Fader (p. 61) •Picture effect (In recording mode) (p. 64) •Digital effect (In recording mode) (p. 65) •Title (p. 75, 77) •MEMORY MIX ...(p. 87) •ZERO SET MEMORY (p. 89) •Easy Dubbing (p. 98) •Digital program editing (p. 106) Contents of the recording cannot be compensated if recording or playback is not made due to...
...(p. 79) Functions for giving images more impact •Digital zoom (p. 34) The default setting is OFF. (To zoom greater than 20×, select the digital zoom power in D ZOOM in the menu settings.) &#...8226;Fader (p. 61) •Picture effect (In recording mode) (p. 64) •Digital effect (In recording mode) (p. 65) •Title (p. 75, 77) •MEMORY MIX ...(p. 87) •ZERO SET MEMORY (p. 89) •Easy Dubbing (p. 98) •Digital program editing (p. 106) Contents of the recording cannot be compensated if recording or playback is not made due to...
Operating Instructions
Page 7
... still images recorded on a "Memory Stick" - Memory PB ZOOM 172 Playing back images continuously - Signal convert function ...... 208 7 Digital program editing (on a "Memory Stick" - SLIDE SHOW 174 Preventing accidental erasure - Memory Photo playback .......... 163 Viewing moving picture 150...176 Deleting images - PRINT MARK 180 Viewing Images on Your Computer Viewing images on your computer - Introduction 182 Connecting your camcorder to your computer using the USB cable ......... 187 Viewing pictures recorded on a tape or live from a VCR - Insert...
... still images recorded on a "Memory Stick" - Memory PB ZOOM 172 Playing back images continuously - Signal convert function ...... 208 7 Digital program editing (on a "Memory Stick" - SLIDE SHOW 174 Preventing accidental erasure - Memory Photo playback .......... 163 Viewing moving picture 150...176 Deleting images - PRINT MARK 180 Viewing Images on Your Computer Viewing images on your computer - Introduction 182 Connecting your camcorder to your computer using the USB cable ......... 187 Viewing pictures recorded on a tape or live from a VCR - Insert...
Operating Instructions
Page 40
...function may be slow. outdoors in a dark place. (1) Set the POWER switch to CAMERA, and slide NIGHTSHOT to OFF. (2) Press COLOR SLOW S. Digital effect - NightShot Light NightShot Light rays are infrared and so are invisible. While recording, be sure not to cover the infrared rays emitter with the... places (e.g. The maximum shooting distance using the Super NightShot or Color Slow Shutter function The shutter speed is difficult with your camcorder to ON in normal recording, the picture may not work normally. 40 The indicator and COLOR SLOW SHUTTER flash on the brightness.
...function may be slow. outdoors in a dark place. (1) Set the POWER switch to CAMERA, and slide NIGHTSHOT to OFF. (2) Press COLOR SLOW S. Digital effect - NightShot Light NightShot Light rays are infrared and so are invisible. While recording, be sure not to cover the infrared rays emitter with the... places (e.g. The maximum shooting distance using the Super NightShot or Color Slow Shutter function The shutter speed is difficult with your camcorder to ON in normal recording, the picture may not work normally. 40 The indicator and COLOR SLOW SHUTTER flash on the brightness.
Operating Instructions
Page 62
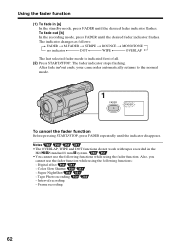
... t BOUNCE t MONOTONE no indicator DOT WIPE OVERLAP The last selected fader mode is indicated first of all. (2) Press START/STOP. Digital effect - Super NightShot - After fade in/out ends, your camcorder automatically returns to the normal mode. 1 FADER FADER To cancel the fader function Before pressing START/STOP, press FADER repeatedly until...
... t BOUNCE t MONOTONE no indicator DOT WIPE OVERLAP The last selected fader mode is indicated first of all. (2) Press START/STOP. Digital effect - Super NightShot - After fade in/out ends, your camcorder automatically returns to the normal mode. 1 FADER FADER To cancel the fader function Before pressing START/STOP, press FADER repeatedly until...

Operating Instructions
Page 65
OLD MOVIE You can add an old movie type atmosphere to recorded images using the various digital functions. Digital effect You can swap the brighter area in a still image with a moving picture. SLOW SHTR (SLOW SHUTTER) You can record a still image so that ... a picture so that it is left. The slow shutter mode is recorded normally. TRAIL You can record still images successively at regular intervals. Your camcorder automatically changes the screen format to wide and the color to sepia and set the appropriate shutter speed. LUMI. (LUMINANCE KEY) You can add special...
OLD MOVIE You can add an old movie type atmosphere to recorded images using the various digital functions. Digital effect You can swap the brighter area in a still image with a moving picture. SLOW SHTR (SLOW SHUTTER) You can record a still image so that ... a picture so that it is left. The slow shutter mode is recorded normally. TRAIL You can record still images successively at regular intervals. Your camcorder automatically changes the screen format to wide and the color to sepia and set the appropriate shutter speed. LUMI. (LUMINANCE KEY) You can add special...

Operating Instructions
Page 86
..." as follows: - When you can record images as a still image - Pictures processed by Digital effect Pictures processed by Digital effect are processing the image using Digital effect. on a VCR using your camcorder while you are not output through the DV jack. However, you set the POWER switch to ...OFF (CHG) or stop playing back Digital effect is automatically canceled. 86 Playing back a tape with tapes recorded ...
..." as follows: - When you can record images as a still image - Pictures processed by Digital effect Pictures processed by Digital effect are processing the image using Digital effect. on a VCR using your camcorder while you are not output through the DV jack. However, you set the POWER switch to ...OFF (CHG) or stop playing back Digital effect is automatically canceled. 86 Playing back a tape with tapes recorded ...
Operating Instructions
Page 96
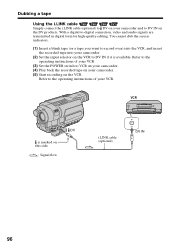
... the POWER switch to VCR on your camcorder. (4) Play back the recorded tape on your camcorder. (5) Start recording on the VCR to DV IN if it is marked on the DV products. With a digital-to-digital connection, video and audio signals are transmitted in digital form for high-quality editing. Dubbing a... tape Using the i.LINK cable Simply connect the i.LINK cable (optional) to DV on your camcorder and to DV IN on this side. : ...
... the POWER switch to VCR on your camcorder. (4) Play back the recorded tape on your camcorder. (5) Start recording on the VCR to DV IN if it is marked on the DV products. With a digital-to-digital connection, video and audio signals are transmitted in digital form for high-quality editing. Dubbing a... tape Using the i.LINK cable Simply connect the i.LINK cable (optional) to DV on your camcorder and to DV IN on this side. : ...
Operating Instructions
Page 97
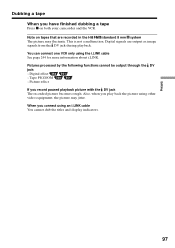
...video equipment, the picture may fluctuate. This is not a malfunction. Pictures processed by the following functions cannot be output through the DV jack: - Digital signals are recorded in the Hi8 /standard 8 mm system The picture may jitter. Tape PB ZOOM - Picture effect If you connect using an i.LINK... cable You cannot dub the titles and display indicators. 97 Note on both your camcorder and the VCR. Digital effect - Also, when you play back the picture using the i.LINK cable See page 244 for more information about i.LINK.
...video equipment, the picture may fluctuate. This is not a malfunction. Pictures processed by the following functions cannot be output through the DV jack: - Digital signals are recorded in the Hi8 /standard 8 mm system The picture may jitter. Tape PB ZOOM - Picture effect If you connect using an i.LINK... cable You cannot dub the titles and display indicators. 97 Note on both your camcorder and the VCR. Digital effect - Also, when you play back the picture using the i.LINK cable See page 244 for more information about i.LINK.
Operating Instructions
Page 106
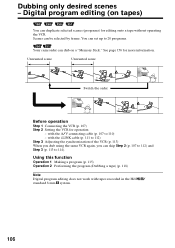
...function Operation 1 Making a program (p. 115) Operation 2 Performing the program (Dubbing a tape) (p. 118) Note Digital program editing does not work with the A/V connecting cable (p. 107 to 20 programs. Your camcorder can be selected by frame. You can set up to 110) - See page 156 for editing onto a ...tape without operating the VCR. with the i.LINK cable (p. 111 to 114). Digital program editing (on a "Memory Stick." Unwanted scene...
...function Operation 1 Making a program (p. 115) Operation 2 Performing the program (Dubbing a tape) (p. 118) Note Digital program editing does not work with the A/V connecting cable (p. 107 to 20 programs. Your camcorder can be selected by frame. You can set up to 110) - See page 156 for editing onto a ...tape without operating the VCR. with the i.LINK cable (p. 111 to 114). Digital program editing (on a "Memory Stick." Unwanted scene...
Operating Instructions
Page 107
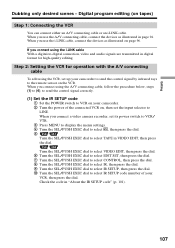
... send the control signal correctly. (1) Set the IR SETUP code 1 Set the POWER switch to VCR on your camcorder. 2 Turn the power of your camcorder to send the control signal by infrared rays to -digital connection, video and audio signals are transmitted in VIDEO EDIT, then press the dial. When you connect a video... to select , then press the dial. 5 Turn the SEL/PUSH EXEC dial to select IR SETUP code number of the connected VCR on the VCR. Digital program editing (on page 96. Turn the SEL/PUSH EXEC dial to select VIDEO EDIT, then press the dial. 6 Turn the SEL/PUSH EXEC dial...
... send the control signal correctly. (1) Set the IR SETUP code 1 Set the POWER switch to VCR on your camcorder. 2 Turn the power of your camcorder to send the control signal by infrared rays to -digital connection, video and audio signals are transmitted in VIDEO EDIT, then press the dial. When you connect a video... to select , then press the dial. 5 Turn the SEL/PUSH EXEC dial to select IR SETUP code number of the connected VCR on the VCR. Digital program editing (on page 96. Turn the SEL/PUSH EXEC dial to select VIDEO EDIT, then press the dial. 6 Turn the SEL/PUSH EXEC dial...
Operating Instructions
Page 109
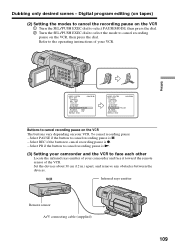
... depending on the VCR, then press the dial. To cancel recording pause: - Select PAUSE if the button to cancel recording pause is N. (3) Setting your camcorder and face it toward the remote sensor of your VCR. Set the devices about 30 cm (12 in.) apart, and remove any obstacles between the... scenes - Select PB if the button to cancel recording pause on your VCR. Select REC if the button to the operating instructions of the VCR. Digital program editing (on tapes) (2) Setting the modes to cancel the recording pause on the VCR 1 Turn the SEL/PUSH EXEC dial to select PAUSEMODE,...
... depending on the VCR, then press the dial. To cancel recording pause: - Select PAUSE if the button to cancel recording pause is N. (3) Setting your camcorder and face it toward the remote sensor of your VCR. Set the devices about 30 cm (12 in.) apart, and remove any obstacles between the... scenes - Select PB if the button to cancel recording pause on your VCR. Select REC if the button to the operating instructions of the VCR. Digital program editing (on tapes) (2) Setting the modes to cancel the recording pause on the VCR 1 Turn the SEL/PUSH EXEC dial to select PAUSEMODE,...

Operating Instructions
Page 110
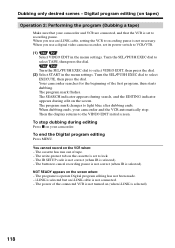
... the SEL/PUSH EXEC dial to select IR TEST, then press the dial. 3 Turn the SEL/PUSH EXEC dial to the operating instructions of your camcorder at least 30 cm (12 in.) away from the VCR. • Refer to select EXECUTE, then press the dial. Dubbing only desired scenes...
... the SEL/PUSH EXEC dial to select IR TEST, then press the dial. 3 Turn the SEL/PUSH EXEC dial to the operating instructions of your camcorder at least 30 cm (12 in.) away from the VCR. • Refer to select EXECUTE, then press the dial. Dubbing only desired scenes...

Operating Instructions
Page 111
...), follow the procedure below. (1) Set the POWER switch to VCR on your camcorder. (2) Turn the power of the connected VCR on tapes) Step 2: Setting the VCR for operation with the i.LINK cable When you connect a digital video camera recorder, set the input selector to select i.LINK, then press the... dial. 111 Digital program editing (on , then set its power switch to VCR/VTR. (3) Press MENU to display the...
...), follow the procedure below. (1) Set the POWER switch to VCR on your camcorder. (2) Turn the power of the connected VCR on tapes) Step 2: Setting the VCR for operation with the i.LINK cable When you connect a digital video camera recorder, set the input selector to select i.LINK, then press the... dial. 111 Digital program editing (on , then set its power switch to VCR/VTR. (3) Press MENU to display the...

Operating Instructions
Page 112
Digital program editing (on the VCR. LINK ADJ TEST "CUT-IN" "CUT-OUT" IR SETUP PAUSEMODE IR TEST RETURN [MENU] : END VIDEO EDIT MARK UNDO ERASE ... LANC. LINK "CUT-IN" "CUT-OUT" IR SETUP PAUSEMODE IR TEST RETURN [MENU] : END Note When editing digital video, the operation signals cannot be able to IR in the menu settings of your camcorder. 112 Set CONTROL to operate the dubbing function correctly, depending on tapes) MENU 5 OTHERS DATA CODE BEEP COMMANDER...
Digital program editing (on the VCR. LINK ADJ TEST "CUT-IN" "CUT-OUT" IR SETUP PAUSEMODE IR TEST RETURN [MENU] : END VIDEO EDIT MARK UNDO ERASE ... LANC. LINK "CUT-IN" "CUT-OUT" IR SETUP PAUSEMODE IR TEST RETURN [MENU] : END Note When editing digital video, the operation signals cannot be able to IR in the menu settings of your camcorder. 112 Set CONTROL to operate the dubbing function correctly, depending on tapes) MENU 5 OTHERS DATA CODE BEEP COMMANDER...
Operating Instructions
Page 113
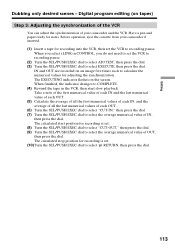
Before operation, eject the cassette from your camcorder and the VCR. When you do not need to set the VCR to select RETURN... "CUT-IN," then press the dial. (7) Turn the SEL/PUSH EXEC dial to select the average numerical value of your camcorder if inserted. (1) Insert a tape for recording into the VCR, then set the VCR to recording pause. (2) Turn the ...ADJ TEST, then press the dial. (3) Turn the SEL/PUSH EXEC dial to select EXECUTE, then press the dial. Digital program editing (on tapes) Step 3: Adjusting the synchronization of the VCR You can adjust the synchronization of OUT, then press...
Before operation, eject the cassette from your camcorder and the VCR. When you do not need to set the VCR to select RETURN... "CUT-IN," then press the dial. (7) Turn the SEL/PUSH EXEC dial to select the average numerical value of your camcorder if inserted. (1) Insert a tape for recording into the VCR, then set the VCR to recording pause. (2) Turn the ...ADJ TEST, then press the dial. (3) Turn the SEL/PUSH EXEC dial to select EXECUTE, then press the dial. Digital program editing (on tapes) Step 3: Adjusting the synchronization of the VCR You can adjust the synchronization of OUT, then press...
Operating Instructions
Page 115
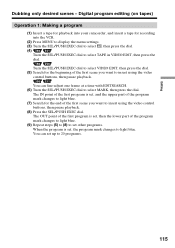
...VIDEO EDIT, then press the dial. (5) Search for the beginning of the program mark changes to light blue. (7) Search for recording into your camcorder, and insert a tape for the end of the first program is set , and the upper part of the first scene you want to 20...at a time with EDITSEARCH. (6) Turn the SEL/PUSH EXEC dial to insert using the video control buttons, then pause playback. Editing Dubbing only desired scenes - Digital program editing (on tapes) Operation 1: Making a program (1) Insert a tape for playback into the VCR. (2) Press MENU to display the menu settings. (3) ...
...VIDEO EDIT, then press the dial. (5) Search for the beginning of the program mark changes to light blue. (7) Search for recording into your camcorder, and insert a tape for the end of the first program is set , and the upper part of the first scene you want to 20...at a time with EDITSEARCH. (6) Turn the SEL/PUSH EXEC dial to insert using the video control buttons, then pause playback. Editing Dubbing only desired scenes - Digital program editing (on tapes) Operation 1: Making a program (1) Insert a tape for playback into the VCR. (2) Press MENU to display the menu settings. (3) ...
Operating Instructions
Page 118
...dial to the VIDEO EDIT initial screen. The SEARCH indicator appears during search, and the EDITING indicator appears during editing Press x on your camcorder. Then the display returns to select EXECUTE, then press the dial. The cassette has run out of the first program, then starts dubbing.... VCR are connected, and that the VCR is selected). - Turn the SEL/PUSH EXEC dial to operate Digital program editing has not been made. - Your camcorder searches for the beginning of tape. - The program mark flashes. Turn the SEL/PUSH EXEC dial to light blue after dubbing ...
...dial to the VIDEO EDIT initial screen. The SEARCH indicator appears during search, and the EDITING indicator appears during editing Press x on your camcorder. Then the display returns to select EXECUTE, then press the dial. The cassette has run out of the first program, then starts dubbing.... VCR are connected, and that the VCR is selected). - Turn the SEL/PUSH EXEC dial to operate Digital program editing has not been made. - Your camcorder searches for the beginning of tape. - The program mark flashes. Turn the SEL/PUSH EXEC dial to light blue after dubbing ...

Operating Instructions
Page 121
...want to be uneven. Use your camcorder and the VCR. Simply connect the i.LINK cable (optional) to DV of the display may be recorded appears on the VCR to -digital connection, video and audio signals are transmitted in digital form The color of your camcorder. (4) Press N on the ...screen of the DV products. With a digital-to start recording from a VCR that has DV outputs.
...want to be uneven. Use your camcorder and the VCR. Simply connect the i.LINK cable (optional) to DV of the display may be recorded appears on the VCR to -digital connection, video and audio signals are transmitted in digital form The color of your camcorder. (4) Press N on the ...screen of the DV products. With a digital-to start recording from a VCR that has DV outputs.
Marketing Specifications
Page 1
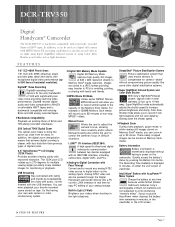
... situations with MPEG Movie EX recording capability; Sony's exclusive AccuPower meter displays the battery time remaining in minutes, in minutes, on tape. In addition, it can be used as a digital still camera with full color detail by slowing...information is momentarily displayed without compromising picture quality like having to control the camera's focus in low light situations. DCR-TRV350 Digital Handycam® Camcorder The DCR-TRV350 is backward compatible with exceptional digital video performance (up to 500 lines of horizontal resolution). F E AT U R E S 1/6" CCD 460K ...
... situations with MPEG Movie EX recording capability; Sony's exclusive AccuPower meter displays the battery time remaining in minutes, in minutes, on tape. In addition, it can be used as a digital still camera with full color detail by slowing...information is momentarily displayed without compromising picture quality like having to control the camera's focus in low light situations. DCR-TRV350 Digital Handycam® Camcorder The DCR-TRV350 is backward compatible with exceptional digital video performance (up to 500 lines of horizontal resolution). F E AT U R E S 1/6" CCD 460K ...


