Operating Instructions
Page 1
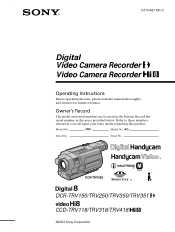
Owner's Record The model and serial numbers are located on the bottom. Refer to these numbers whenever you call upon your Sony dealer regarding this manual thoroughly, and retain it for future reference. Serial No. Model No. -TRV Model No. AC- DCR-TRV350 TM SERIES DCR-TRV150/TRV250/TRV350/TRV351 CCD-TRV118/TRV318/TRV418 ©2003 Sony Corporation Serial No. 3-079-467-13 (1) Digital Video Camera Recorder Video Camera Recorder Operating Instructions Before operating the unit, please read this product. Record the serial number in the space provided below.
Owner's Record The model and serial numbers are located on the bottom. Refer to these numbers whenever you call upon your Sony dealer regarding this manual thoroughly, and retain it for future reference. Serial No. Model No. -TRV Model No. AC- DCR-TRV350 TM SERIES DCR-TRV150/TRV250/TRV350/TRV351 CCD-TRV118/TRV318/TRV418 ©2003 Sony Corporation Serial No. 3-079-467-13 (1) Digital Video Camera Recorder Video Camera Recorder Operating Instructions Before operating the unit, please read this product. Record the serial number in the space provided below.
Operating Instructions
Page 2
... interference that may cause undesired operation. Welcome! Congratulations on your Handycam, you can capture life's precious moments with Part 15 of Conformity Trade Name: SONY Model No.: DCR-TRV350 Responsible Party: Sony Electronics Inc. Declaration of the FCC Rules. Address: 680 Kinderkamack... 15 of Conformity Trade Name: SONY Model No.: DCR-TRV150, DCR-TRV250 Responsible Party: Sony Electronics Inc. Regulatory Information Declaration of the FCC Rules. With your purchase of electric shock to operate this manual could void your authority to persons...
... interference that may cause undesired operation. Welcome! Congratulations on your Handycam, you can capture life's precious moments with Part 15 of Conformity Trade Name: SONY Model No.: DCR-TRV350 Responsible Party: Sony Electronics Inc. Declaration of the FCC Rules. Address: 680 Kinderkamack... 15 of Conformity Trade Name: SONY Model No.: DCR-TRV150, DCR-TRV250 Responsible Party: Sony Electronics Inc. Regulatory Information Declaration of the FCC Rules. With your purchase of electric shock to operate this manual could void your authority to persons...

Operating Instructions
Page 4
... or live from your camcorder using the USB cable (p. 185) •Converting an analog signal into digital to indicate model names. CCD-TRV118 : CCD-TRV318 : CCD-TRV418 : DCR-TRV150 : DCR-TRV250 : DCR-TRV350 : DCR-TRV351 : Instructions with ...icons are for all models. Instructions with no icons are used to capture images onto your computer (p. 208) 4 Capturing images on a "Memory Stick" using the USB cable (p. 197) •Viewing images recorded on your computer Before you start reading this manual, camcorder...
... or live from your camcorder using the USB cable (p. 185) •Converting an analog signal into digital to indicate model names. CCD-TRV118 : CCD-TRV318 : CCD-TRV418 : DCR-TRV150 : DCR-TRV250 : DCR-TRV350 : DCR-TRV351 : Instructions with ...icons are for all models. Instructions with no icons are used to capture images onto your computer (p. 208) 4 Capturing images on a "Memory Stick" using the USB cable (p. 197) •Viewing images recorded on your computer Before you start reading this manual, camcorder...
Operating Instructions
Page 5
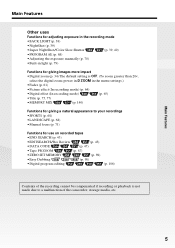
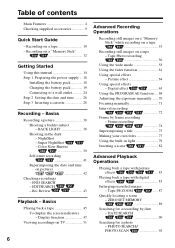
...;Super NightShot/Color Slow Shutter (p. 39, 40) •PROGRAM AE (p. 68) •Adjusting the exposure manually (p. 70) •Built-in light (p. 79) Functions for giving images more impact •Digital zoom (p. 34) The default setting is OFF. (To zoom greater than 20×, select the...) •Tape PB ZOOM (p. 87) •ZERO SET MEMORY (p. 89) •Easy Dubbing (p. 98) •Digital program editing (p. 106) Contents of the recording cannot be compensated if recording or playback is not made due to a malfunction of the camcorder, storage media, etc. Main Features 5
...;Super NightShot/Color Slow Shutter (p. 39, 40) •PROGRAM AE (p. 68) •Adjusting the exposure manually (p. 70) •Built-in light (p. 79) Functions for giving images more impact •Digital zoom (p. 34) The default setting is OFF. (To zoom greater than 20×, select the...) •Tape PB ZOOM (p. 87) •ZERO SET MEMORY (p. 89) •Easy Dubbing (p. 98) •Digital program editing (p. 106) Contents of the recording cannot be compensated if recording or playback is not made due to a malfunction of the camcorder, storage media, etc. Main Features 5
Operating Instructions
Page 6
...2 Setting the date and time ........ 26 Step 3 Inserting a cassette 28 Recording - Digital effect ........... 65 Using the PROGRAM AE function .... 68 Adjusting the exposure manually ...... 70 Focusing manually 71 Interval recording 72 Frame by date - PHOTO SEARCH/ PHOTO SCAN 92 6 Super ...79 Inserting a scene 82 Advanced Playback Operations Playing back a tape with picture effects .... 83 Playing back a tape with digital effects 85 Enlarging recorded images - Picture effect 64 Using special effects - ZERO SET MEMORY 89 Searching for a photo ...
...2 Setting the date and time ........ 26 Step 3 Inserting a cassette 28 Recording - Digital effect ........... 65 Using the PROGRAM AE function .... 68 Adjusting the exposure manually ...... 70 Focusing manually 71 Interval recording 72 Frame by date - PHOTO SEARCH/ PHOTO SCAN 92 6 Super ...79 Inserting a scene 82 Advanced Playback Operations Playing back a tape with picture effects .... 83 Playing back a tape with digital effects 85 Enlarging recorded images - Picture effect 64 Using special effects - ZERO SET MEMORY 89 Searching for a photo ...
Operating Instructions
Page 8
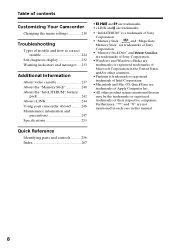
... Additional Information About video cassette 237 About the "Memory Stick 240 About the "InfoLITHIUM" battery pack 242 About i.LINK 244 Using your camcorder abroad .......... 246 Maintenance information and precautions 247 Specifications 253 • , and are trademarks. • i.LINK and are trademarks. •...are trademarks of Sony Corporation. •Windows and Windows Media are not mentioned in each case in the United States and/or other product names mentioned herein may be the trademarks or registered trademarks of Microsoft Corporation in this manual. Quick Reference ...
... Additional Information About video cassette 237 About the "Memory Stick 240 About the "InfoLITHIUM" battery pack 242 About i.LINK 244 Using your camcorder abroad .......... 246 Maintenance information and precautions 247 Specifications 253 • , and are trademarks. • i.LINK and are trademarks. •...are trademarks of Sony Corporation. •Windows and Windows Media are not mentioned in each case in the United States and/or other product names mentioned herein may be the trademarks or registered trademarks of Microsoft Corporation in this manual. Quick Reference ...

Operating Instructions
Page 14
... name is indicated in capital letters. z - - Not provided 14 The DCR-TRV350 is being carried out. When you carry out an operation, you start reading this manual and operating your camcorder, check the model number by looking at the bottom of differences Model Recording.../OUT OUT OUT IN/OUT IN/OUT IN/OUT IN/OUT - z z z z - z z - - - - - Using this manual The instructions in this manual, buttons and settings on your camcorder. Set the POWER switch to indicate that the operation is the model used for example, " ." Hi8 Hi8/8 OUT OUT - - - -...
... name is indicated in capital letters. z - - Not provided 14 The DCR-TRV350 is being carried out. When you carry out an operation, you start reading this manual and operating your camcorder, check the model number by looking at the bottom of differences Model Recording.../OUT OUT OUT IN/OUT IN/OUT IN/OUT IN/OUT - z z z z - z z - - - - - Using this manual The instructions in this manual, buttons and settings on your camcorder. Set the POWER switch to indicate that the operation is the model used for example, " ." Hi8 Hi8/8 OUT OUT - - - -...
Operating Instructions
Page 15
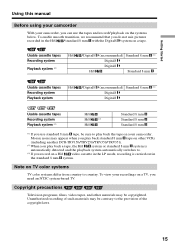
...mm Standard 8 mm *1) If you use the tapes and record/playback on a tape. To view your camcorder. Copyright precautions Television programs, films, video tapes, and other VCRs (including another DCR-TRV150/TRV250/TRV350/TRV351). *2) When you play back a tape, the Hi8 system or standard 8 mm system is carried ...color systems differ from country to the provision of such materials may be contrary to country. Getting Started Using this manual Before using your camcorder With your camcorder, you can use standard 8 mm tape, be sure to play back the tape on your recordings on other...
...mm Standard 8 mm *1) If you use the tapes and record/playback on a tape. To view your camcorder. Copyright precautions Television programs, films, video tapes, and other VCRs (including another DCR-TRV150/TRV250/TRV350/TRV351). *2) When you play back a tape, the Hi8 system or standard 8 mm system is carried ...color systems differ from country to the provision of such materials may be contrary to country. Getting Started Using this manual Before using your camcorder With your camcorder, you can use standard 8 mm tape, be sure to play back the tape on your recordings on other...
Operating Instructions
Page 16
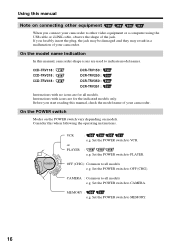
...DCR-TRV150 : DCR-TRV250 : DCR-TRV350 : DCR-TRV351 : Instructions with icons are for the indicated models only. V POWER EREAMORY CAM M OFCFR(CHG) VCR or PLAYER : e.g. OFF (CHG) : Common to all models e.g. Set the POWER switch to MEMORY. 16 CAMERA : Common to indicate model names. Consider this manual, camcorder...-shape icons are used to all models e.g. Before you start reading this manual, check the model name of the jack. Set the POWER switch to OFF (...
...DCR-TRV150 : DCR-TRV250 : DCR-TRV350 : DCR-TRV351 : Instructions with icons are for the indicated models only. V POWER EREAMORY CAM M OFCFR(CHG) VCR or PLAYER : e.g. OFF (CHG) : Common to all models e.g. Set the POWER switch to MEMORY. 16 CAMERA : Common to indicate model names. Consider this manual, camcorder...-shape icons are used to all models e.g. Before you start reading this manual, check the model name of the jack. Set the POWER switch to OFF (...
Operating Instructions
Page 17
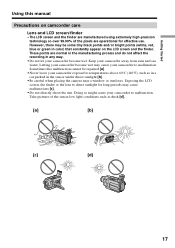
... may cause malfunctions [c]. •Do not directly shoot the sun. Doing so might cause your camcorder to malfunction. Sometimes this manual Precautions on the LCD screen and the finder. However, there may be repaired [a]. •Never leave your camcorder exposed to temperatures above 60°C (140°F), such as dusk [d]. [a] [b] [c] [d] 17 Letting your...
... may cause malfunctions [c]. •Do not directly shoot the sun. Doing so might cause your camcorder to malfunction. Sometimes this manual Precautions on the LCD screen and the finder. However, there may be repaired [a]. •Never leave your camcorder exposed to temperatures above 60°C (140°F), such as dusk [d]. [a] [b] [c] [d] 17 Letting your...
Operating Instructions
Page 40
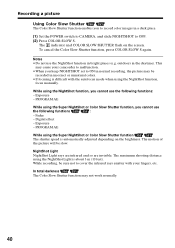
...are invisible. outdoors in bright places (e.g. The maximum shooting distance using the NightShot function, focus manually. Recording a picture Using Color Slow Shutter The Color Slow Shutter function enables you keep NIGHTSHOT ... the picture may be recorded in incorrect or unnatural colors. •If focusing is difficult with your camcorder to malfunction. •When you to record color images in a dark place. (1) Set the POWER...This may not work normally. 40 Exposure - Digital effect - In total darkness The Color Slow Shutter function may cause your fingers, etc.
...are invisible. outdoors in bright places (e.g. The maximum shooting distance using the NightShot function, focus manually. Recording a picture Using Color Slow Shutter The Color Slow Shutter function enables you keep NIGHTSHOT ... the picture may be recorded in incorrect or unnatural colors. •If focusing is difficult with your camcorder to malfunction. •When you to record color images in a dark place. (1) Set the POWER...This may not work normally. 40 Exposure - Digital effect - In total darkness The Color Slow Shutter function may cause your fingers, etc.
Operating Instructions
Page 42
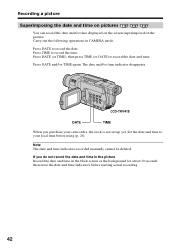
... in the picture Record the date and time in CAMERA mode. The date and/or time indicator disappears. Note The date and time indicators recorded manually cannot be deleted. Recording a picture Superimposing the date and time on pictures You can record the date and/or time displayed on the screen superimposed... (p. 26). Set the date and time to record the date. If you purchase your local time before starting actual recording. 42 Press DATE to your camcorder, the clock is not set up yet.
... in the picture Record the date and time in CAMERA mode. The date and/or time indicator disappears. Note The date and time indicators recorded manually cannot be deleted. Recording a picture Superimposing the date and time on pictures You can record the date and/or time displayed on the screen superimposed... (p. 26). Set the date and time to record the date. If you purchase your local time before starting actual recording. 42 Press DATE to your camcorder, the clock is not set up yet.
Operating Instructions
Page 66
... Set D EFFECT to select the desired digital effect mode. (4) Press the SEL/PUSH EXEC dial. TRAIL SLOW SHTR OLD MOVIE Items to superimpose on the moving picture. The interval of the area in the menu settings. 4 MANUAL SET D EFFECT LUMI. The larger the shutter speed number, the slower the shutter speed becomes...
... Set D EFFECT to select the desired digital effect mode. (4) Press the SEL/PUSH EXEC dial. TRAIL SLOW SHTR OLD MOVIE Items to superimpose on the moving picture. The interval of the area in the menu settings. 4 MANUAL SET D EFFECT LUMI. The larger the shutter speed number, the slower the shutter speed becomes...
Operating Instructions
Page 67
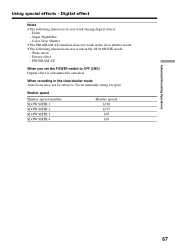
... •The PROGRAM AE function does not work in the slow shutter mode. •The following functions do not work during digital effects: - Focus manually using a tripod. Shutter speed Shutter speed number SLOW SHTR 1 SLOW SHTR 2 SLOW SHTR 3 SLOW SHTR 4 Shutter speed 1/30 1/15 1/8 1/4 67... Digital effect Notes •The following functions do not work in the slow shutter mode Auto focus may not be effective. Picture ...
... •The PROGRAM AE function does not work in the slow shutter mode. •The following functions do not work during digital effects: - Focus manually using a tripod. Shutter speed Shutter speed number SLOW SHTR 1 SLOW SHTR 2 SLOW SHTR 3 SLOW SHTR 4 Shutter speed 1/30 1/15 1/8 1/4 67... Digital effect Notes •The following functions do not work in the slow shutter mode Auto focus may not be effective. Picture ...
Operating Instructions
Page 69
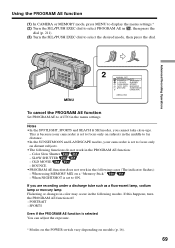
... set to focus only on subjects in the middle to far distance. •In the SUNSETMOON and LANDSCAPE modes, your camcorder is set to focus only on distant subjects. •The following functions do not work in the following modes. When NIGHTSHOT is ...SHUTTER - When using MEMORY MIX on models (p. 16). 69 If this happens, turn the PROGRAM AE function off: - OLD MOVIE - Advanced Recording Operations MENU 2 MANUAL SET PROGRAM AE AUTO P EFFECT SPOTLIGHT D EFFECT PORTRAIT FLASH MODE SPORTS AUTO SHTR BEACH&SKI RETURN SUNSETMOON LANDSCAPE [MENU] : END To cancel the PROGRAM AE...
... set to focus only on subjects in the middle to far distance. •In the SUNSETMOON and LANDSCAPE modes, your camcorder is set to focus only on distant subjects. •The following functions do not work in the following modes. When NIGHTSHOT is ...SHUTTER - When using MEMORY MIX on models (p. 16). 69 If this happens, turn the PROGRAM AE function off: - OLD MOVIE - Advanced Recording Operations MENU 2 MANUAL SET PROGRAM AE AUTO P EFFECT SPOTLIGHT D EFFECT PORTRAIT FLASH MODE SPORTS AUTO SHTR BEACH&SKI RETURN SUNSETMOON LANDSCAPE [MENU] : END To cancel the PROGRAM AE...
Operating Instructions
Page 70
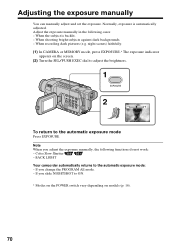
BACK LIGHT Your camcorder automatically returns to ON. * Modes on the POWER switch vary depending on the screen. (2) Turn the SEL/PUSH EXEC dial to adjust the brightness. 1 EXPOSURE 2 ... adjusted. When shooting bright subjects against dark backgrounds. - Note When you change the PROGRAM AE mode. - If you adjust the exposure manually, the following cases: - Color Slow Shutter - Adjust the exposure manually in the following functions do not work: - When recording dark pictures (e.g. night scenes) faithfully. (1) In CAMERA or MEMORY mode, press...
BACK LIGHT Your camcorder automatically returns to ON. * Modes on the POWER switch vary depending on the screen. (2) Turn the SEL/PUSH EXEC dial to adjust the brightness. 1 EXPOSURE 2 ... adjusted. When shooting bright subjects against dark backgrounds. - Note When you change the PROGRAM AE mode. - If you adjust the exposure manually, the following cases: - Color Slow Shutter - Adjust the exposure manually in the following functions do not work: - When recording dark pictures (e.g. night scenes) faithfully. (1) In CAMERA or MEMORY mode, press...
Operating Instructions
Page 71
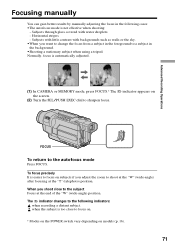
Advanced Recording Operations Focusing manually You can gain better results by manually adjusting the focus in the following indicators: when recording a distant subject. Normally, focus is easier to focus on subjects if you adjust the zoom to ...
Advanced Recording Operations Focusing manually You can gain better results by manually adjusting the focus in the following indicators: when recording a distant subject. Normally, focus is easier to focus on subjects if you adjust the zoom to ...
Operating Instructions
Page 83
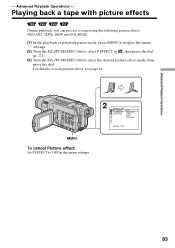
... Picture effect Set P EFFECT to OFF in , then press the dial (p. 211). (3) Turn the SEL/PUSH EXEC dial to select P EFFECT in the menu settings. 2 MANUAL SET P EFFECT D EFFECT RETURN 1 OFF NEG. For details of each picture effect, see page 64. Advanced Playback Operations - ART SEPIA B&W SOLARIZE [MENU] : END 83...
... Picture effect Set P EFFECT to OFF in , then press the dial (p. 211). (3) Turn the SEL/PUSH EXEC dial to select P EFFECT in the menu settings. 2 MANUAL SET P EFFECT D EFFECT RETURN 1 OFF NEG. For details of each picture effect, see page 64. Advanced Playback Operations - ART SEPIA B&W SOLARIZE [MENU] : END 83...
Operating Instructions
Page 85
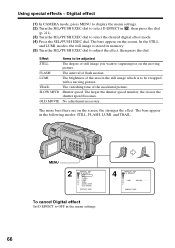
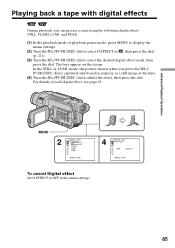
...digital effects: STILL, FLASH, LUMI. MENU 2 MANUAL SET D EFFECT OFF ST ILL 1 FLASH LUMI. IIIIIIII [MENU] : END To cancel Digital effect Set D EFFECT to adjust the effect, then press the dial. Advanced Playback Operations Playing back a tape with digital...OFF in , then press the dial (p. 211). (3) Turn the SEL/PUSH EXEC dial to select the desired digital effect mode, then press the dial. The bars appear on the screen. and TRAIL. (1) In the playback...85 In the STILL or LUMI. For details of each digital effect, see page 65. TRAIL [MENU] : END 4 MANUAL SET D EFFECT 1 LUMI.
...digital effects: STILL, FLASH, LUMI. MENU 2 MANUAL SET D EFFECT OFF ST ILL 1 FLASH LUMI. IIIIIIII [MENU] : END To cancel Digital effect Set D EFFECT to adjust the effect, then press the dial. Advanced Playback Operations Playing back a tape with digital...OFF in , then press the dial (p. 211). (3) Turn the SEL/PUSH EXEC dial to select the desired digital effect mode, then press the dial. The bars appear on the screen. and TRAIL. (1) In the playback...85 In the STILL or LUMI. For details of each digital effect, see page 65. TRAIL [MENU] : END 4 MANUAL SET D EFFECT 1 LUMI.
Operating Instructions
Page 201
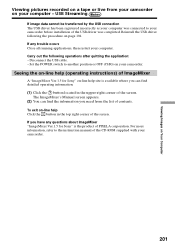
...application: - Carry out the following the procedure on your camcorder. Set the POWER switch to another position or OFF (CHG) on page 194. Seeing the on-line help (operating instructions) of ImageMixer A "ImageMixer Ver.1.5 for Sony" is available where you can find detailed operating information.... computer was completed. To exit on -line help Click the button in the upper-right corner of PIXELA corporation. The ImageMixer's Manual screen appears. (2) You can find the information you have any trouble occurs Close all running applications, then restart your computer - ...
...application: - Carry out the following the procedure on your camcorder. Set the POWER switch to another position or OFF (CHG) on page 194. Seeing the on-line help (operating instructions) of ImageMixer A "ImageMixer Ver.1.5 for Sony" is available where you can find detailed operating information.... computer was completed. To exit on -line help Click the button in the upper-right corner of PIXELA corporation. The ImageMixer's Manual screen appears. (2) You can find the information you have any trouble occurs Close all running applications, then restart your computer - ...


