Operating Instructions
Page 1
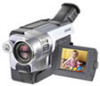
AC- Record the serial number in the space provided below. Serial No. 3-079-467-13 (1) Digital Video Camera Recorder Video Camera Recorder Operating Instructions Before operating the unit, please read this product. Refer to these numbers whenever you call upon your Sony dealer regarding this manual thoroughly, and retain it for future reference. DCR-TRV350 TM SERIES DCR-TRV150/TRV250/TRV350/TRV351 CCD-TRV118/TRV318/TRV418 ©2003 Sony Corporation Owner's Record The model and serial numbers are located on the bottom. Serial No. Model No. -TRV Model No.
AC- Record the serial number in the space provided below. Serial No. 3-079-467-13 (1) Digital Video Camera Recorder Video Camera Recorder Operating Instructions Before operating the unit, please read this product. Refer to these numbers whenever you call upon your Sony dealer regarding this manual thoroughly, and retain it for future reference. DCR-TRV350 TM SERIES DCR-TRV150/TRV250/TRV350/TRV351 CCD-TRV118/TRV318/TRV418 ©2003 Sony Corporation Owner's Record The model and serial numbers are located on the bottom. Serial No. Model No. -TRV Model No.

Operating Instructions
Page 11
...26). ERMAORY ERMAORY Quick Start Guide Recording a picture (p. 30) 1 Remove the lens cap. The picture appears on the LCD screen (p. 45) 2 Press m to CAMERA while pressing the small green button. The picture in the viewfinder is closed (p. 32). Monitoring the playback picture on the LCD screen. 2 Set the POWER...the tape. Adjust the viewfinder lens to record the date and time for a picture, set up your camcorder. 3 Open the LCD panel while pressing OPEN. When you purchase your camcorder, the clock is not attached when you want to your eye against this part when the LCD panel ...
...26). ERMAORY ERMAORY Quick Start Guide Recording a picture (p. 30) 1 Remove the lens cap. The picture appears on the LCD screen (p. 45) 2 Press m to CAMERA while pressing the small green button. The picture in the viewfinder is closed (p. 32). Monitoring the playback picture on the LCD screen. 2 Set the POWER...the tape. Adjust the viewfinder lens to record the date and time for a picture, set up your camcorder. 3 Open the LCD panel while pressing OPEN. When you purchase your camcorder, the clock is not attached when you want to your eye against this part when the LCD panel ...

Operating Instructions
Page 14
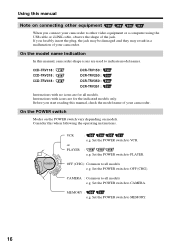
...carry out an operation, you start reading this manual and operating your camcorder, check the model number by looking at the bottom of differences Model ... slot LANC jack SteadyShot Remote sensor RFU jack MIC jack Hi8 Hi8/8 OUT OUT - - - - - - Types of your camcorder are shown in capital letters. Hi8 Hi8/8 OUT OUT - - - - z z - - - - - z - z...purposes. Hi8 Hi8/8 OUT OUT - - - - Not provided 14 The DCR-TRV350 is indicated in the text, for the seven models listed in this manual, buttons and settings on your camcorder. z - z z z - z z z z - z z ...
...carry out an operation, you start reading this manual and operating your camcorder, check the model number by looking at the bottom of differences Model ... slot LANC jack SteadyShot Remote sensor RFU jack MIC jack Hi8 Hi8/8 OUT OUT - - - - - - Types of your camcorder are shown in capital letters. Hi8 Hi8/8 OUT OUT - - - - z z - - - - - z - z...purposes. Hi8 Hi8/8 OUT OUT - - - - Not provided 14 The DCR-TRV350 is indicated in the text, for the seven models listed in this manual, buttons and settings on your camcorder. z - z z z - z z z z - z z ...
Operating Instructions
Page 16
... your camcorder. MEMORY : e.g. Set the POWER switch to all models e.g. CAMERA : Common to VCR. : e.g. Instructions with no icons are for the indicated models only. V POWER EREAMORY CAM M OFCFR(CHG) VCR or PLAYER : e.g. Set the POWER switch to CAMERA. Set the POWER switch to PLAYER. CCD-TRV118 : CCD-TRV318 : CCD-TRV418 : DCR-TRV150 : DCR-TRV250 : DCR-TRV350 : DCR-TRV351...
... your camcorder. MEMORY : e.g. Set the POWER switch to all models e.g. CAMERA : Common to VCR. : e.g. Instructions with no icons are for the indicated models only. V POWER EREAMORY CAM M OFCFR(CHG) VCR or PLAYER : e.g. Set the POWER switch to CAMERA. Set the POWER switch to PLAYER. CCD-TRV118 : CCD-TRV318 : CCD-TRV418 : DCR-TRV150 : DCR-TRV250 : DCR-TRV350 : DCR-TRV351...
Operating Instructions
Page 17
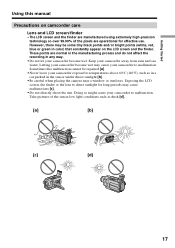
... light conditions such as in a car parked in the sun or under direct sunlight [b]. •Be careful when placing the camera near a window or outdoors. Letting your camcorder become wet. Exposing the LCD screen, the finder or the lens to direct sunlight for effective use. However, there may cause... tiny black points and/or bright points (white, red, blue or green in any way. •Do not let your camcorder become wet may cause your camcorder to malfunction. These points are normal in the manufacturing process and do not affect the recording in color) that constantly appear on...
... light conditions such as in a car parked in the sun or under direct sunlight [b]. •Be careful when placing the camera near a window or outdoors. Letting your camcorder become wet. Exposing the LCD screen, the finder or the lens to direct sunlight for effective use. However, there may cause... tiny black points and/or bright points (white, red, blue or green in any way. •Do not let your camcorder become wet may cause your camcorder to malfunction. These points are normal in the manufacturing process and do not affect the recording in color) that constantly appear on...
Operating Instructions
Page 26
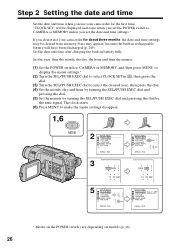
.... Step 2 Setting the date and time Set the date and time when you do not use your camcorder for the first time. Set the date and time after charging the built-in , then press the dial... year, then the month, the day, the hour and then the minute. (1) Set the POWER switch to CAMERA or MEMORY, and then press MENU to display the menu settings.* (2) Turn the SEL/PUSH EXEC dial to select... be displayed each time when you set the POWER switch to CAMERA or MEMORY unless you set the date and time settings.* If you use your camcorder for about three months, the date and time settings may be...
.... Step 2 Setting the date and time Set the date and time when you do not use your camcorder for the first time. Set the date and time after charging the built-in , then press the dial... year, then the month, the day, the hour and then the minute. (1) Set the POWER switch to CAMERA or MEMORY, and then press MENU to display the menu settings.* (2) Turn the SEL/PUSH EXEC dial to select... be displayed each time when you set the POWER switch to CAMERA or MEMORY unless you set the date and time settings.* If you use your camcorder for about three months, the date and time settings may be...

Operating Instructions
Page 30
Recording a picture Your camcorder automatically focuses. (1) Remove the lens cap and attach the lens cap to CAMERA while pressing the small green button. The REC indicator appears on the Remote Commander during playback. •Fasten the grip strap firmly....code (date/time when recorded) are recorded automatically onto the tape. Basics - The viewfinder automatically turns off. (5) Press START/STOP. The camera recording lamp located on the front of your camcorder to the standby mode. (4) Open the LCD panel while pressing OPEN. Recording - See "Step 1" to "Step 3" for more information...
Recording a picture Your camcorder automatically focuses. (1) Remove the lens cap and attach the lens cap to CAMERA while pressing the small green button. The REC indicator appears on the Remote Commander during playback. •Fasten the grip strap firmly....code (date/time when recorded) are recorded automatically onto the tape. Basics - The viewfinder automatically turns off. (5) Press START/STOP. The camera recording lamp located on the front of your camcorder to the standby mode. (4) Open the LCD panel while pressing OPEN. Recording - See "Step 1" to "Step 3" for more information...

Operating Instructions
Page 31
... battery pack, set to OFF (CHG). Select SP or LP in the LP (long play back the tape on one tape. - When you leave your camcorder. When you record in the LP mode •The time code may be set the POWER switch to MEMORY accidentally. In the LP mode, you... longer be distorted. *1) 1.5 times: Twice: *2) three minutes: five minutes: 31 To set to prevent battery and tape wear. Recording - This is set the counter to CAMERA again. The LOCK switch is to save battery power and to the left as you do not eject the cassette even if you slide the...
... battery pack, set to OFF (CHG). Select SP or LP in the LP (long play back the tape on one tape. - When you leave your camcorder. When you record in the LP mode •The time code may be set the POWER switch to MEMORY accidentally. In the LP mode, you... longer be distorted. *1) 1.5 times: Twice: *2) three minutes: five minutes: 31 To set to prevent battery and tape wear. Recording - This is set the counter to CAMERA again. The LOCK switch is to save battery power and to the left as you do not eject the cassette even if you slide the...
Operating Instructions
Page 33
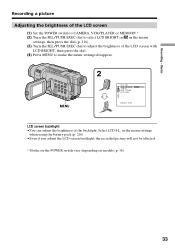
... switch vary depending on models (p. 16). 33 Recording - Select LCD B.L. Basics Recording a picture Adjusting the brightness of the LCD screen (1) Set the POWER switch to CAMERA, VCR/PLAYER or MEMORY.* (2) Turn the SEL/PUSH EXEC dial to make the menu settings disappear.
... switch vary depending on models (p. 16). 33 Recording - Select LCD B.L. Basics Recording a picture Adjusting the brightness of the LCD screen (1) Set the POWER switch to CAMERA, VCR/PLAYER or MEMORY.* (2) Turn the SEL/PUSH EXEC dial to make the menu settings disappear.
Operating Instructions
Page 34
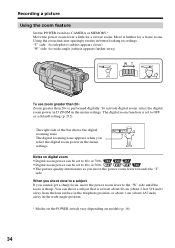
"T" side: for telephoto (subject appears closer) "W" side: for a faster zoom. To activate digital zoom, select the digital zoom power in D ZOOM in better-looking recordings. You can be set to CAMERA or MEMORY.* Move the power zoom lever a little for a slower zoom. Using the zoom function sparingly ...results in the menu settings. The right side of the bar shows the digital zooming zone. W T The digital zooming zone appears when you move...
"T" side: for telephoto (subject appears closer) "W" side: for a faster zoom. To activate digital zoom, select the digital zoom power in D ZOOM in better-looking recordings. You can be set to CAMERA or MEMORY.* Move the power zoom lever a little for a slower zoom. Using the zoom function sparingly ...results in the menu settings. The right side of the bar shows the digital zooming zone. W T The digital zooming zone appears when you move...
Operating Instructions
Page 35
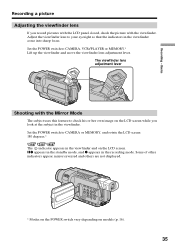
... the POWER switch vary depending on the LCD screen. The viewfinder lens adjustment lever Shooting with the Mirror Mode The subject uses this feature to CAMERA or MEMORY, and rotate the LCD screen 180 degrees.* The indicator appears in the viewfinder. Basics Recording a picture Adjusting the viewfinder lens If you look... image on the LCD screen while you record pictures with the LCD panel closed, check the picture with the viewfinder. Adjust the viewfinder lens to CAMERA, VCR/PLAYER or MEMORY.* Lift up the viewfinder and move the viewfinder lens adjustment lever.
... the POWER switch vary depending on the LCD screen. The viewfinder lens adjustment lever Shooting with the Mirror Mode The subject uses this feature to CAMERA or MEMORY, and rotate the LCD screen 180 degrees.* The indicator appears in the viewfinder. Basics Recording a picture Adjusting the viewfinder lens If you look... image on the LCD screen while you record pictures with the LCD panel closed, check the picture with the viewfinder. Adjust the viewfinder lens to CAMERA, VCR/PLAYER or MEMORY.* Lift up the viewfinder and move the viewfinder lens adjustment lever.
Operating Instructions
Page 36
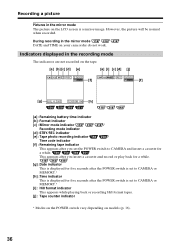
... on models (p. 16). 36 Recording a picture Pictures in the mirror mode The picture on your camcorder do not work. During recording in the mirror mode DATE and TIME on the LCD screen is set to CAMERA and insert a cassette for a while. This appears after you set the POWER switch to...insert a cassette and record or play back for a while. [g] :Date indicator This is displayed for five seconds after the POWER switch is set to CAMERA or MEMORY.* [h] :Time indicator This is displayed for five seconds after the POWER switch is a mirror-image. However, the picture will be normal when...
... on models (p. 16). 36 Recording a picture Pictures in the mirror mode The picture on your camcorder do not work. During recording in the mirror mode DATE and TIME on the LCD screen is set to CAMERA and insert a cassette for a while. This appears after you set the POWER switch to...insert a cassette and record or play back for a while. [g] :Date indicator This is displayed for five seconds after the POWER switch is set to CAMERA or MEMORY.* [h] :Time indicator This is displayed for five seconds after the POWER switch is a mirror-image. However, the picture will be normal when...
Operating Instructions
Page 37
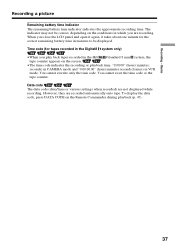
... 8 mm system, the tape counter appears on the screen. •The time code indicates the recording or playback time, "0:00:00" (hours:minutes: seconds) in CAMERA mode and "0:00:00:00" (hours:minutes:seconds:frames) in minutes to be correct, depending on the Remote Commander during playback (p. 47). 37 You cannot...
... 8 mm system, the tape counter appears on the screen. •The time code indicates the recording or playback time, "0:00:00" (hours:minutes: seconds) in CAMERA mode and "0:00:00:00" (hours:minutes:seconds:frames) in minutes to be correct, depending on the Remote Commander during playback (p. 47). 37 You cannot...
Operating Instructions
Page 38
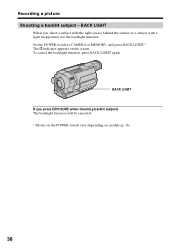
To cancel the backlight function, press BACK LIGHT again. Set the POWER switch to CAMERA or MEMORY, and press BACK LIGHT.* The . indicator appears on models (p. 16). 38 BACK LIGHT If you shoot a subject with the light source behind the subject or a subject with a light background, use the backlight function. Recording a picture Shooting a backlit subject - BACK LIGHT When you press EXPOSURE when shooting backlit subjects The backlight function will be canceled. * Modes on the POWER switch vary depending on the screen.
To cancel the backlight function, press BACK LIGHT again. Set the POWER switch to CAMERA or MEMORY, and press BACK LIGHT.* The . indicator appears on models (p. 16). 38 BACK LIGHT If you shoot a subject with the light source behind the subject or a subject with a light background, use the backlight function. Recording a picture Shooting a backlit subject - BACK LIGHT When you press EXPOSURE when shooting backlit subjects The backlight function will be canceled. * Modes on the POWER switch vary depending on the screen.

Operating Instructions
Page 39
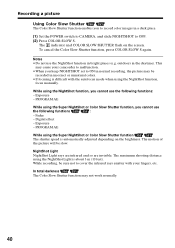
... NightShot Set the POWER switch to CAMERA or MEMORY, and slide NIGHTSHOT to OFF. To cancel the NightShot function, slide NIGHTSHOT to ON.* The indicator and "NIGHTSHOT" flash on the screen. To cancel the Super NightShot function, press SUPER NS again. Your camcorder returns to ON in the menu ... Super NightShot function makes subjects up to 16 times brighter than those recorded in the NightShot mode. (1) Set the POWER switch to CAMERA, and slide NIGHTSHOT to shoot a subject in the dark - Recording - Super NightShot - Color Slow Shutter The NightShot function enables you use ...
... NightShot Set the POWER switch to CAMERA or MEMORY, and slide NIGHTSHOT to OFF. To cancel the NightShot function, slide NIGHTSHOT to ON.* The indicator and "NIGHTSHOT" flash on the screen. To cancel the Super NightShot function, press SUPER NS again. Your camcorder returns to ON in the menu ... Super NightShot function makes subjects up to 16 times brighter than those recorded in the NightShot mode. (1) Set the POWER switch to CAMERA, and slide NIGHTSHOT to shoot a subject in the dark - Recording - Super NightShot - Color Slow Shutter The NightShot function enables you use ...
Operating Instructions
Page 40
... functions : - While using the NightShot function, you to record color images in a dark place. (1) Set the POWER switch to CAMERA, and slide NIGHTSHOT to ON in normal recording, the picture may be slow. Exposure - NightShot Light NightShot Light rays are infrared and... again. The maximum shooting distance using the NightShot function, focus manually. Digital effect - The motion of the picture will be recorded in incorrect or unnatural colors. •If focusing is difficult with your camcorder to malfunction. •When you cannot use the following functions: - ...
... functions : - While using the NightShot function, you to record color images in a dark place. (1) Set the POWER switch to CAMERA, and slide NIGHTSHOT to ON in normal recording, the picture may be slow. Exposure - NightShot Light NightShot Light rays are infrared and... again. The maximum shooting distance using the NightShot function, focus manually. Digital effect - The motion of the picture will be recorded in incorrect or unnatural colors. •If focusing is difficult with your camcorder to malfunction. •When you cannot use the following functions: - ...

Operating Instructions
Page 41
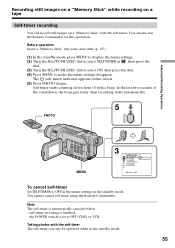
... cannot cancel self-timer using the Remote Commander. You can also record still images on the screen. (5) Press START/STOP. START/STOP START/STOP MENU 3 CAMERA SET SELFTIMER D ZOOM 16:9WIDE STEADYSHOT N.S.LIGHT RETURN OFF ON [MENU] : END To stop the countdown Press START/STOP. To restart the countdown, press START...
... cannot cancel self-timer using the Remote Commander. You can also record still images on the screen. (5) Press START/STOP. START/STOP START/STOP MENU 3 CAMERA SET SELFTIMER D ZOOM 16:9WIDE STEADYSHOT N.S.LIGHT RETURN OFF ON [MENU] : END To stop the countdown Press START/STOP. To restart the countdown, press START...
Operating Instructions
Page 42
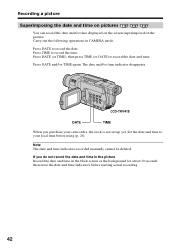
... time indicator disappears. CCD-TRV418 DATE TIME When you do not record the date and time in the picture Record the date and time in CAMERA mode. If you purchase your local time before starting actual recording. 42 Set the date and time to record the date. Press TIME to record... the date and time. Press DATE to your camcorder, the clock is not set up yet. Press DATE and/or TIME again. Carry out the following operations in the black screen as the background...
... time indicator disappears. CCD-TRV418 DATE TIME When you do not record the date and time in the picture Record the date and time in CAMERA mode. If you purchase your local time before starting actual recording. 42 Set the date and time to record the date. Press TIME to record... the date and time. Press DATE to your camcorder, the clock is not set up yet. Press DATE and/or TIME again. Carry out the following operations in the black screen as the background...
Operating Instructions
Page 54
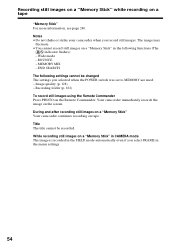
... Your camcorder continues recording on a "Memory Stick" in the menu settings. 54 The image may fluctuate. •You cannot record still images on tape. BOUNCE - Recording folder (p. 162) To record still images using the Remote Commander Press PHOTO on a "Memory Stick" in CAMERA mode ...following functions (The indicator flashes): - Image quality (p. 128) - Title The title cannot be changed The settings you record still images. Your camcorder immediately records the image on a tape "Memory Stick" For more information, see page 240. Recording still images on a "Memory Stick" ...
... Your camcorder continues recording on a "Memory Stick" in the menu settings. 54 The image may fluctuate. •You cannot record still images on tape. BOUNCE - Recording folder (p. 162) To record still images using the Remote Commander Press PHOTO on a "Memory Stick" in CAMERA mode ...following functions (The indicator flashes): - Image quality (p. 128) - Title The title cannot be changed The settings you record still images. Your camcorder immediately records the image on a tape "Memory Stick" For more information, see page 240. Recording still images on a "Memory Stick" ...
Operating Instructions
Page 55
...In the last two seconds of the countdown, the beep gets faster, then recording starts automatically. 5 PHOTO Advanced Recording Operations PHOTO MENU 3 CAMERA SET SELFTIMER D ZOOM 16:9WIDE STEADYSHOT N.S.LIGHT RETURN OFF ON [MENU] : END To cancel self-timer Set SELFTIMER to OFF in the...timer using the Remote Commander. the POWER switch is automatically canceled when: - Taking photos with a beep. Before operation Insert a "Memory Stick" into your camcorder (p. 127). (1) In the standby mode, press MENU to display the menu settings. (2) Turn the SEL/PUSH EXEC dial to OFF (CHG) or VCR...
...In the last two seconds of the countdown, the beep gets faster, then recording starts automatically. 5 PHOTO Advanced Recording Operations PHOTO MENU 3 CAMERA SET SELFTIMER D ZOOM 16:9WIDE STEADYSHOT N.S.LIGHT RETURN OFF ON [MENU] : END To cancel self-timer Set SELFTIMER to OFF in the...timer using the Remote Commander. the POWER switch is automatically canceled when: - Taking photos with a beep. Before operation Insert a "Memory Stick" into your camcorder (p. 127). (1) In the standby mode, press MENU to display the menu settings. (2) Turn the SEL/PUSH EXEC dial to OFF (CHG) or VCR...


