
Operating Instructions
Page 9
The picture appears on the LCD screen (p. 38) 1 Set the POWER switch to CAMERA while pressing the small green button. To stop recording, press START/STOP again. PLAY NOTE Do not pick up your eye against the eyecup. Your camcorder starts recording. If you purchase your eyesight (p. 29... Press START/STOP. Monitoring the playback picture on the screen. 2 Set the POWER switch to VCR while pressing the small green button. POWER VCR OFF(CHG) CAMERA MEMORY Viewfinder When the LCD panel is set the clock before recording (p. 23). Adjust the viewfinder lens to rewind the...
The picture appears on the LCD screen (p. 38) 1 Set the POWER switch to CAMERA while pressing the small green button. To stop recording, press START/STOP again. PLAY NOTE Do not pick up your eye against the eyecup. Your camcorder starts recording. If you purchase your eyesight (p. 29... Press START/STOP. Monitoring the playback picture on the screen. 2 Set the POWER switch to VCR while pressing the small green button. POWER VCR OFF(CHG) CAMERA MEMORY Viewfinder When the LCD panel is set the clock before recording (p. 23). Adjust the viewfinder lens to rewind the...

Operating Instructions
Page 11
... the LCD panel or the battery pack. 11 PLAY Press MEMORY -/+ to the left (unlock) position. Make sure that the LOCK switch is set the clock before recording (p. 23). Recording a still image on the screen. 2 Set the POWER switch to off. POWER VCR OFF(CHG) CAMERA MEMORY ...2 Press MEMORY PLAY. The picture appears on a "Memory Stick" (p. 112) 1 Remove the lens cap. 3 Open the LCD panel while pressing OPEN.
... the LCD panel or the battery pack. 11 PLAY Press MEMORY -/+ to the left (unlock) position. Make sure that the LOCK switch is set the clock before recording (p. 23). Recording a still image on the screen. 2 Set the POWER switch to off. POWER VCR OFF(CHG) CAMERA MEMORY ...2 Press MEMORY PLAY. The picture appears on a "Memory Stick" (p. 112) 1 Remove the lens cap. 3 Open the LCD panel while pressing OPEN.
Operating Instructions
Page 12
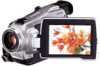
... switch) Intelligent accessory shoe 8 pin LCD screen 6.2 cm (2.5 type) TRV18 z 15 pin*2) 6.2 cm (2.5 type) TRV25 z 15 pin*2) 6.2 cm (2.5 type) TRV27 z 15 pin*2) 8.8 cm (3.5 type) z Provided - As you can hear a beep to indicate that the operation is designed to CAMERA. Getting Started - See page 105 for example, "DCR-TRV27 only". The DCR-TRV27 is the model used for the... you carry out an operation, you read through this manual and operating your camcorder, check the model number by looking at the bottom of differences DCR-
... switch) Intelligent accessory shoe 8 pin LCD screen 6.2 cm (2.5 type) TRV18 z 15 pin*2) 6.2 cm (2.5 type) TRV25 z 15 pin*2) 6.2 cm (2.5 type) TRV27 z 15 pin*2) 8.8 cm (3.5 type) z Provided - As you can hear a beep to indicate that the operation is designed to CAMERA. Getting Started - See page 105 for example, "DCR-TRV27 only". The DCR-TRV27 is the model used for the... you carry out an operation, you read through this manual and operating your camcorder, check the model number by looking at the bottom of differences DCR-
Operating Instructions
Page 14
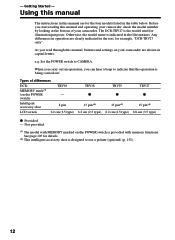
... the finder. Take pictures of the pixels are normal in the manufacturing process and do not affect the recording in color) that constantly appear on mounted models only) •The LCD screen and the finder are manufactured using extremely high-precision technology, so over 99.99 % of the sun in ...low light conditions such as in a car parked in the sun or under direct sunlight [b]. •Be careful when placing the camera near a window or outdoors....
... the finder. Take pictures of the pixels are normal in the manufacturing process and do not affect the recording in color) that constantly appear on mounted models only) •The LCD screen and the finder are manufactured using extremely high-precision technology, so over 99.99 % of the sun in ...low light conditions such as in a car parked in the sun or under direct sunlight [b]. •Be careful when placing the camera near a window or outdoors....
Operating Instructions
Page 19
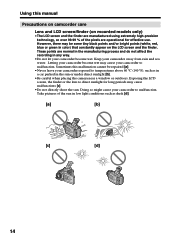
... NP-FM70 NP-QM71 NP-FM90 NP-FM91/QM91 Recording with the viewfinder Continuous Typical* 145 75 305 170 355 195 460 255 535 295 Recording with the LCD screen Continuous Typical* 115 60 245 135 285 160 370 210 430 240 DCR-TRV27 Battery pack NP-FM50 (supplied) NP-FM70 NP-...QM71 NP-FM90 NP-FM91/QM91 Recording with the viewfinder Continuous Typical* 145 75 305 170...
... NP-FM70 NP-QM71 NP-FM90 NP-FM91/QM91 Recording with the viewfinder Continuous Typical* 145 75 305 170 355 195 460 255 535 295 Recording with the LCD screen Continuous Typical* 115 60 245 135 285 160 370 210 430 240 DCR-TRV27 Battery pack NP-FM50 (supplied) NP-FM70 NP-...QM71 NP-FM90 NP-FM91/QM91 Recording with the viewfinder Continuous Typical* 145 75 305 170...
Operating Instructions
Page 20
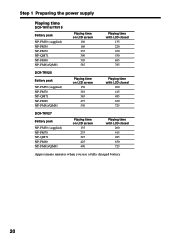
... on LCD screen 100 160 335 390 505 585 Playing time with LCD closed 135 220 450 530 685 785 DCR-TRV25 Battery pack NP-FM50 (supplied) NP-FM70 NP-QM71 NP-FM90 NP-FM91/QM91 Playing time on LCD screen 150 310 365 475 550 Playing time with LCD closed 200 415 485 630 725 DCR-TRV27 Battery... pack NP-FM50 (supplied) NP-FM70 NP-QM71 NP-FM90 NP-FM91/QM91 Playing time on LCD screen 135 275 325 425 490 Playing time with...
... on LCD screen 100 160 335 390 505 585 Playing time with LCD closed 135 220 450 530 685 785 DCR-TRV25 Battery pack NP-FM50 (supplied) NP-FM70 NP-QM71 NP-FM90 NP-FM91/QM91 Playing time on LCD screen 150 310 365 475 550 Playing time with LCD closed 200 415 485 630 725 DCR-TRV27 Battery... pack NP-FM50 (supplied) NP-FM70 NP-QM71 NP-FM90 NP-FM91/QM91 Playing time on LCD screen 135 275 325 425 490 Playing time with...
Operating Instructions
Page 27
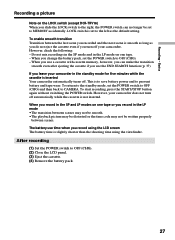
... (except DCR-TRV16) When you slide the LOCK switch to OFF (CHG). (2) Close the LCD panel. (3) Eject the cassette. (4) Remove the battery pack. 27 However, check the following: - To start recording, press ... not be set to OFF (CHG). - LOCK switch is to save battery power and to CAMERA. When you use time when you change the battery pack, set the POWER switch to OFF...you record in the standby mode for five minutes while the cassette is inserted Your camcorder automatically turns off automatically while the cassette is slightly shorter than the shooting time using the LCD screen ...
... (except DCR-TRV16) When you slide the LOCK switch to OFF (CHG). (2) Close the LCD panel. (3) Eject the cassette. (4) Remove the battery pack. 27 However, check the following: - To start recording, press ... not be set to OFF (CHG). - LOCK switch is to save battery power and to CAMERA. When you use time when you change the battery pack, set the POWER switch to OFF...you record in the standby mode for five minutes while the cassette is inserted Your camcorder automatically turns off automatically while the cassette is slightly shorter than the shooting time using the LCD screen ...
Operating Instructions
Page 28
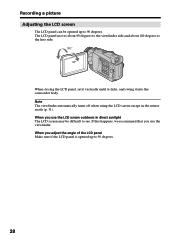
...viewfinder. When you adjust the angle of the LCD panel Make sure if the LCD panel is opened up to 90 degrees. 28 If this happens, we recommend that you use the LCD screen outdoors in the mirror mode (p. 31). The LCD panel moves about 90 degrees to the viewfinder... When closing the LCD panel, set it vertically until it clicks, and swing it into the camcorder body. Note The viewfinder automatically turns off when using the LCD screen except in direct sunlight The LCD screen may be opened up to 90 degrees. Recording a picture Adjusting the LCD screen The LCD panel can be difficult...
...viewfinder. When you adjust the angle of the LCD panel Make sure if the LCD panel is opened up to 90 degrees. 28 If this happens, we recommend that you use the LCD screen outdoors in the mirror mode (p. 31). The LCD panel moves about 90 degrees to the viewfinder... When closing the LCD panel, set it vertically until it clicks, and swing it into the camcorder body. Note The viewfinder automatically turns off when using the LCD screen except in direct sunlight The LCD screen may be opened up to 90 degrees. Recording a picture Adjusting the LCD screen The LCD panel can be difficult...

Operating Instructions
Page 29
... the viewfinder If you record pictures with the LCD panel closed, check the picture with LCD BRIGHT, then press the dial. (3) Press MENU to CAMERA, VCR or MEMORY (except DCR-TRV16). in the menu settings when using the battery pack (p. 178). 29 Select VF B.L. Select LCD B.L. Recording - Basics Recording a picture Adjusting the brightness of the LCD screen (1) Set the POWER...
... the viewfinder If you record pictures with the LCD panel closed, check the picture with LCD BRIGHT, then press the dial. (3) Press MENU to CAMERA, VCR or MEMORY (except DCR-TRV16). in the menu settings when using the battery pack (p. 178). 29 Select VF B.L. Select LCD B.L. Recording - Basics Recording a picture Adjusting the brightness of the LCD screen (1) Set the POWER...

Operating Instructions
Page 31
...displayed. Picture in the mirror mode The picture on the LCD screen. Basics Recording a picture Shooting with the Mirror Mode This feature allows the camera subject to view him-or herself on the LCD screen is a mirror-image. During recording in the viewfinder. Set the POWER switch to check ...the LCD screen. The indicator appears in the recording mode. However, the picture will be normal when recorded. Xz appears in the standby mode, and z appears in the viewfinder and on the Remote Commander does not work. 31 The subject uses this feature to CAMERA or MEMORY (except DCR-...
...displayed. Picture in the mirror mode The picture on the LCD screen. Basics Recording a picture Shooting with the Mirror Mode This feature allows the camera subject to view him-or herself on the LCD screen is a mirror-image. During recording in the viewfinder. Set the POWER switch to check ...the LCD screen. The indicator appears in the recording mode. However, the picture will be normal when recorded. Xz appears in the standby mode, and z appears in the viewfinder and on the Remote Commander does not work. 31 The subject uses this feature to CAMERA or MEMORY (except DCR-...

Operating Instructions
Page 38
...turn the volume up 3 2 POWER VCR OFF(CHG) CAMERA MEMORY 1 4 REW 5 PLAY 6 VOLUME To stop playback Press x. This is set vertically. - Sound is muted when the LCD panel is closed. - : To turn the volume down + : To turn the LCD panel over and move it back to the camcorder body with... and insert the recorded tape. (2) Set the POWER switch to VCR while pressing the small green button. (3) Open the LCD panel while pressing OPEN. (4) Press m to rewind the tape. (5) Press N to start playback. (6) To adjust the volume, press either of the two buttons on the LCD screen You can control...
...turn the volume up 3 2 POWER VCR OFF(CHG) CAMERA MEMORY 1 4 REW 5 PLAY 6 VOLUME To stop playback Press x. This is set vertically. - Sound is muted when the LCD panel is closed. - : To turn the volume down + : To turn the LCD panel over and move it back to the camcorder body with... and insert the recorded tape. (2) Set the POWER switch to VCR while pressing the small green button. (3) Open the LCD panel while pressing OPEN. (4) Press m to rewind the tape. (5) Press N to start playback. (6) To adjust the volume, press either of the two buttons on the LCD screen You can control...
Operating Instructions
Page 88
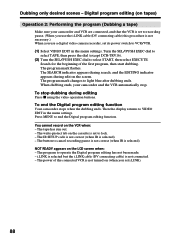
... you use a digital video camera recorder, set to cancel recording pause is not correct (when IR is set its power switch to select START, then select EXECUTE. The power of the first program, then start dubbing. To stop . NOT READY appears on the VCR when: - You cannot record on the LCD screen when: - The...SEL/PUSH EXEC dial to select TAPE, then press the dial (except DCR-TRV16). (2) Turn the SEL/PUSH EXEC dial to VCR/VTR. (1) Select VIDEO EDIT in the menu settings. The program mark changes to VIDEO EDIT in the menu settings. Then the display returns to light blue after...
... you use a digital video camera recorder, set to cancel recording pause is not correct (when IR is set its power switch to select START, then select EXECUTE. The power of the first program, then start dubbing. To stop . NOT READY appears on the VCR when: - You cannot record on the LCD screen when: - The...SEL/PUSH EXEC dial to select TAPE, then press the dial (except DCR-TRV16). (2) Turn the SEL/PUSH EXEC dial to VCR/VTR. (1) Select VIDEO EDIT in the menu settings. The program mark changes to VIDEO EDIT in the menu settings. Then the display returns to light blue after...

Operating Instructions
Page 115
...images in continuous shooting The number of images you can shoot continuously varies depending on the LCD screen. When shooting with the self-timer function or the Remote Commander Your camcorder automatically records up to the maximum number of still images. The effect of exposure bracketing (EXP BRKTG... image size and the capacity of the "Memory Stick" becomes full " FULL" appears on the screen, and you press PHOTO. * DCR-TRV25/TRV27 only 115 " FULL" is displayed when you cannot record a still image on the "Memory Stick" for the expected effect is space remaining on this "Memory...
...images in continuous shooting The number of images you can shoot continuously varies depending on the LCD screen. When shooting with the self-timer function or the Remote Commander Your camcorder automatically records up to the maximum number of still images. The effect of exposure bracketing (EXP BRKTG... image size and the capacity of the "Memory Stick" becomes full " FULL" appears on the screen, and you press PHOTO. * DCR-TRV25/TRV27 only 115 " FULL" is displayed when you cannot record a still image on the "Memory Stick" for the expected effect is space remaining on this "Memory...

Operating Instructions
Page 134
... the beginning of data on your camcorder automatically stops. When the dubbing ends, your camcorder, and REC appears during editing Press x using the video operation buttons. The program you made . - Turn the SEL/PUSH EXEC dial to select MEMORY, then press the dial. (2) Select START ...dubbing during dubbing on the LCD screen when: - The program to operate the Digital program editing has not been made is set to light blue after dubbing is not inserted. - NOT READY appears on the screen. Press MENU to select EXECUTE, then press the dial. Recording edited pictures from a tape ...
... the beginning of data on your camcorder automatically stops. When the dubbing ends, your camcorder, and REC appears during editing Press x using the video operation buttons. The program you made . - Turn the SEL/PUSH EXEC dial to select MEMORY, then press the dial. (2) Select START ...dubbing during dubbing on the LCD screen when: - The program to operate the Digital program editing has not been made is set to light blue after dubbing is not inserted. - NOT READY appears on the screen. Press MENU to select EXECUTE, then press the dial. Recording edited pictures from a tape ...

Operating Instructions
Page 138
.... •Turn the audio volume of recorded images Print mark Protect Recording date/time/various settings *DCR-TRV25/TRV27 only Recording data You can view the recording data (date/time or various settings when recorded) by pressing DATA CODE on the Remote Commander. 138 When no image is recorded on the LCD screen, the image quality may be output from...
.... •Turn the audio volume of recorded images Print mark Protect Recording date/time/various settings *DCR-TRV25/TRV27 only Recording data You can view the recording data (date/time or various settings when recorded) by pressing DATA CODE on the Remote Commander. 138 When no image is recorded on the LCD screen, the image quality may be output from...
Operating Instructions
Page 161
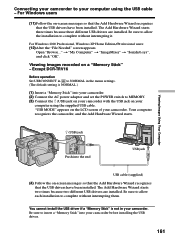
...on your computer using the USB cable - Viewing images recorded on -screen messages so that the Add Hardware Wizard recognizes that the ... (4) Follow the on the LCD screen of your computer using the supplied USB cable. "USB MODE" appears on -screen messages so that the Add... Hardware Wizard recognizes that the USB drivers have been installed. Viewing Images Using Your Computer (USB) jack Push into your camcorder. Connecting your camcorder to your camcorder. For Windows users (11) Follow the on a "Memory Stick" - Open "Browse..." Except DCR...
...on your computer using the USB cable - Viewing images recorded on -screen messages so that the Add Hardware Wizard recognizes that the ... (4) Follow the on the LCD screen of your computer using the supplied USB cable. "USB MODE" appears on -screen messages so that the Add... Hardware Wizard recognizes that the USB drivers have been installed. Viewing Images Using Your Computer (USB) jack Push into your camcorder. Connecting your camcorder to your camcorder. For Windows users (11) Follow the on a "Memory Stick" - Open "Browse..." Except DCR...
Operating Instructions
Page 167
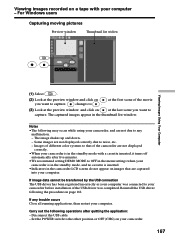
Viewing images recorded on a tape with a cassette inserted, it turns off automatically after quitting the application: - The captured images appear in the standby mode with your computer - The ... MODE to OFF in the menu settings when your camcorder is in the standby mode, and no cassette is inserted. •Indicators in the camcorder LCD screen do not appear on images that of the USB driver was connected to the other position or OFF (CHG) on at the first scene of...
Viewing images recorded on a tape with a cassette inserted, it turns off automatically after quitting the application: - The captured images appear in the standby mode with your computer - The ... MODE to OFF in the menu settings when your camcorder is in the standby mode, and no cassette is inserted. •Indicators in the camcorder LCD screen do not appear on images that of the USB driver was connected to the other position or OFF (CHG) on at the first scene of...

Operating Instructions
Page 178
... brighten the LCD screen - z BRT NORMAL To set the brightness on the LCD screen to normal BRIGHT To brighten the viewfinder screen VCR CAMERA MEMORY Notes on the LCD screen with sub sound To adjust the balance between the stereo 1 and stereo 2 (p. 96) VCR VCR A/V t DV OUT z OFF ON LCD/VF SET LCD BRIGHT - ST 1 ST 2 To output digital images and...
... brighten the LCD screen - z BRT NORMAL To set the brightness on the LCD screen to normal BRIGHT To brighten the viewfinder screen VCR CAMERA MEMORY Notes on the LCD screen with sub sound To adjust the balance between the stereo 1 and stereo 2 (p. 96) VCR VCR A/V t DV OUT z OFF ON LCD/VF SET LCD BRIGHT - ST 1 ST 2 To output digital images and...
Operating Instructions
Page 184
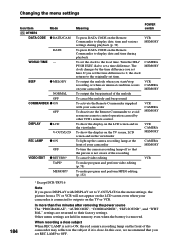
... on the TV screen, LCD screen and in the viewfinder To light up the camera recording lamp at the front of the recording To cancel video editing To make program and perform video editing (p. 78) To make program and perform MPEG editing (p. 132) VCR MEMORY CAMERA MEMORY VCR CAMERA MEMORY VCR CAMERA MEMORY VCR CAMERA MEMORY CAMERA MEMORY VCR 184 * Except DCR-TRV16 Note...
... on the TV screen, LCD screen and in the viewfinder To light up the camera recording lamp at the front of the recording To cancel video editing To make program and perform video editing (p. 78) To make program and perform MPEG editing (p. 132) VCR MEMORY CAMERA MEMORY VCR CAMERA MEMORY VCR CAMERA MEMORY VCR CAMERA MEMORY CAMERA MEMORY VCR 184 * Except DCR-TRV16 Note...

Operating Instructions
Page 191
...by ss) differ depending on the LCD screen or in the display window. c Use an "InfoLITHIUM" battery pack. (p. 197) • Moisture condensation has occurred. Five-digit display C:04:ss C:21:ss ... your camcorder. • A malfunction that you are unable to acclimatize. (p. 202) • The video heads are using the cleaning cassette (optional). (p. 203) • A malfunction other than the above that...if you try corrective actions a few times, contact your Sony dealer or local authorized Sony service facility and inform them of the 5-digit code. (example: E:61:10) If you can ...
...by ss) differ depending on the LCD screen or in the display window. c Use an "InfoLITHIUM" battery pack. (p. 197) • Moisture condensation has occurred. Five-digit display C:04:ss C:21:ss ... your camcorder. • A malfunction that you are unable to acclimatize. (p. 202) • The video heads are using the cleaning cassette (optional). (p. 203) • A malfunction other than the above that...if you try corrective actions a few times, contact your Sony dealer or local authorized Sony service facility and inform them of the 5-digit code. (example: E:61:10) If you can ...


