
Camera Operations Guide
Page 3
...from what you insert the connector plug forcibly in a particular installation. Take pictures of the sun only in color) that appear constantly on the LCD screen and the viewfinder. CAUTION You are cautioned that any changes or modifications not... CCD-TRV428: TRV428 DCR-TRV260: TRV260 DCR-TRV265: TRV265 Instructions with specific model names are manufactured using a digital still camera, and thus may cause harmful interference to the copyright laws. Unauthorized recording of your camcorder to other device Before connecting your camcorder. • The illustrations...
...from what you insert the connector plug forcibly in a particular installation. Take pictures of the sun only in color) that appear constantly on the LCD screen and the viewfinder. CAUTION You are cautioned that any changes or modifications not... CCD-TRV428: TRV428 DCR-TRV260: TRV260 DCR-TRV265: TRV265 Instructions with specific model names are manufactured using a digital still camera, and thus may cause harmful interference to the copyright laws. Unauthorized recording of your camcorder to other device Before connecting your camcorder. • The illustrations...
Camera Operations Guide
Page 5
...pictures ( TRV128/228/328/428 25 Recording still images - Table of a scene - Easy Handycam 26 Adjusting the exposure 27 Adjusting the exposure for a longer time 23 Using zoom ...23 Using the built-in light 23 Recording in and out of Contents CCD-TRV128: CCD-TRV228: TRV128 CCD-TRV428: TRV428 TRV228 DCR-TRV260: TRV260... the viewfinder 16 Step 5: Setting the date and time 17 Step 6: Inserting a cassette tape 18 Step 7: Setting the screen language 19 Recording Recording movies 21 Recording for backlit subjects 27 Adjusting the exposure manually 28 Recording in dark places -
...pictures ( TRV128/228/328/428 25 Recording still images - Table of a scene - Easy Handycam 26 Adjusting the exposure 27 Adjusting the exposure for a longer time 23 Using zoom ...23 Using the built-in light 23 Recording in and out of Contents CCD-TRV128: CCD-TRV228: TRV128 CCD-TRV428: TRV428 TRV228 DCR-TRV260: TRV260... the viewfinder 16 Step 5: Setting the date and time 17 Step 6: Inserting a cassette tape 18 Step 7: Setting the screen language 19 Recording Recording movies 21 Recording for backlit subjects 27 Adjusting the exposure manually 28 Recording in dark places -
Camera Operations Guide
Page 6
Photo scan 42 6 Date search 41 Searching for a desired scene - Easy Handycam 36 Various playback functions 37 Displaying the screen indicators 37 Displaying the date/time and camera settings data - Zero set memory 40 Searching for a scene by date of the ...ease - Superimposing a title 31 Searching for the last scene of recording - END SEARCH 33 Playback Viewing pictures recorded on a tape for playback ( TRV265 40 Searching quickly for a still image - Data code ( TRV260/265 37 Playing the picture on a TV 39 Locating a scene on a tape 34 Playing back in sequence -
Photo scan 42 6 Date search 41 Searching for a desired scene - Easy Handycam 36 Various playback functions 37 Displaying the screen indicators 37 Displaying the date/time and camera settings data - Zero set memory 40 Searching for a scene by date of the ...ease - Superimposing a title 31 Searching for the last scene of recording - END SEARCH 33 Playback Viewing pictures recorded on a tape for playback ( TRV265 40 Searching quickly for a still image - Data code ( TRV260/265 37 Playing the picture on a TV 39 Locating a scene on a tape 34 Playing back in sequence -
Camera Operations Guide
Page 9
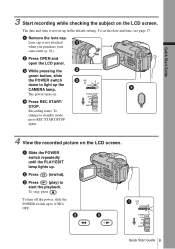
... the CAMERA lamp. Recording starts. c Press (play) to standby mode, press REC START/STOP again. 4 View the recorded picture on . To stop, press . a Remove the lens cap. The power turns on the LCD screen. To change to start the playback. a Slide the POWER switch repeatedly until the PLAY/EDIT lamp lights up.... Quick Start Guide 9 To set up . b Press OPEN and open the LCD panel. Quick Start Guide 3 Start recording while checking the subject on the LCD screen. The date and time is not attached when you purchase your camcorder (p. 91).
... the CAMERA lamp. Recording starts. c Press (play) to standby mode, press REC START/STOP again. 4 View the recorded picture on . To stop, press . a Remove the lens cap. The power turns on the LCD screen. To change to start the playback. a Slide the POWER switch repeatedly until the PLAY/EDIT lamp lights up.... Quick Start Guide 9 To set up . b Press OPEN and open the LCD panel. Quick Start Guide 3 Start recording while checking the subject on the LCD screen. The date and time is not attached when you purchase your camcorder (p. 91).

Camera Operations Guide
Page 15
... conditions. - To enter the recording or playing mode, slide the switch repeatedly until the respective lamp for the first time, the [CLOCK SET] screen appears (p. 17). Getting started 15 Step 3: Turning the power on You need to slide the POWER switch repeatedly to select the desired power mode ... if its charge even when it while connected to record or play or edit pictures on . While you do not want the battery to your camcorder as the power source when you are using this camcorder for the desired power mode lights up to it is not attached correctly. - The battery...
... conditions. - To enter the recording or playing mode, slide the switch repeatedly until the respective lamp for the first time, the [CLOCK SET] screen appears (p. 17). Getting started 15 Step 3: Turning the power on You need to slide the POWER switch repeatedly to select the desired power mode ... if its charge even when it while connected to record or play or edit pictures on . While you do not want the battery to your camcorder as the power source when you are using this camcorder for the desired power mode lights up to it is not attached correctly. - The battery...

Camera Operations Guide
Page 16
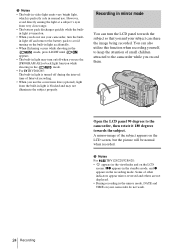
...the brightness by selecting [LCD B.L.] in the (LCD SET) menu (p. 53). • The recorded picture will not be affected by this setting. • You can view images using the viewfinder when you... the LCD panel. SEL/PUSH EXEC dial Open the LCD panel 90 degrees to the camcorder, then rotate it to see. Adjusting the viewfinder Maximum 180 degrees Maximum 90 degrees You... the dial. 5 Press MENU. z Tips • If you can check the subject on the LCD screen during recording by setting [BEEP] in the (OTHERS) menu to meet various recording situations. Viewfinder lens adjustment...
...the brightness by selecting [LCD B.L.] in the (LCD SET) menu (p. 53). • The recorded picture will not be affected by this setting. • You can view images using the viewfinder when you... the LCD panel. SEL/PUSH EXEC dial Open the LCD panel 90 degrees to the camcorder, then rotate it to see. Adjusting the viewfinder Maximum 180 degrees Maximum 90 degrees You... the dial. 5 Press MENU. z Tips • If you can check the subject on the LCD screen during recording by setting [BEEP] in the (OTHERS) menu to meet various recording situations. Viewfinder lens adjustment...
Camera Operations Guide
Page 22
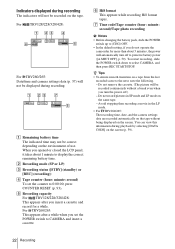
... battery power ([A.SHUT OFF], p. 59). Do not remove the cassette. (The picture will be correct depending on the screen (p. 59). 22 Recording For TRV128/228/328/428: 1 23 4 60min SP REC 0:00:00 6 5 For TRV260/265: Date/time and camera settings data (p. 37) will not be displayed during...break even when you do not operate the camcorder for a while. z Tips • To ensure smooth transition on the same tape. - You can view this information during playback by selecting [DATA CODE] on the environment of use. For TRV260/265: This appears after you opened or closed...
... battery power ([A.SHUT OFF], p. 59). Do not remove the cassette. (The picture will be correct depending on the screen (p. 59). 22 Recording For TRV128/228/328/428: 1 23 4 60min SP REC 0:00:00 6 5 For TRV260/265: Date/time and camera settings data (p. 37) will not be displayed during...break even when you do not operate the camcorder for a while. z Tips • To ensure smooth transition on the same tape. - You can view this information during playback by selecting [DATA CODE] on the environment of use. For TRV260/265: This appears after you opened or closed...
Camera Operations Guide
Page 24
...-image of small children attracted to the camcorder while you and your subject can turn the LCD panel towards the subject. b Notes For TRV128/228/328/428: • appears in the viewfinder and on the LCD screen, but the picture will be normal when recorded. in light is turned on /off when ...you use the [PROGRAM AE] or back light function while shooting in the mode. • For TRV260/265: The built-in light is turned off and remove the battery pack to the camcorder, then rotate...
...-image of small children attracted to the camcorder while you and your subject can turn the LCD panel towards the subject. b Notes For TRV128/228/328/428: • appears in the viewfinder and on the LCD screen, but the picture will be normal when recorded. in light is turned on /off when ...you use the [PROGRAM AE] or back light function while shooting in the mode. • For TRV260/265: The built-in light is turned off and remove the battery pack to the camcorder, then rotate...

Camera Operations Guide
Page 25
... the date and time on the picture. To hide the date and time, press DATE and/or TIME again. Recording still images - Press DATE (or TIME), then press TIME (or DATE) to the grip belt. Set the date and time to 7 in the black screen as the background for about 10 ... steps 1 to your camcorder, the clock is not set up yet. When you do not record the date and time in the picture, record the date and time in "Getting started" (p. 11 - Tape photo recording ( TRV260/265) You can record the date and/or time displayed on the screen superimposed on pictures ( TRV128/228/328...
... the date and time on the picture. To hide the date and time, press DATE and/or TIME again. Recording still images - Press DATE (or TIME), then press TIME (or DATE) to the grip belt. Set the date and time to 7 in the black screen as the background for about 10 ... steps 1 to your camcorder, the clock is not set up yet. When you do not record the date and time in the picture, record the date and time in "Getting started" (p. 11 - Tape photo recording ( TRV260/265) You can record the date and/or time displayed on the screen superimposed on pictures ( TRV128/228/328...
Camera Operations Guide
Page 26
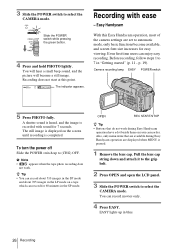
...for 7 seconds. OPEN REC START/STOP z Tip • Buttons that are displayed when MENU is pressed. 1 Remove the lens cap. Easy Handycam With this point. 60min CAPTURE The indicator appears. Before recording, follow steps 1 to select the CAMERA mode. A shutter sound is heard, ...completed. The still image is displayed on your camcorder. p. 19). Slide the POWER switch while pressing the green button. 4 Press and hold PHOTO lightly. You will hear a small beep sound, and the picture will become available, and screen font size increases for easy viewing. Pull ...
...for 7 seconds. OPEN REC START/STOP z Tip • Buttons that are displayed when MENU is pressed. 1 Remove the lens cap. Easy Handycam With this point. 60min CAPTURE The indicator appears. Before recording, follow steps 1 to select the CAMERA mode. A shutter sound is heard, ...completed. The still image is displayed on your camcorder. p. 19). Slide the POWER switch while pressing the green button. 4 Press and hold PHOTO lightly. You will hear a small beep sound, and the picture will become available, and screen font size increases for easy viewing. Pull ...
Camera Operations Guide
Page 28
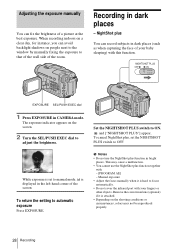
...the shooting conditions or circumstances, colors may cause a malfunction. • You cannot use the NightShot plus You can fix the brightness of a picture at the best exposure. EXPOSURE SEL/PUSH EXEC dial 1 Press EXPOSURE in dark places - The exposure indicator appears on people next to the ... appear. Set the NIGHTSHOT PLUS switch to adjust the brightness. While exposure is displayed in the left-hand corner of the screen. This may not be reproduced properly. 28 Recording When recording indoors on a clear day, for instance, you can avoid backlight shadows on the...
...the shooting conditions or circumstances, colors may cause a malfunction. • You cannot use the NightShot plus You can fix the brightness of a picture at the best exposure. EXPOSURE SEL/PUSH EXEC dial 1 Press EXPOSURE in dark places - The exposure indicator appears on people next to the ... appear. Set the NIGHTSHOT PLUS switch to adjust the brightness. While exposure is displayed in the left-hand corner of the screen. This may not be reproduced properly. 28 Recording When recording indoors on a clear day, for instance, you can avoid backlight shadows on the...
Camera Operations Guide
Page 35
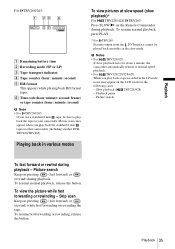
... (hour: minute: second) b Note • For TRV260/265: If you use a standard 8 mm tape, be played back smoothly in various modes To view pictures at slow speed (slow playback)* For TRV228/428/ TRV265: Press SLOW y on other camcorders (including another DCRTRV260/TRV265). Playing back in the slow mode... may appear when you play back the tape on the LCD screen in the LP mode, noise may appear on your camcorder. To resume normal playback, release the button. To view the picture while fast forwarding or rewinding - Picture search Keep on pressing (fast forward) or (rewind) while ...
... (hour: minute: second) b Note • For TRV260/265: If you use a standard 8 mm tape, be played back smoothly in various modes To view pictures at slow speed (slow playback)* For TRV228/428/ TRV265: Press SLOW y on other camcorders (including another DCRTRV260/TRV265). Playing back in the slow mode... may appear when you play back the tape on the LCD screen in the LP mode, noise may appear on your camcorder. To resume normal playback, release the button. To view the picture while fast forwarding or rewinding - Picture search Keep on pressing (fast forward) or (rewind) while ...
Camera Operations Guide
Page 37
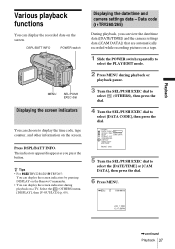
...- Data code ( TRV260/265) During playback, you press the button. Select the (OTHERS) menu, [DISPLAY], then [V-OUT/LCD] (p. 60). OTHERS DATA CODE OFF WORLD TIME DATE/TIME BEEP CAM DATA A. z Tips • For TRV228/428/ TRV265: You can display the screen indicators by pressing DISPLAY.../BATT INFO POWER switch MENU SEL/PUSH EXEC dial Displaying the screen indicators You can view the date/time data ([DATE/TIME]) and the camera settings data ([CAM DATA]) that are automatically recorded while recording pictures on a TV. The indicators appear/disappear as you can choose...
...- Data code ( TRV260/265) During playback, you press the button. Select the (OTHERS) menu, [DISPLAY], then [V-OUT/LCD] (p. 60). OTHERS DATA CODE OFF WORLD TIME DATE/TIME BEEP CAM DATA A. z Tips • For TRV228/428/ TRV265: You can display the screen indicators by pressing DISPLAY.../BATT INFO POWER switch MENU SEL/PUSH EXEC dial Displaying the screen indicators You can view the date/time data ([DATE/TIME]) and the camera settings data ([CAM DATA]) that are automatically recorded while recording pictures on a TV. The indicators appear/disappear as you can choose...
Camera Operations Guide
Page 40
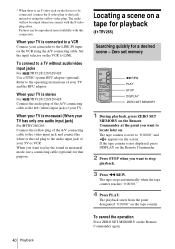
... The tape stops automatically when the tape counter reaches "0:00:00." 4 Press PLAY. Pictures can be output when you want to play the sound in monaural mode, use a... a desired scene - To connect to "0:00:00" and appears on the screen. To cancel the operation Press ZERO SET MEMORY on the tape counter. When ... tape for playback ( TRV265) Searching quickly for that jack instead of your camcorder to the LINE IN input on the VCR using the yellow video plug. ... monaural (When your TV has only one audio input jack) For TRV260/265: Connect the yellow plug of the A/V connecting cable to the...
... The tape stops automatically when the tape counter reaches "0:00:00." 4 Press PLAY. Pictures can be output when you want to play the sound in monaural mode, use a... a desired scene - To connect to "0:00:00" and appears on the screen. To cancel the operation Press ZERO SET MEMORY on the tape counter. When ... tape for playback ( TRV265) Searching quickly for that jack instead of your camcorder to the LINE IN input on the VCR using the yellow video plug. ... monaural (When your TV has only one audio input jack) For TRV260/265: Connect the yellow plug of the A/V connecting cable to the...
Camera Operations Guide
Page 44
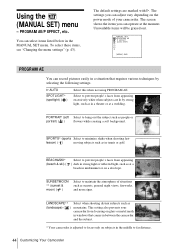
...The default settings are lit by selecting the following settings. The screen shows the items you can operate at a wedding. Select to...( ) flowers while creating a soft background. SPORTS* (sports Select to maintain the atmosphere of your camcorder from appearing ) dark in windows that requires various techniques by strong light, such as sunsets, general night... Select to prevent people's faces from appearing excessively white when subjects are marked with G. You can record pictures easily in a situation that comes in tennis or golf. MANUAL SET PROGRAM AE P EFFECT AUTO SHTR ...
...The default settings are lit by selecting the following settings. The screen shows the items you can operate at a wedding. Select to...( ) flowers while creating a soft background. SPORTS* (sports Select to maintain the atmosphere of your camcorder from appearing ) dark in windows that requires various techniques by strong light, such as sunsets, general night... Select to prevent people's faces from appearing excessively white when subjects are marked with G. You can record pictures easily in a situation that comes in tennis or golf. MANUAL SET PROGRAM AE P EFFECT AUTO SHTR ...
Camera Operations Guide
Page 47
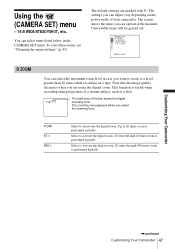
...in the CAMERA SET menu. The right side of your camcorder. Up to 20 times zoom is useful when recording enlarged pictures of a distant subject, such as a bird. Customizing Your Camcorder ,continued Customizing Your Camcorder 47 The screen shows the items you are marked with G. L I ...DE STEADYSHOT N. This function is performed optically. The zooming zone appears when you want to zoom to activate the digital ...
...in the CAMERA SET menu. The right side of your camcorder. Up to 20 times zoom is useful when recording enlarged pictures of a distant subject, such as a bird. Customizing Your Camcorder ,continued Customizing Your Camcorder 47 The screen shows the items you are marked with G. L I ...DE STEADYSHOT N. This function is performed optically. The zooming zone appears when you want to zoom to activate the digital ...
Camera Operations Guide
Page 48
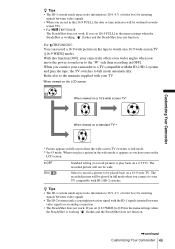
... you play back on a 16:9 wide TV. 48 Customizing Your Camcorder GOFF Standard setting (to record pictures to be wide. The recorded picture will not be played back on a 4:3 TV). Refer also to watch on the 16:9 wide-screen TV. CINEMA ( ) Select to record a picture to be played back in CINEMA mode. 16:9 FULL ( ) Select...
... you play back on a 16:9 wide TV. 48 Customizing Your Camcorder GOFF Standard setting (to record pictures to be wide. The recorded picture will not be played back on a 4:3 TV). Refer also to watch on the 16:9 wide-screen TV. CINEMA ( ) Select to record a picture to be played back in CINEMA mode. 16:9 FULL ( ) Select...
Camera Operations Guide
Page 49
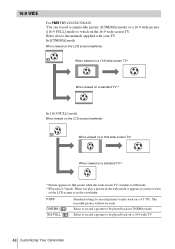
... not work . For TRV260/265: You can record a 16:9 wide picture on the tape to watch on a standard TV** * Picture appears in full screen when the wide-screen TV switches to full mode automatically. When viewed on the LCD screen When viewed on a 16:9 wide screen TV* Customizing Your Camcorder When viewed on a 16:9 wide-screen TV ([16:9 WIDE...
... not work . For TRV260/265: You can record a 16:9 wide picture on the tape to watch on a standard TV** * Picture appears in full screen when the wide-screen TV switches to full mode automatically. When viewed on the LCD screen When viewed on a 16:9 wide screen TV* Customizing Your Camcorder When viewed on a 16:9 wide-screen TV ([16:9 WIDE...
Camera Operations Guide
Page 53
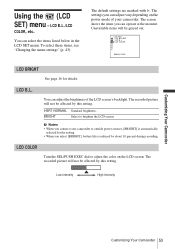
... in the LCD SET menu. Low intensity High intensity Customizing Your Camcorder Customizing Your Camcorder 53 The recorded picture will not be affected by this setting. You can adjust the brightness of your camcorder to brighten the LCD screen. LCD B.L. GBRT NORMAL Standard brightness. The screen shows the items you can operate at the moment. LCD...
... in the LCD SET menu. Low intensity High intensity Customizing Your Camcorder Customizing Your Camcorder 53 The recorded picture will not be affected by this setting. You can adjust the brightness of your camcorder to brighten the LCD screen. LCD B.L. GBRT NORMAL Standard brightness. The screen shows the items you can operate at the moment. LCD...
Camera Operations Guide
Page 75
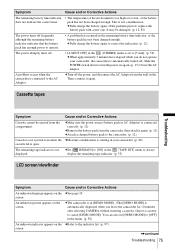
... has not been charged enough. display the remaining tape indicator. (p. 55) LCD screen/viewfinder Symptom Cause and/or Corrective Actions An unknown language appears on the screen. An unknown picture appears on the cSee page 19. cThe camcorder is in your camcorder, the camcorder is connected to always displayed. It may be ejected from the compartment...
... has not been charged enough. display the remaining tape indicator. (p. 55) LCD screen/viewfinder Symptom Cause and/or Corrective Actions An unknown language appears on the screen. An unknown picture appears on the cSee page 19. cThe camcorder is in your camcorder, the camcorder is connected to always displayed. It may be ejected from the compartment...


