Operating Instructions
Page 7
...Quick Reference Identifying parts and controls 209 Index 219 7 For Macintosh users (except DCR-TRV16 173 Capturing images from a tape - Signal convert function 174 Customizing Your Camcorder Changing the menu settings 175 Troubleshooting Types of contents Recording moving pictures on a "... the USB cable - For Windows users 157 Viewing images recorded on a "Memory Stick" with your computer - SLIDE SHOW 147 Preventing accidental erasure - For Macintosh users (except DCR-TRV16 171 Viewing images recorded on a "Memory Stick" - Digital program editing (on "Memory Stick...
...Quick Reference Identifying parts and controls 209 Index 219 7 For Macintosh users (except DCR-TRV16 173 Capturing images from a tape - Signal convert function 174 Customizing Your Camcorder Changing the menu settings 175 Troubleshooting Types of contents Recording moving pictures on a "... the USB cable - For Windows users 157 Viewing images recorded on a "Memory Stick" with your computer - SLIDE SHOW 147 Preventing accidental erasure - For Macintosh users (except DCR-TRV16 171 Viewing images recorded on a "Memory Stick" - Digital program editing (on "Memory Stick...
Operating Instructions
Page 8
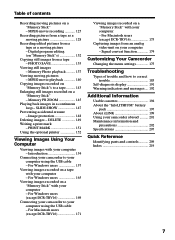
... chapter introduces you to the basic features to insert the cassette. Quick Start Guide AC power adaptor (supplied) Connect the plug with the window facing up . After the cassette compartment goes down completely, close the lid until it clicks. 8 Connecting the power cord (p. 22) ...Use the battery pack when using your camcorder. Insert the cassette straight as far as possible into the cassette compartment with its v mark facing up . 3 Close the cassette compartment by ...
... chapter introduces you to the basic features to insert the cassette. Quick Start Guide AC power adaptor (supplied) Connect the plug with the window facing up . After the cassette compartment goes down completely, close the lid until it clicks. 8 Connecting the power cord (p. 22) ...Use the battery pack when using your camcorder. Insert the cassette straight as far as possible into the cassette compartment with its v mark facing up . 3 Close the cassette compartment by ...
Operating Instructions
Page 14
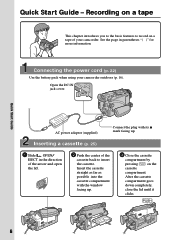
... the manufacturing process and do not affect the recording in the sun or under direct sunlight [b]. •Be careful when placing the camera near a window or outdoors. Take pictures of the pixels are operational for long periods may cause malfunctions [c]. •Do not directly shoot the sun. However, there... Lens and LCD screen/finder (on the LCD screen and the finder. Keep your camcorder to direct sunlight for effective use. Letting your camcorder become wet. Using this malfunction cannot be some tiny black points and/or bright points (white, red, blue or green in color) that ...
... the manufacturing process and do not affect the recording in the sun or under direct sunlight [b]. •Be careful when placing the camera near a window or outdoors. Take pictures of the pixels are operational for long periods may cause malfunctions [c]. •Do not directly shoot the sun. However, there... Lens and LCD screen/finder (on the LCD screen and the finder. Keep your camcorder to direct sunlight for effective use. Letting your camcorder become wet. Using this malfunction cannot be some tiny black points and/or bright points (white, red, blue or green in color) that ...
Operating Instructions
Page 17
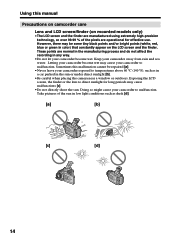
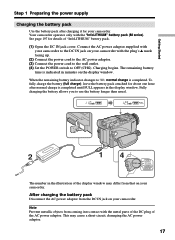
... battery pack after normal charge is completed until FULL appears in minutes on the display window. See page 197 for your camcorder. Connect the AC power adaptor supplied with your camcorder. Note Prevent metallic objects from that on your camcorder to OFF (CHG). The remaining battery time is completed. When the remaining battery indicator...
... battery pack after normal charge is completed until FULL appears in minutes on the display window. See page 197 for your camcorder. Connect the AC power adaptor supplied with your camcorder. Note Prevent metallic objects from that on your camcorder to OFF (CHG). The remaining battery time is completed. When the remaining battery indicator...

Operating Instructions
Page 18
...The charging time may increase if the battery's temperature is extremely high or low because of the ambient temperature. *1) DCR-TRV16/TRV18 supplied *2) DCR-TRV25/TRV27 supplied 18 min" appears in the display window indicates the approximate recording time when recording using the AC power adaptor, if any trouble occurs with this unit, disconnect... (77°F) to cut off the power. Step 1 Preparing the power supply Remaining battery time indicator The remaining battery time indicator in the display window. Until your camcorder calculates the actual remaining battery time "- - - -
...The charging time may increase if the battery's temperature is extremely high or low because of the ambient temperature. *1) DCR-TRV16/TRV18 supplied *2) DCR-TRV25/TRV27 supplied 18 min" appears in the display window indicates the approximate recording time when recording using the AC power adaptor, if any trouble occurs with this unit, disconnect... (77°F) to cut off the power. Step 1 Preparing the power supply Remaining battery time indicator The remaining battery time indicator in the display window. Until your camcorder calculates the actual remaining battery time "- - - -
Operating Instructions
Page 25
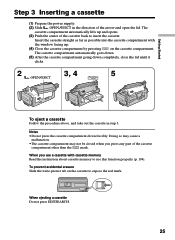
... the cassette straight as far as possible into the cassette compartment with cassette memory Read the instruction about cassette memory to use a cassette with the window facing up and opens. (3) Push the center of the cassette compartment other than the mark. The cassette compartment automatically goes down. (5) After the cassette compartment...
... the cassette straight as far as possible into the cassette compartment with cassette memory Read the instruction about cassette memory to use a cassette with the window facing up and opens. (3) Push the center of the cassette compartment other than the mark. The cassette compartment automatically goes down. (5) After the cassette compartment...
Operating Instructions
Page 58
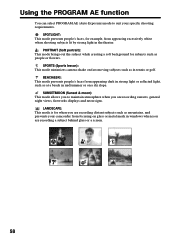
LANDSCAPE: This mode is for example, from appearing excessively white when shooting subjects lit by strong light in windows when you are recording a subject behind glass or a screen. 58 SPOTLIGHT: This mode prevents people's faces, for when you are recording distant subjects ...while creating a soft background for subjects such as at a beach in tennis or golf. SUNSETMOON (Sunset & moon): This mode allows you to suit your camcorder from appearing dark in strong light or reflected light, such as people or flowers. BEACH&SKI: This mode prevents people's faces from focusing on a ski...
LANDSCAPE: This mode is for example, from appearing excessively white when shooting subjects lit by strong light in windows when you are recording a subject behind glass or a screen. 58 SPOTLIGHT: This mode prevents people's faces, for when you are recording distant subjects ...while creating a soft background for subjects such as at a beach in tennis or golf. SUNSETMOON (Sunset & moon): This mode allows you to suit your camcorder from appearing dark in strong light or reflected light, such as people or flowers. BEACH&SKI: This mode prevents people's faces from focusing on a ski...
Operating Instructions
Page 106
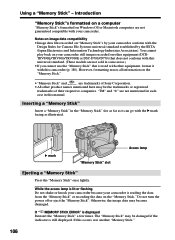
..." and are not mentioned in each case in the "Memory Stick" slot as far as illustrated. However, formatting erases all information on Windows OS or Macintosh computers are not sold in some areas.) •If you cannot use another "Memory Stick." 106 Inserting a "Memory ... trademarks or registered trademarks of Sony Corporation. •All other equipment, format it with the Design Rules for Camera File Systems universal standard established by your camcorder is lit or flashing Do not shake or knock your camcorder because your camcorder conform with this occurs, use...
..." and are not mentioned in each case in the "Memory Stick" slot as far as illustrated. However, formatting erases all information on Windows OS or Macintosh computers are not sold in some areas.) •If you cannot use another "Memory Stick." 106 Inserting a "Memory ... trademarks or registered trademarks of Sony Corporation. •All other equipment, format it with the Design Rules for Camera File Systems universal standard established by your camcorder is lit or flashing Do not shake or knock your camcorder because your camcorder conform with this occurs, use...
Operating Instructions
Page 155
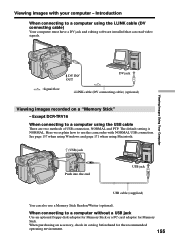
Except DCR-TRV16 When connecting to a computer without a USB jack Use an optional floppy disk adaptor for Memory Stick or a PC...Macintosh. (USB) jack Push into the end USB jack USB cable (supplied) You can read video signals. See page 157 when using Windows and page 171 when using the USB cable There are two methods of USB connection, NORMAL and PTP. When purchasing an accessory, check ...i.LINK cable (DV connecting cable) Your computer must have a DV jack and editing software installed that can also use the camcorder with your computer - Viewing images with NORMAL USB connection.
Except DCR-TRV16 When connecting to a computer without a USB jack Use an optional floppy disk adaptor for Memory Stick or a PC...Macintosh. (USB) jack Push into the end USB jack USB cable (supplied) You can read video signals. See page 157 when using Windows and page 171 when using the USB cable There are two methods of USB connection, NORMAL and PTP. When purchasing an accessory, check ...i.LINK cable (DV connecting cable) Your computer must have a DV jack and editing software installed that can also use the camcorder with your computer - Viewing images with NORMAL USB connection.
Operating Instructions
Page 157
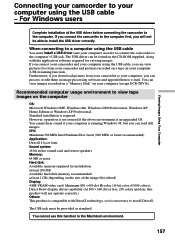
... cannot hear sound if your computer is an upgraded OS. If you connect your camcorder and your computer in order to connect the camcorder to install the USB driver correctly. Recommended computer usage environment to install DirectX. The...Windows 98, but you can read still images. Standard installation is necessary to view tape images on your computer (except DCR-TRV16). Furthermore, if you download pictures from your camcorder and pictures recorded on a tape on the computer OS: Microsoft Windows 98SE, Windows Me, Windows 2000 Professional, Windows XP Home Edition or Windows...
... cannot hear sound if your computer is an upgraded OS. If you connect your camcorder and your computer in order to connect the camcorder to install the USB driver correctly. Recommended computer usage environment to install DirectX. The...Windows 98, but you can read still images. Standard installation is necessary to view tape images on your computer (except DCR-TRV16). Furthermore, if you download pictures from your camcorder and pictures recorded on a tape on the computer OS: Microsoft Windows 98SE, Windows Me, Windows 2000 Professional, Windows XP Home Edition or Windows...
Operating Instructions
Page 158
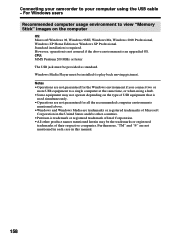
... computer environments mentioned above environment is not assured if the above . •Windows and Windows Media are trademarks or registered trademarks of their respective companies. However, operation is an upgraded OS. Windows Media Player must be provided as standard. CPU: MMX Pentium 200 MHz or...158 Furthermore, "TM" and "®" are not guaranteed for the Windows environment if you connect two or more USB equipment to a single computer at the same time, or when using the USB cable - Connecting your camcorder to your computer using a hub. •Some equipment may be...
... computer environments mentioned above environment is not assured if the above . •Windows and Windows Media are trademarks or registered trademarks of their respective companies. However, operation is an upgraded OS. Windows Media Player must be provided as standard. CPU: MMX Pentium 200 MHz or...158 Furthermore, "TM" and "®" are not guaranteed for the Windows environment if you connect two or more USB equipment to a single computer at the same time, or when using the USB cable - Connecting your camcorder to your computer using a hub. •Some equipment may be...
Operating Instructions
Page 159
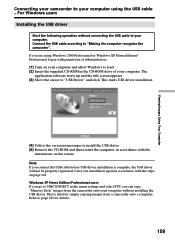
...select PTP, you are using the USB cable - Viewing Images Using Your Computer Connecting your camcorder to your computer without connecting the USB cable to your computer. Windows XP Home Edition/Professional users If you go to USBCONNECT in the CD-ROM drive of ...starts USB driver installation. (4) Follow the on-screen messages to page 183 for simply copying images from the camcorder onto your computer using Windows 2000 Professional or Windows XP Home Edition/ Professional, log in accordance with permission of your computer. This is complete, the USB driver...
...select PTP, you are using the USB cable - Viewing Images Using Your Computer Connecting your camcorder to your computer without connecting the USB cable to your computer. Windows XP Home Edition/Professional users If you go to USBCONNECT in the CD-ROM drive of ...starts USB driver installation. (4) Follow the on-screen messages to page 183 for simply copying images from the camcorder onto your computer using Windows 2000 Professional or Windows XP Home Edition/ Professional, log in accordance with permission of your computer. This is complete, the USB driver...
Operating Instructions
Page 160
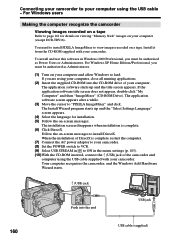
...-click "My Computer" and then "ImageMixer" (CD-ROM Drive). Your computer recognizes the camcorder, and the Windows Add Hardware Wizard starts. (USB) jack Push into the CD-ROM drive of your camcorder. Connecting your camcorder to your computer (except DCR-TRV16). For Windows XP Home Edition/Professional, you are using the USB cable - The Install Wizard...
...-click "My Computer" and then "ImageMixer" (CD-ROM Drive). Your computer recognizes the camcorder, and the Windows Add Hardware Wizard starts. (USB) jack Push into the CD-ROM drive of your camcorder. Connecting your camcorder to your computer (except DCR-TRV16). For Windows XP Home Edition/Professional, you are using the USB cable - The Install Wizard...
Operating Instructions
Page 161
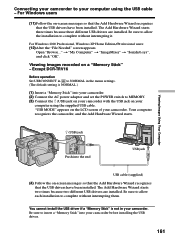
...Add Hardware Wizard recognizes that the USB drivers have been installed. Be sure to insert a "Memory Stick" into your camcorder. (2) Connect the AC power adaptor and set the POWER switch to NORMAL in the menu settings. (The default setting is not in .... Except DCR-TRV16 Before operation Set USBCONNECT in to MEMORY. (3) Connect the (USB) jack on your camcorder. For Windows users (11) Follow the on your camcorder before installing the USB driver. 161 Your computer recognizes the camcorder, and the Add Hardware Wizard starts. For Windows 2000 Professional, Windows XP Home...
...Add Hardware Wizard recognizes that the USB drivers have been installed. Be sure to insert a "Memory Stick" into your camcorder. (2) Connect the AC power adaptor and set the POWER switch to NORMAL in the menu settings. (The default setting is not in .... Except DCR-TRV16 Before operation Set USBCONNECT in to MEMORY. (3) Connect the (USB) jack on your camcorder. For Windows users (11) Follow the on your camcorder before installing the USB driver. 161 Your computer recognizes the camcorder, and the Add Hardware Wizard starts. For Windows 2000 Professional, Windows XP Home...
Operating Instructions
Page 162
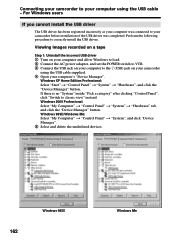
...the AC power adaptor, and set the POWER switch to VCR. 3 Connect the USB jack on your computer to the (USB) jack on your camcorder using the USB cable supplied. 4 Open your computer using the USB cable - If there is no "System" inside "Pick a category" after ..."System" t "Hardware" tab, and click the "Device Manager" button. Perform the following procedure to classic view" instead. Connecting your camcorder to your computer's "Device Manager". For Windows users If you cannot install the USB driver The USB driver has been registered incorrectly as your computer was connected to your...
...the AC power adaptor, and set the POWER switch to VCR. 3 Connect the USB jack on your computer to the (USB) jack on your camcorder using the USB cable supplied. 4 Open your computer using the USB cable - If there is no "System" inside "Pick a category" after ..."System" t "Hardware" tab, and click the "Device Manager" button. Perform the following procedure to classic view" instead. Connecting your camcorder to your computer's "Device Manager". For Windows users If you cannot install the USB driver The USB driver has been registered incorrectly as your computer was connected to your...
Operating Instructions
Page 163
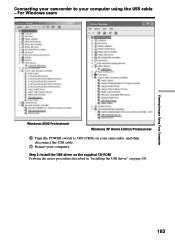
For Windows users Viewing Images Using Your Computer Windows 2000 Professional Windows XP Home Edition/Professional 6 Turn the POWER switch to your computer. Step 2: Install the USB driver on the supplied CD-ROM Perform the entire procedure described in "Installing the USB driver" on your camcorder, and then disconnect the USB cable. 7 Restart your computer using the USB cable - Connecting your camcorder to OFF (CHG) on page 159. 163
For Windows users Viewing Images Using Your Computer Windows 2000 Professional Windows XP Home Edition/Professional 6 Turn the POWER switch to your computer. Step 2: Install the USB driver on the supplied CD-ROM Perform the entire procedure described in "Installing the USB driver" on your camcorder, and then disconnect the USB cable. 7 Restart your computer using the USB cable - Connecting your camcorder to OFF (CHG) on page 159. 163
Operating Instructions
Page 164
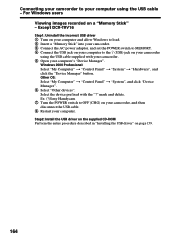
..."Device Manager". 6 Select "Other devices". Windows 2000 Professional: Select "My Computer" t "Control Panel" t "System" t "Hardware", and click the "Device Manager" button. Select the device prefixed with your camcorder. 5 Open your computer's "Device Manager". mark and delete. Ex: (?)Sony Handycam 7 Turn the POWER switch to OFF (... to the (USB) jack on a "Memory Stick" - Except DCR-TRV16 Step1: Uninstall the incorrect USB driver 1 Turn on your computer and allow Windows to load. 2 Insert a "Memory Stick" into your camcorder. 3 Connect the AC power adaptor, and set the POWER switch ...
..."Device Manager". 6 Select "Other devices". Windows 2000 Professional: Select "My Computer" t "Control Panel" t "System" t "Hardware", and click the "Device Manager" button. Select the device prefixed with your camcorder. 5 Open your computer's "Device Manager". mark and delete. Ex: (?)Sony Handycam 7 Turn the POWER switch to OFF (... to the (USB) jack on a "Memory Stick" - Except DCR-TRV16 Step1: Uninstall the incorrect USB driver 1 Turn on your computer and allow Windows to load. 2 Insert a "Memory Stick" into your camcorder. 3 Connect the AC power adaptor, and set the POWER switch ...

Operating Instructions
Page 165
For Windows XP Home Edition/Professional, you must be authorized as Administrators. Viewing Images Using Your Computer The "PIXELA ImageMixer Ver.1.0 for Sony" startup screen appears on your camcorder. (3) Set the POWER switch to load. (2) Connect the AC power adaptor, and insert a tape into your computer.... The title screen is displayed. (6) Select . To install and use this software in Windows 2000 Professional, you...
For Windows XP Home Edition/Professional, you must be authorized as Administrators. Viewing Images Using Your Computer The "PIXELA ImageMixer Ver.1.0 for Sony" startup screen appears on your camcorder. (3) Set the POWER switch to load. (2) Connect the AC power adaptor, and insert a tape into your computer.... The title screen is displayed. (6) Select . To install and use this software in Windows 2000 Professional, you...
Operating Instructions
Page 166
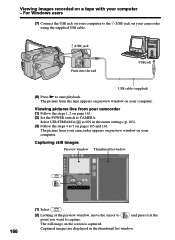
...are displayed in the menu settings (p. 183). (3) Follow the steps 4 to CAMERA. The picture from the tape appears on preview window on your computer. The picture from your camcorder (1) Follow the steps 1, 2 on page 165. (2) Set the POWER switch to 7 on your computer to capture. The ...Select USB STREAM in to ON in the thumbnail list window. Viewing pictures live from your camcorder appears on preview window on your computer. Capturing still images Preview window Thumbnail list widow 166 (1) Select . (2) Looking at the preview window, move the cursor to and press it at the point...
...are displayed in the menu settings (p. 183). (3) Follow the steps 4 to CAMERA. The picture from the tape appears on preview window on your computer. The picture from your camcorder (1) Follow the steps 1, 2 on page 165. (2) Set the POWER switch to 7 on your computer to capture. The ...Select USB STREAM in to ON in the thumbnail list window. Viewing pictures live from your camcorder appears on preview window on your computer. Capturing still images Preview window Thumbnail list widow 166 (1) Select . (2) Looking at the preview window, move the cursor to and press it at the point...
Operating Instructions
Page 167
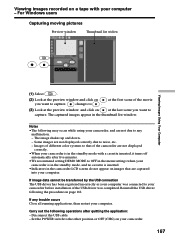
... to that of different color systems to capture. Images of the camcorder are not displayed correctly. •When your camcorder is in the thumbnail list window. Reinstall the USB driver following may occur while using your computer - For Windows users Capturing moving pictures Preview window Thumbnail list widow Viewing Images Using Your Computer (1) Select . (2) Look...
... to that of different color systems to capture. Images of the camcorder are not displayed correctly. •When your camcorder is in the thumbnail list window. Reinstall the USB driver following may occur while using your computer - For Windows users Capturing moving pictures Preview window Thumbnail list widow Viewing Images Using Your Computer (1) Select . (2) Look...


