PIXELA ImageMixer 1.0 Manual
Page 42
... to playback recorded sounds. Control panel From the control panel, you to record sounds using a microphone or other sound output devices (such as a TV, cassette tape player, etc.) connected to an audio input jack on your computer. Sound effects and narration can also use the control panel (shown below) to movies...
... to playback recorded sounds. Control panel From the control panel, you to record sounds using a microphone or other sound output devices (such as a TV, cassette tape player, etc.) connected to an audio input jack on your computer. Sound effects and narration can also use the control panel (shown below) to movies...
PIXELA ImageMixer 1.0 Manual
Page 44
Connect the microphone or other sound output device, such as a TV, cassette tape player, etc. Recording sound files while previewing movie images The audio format of digitally recorded files is PCM, the sampling rate is 44.1KHz, and the bit rate is WAVE. Select an album. Click the [Record] button. 4. In Windows, ...
Connect the microphone or other sound output device, such as a TV, cassette tape player, etc. Recording sound files while previewing movie images The audio format of digitally recorded files is PCM, the sampling rate is 44.1KHz, and the bit rate is WAVE. Select an album. Click the [Record] button. 4. In Windows, ...
PIXELA ImageMixer 1.0 Manual
Page 56
... camera to the IEEE1394 port on your PC and set in the mode you would normally use to view scenes already recorded on the tape inside the machine. That is a problem with the connection between the PC and the device is working properly: A blue monitor window is inactive (appears...directory,' (for capturing movie scenes) or 'Ready to the PC, or is ... If the digital video camera is not properly connected to capture still picture.' of free space in the information display panel will say "Camcorder Not Found." When a cassette is not present, the icon is displayed. Depending on your ...
... camera to the IEEE1394 port on your PC and set in the mode you would normally use to view scenes already recorded on the tape inside the machine. That is a problem with the connection between the PC and the device is working properly: A blue monitor window is inactive (appears...directory,' (for capturing movie scenes) or 'Ready to the PC, or is ... If the digital video camera is not properly connected to capture still picture.' of free space in the information display panel will say "Camcorder Not Found." When a cassette is not present, the icon is displayed. Depending on your ...
PIXELA ImageMixer 1.0 Manual
Page 140
... and pasting objects Deleting objects Transforming 3-D appearance of text objects (Win) Arranging and Editing Text Creating new text and arranging it as labels for video tapes, disks, etc. Double-click the [Layout Environment] Selector or Mode Select Bar. This button is not displayed when working with titles. You can also create...
... and pasting objects Deleting objects Transforming 3-D appearance of text objects (Win) Arranging and Editing Text Creating new text and arranging it as labels for video tapes, disks, etc. Double-click the [Layout Environment] Selector or Mode Select Bar. This button is not displayed when working with titles. You can also create...
PIXELA ImageMixer 1.0 Manual
Page 145
... on the layout. This is displayed. Select to start the layout in letter size. Click the [OK] button to display the layout types for VHS tape, 8mm tape, floppy disk, MD, DV cassette and CD labels. Select to select the desired layout type. Click to start the layout in A4 size. In...
... on the layout. This is displayed. Select to start the layout in letter size. Click the [OK] button to display the layout types for VHS tape, 8mm tape, floppy disk, MD, DV cassette and CD labels. Select to select the desired layout type. Click to start the layout in A4 size. In...
PIXELA ImageMixer 1.0 Manual
Page 146
...) postcard layout. Click it to be inserted into a movie media stream. Labels VHS 8mm FD MD DV cassette CD Create a VHS tape label. In Macintosh, the [Custom] button is displayed. Create a digital video camera cassette label. Create a CD jewel case insert. Layout will start using the selected paper size. Copyright © 2001...
...) postcard layout. Click it to be inserted into a movie media stream. Labels VHS 8mm FD MD DV cassette CD Create a VHS tape label. In Macintosh, the [Custom] button is displayed. Create a digital video camera cassette label. Create a CD jewel case insert. Layout will start using the selected paper size. Copyright © 2001...
Operating Instructions
Page 4
...Viewing images recorded on "Memory Stick"s using the USB cable (except DCR-TRV240) (p. 155) •Viewing images recorded on a tape using the USB cable (p. 94) •Viewing images live on your computer from your camcorder using the USB cable (p. 103) •Capturing images from an analog...Adjusting the exposure manually (p. 53) Functions for giving images more impact •Digital zoom [MENU] (p. 24) The default setting is OFF. (To zoom greater than 25×, (DCR-TRV240/TRV340)/15× (DCR-TRV740/TRV840), select the digital zoom power in D ZOOM in the menu settings.) •Fader (p. 44...
...Viewing images recorded on "Memory Stick"s using the USB cable (except DCR-TRV240) (p. 155) •Viewing images recorded on a tape using the USB cable (p. 94) •Viewing images live on your computer from your camcorder using the USB cable (p. 103) •Capturing images from an analog...Adjusting the exposure manually (p. 53) Functions for giving images more impact •Digital zoom [MENU] (p. 24) The default setting is OFF. (To zoom greater than 25×, (DCR-TRV240/TRV340)/15× (DCR-TRV740/TRV840), select the digital zoom power in D ZOOM in the menu settings.) •Fader (p. 44...

Operating Instructions
Page 6
...Digital effect 48 Using the PROGRAM AE function .... 51 Adjusting the exposure manually ...... 53 Focusing manually 54 Interval recording 55 Frame by date - Tape PB ZOOM 65 Quickly locating a scene - ZERO SET MEMORY 67 Searching a recording by frame recording - NightShot/Super NightShot/ Color Slow Shutter 29 Self-timer recording (except DCR-TRV240... Recording still images on a tape - Picture effect 47 Using special effects - Frame recording 57 Superimposing a title 58 Making your computer (Windows users only 94 Customizing Your Camcorder Changing the menu settings 105 ...
...Digital effect 48 Using the PROGRAM AE function .... 51 Adjusting the exposure manually ...... 53 Focusing manually 54 Interval recording 55 Frame by date - Tape PB ZOOM 65 Quickly locating a scene - ZERO SET MEMORY 67 Searching a recording by frame recording - NightShot/Super NightShot/ Color Slow Shutter 29 Self-timer recording (except DCR-TRV240... Recording still images on a tape - Picture effect 47 Using special effects - Frame recording 57 Superimposing a title 58 Making your computer (Windows users only 94 Customizing Your Camcorder Changing the menu settings 105 ...
Operating Instructions
Page 7
... "Memory Stick" operations (except DCR-TRV240) Using "Memory Stick" - MEMORY MIX 129 Recording images from a tape as still images 135 Copying still images from a tape as moving pictures 142 Recording edited pictures as a moving pictures - Digital program editing (on "Memory Stick...Stick"s 146 Viewing still images - MPEG movie recording 140 Recording pictures from a tape - MPEG movie playback 153 Viewing images recorded on "Memory Stick"s on your camcorder abroad .......... 193 Maintenance information and precautions 194 Specifications 199 Quick Reference Identifying parts ...
... "Memory Stick" operations (except DCR-TRV240) Using "Memory Stick" - MEMORY MIX 129 Recording images from a tape as still images 135 Copying still images from a tape as moving pictures 142 Recording edited pictures as a moving pictures - Digital program editing (on "Memory Stick...Stick"s 146 Viewing still images - MPEG movie recording 140 Recording pictures from a tape - MPEG movie playback 153 Viewing images recorded on "Memory Stick"s on your camcorder abroad .......... 193 Maintenance information and precautions 194 Specifications 199 Quick Reference Identifying parts ...

Operating Instructions
Page 9
Viewfinder When the LCD panel is closed, use the viewfinder with your camcorder by holding the viewfinder, the LCD panel, or the battery pack. 9 E ERMAORY E... LCD screen (p. 34) 2 Press m to VCR while pressing the small green button. If you purchase your camcorder, the clock setting is black and white. REW 3 Press N to CAMERA while pressing the small green button.... LCD panel while pressing OPEN. V POWER CAM M Note Do not pick up your eye against the eyecup. Your camcorder starts recording. When you want to record the date and time for a picture, set to off. PLAY Quick Start...
Viewfinder When the LCD panel is closed, use the viewfinder with your camcorder by holding the viewfinder, the LCD panel, or the battery pack. 9 E ERMAORY E... LCD screen (p. 34) 2 Press m to VCR while pressing the small green button. If you purchase your camcorder, the clock setting is black and white. REW 3 Press N to CAMERA while pressing the small green button.... LCD panel while pressing OPEN. V POWER CAM M Note Do not pick up your eye against the eyecup. Your camcorder starts recording. When you want to record the date and time for a picture, set to off. PLAY Quick Start...
Operating Instructions
Page 10
... manual and operating your camcorder plays back tapes recorded in the text, for example, "except DCRTRV240." As you need an NTSC system-based TV. TRV240 MEMORY mark* (on TV color systems TV color systems differ from country to country. Your camcorder records and plays back ...Digital8 system. To view your digital camcorder, you can hear a beep to 70 for illustration purposes. You, however, cannot use Hi8 /Digital8 video cassettes. - Getting Started - The DCR-TRV740 is indicated in the Hi8 /standard 8 with MEMORY marked on a tape. When you carry out an ...
... manual and operating your camcorder plays back tapes recorded in the text, for example, "except DCRTRV240." As you need an NTSC system-based TV. TRV240 MEMORY mark* (on TV color systems TV color systems differ from country to country. Your camcorder records and plays back ...Digital8 system. To view your digital camcorder, you can hear a beep to 70 for illustration purposes. You, however, cannot use Hi8 /Digital8 video cassettes. - Getting Started - The DCR-TRV740 is indicated in the Hi8 /standard 8 with MEMORY marked on a tape. When you carry out an ...
Operating Instructions
Page 16
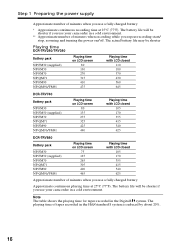
.... Step 1 Preparing the power supply Approximate number of minutes when you use your camcorder in a cold environment. ** Approximate number of minutes when recording while you repeat recording...screen 75 125 265 305 400 465 Playing time with LCD closed 105 170 355 415 540 625 DCR-TRV840 Battery pack NP-FM30 NP-FM50 (supplied) NP-FM70 NP-QM71 NP-FM90 NP-QM91/FM91 ... Note The table shows the playing time for tapes recorded in the Hi8/standard 8 system is reduced by about 20%.. 16 The battery life will be shorter Playing time DCR-TRV240/TRV340 Battery pack NP-FM30 (supplied) NP-...
.... Step 1 Preparing the power supply Approximate number of minutes when you use your camcorder in a cold environment. ** Approximate number of minutes when recording while you repeat recording...screen 75 125 265 305 400 465 Playing time with LCD closed 105 170 355 415 540 625 DCR-TRV840 Battery pack NP-FM30 NP-FM50 (supplied) NP-FM70 NP-QM71 NP-FM90 NP-QM91/FM91 ... Note The table shows the playing time for tapes recorded in the Hi8/standard 8 system is reduced by about 20%.. 16 The battery life will be shorter Playing time DCR-TRV240/TRV340 Battery pack NP-FM30 (supplied) NP-...
Operating Instructions
Page 19
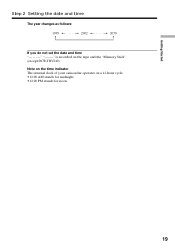
Getting Started Step 2 Setting the date and time The year changes as follows: 1995 T t 2002 T t 2079 If you do not set the date and time is recorded on the tape and the "Memory Stick". (except DCR-TRV240) Note on the time indicator The internal clock of your camcorder operates on a 12-hour cycle. •12:00 AM stands for midnight. •12:00 PM stands for noon. 19
Getting Started Step 2 Setting the date and time The year changes as follows: 1995 T t 2002 T t 2079 If you do not set the date and time is recorded on the tape and the "Memory Stick". (except DCR-TRV240) Note on the time indicator The internal clock of your camcorder operates on a 12-hour cycle. •12:00 AM stands for midnight. •12:00 PM stands for noon. 19
Operating Instructions
Page 20
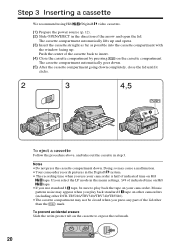
... down. (5) After the cassette compartment going down . Doing so may cause a malfunction. •Your camcorder records pictures in the menu settings, 3/4 of indicated time on Hi8 tape. •If you use your camcorder is half of the lid other than the mark. If you select the LP mode in the... direction of the cassette back to expose the red mark. 20 To prevent accidental erasure Slide the write-protect tab on other camcorders (including other DCR-TRV240/TRV340/TRV740/TRV840). •The cassette compartment may appear when you press any part of indicated time on your...
... down. (5) After the cassette compartment going down . Doing so may cause a malfunction. •Your camcorder records pictures in the menu settings, 3/4 of indicated time on Hi8 tape. •If you use your camcorder is half of the lid other than the mark. If you select the LP mode in the... direction of the cassette back to expose the red mark. 20 To prevent accidental erasure Slide the write-protect tab on other camcorders (including other DCR-TRV240/TRV340/TRV740/TRV840). •The cassette compartment may appear when you press any part of indicated time on your...
Operating Instructions
Page 22
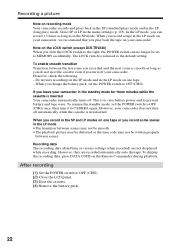
..., the POWER switch can record 1.5 times as long as in the SP mode. After recording (1) Set the POWER switch to prevent battery and tape wear. Recording a picture Note on recording mode Your camcorder records and plays back in the SP (standard play) mode and in the menu settings (p. 105). Note on one... tape or you turn off your camcorder. The LOCK switch is released as you do not eject the cassette even if you record some scenes in the LP mode on the LOCK switch (except DCR-TRV240) When you slide the LOCK switch to MEMORY accidentally...
..., the POWER switch can record 1.5 times as long as in the SP mode. After recording (1) Set the POWER switch to prevent battery and tape wear. Recording a picture Note on recording mode Your camcorder records and plays back in the SP (standard play) mode and in the menu settings (p. 105). Note on one... tape or you turn off your camcorder. The LOCK switch is released as you do not eject the cassette even if you record some scenes in the LP mode on the LOCK switch (except DCR-TRV240) When you slide the LOCK switch to MEMORY accidentally...

Operating Instructions
Page 27
... recording mode Indicators are recording. When you are not recorded on the screen. You cannot reset the time code or the tape counter. 27 Remaining battery time indicator during recording The remaining battery time indicator roughly indicates the continuous recording time. You cannot ...be correct, depending on the conditions in the Hi8/standard 8 system, the tape counter appears on tapes. Time code (for five seconds after the POWER switch is set to CAMERA or MEMORY (except DCR-TRV240). Basics Recording a picture Indicators displayed in VCR mode. Date This is ...
... recording mode Indicators are recording. When you are not recorded on the screen. You cannot reset the time code or the tape counter. 27 Remaining battery time indicator during recording The remaining battery time indicator roughly indicates the continuous recording time. You cannot ...be correct, depending on the conditions in the Hi8/standard 8 system, the tape counter appears on tapes. Time code (for five seconds after the POWER switch is set to CAMERA or MEMORY (except DCR-TRV240). Basics Recording a picture Indicators displayed in VCR mode. Date This is ...

Operating Instructions
Page 33
If a tape has a blank portion between the last scene you have recorded on the tape, the end search function does not work correctly. 33 Basics Checking recordings - END SEARCH/EDITSEARCH/Rec Review Notes •END SEARCH, EDITSEARCH and Rec Review work only for tapes recorded in the Digital8 system. •If you start recording after using the end search function, occasionally, the transition between recorded portions The end search function may not be smooth. •Once you eject the cassette after you recorded and the next scene may not work . Recording -
If a tape has a blank portion between the last scene you have recorded on the tape, the end search function does not work correctly. 33 Basics Checking recordings - END SEARCH/EDITSEARCH/Rec Review Notes •END SEARCH, EDITSEARCH and Rec Review work only for tapes recorded in the Digital8 system. •If you start recording after using the end search function, occasionally, the transition between recorded portions The end search function may not be smooth. •Once you eject the cassette after you recorded and the next scene may not work . Recording -

Operating Instructions
Page 34
...CAM M 6 3 VOLUME 1 To stop playback Press x. When you can control playback using the Remote Commander supplied with your camcorder. (1) Install the power source and insert the recorded tape. (2) Set the POWER switch to VCR while pressing the small green button. (3) Open the LCD panel while pressing OPEN.... (4) Press m to rewind the tape. (5) Press N to the camcorder body with the LCD screen facing out. 34 You can monitor the playback picture in the viewfinder. Playback - When monitoring ...
...CAM M 6 3 VOLUME 1 To stop playback Press x. When you can control playback using the Remote Commander supplied with your camcorder. (1) Install the power source and insert the recorded tape. (2) Set the POWER switch to VCR while pressing the small green button. (3) Open the LCD panel while pressing OPEN.... (4) Press m to rewind the tape. (5) Press N to the camcorder body with the LCD screen facing out. 34 You can monitor the playback picture in the viewfinder. Playback - When monitoring ...

Operating Instructions
Page 35
... settings when recorded) (Data code). Basics DISPLAY About date/time and various settings Your camcorder automatically records not only pictures on your camcorder or the Remote Commander supplied with your camcorder. The indicators appear on the Remote Commander. Use the Remote Commander for this operation. ...1 Set the POWER switch to VCR, then playback a tape. 2 Press DATA CODE on the screen. To ...
... settings when recorded) (Data code). Basics DISPLAY About date/time and various settings Your camcorder automatically records not only pictures on your camcorder or the Remote Commander supplied with your camcorder. The indicators appear on the Remote Commander. Use the Remote Commander for this operation. ...1 Set the POWER switch to VCR, then playback a tape. 2 Press DATA CODE on the screen. To ...
Operating Instructions
Page 36
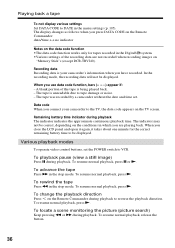
... Digital8 system. •Various settings of the tape is being played back. - To advance the tape Press M in the stop mode. Playing back a tape To not display various settings Set DATA CODE to tape damage or noise. - The tape is your camcorder to be displayed. The tape was recorded by a camcorder without the date and time set the... time indicator during playback. To playback pause (view a still image) Press X during playback to VCR. To change the playback direction Press on "Memory Stick"s (except DCR-TRV240).
... Digital8 system. •Various settings of the tape is being played back. - To advance the tape Press M in the stop mode. Playing back a tape To not display various settings Set DATA CODE to tape damage or noise. - The tape is your camcorder to be displayed. The tape was recorded by a camcorder without the date and time set the... time indicator during playback. To playback pause (view a still image) Press X during playback to VCR. To change the playback direction Press on "Memory Stick"s (except DCR-TRV240).


