Operating Instructions
Page 42
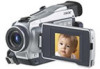
...camcorder. Connect your camcorder from a wall outlet using an S video cable (optional). Then press DISPLAY on the TV screen, we recommend that you power your camcorder... cable (supplied) Red AUDIO If your camcorder again. 42 If you do not need to the operating instructions of the A/V connecting cable...cable (optional) to VCR. You can be reproduced more faithfully by using the A/V connecting cable supplied with your camcorder. Refer to connect the yellow (video) plug of your camcorder...a VCR Connect your camcorder to the TV using the A/V connecting cable supplied with your TV...
...camcorder. Connect your camcorder from a wall outlet using an S video cable (optional). Then press DISPLAY on the TV screen, we recommend that you power your camcorder... cable (supplied) Red AUDIO If your camcorder again. 42 If you do not need to the operating instructions of the A/V connecting cable...cable (optional) to VCR. You can be reproduced more faithfully by using the A/V connecting cable supplied with your camcorder. Refer to connect the yellow (video) plug of your camcorder...a VCR Connect your camcorder to the TV using the A/V connecting cable supplied with your TV...

Operating Instructions
Page 75
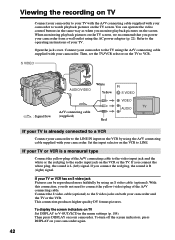
..., S-VHS, VHSC, S-VHSC, Betamax, ED Betamax, mini DV, DV, Digital8, MICRO MV 75 Connect your camcorder to VCR on your camcorder. (4) Play back the recorded tape on both your camcorder. (2) Prepare the VCR for recording, then set the input selector to your camcorder using the A/V connecting cable supplied with your camcorder as a player. S VIDEO : Signal flow AUDIO/VIDEO...
..., S-VHS, VHSC, S-VHSC, Betamax, ED Betamax, mini DV, DV, Digital8, MICRO MV 75 Connect your camcorder to VCR on your camcorder. (4) Play back the recorded tape on both your camcorder. (2) Prepare the VCR for recording, then set the input selector to your camcorder using the A/V connecting cable supplied with your camcorder as a player. S VIDEO : Signal flow AUDIO/VIDEO...
Operating Instructions
Page 76
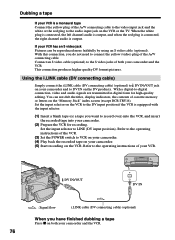
... DCR-TRV16). Set the input selector on the VCR to DV IN on the VCR. DV IN/OUT DV DV IN : Signal flow i.LINK cable (DV connecting cable) (optional) When you want to -digital connection, video and audio signals are transmitted in digital form for recording. With a digital-to record over) into the VCR, and insert the recorded tape into your camcorder...
... DCR-TRV16). Set the input selector on the VCR to DV IN on the VCR. DV IN/OUT DV DV IN : Signal flow i.LINK cable (DV connecting cable) (optional) When you want to -digital connection, video and audio signals are transmitted in digital form for recording. With a digital-to record over) into the VCR, and insert the recorded tape into your camcorder...

Operating Instructions
Page 77
Editing Dubbing a tape You can connect one VCR only using other video equipment, the picture may jitter. 77 Pictures processed by the picture effect, the digital effect or PB ZOOM function Pictures processed by the picture effect, the digital effect or PB ZOOM function are not output through the DV IN/OUT jack. If you play back the picture using the i.LINK cable (DV connecting cable) See page 199 for more information about i.LINK. Also, when you record a playback pause picture with the DV IN/OUT jack The recorded picture becomes rough.
Editing Dubbing a tape You can connect one VCR only using other video equipment, the picture may jitter. 77 Pictures processed by the picture effect, the digital effect or PB ZOOM function Pictures processed by the picture effect, the digital effect or PB ZOOM function are not output through the DV IN/OUT jack. If you play back the picture using the i.LINK cable (DV connecting cable) See page 199 for more information about i.LINK. Also, when you record a playback pause picture with the DV IN/OUT jack The recorded picture becomes rough.
Operating Instructions
Page 78
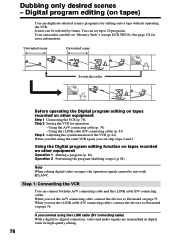
...(p. 88). When you dub using the i.LINK cable (DV connecting cable) With a digital-to 20 programs. Your camcorder can duplicate selected scenes (programs) for operation. - If you connect using the same VCR again, you use the i.LINK cable (DV connecting cable), connect the devices as illustrated on tapes) You...See page 132 for high-quality editing. 78 Using the i.LINK cable (DV connecting cable) (p. 83) Step 3 Adjusting the synchronization of the VCR (p. 84). Note When editing digital video on "Memory Stick"s (except DCR-TRV16). You can skip steps 2 and 3. When you can ...
...(p. 88). When you dub using the i.LINK cable (DV connecting cable) With a digital-to 20 programs. Your camcorder can duplicate selected scenes (programs) for operation. - If you connect using the same VCR again, you use the i.LINK cable (DV connecting cable), connect the devices as illustrated on tapes) You...See page 132 for high-quality editing. 78 Using the i.LINK cable (DV connecting cable) (p. 83) Step 3 Adjusting the synchronization of the VCR (p. 84). Note When editing digital video on "Memory Stick"s (except DCR-TRV16). You can skip steps 2 and 3. When you can ...
Operating Instructions
Page 83
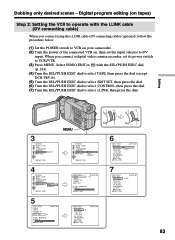
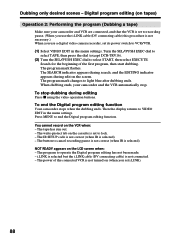
...-IN" "CUT-OUT" IR SETUP PAUSEMODE IR TEST RETURN [MENU] : END 83 Select VIDEO EDIT in with the i.LINK cable (DV connecting cable) When you connect a digital video camera recorder, set the input selector to VCR/VTR. (3) Press MENU. Dubbing only desired scenes - Editing 3 OTHERS DATA...cable) (optional), follow the procedure below. (1) Set the POWER switch to VCR on your camcorder. (2) Turn the power of the connected VCR on tapes) Step 2: Setting the VCR to operate with the SEL/PUSH EXEC dial (p. 184). (4) Turn the SEL/PUSH EXEC dial to select TAPE, then press the dial (except DCR...
...-IN" "CUT-OUT" IR SETUP PAUSEMODE IR TEST RETURN [MENU] : END 83 Select VIDEO EDIT in with the i.LINK cable (DV connecting cable) When you connect a digital video camera recorder, set the input selector to VCR/VTR. (3) Press MENU. Dubbing only desired scenes - Editing 3 OTHERS DATA...cable) (optional), follow the procedure below. (1) Set the POWER switch to VCR on your camcorder. (2) Turn the power of the connected VCR on tapes) Step 2: Setting the VCR to operate with the SEL/PUSH EXEC dial (p. 184). (4) Turn the SEL/PUSH EXEC dial to select TAPE, then press the dial (except DCR...

Operating Instructions
Page 84
...dial to select ADJ TEST, then press the dial. (3) Turn the SEL/PUSH EXEC dial to select the average number value of your camcorder. Dubbing only desired scenes - Have a pen and paper ready for recording is set to operate the dubbing function correctly, depending on the... indicator changes to select the average number value of your camcorder and the VCR. IN and OUT are recorded on the screen. The calculated start slow playback. Digital program editing (on tapes) When you connect using the i.LINK cable (DV connecting cable) •You cannot dub the titles, display indicators. ...
...dial to select ADJ TEST, then press the dial. (3) Turn the SEL/PUSH EXEC dial to select the average number value of your camcorder. Dubbing only desired scenes - Have a pen and paper ready for recording is set to operate the dubbing function correctly, depending on the... indicator changes to select the average number value of your camcorder and the VCR. IN and OUT are recorded on the screen. The calculated start slow playback. Digital program editing (on tapes) When you connect using the i.LINK cable (DV connecting cable) •You cannot dub the titles, display indicators. ...

Operating Instructions
Page 85
... 3, the image used to adjust the syncronization is recorded for about 10 seconds' lead before starting recording. •When you connect with the i.LINK cable (DV connecting cable), you start recording from the very beginning of the tape, the first few seconds of the tape may not be able to IR in the... menu settings (p. 79). Be sure to allow about 50 seconds. •If you may not record properly. Video and audio are sent by digital signals. 85 Digital...
... 3, the image used to adjust the syncronization is recorded for about 10 seconds' lead before starting recording. •When you connect with the i.LINK cable (DV connecting cable), you start recording from the very beginning of the tape, the first few seconds of the tape may not be able to IR in the... menu settings (p. 79). Be sure to allow about 50 seconds. •If you may not record properly. Video and audio are sent by digital signals. 85 Digital...
Operating Instructions
Page 88
...Dubbing a tape) Make sure your camcorder and the VCR automatically stop dubbing during edit on the screen. Then the display returns to cancel recording pause is not correct (when IR is not connected. - i.LINK is selected but the i.LINK cable (DV connecting cable) is selected). Dubbing only desired ...DCR-TRV16). (2) Turn the SEL/PUSH EXEC dial to operate the Digital program editing has not been made. - The write-protect tab on (when you use a digital video camera recorder, set i.LINK). 88 Press MENU to light blue after dubbing ends. When dubbing ends, your camcorder ...
...Dubbing a tape) Make sure your camcorder and the VCR automatically stop dubbing during edit on the screen. Then the display returns to cancel recording pause is not correct (when IR is not connected. - i.LINK is selected but the i.LINK cable (DV connecting cable) is selected). Dubbing only desired ...DCR-TRV16). (2) Turn the SEL/PUSH EXEC dial to operate the Digital program editing has not been made. - The write-protect tab on (when you use a digital video camera recorder, set i.LINK). 88 Press MENU to light blue after dubbing ends. When dubbing ends, your camcorder ...

Operating Instructions
Page 90
...S video jacks of both your TV or VCR has an S video jack Pictures can be reproduced more faithfully by using an S video cable (optional). If your camcorder and the TV or VCR. Connect an S video cable (optional) to the audio output jack on the VCR or the TV. This connection produces higher quality... DV format pictures. 90 When the white plug is connected, the left channel audio is recorded, and when the red plug is connected, ...
...S video jacks of both your TV or VCR has an S video jack Pictures can be reproduced more faithfully by using an S video cable (optional). If your camcorder and the TV or VCR. Connect an S video cable (optional) to the audio output jack on the VCR or the TV. This connection produces higher quality... DV format pictures. 90 When the white plug is connected, the left channel audio is recorded, and when the red plug is connected, ...

Operating Instructions
Page 91
... are transmitted in digital form The color of the display may appear on both equipment. 91 If you play back the picture using the i.LINK cable (DV connecting cable). Recording video or TV programs Using the i.LINK cable (DV connecting cable) Simply connect the i.LINK cable (DV connecting cable) (optional) to DV IN/OUT jack on your camcorder and to DV OUT on...
... are transmitted in digital form The color of the display may appear on both equipment. 91 If you play back the picture using the i.LINK cable (DV connecting cable). Recording video or TV programs Using the i.LINK cable (DV connecting cable) Simply connect the i.LINK cable (DV connecting cable) (optional) to DV IN/OUT jack on your camcorder and to DV OUT on...

Operating Instructions
Page 97
We recommend that you add audio on a tape recorded with your camcorder You cannot add audio to release the write protection. 97 Slide the write-protect tab to a recorded tape. If you add audio on a tape. Editing ... be recorded on a tape already recorded in the LP mode. • You cannot add audio with another camcorder, the sound quality may become worse. If an i.LINK cable (DV connecting cable) (optional) is connected to your camcorder If you set the write-protect tab of the cassette to lock You cannot record on a tape recorded...
We recommend that you add audio on a tape recorded with your camcorder You cannot add audio to release the write protection. 97 Slide the write-protect tab to a recorded tape. If you add audio on a tape. Editing ... be recorded on a tape already recorded in the LP mode. • You cannot add audio with another camcorder, the sound quality may become worse. If an i.LINK cable (DV connecting cable) (optional) is connected to your camcorder If you set the write-protect tab of the cassette to lock You cannot record on a tape recorded...

Operating Instructions
Page 119
When recording on a tape that are distorted due to input images that has been repeatedly used for example, on a tape in use "Memory Stick" Operations 119 Recording an image from a tape as a still image Using the i.LINK cable (DV connecting cable) DV IN/OUT DV DV OUT : Signal flow i.LINK cable (DV connecting cable) (optional) Note In the following instances, recording is interrupted or " REC ERROR" is in a poor recording state, for dubbing - When attempting to poor radio wave reception when a TV tuner unit is displayed. -
When recording on a tape that are distorted due to input images that has been repeatedly used for example, on a tape in use "Memory Stick" Operations 119 Recording an image from a tape as a still image Using the i.LINK cable (DV connecting cable) DV IN/OUT DV DV OUT : Signal flow i.LINK cable (DV connecting cable) (optional) Note In the following instances, recording is interrupted or " REC ERROR" is in a poor recording state, for dubbing - When attempting to poor radio wave reception when a TV tuner unit is displayed. -

Operating Instructions
Page 131
... and you cannot record pictures. - When recording on a tape in use - Recording pictures from a tape as a moving picture Using the i.LINK cable (DV connecting cable) DV IN/OUT DV DV OUT : Signal flow i.LINK cable (DV connecting cable) (optional) Note In the following instances, recording is interrupted or " REC ERROR" is cut off. When attempting to poor radio wave...
... and you cannot record pictures. - When recording on a tape in use - Recording pictures from a tape as a moving picture Using the i.LINK cable (DV connecting cable) DV IN/OUT DV DV OUT : Signal flow i.LINK cable (DV connecting cable) (optional) Note In the following instances, recording is interrupted or " REC ERROR" is cut off. When attempting to poor radio wave...
Operating Instructions
Page 154
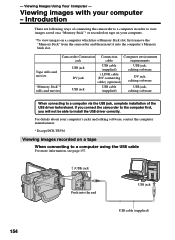
... the computer manufacturer. * Except DCR-TRV16 Viewing images recorded on a computer which has a Memory Stick slot, first remove the "Memory Stick" from the camcorder and then insert it into the end USB jack USB cable (supplied) 154 Introduction There are following ways of the USB driver beforehand. LINK cable (DV connecting cable) (optional) USB jack, editing...
... the computer manufacturer. * Except DCR-TRV16 Viewing images recorded on a computer which has a Memory Stick slot, first remove the "Memory Stick" from the camcorder and then insert it into the end USB jack USB cable (supplied) 154 Introduction There are following ways of the USB driver beforehand. LINK cable (DV connecting cable) (optional) USB jack, editing...
Operating Instructions
Page 155
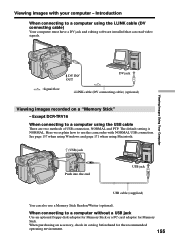
...DCR-TRV16 When connecting to a computer without a USB jack Use an optional floppy disk adaptor for Memory Stick or a PC card adaptor for the recommended operating environment. 155 When connecting to a computer using the i.LINK cable (DV connecting cable) Your computer must have a DV jack and editing software installed that can also use the camcorder... with your computer - Here we explain how to a computer using the USB cable There are two...
...DCR-TRV16 When connecting to a computer without a USB jack Use an optional floppy disk adaptor for Memory Stick or a PC card adaptor for the recommended operating environment. 155 When connecting to a computer using the i.LINK cable (DV connecting cable) Your computer must have a DV jack and editing software installed that can also use the camcorder... with your computer - Here we explain how to a computer using the USB cable There are two...
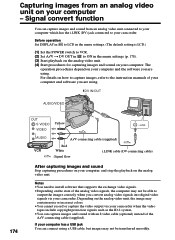
Operating Instructions
Page 174
...cable (DV connecting cable) After capturing images and sound Stop capturing procedures on your computer - Depending on how to capture images, refer to install software that supports the exchange video signals. •Depending on your computer and the software you convert analog video signals into digital video signals via your camcorder... when the video tapes include copyright protection signals such as the ID-2 system. •You can capture images and sound with an S video cable (optional) instead of your camcorder. For details...
...cable (DV connecting cable) After capturing images and sound Stop capturing procedures on your computer - Depending on how to capture images, refer to install software that supports the exchange video signals. •Depending on your computer and the software you convert analog video signals into digital video signals via your camcorder... when the video tapes include copyright protection signals such as the ID-2 system. •You can capture images and sound with an S video cable (optional) instead of your camcorder. For details...
Operating Instructions
Page 189
...PLAY to play back images recorded by other equipment. This is not a malfunction. • Your camcorder cannot play back some images processed with a computer (The file name will blink). • If... you try to play back the image. (p. 137) • You are not synchronized. Digital program editing to LOCK. c Superimpose the title to a recorded portion. (p. 98) • The cassette...back images in actual size when you record images with any other than Sony using the i.LINK cable (DV connecting cable). Cause and/or Corrective Actions • The cassette has no cassette memory...
...PLAY to play back images recorded by other equipment. This is not a malfunction. • Your camcorder cannot play back some images processed with a computer (The file name will blink). • If... you try to play back the image. (p. 137) • You are not synchronized. Digital program editing to LOCK. c Superimpose the title to a recorded portion. (p. 98) • The cassette...back images in actual size when you record images with any other than Sony using the i.LINK cable (DV connecting cable). Cause and/or Corrective Actions • The cassette has no cassette memory...
Operating Instructions
Page 199
...by the i.LINK cable (DV connecting cable). When connecting this unit is an i.LINK-compliant DV input/output jack. IEEE 1394 is an international standard standardized by a single i.LINK cable. i.LINK-compatible equipment... 199 Additional Information About i.LINK The DV jack on some connected equipment. When two or more familiar term for handling digital video, digital audio and other data in a daisy ...according to but also with various digital AV equipment. This section describes the i.LINK standard and its features. What is a trademark approved by SONY, and is i.LINK? Possible...
...by the i.LINK cable (DV connecting cable). When connecting this unit is an i.LINK-compliant DV input/output jack. IEEE 1394 is an international standard standardized by a single i.LINK cable. i.LINK-compatible equipment... 199 Additional Information About i.LINK The DV jack on some connected equipment. When two or more familiar term for handling digital video, digital audio and other data in a daisy ...according to but also with various digital AV equipment. This section describes the i.LINK standard and its features. What is a trademark approved by SONY, and is i.LINK? Possible...

Operating Instructions
Page 200
... varies according to -4-pin cable (during DV dubbing). When units are connected to equipment having a different maximum baud rate, the baud rate sometimes differs from the indicated baud rate. *What is connected to a personal computer, make sure that application software supported by SONY (e.g. i.LINK functions on this...unit For details on how to dub when this unit to other video equipment having DV jacks, see page 76 and 91. Before connecting this unit is Mbps? Required i.LINK cable Use the Sony i.LINK 4-pin-to the equipment. It is already installed on precautions when connecting ...
... varies according to -4-pin cable (during DV dubbing). When units are connected to equipment having a different maximum baud rate, the baud rate sometimes differs from the indicated baud rate. *What is connected to a personal computer, make sure that application software supported by SONY (e.g. i.LINK functions on this...unit For details on how to dub when this unit to other video equipment having DV jacks, see page 76 and 91. Before connecting this unit is Mbps? Required i.LINK cable Use the Sony i.LINK 4-pin-to the equipment. It is already installed on precautions when connecting ...


