Operation Guide
Page 1
4-134-120-11(1) Table of contents 7 Getting started 9 Recording 13 Playback 17 DCR-SX30E/SX31E/SX40E/SX41E/ Saving movies and photos 21 SX50E/SX60E with a computer Saving images with a DVD 27 Digital Video Camera Recorder writer, recorder Operating Guide Making good use of your 33 camcorder Additional information 42 2009 Sony Corporation
4-134-120-11(1) Table of contents 7 Getting started 9 Recording 13 Playback 17 DCR-SX30E/SX31E/SX40E/SX41E/ Saving movies and photos 21 SX50E/SX60E with a computer Saving images with a DVD 27 Digital Video Camera Recorder writer, recorder Operating Guide Making good use of your 33 camcorder Additional information 42 2009 Sony Corporation

Operation Guide
Page 3
... where you purchased the product. By ensuring these batteries are disposed of this product, you have any service or guarantee matters please refer to remove the battery from the product safely. If you may influence the picture and sound of correctly, you will help prevent potential negative consequences for using connection cables shorter than 3 meters (9.8 feet). This product has been...
... where you purchased the product. By ensuring these batteries are disposed of this product, you have any service or guarantee matters please refer to remove the battery from the product safely. If you may influence the picture and sound of correctly, you will help prevent potential negative consequences for using connection cables shorter than 3 meters (9.8 feet). This product has been...
Operation Guide
Page 4
These limits are the supplied quantity. AC Adaptor (1) Power cord (Mains lead) (1) A/V connecting cable (1) USB cable (1) Rechargeable battery pack NP-FH30 (1) CD-ROM "Handycam Application Software" (1) (p. 21) "PMB" (software) including "PMB Guide" "Handycam Handbook" (PDF) "Operating Guide" (This manual) (1) See page 35 for a digital device pursuant to the following two conditions: (1) This device may not cause harmful interference, and (2) this...
These limits are the supplied quantity. AC Adaptor (1) Power cord (Mains lead) (1) A/V connecting cable (1) USB cable (1) Rechargeable battery pack NP-FH30 (1) CD-ROM "Handycam Application Software" (1) (p. 21) "PMB" (software) including "PMB Guide" "Handycam Handbook" (PDF) "Operating Guide" (This manual) (1) See page 35 for a digital device pursuant to the following two conditions: (1) This device may not cause harmful interference, and (2) this...
Operation Guide
Page 5
... from the actual images of the LCD screen. In this Operating Guide, the internal memory of the camcorder. If you need a PAL system-based TV. Television programs, films, video tapes, and other malfunctions could occur. ejecting "Memory Stick PRO Duo" media removing the battery pack or AC Adaptor from being lost or other materials may be copyrighted. Change the screen language before using a DVD writer, VCR, or DVD/HDD recorder. See "Precautions...
... from the actual images of the LCD screen. In this Operating Guide, the internal memory of the camcorder. If you need a PAL system-based TV. Television programs, films, video tapes, and other malfunctions could occur. ejecting "Memory Stick PRO Duo" media removing the battery pack or AC Adaptor from being lost or other materials may be copyrighted. Change the screen language before using a DVD writer, VCR, or DVD/HDD recorder. See "Precautions...

Operation Guide
Page 7
... 2 Operation flow 6 Getting started Step 1: Charging the battery pack 9 Charging the battery pack abroad 10 Step 2: Turning the power on, and setting the date and time 11 Changing the language setting 12 Recording Recording 13 Recording and playing movies and photos easily (Easy Handycam operation 16 Playback Playback on the camcorder 17 Playing images on a TV 20 Saving movies and photos with a computer Preparing a computer (Windows 21 When using a Macintosh 21 Creating a disc with one touch (One Touch Disc Burn 23 Importing movies and photos to...
... 2 Operation flow 6 Getting started Step 1: Charging the battery pack 9 Charging the battery pack abroad 10 Step 2: Turning the power on, and setting the date and time 11 Changing the language setting 12 Recording Recording 13 Recording and playing movies and photos easily (Easy Handycam operation 16 Playback Playback on the camcorder 17 Playing images on a TV 20 Saving movies and photos with a computer Preparing a computer (Windows 21 When using a Macintosh 21 Creating a disc with one touch (One Touch Disc Burn 23 Importing movies and photos to...
Operation Guide
Page 11
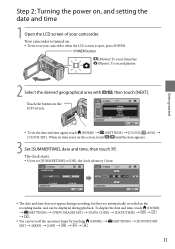
... recording, but they are automatically recorded on , and setting the date and time 1 Open the LCD screen of your camcorder when the LCD screen is not on your camcorder. POWER button (Movie): To record movies (Photo): To record photos 2 Select the desired geographical area with / , then touch [NEXT]. When an item is open, press POWER. Getting started Step 2: Turning the power on the recording media, and can turn on the screen, touch / until the item appears. 3 Set [SUMMERTIME], date and time...
... recording, but they are automatically recorded on , and setting the date and time 1 Open the LCD screen of your camcorder when the LCD screen is not on your camcorder. POWER button (Movie): To record movies (Photo): To record photos 2 Select the desired geographical area with / , then touch [NEXT]. When an item is open, press POWER. Getting started Step 2: Turning the power on the recording media, and can turn on the screen, touch / until the item appears. 3 Set [SUMMERTIME], date and time...
Operation Guide
Page 14
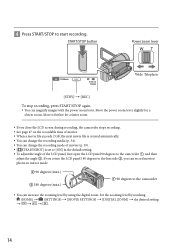
... lens side , you close the LCD screen during recording, the camcorder stops recording. See page 47 on the recordable time of movies. When a movie file exceeds 2 GB, the next movie file is created automatically. You can change the recording media (p. 34). You can change the recording mode of the LCD panel, first open the LCD panel 90 degrees to the camcorder , and then adjust the angle . Set the zooming level by using...
... lens side , you close the LCD screen during recording, the camcorder stops recording. See page 47 on the recordable time of movies. When a movie file exceeds 2 GB, the next movie file is created automatically. You can change the recording media (p. 34). You can change the recording mode of the LCD panel, first open the LCD panel 90 degrees to the camcorder , and then adjust the angle . Set the zooming level by using...

Operation Guide
Page 20
... the A/V jack using the supplied AC Adaptor for this operation (p. 10). Connect the white and red plugs (left/right audio) and the S VIDEO plug (S VIDEO channel) of the TV to the input your camcorder will not output audio. The yellow plug connection is not necessary. IN S VIDEO VIDEO (Yellow) AUDIO (White) (Red) VCRs or TVs (Yellow) :Signal flow A/V Remote Connector Set the input selector of the A/V connecting cable with S VIDEO . Refer also to the instruction manuals supplied with...
... the A/V jack using the supplied AC Adaptor for this operation (p. 10). Connect the white and red plugs (left/right audio) and the S VIDEO plug (S VIDEO channel) of the TV to the input your camcorder will not output audio. The yellow plug connection is not necessary. IN S VIDEO VIDEO (Yellow) AUDIO (White) (Red) VCRs or TVs (Yellow) :Signal flow A/V Remote Connector Set the input selector of the A/V connecting cable with S VIDEO . Refer also to the instruction manuals supplied with...
Operation Guide
Page 21
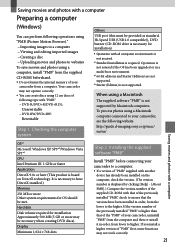
...://guide.d-imaging.sony.co.jp/mac/ ms/us/ Saving movies and photos with another device has already been installed on DirectX technology. Your camcorder may not work correctly. 21 To process photos using a computer, install "PMB" from the supplied CD-ROM beforehand. Do not format the internal memory of "PMB" first, some functions may not operate correctly. You can perform following type with that of the previously installed "PMB," check to...
...://guide.d-imaging.sony.co.jp/mac/ ms/us/ Saving movies and photos with another device has already been installed on DirectX technology. Your camcorder may not work correctly. 21 To process photos using a computer, install "PMB" from the supplied CD-ROM beforehand. Do not format the internal memory of "PMB" first, some functions may not operate correctly. You can perform following type with that of the previously installed "PMB," check to...
Operation Guide
Page 26
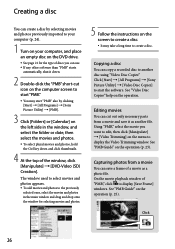
... the DVD drive. See page 21 for selecting movies and photos. 5 Follow the instructions on the operation (p. 25). Using "PMB," select the movie you can use. If any other software than "PMB" starts automatically, shut it as a photo file. On the movie playback window of discs you want to create a disc. Capturing photos from a movie and save a frame of the window, click [Manipulate] [DVD-Video (SD) Creation]. See "Video Disc Copier" help on the menu...
... the DVD drive. See page 21 for selecting movies and photos. 5 Follow the instructions on the operation (p. 25). Using "PMB," select the movie you can use. If any other software than "PMB" starts automatically, shut it as a photo file. On the movie playback window of discs you want to create a disc. Capturing photos from a movie and save a frame of the window, click [Manipulate] [DVD-Video (SD) Creation]. See "Video Disc Copier" help on the menu...
Operation Guide
Page 27
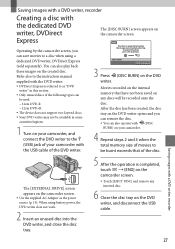
... DVD writer. Saving images with a DVD writer, recorder 27 The [EXTERNAL DRIVE] screen appears on the camcorder screen. Use the supplied AC Adaptor as "DVD writer" in some countries/regions. 1 Turn on the DVD writer, and disconnect the USB cable. Operating by the camcorder screen, you can remove the disc. You can save movies to a disc when using battery power, the DVD writer does not work. 2 Insert an unused disc into the DVD writer, and close the disc tray. 3 Press (DISC...
... DVD writer. Saving images with a DVD writer, recorder 27 The [EXTERNAL DRIVE] screen appears on the camcorder screen. Use the supplied AC Adaptor as "DVD writer" in some countries/regions. 1 Turn on the DVD writer, and disconnect the USB cable. Operating by the camcorder screen, you can remove the disc. You can save movies to a disc when using battery power, the DVD writer does not work. 2 Insert an unused disc into the DVD writer, and close the disc tray. 3 Press (DISC...
Operation Guide
Page 30
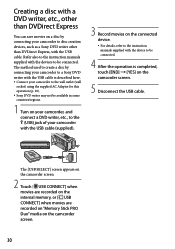
... a disc by connecting your camcorder with the USB cable (supplied). 3 Record movies on the camcorder screen. 30 The [USB SELECT] screen appears on the camcorder screen. 2 Touch [ USB CONNECT] when movies are recorded on the internal memory, or [ USB CONNECT] when movies are recorded on "Memory Stick PRO Duo" media on the connected device. For details, refer to the instruction manuals supplied with the device to disc creation devices, such as a Sony DVD writer other than DVDirect Express, with the devices to be connected. 4 After the operation is...
... a disc by connecting your camcorder with the USB cable (supplied). 3 Record movies on the camcorder screen. 30 The [USB SELECT] screen appears on the camcorder screen. 2 Touch [ USB CONNECT] when movies are recorded on the internal memory, or [ USB CONNECT] when movies are recorded on "Memory Stick PRO Duo" media on the connected device. For details, refer to the instruction manuals supplied with the device to disc creation devices, such as a Sony DVD writer other than DVDirect Express, with the devices to be connected. 4 After the operation is...
Operation Guide
Page 33
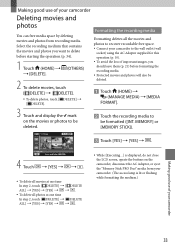
... free media space by deleting movies and photos from your camcorder. (The access lamp is displayed, do not close the LCD screen, oprate the buttons on the movies or photos to be deleted. Touch the recording media to delete before formatting the recording media. Protected movies and photos will also be deleted. Touch (HOME) (MANAGE MEDIA) [MEDIA FORMAT]. 3 Touch and display the mark on the camcorder, disconnect the AC Adaptor, or eject the "Memory Stick PRO Duo" media...
... free media space by deleting movies and photos from your camcorder. (The access lamp is displayed, do not close the LCD screen, oprate the buttons on the movies or photos to be deleted. Touch the recording media to delete before formatting the recording media. Protected movies and photos will also be deleted. Touch (HOME) (MANAGE MEDIA) [MEDIA FORMAT]. 3 Touch and display the mark on the camcorder, disconnect the AC Adaptor, or eject the "Memory Stick PRO Duo" media...
Operation Guide
Page 39
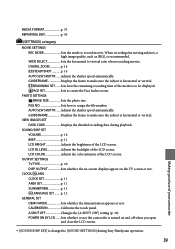
... the camcorder is turned on the TV screen or not. FILE NO Sets how to [SOUND SETTINGS] during playback. GUIDEFRAME Displays the frame to record movies. MEDIA FORMAT p. 33 REPAIR IMG.DB F p. 43 (SETTINGS) category MOVIE SETTINGS REC MODE Sets the mode to make sure the subject is horizontal or vertical. AUTO SLW SHUTTR....... LCD COLOR Adjusts the color intensity of the LCD screen. A.SHUT OFF Changes the [A.SHUT OFF] setting (p. 10). Adjusts the shutter speed automatically. PHOTO SETTINGS IMAGE SIZE Sets the photo size. p. 12 GENERAL SET DEMO MODE Sets whether...
... the camcorder is turned on the TV screen or not. FILE NO Sets how to [SOUND SETTINGS] during playback. GUIDEFRAME Displays the frame to record movies. MEDIA FORMAT p. 33 REPAIR IMG.DB F p. 43 (SETTINGS) category MOVIE SETTINGS REC MODE Sets the mode to make sure the subject is horizontal or vertical. AUTO SLW SHUTTR....... LCD COLOR Adjusts the color intensity of the LCD screen. A.SHUT OFF Changes the [A.SHUT OFF] setting (p. 10). Adjusts the shutter speed automatically. PHOTO SETTINGS IMAGE SIZE Sets the photo size. p. 12 GENERAL SET DEMO MODE Sets whether...

Operation Guide
Page 41
... "Handycam Handbook." To view the "Handycam Handbook," double-click the short-cut icon on the computer screen. When using a Macintosh, open the [Handbook] - [GB] folder in the disc drive of your camcorder are described, some of them with color photos. Making good use of your camcorder 3 Select the desired language and the model name of your camcorder, then click [Handycam Handbook (PDF)]. The model name of your computer. 2 On the installation screen displayed, click [Handycam Handbook...
... "Handycam Handbook." To view the "Handycam Handbook," double-click the short-cut icon on the computer screen. When using a Macintosh, open the [Handbook] - [GB] folder in the disc drive of your camcorder are described, some of them with color photos. Making good use of your camcorder 3 Select the desired language and the model name of your camcorder, then click [Handycam Handbook (PDF)]. The model name of your computer. 2 On the installation screen displayed, click [Handycam Handbook...
Operation Guide
Page 42
... any loss of internal memory data. During repair, we may check a minimum amount of data stored on . Attach a charged battery pack to the camcorder (p. 9). Connect the plug of your Sony dealer. Delete unnecessary images (p. 33). The total number of movie scenes or photos has exceeded the recordable capacity of the AC Adaptor to install "PMB" (p. 21). Additional information Troubleshooting If you run into any problems using a pointed object...
... any loss of internal memory data. During repair, we may check a minimum amount of data stored on . Attach a charged battery pack to the camcorder (p. 9). Connect the plug of your Sony dealer. Delete unnecessary images (p. 33). The total number of movie scenes or photos has exceeded the recordable capacity of the AC Adaptor to install "PMB" (p. 21). Additional information Troubleshooting If you run into any problems using a pointed object...
Operation Guide
Page 44
... Sometimes this malfunction cannot be repaired. Near windows or outdoors, where the LCD screen or the lens may heat up the battery pack completely before operating it . When not using your camcorder. Do not wrap...Use cleaning paper moistened with a towel, for example, and operate it any solid object or liquid gets inside . When disconnecting the power cord (mains lead), pull it by the plug and not the cord. 44 Do not damage the power cord (mains lead) such as hammering, dropping or stepping on and let it run by recording and playing back images...
... Sometimes this malfunction cannot be repaired. Near windows or outdoors, where the LCD screen or the lens may heat up the battery pack completely before operating it . When not using your camcorder. Do not wrap...Use cleaning paper moistened with a towel, for example, and operate it any solid object or liquid gets inside . When disconnecting the power cord (mains lead), pull it by the plug and not the cord. 44 Do not damage the power cord (mains lead) such as hammering, dropping or stepping on and let it run by recording and playing back images...
Operation Guide
Page 46
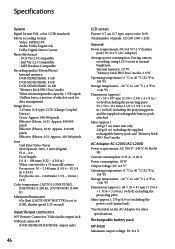
Specifications System Signal format: PAL color, CCIR standards Movie recording format Video: MPEG2-PS Audio: Dolby Digital 2ch Dolby Digital Stereo Creator Photo file format : DCF Ver.2.0 Compatible : Exif Ver.2.21 Compatible : MPF Baseline Compatible Recording media (Movie/Photo) Internal memory: DCR-SX30E/SX40E: 4 GB DCR-SX31E/SX41E: 8 GB DCR-SX50E/SX60E: 16 GB "Memory Stick PRO Duo" media When measuring media capacity, 1 GB equals 1 billion bytes, a portion of pixels: 123 200 (560 × 220) General Power requirements: DC 6.8 V/7.2 V (battery pack) DC 8.4 V (AC Adaptor...
Specifications System Signal format: PAL color, CCIR standards Movie recording format Video: MPEG2-PS Audio: Dolby Digital 2ch Dolby Digital Stereo Creator Photo file format : DCF Ver.2.0 Compatible : Exif Ver.2.21 Compatible : MPF Baseline Compatible Recording media (Movie/Photo) Internal memory: DCR-SX30E/SX40E: 4 GB DCR-SX31E/SX41E: 8 GB DCR-SX50E/SX60E: 16 GB "Memory Stick PRO Duo" media When measuring media capacity, 1 GB equals 1 billion bytes, a portion of pixels: 123 200 (560 × 220) General Power requirements: DC 6.8 V/7.2 V (battery pack) DC 8.4 V (AC Adaptor...
Operation Guide
Page 47
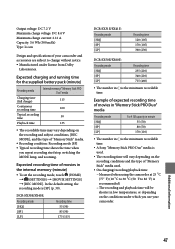
...: 3.6 Wh (500 mAh) Type: Li-ion Design and specifications of your camcorder. Expected recording time of "Memory Stick" media used. On charging/recording/playback time Measured when using the camcorder at 25 C (77 ˚F) (10 C to 30 C (50 ˚F to change without notice. Manufactured under which you repeat recording start/stop, switching the MODE lamp, and zooming. Example of expected recording time of movies in "Memory Stick PRO Duo" media Recording mode [HQ] [SP...
...: 3.6 Wh (500 mAh) Type: Li-ion Design and specifications of your camcorder. Expected recording time of "Memory Stick" media used. On charging/recording/playback time Measured when using the camcorder at 25 C (77 ˚F) (10 C to 30 C (50 ˚F to change without notice. Manufactured under which you repeat recording start/stop, switching the MODE lamp, and zooming. Example of expected recording time of movies in "Memory Stick PRO Duo" media Recording mode [HQ] [SP...
Operation Guide
Page 51
..." media 35 "Memory Stick PRO Duo" media 35 Menus 37 Movies 13, 17 O One Touch Disc Burn 23 Operation beeps 11 Operation flow 6 OPTION MENU 37, 40 P Parts and controls 50 Photos 15, 18 Playback 17 PMB (Picture Motion Browser)....21, 25 PMB Guide 25 R Recording 13 Recording and playback time....47 Recording media 34 Repair 42 RESET 50 S Screen indicators 49 Self-diagnosis display 43 Setting the date and time...........11 Software 21 Specifications 46 Supplied items 4 T Tripod 34 Troubleshooting 42 Turning the power...
..." media 35 "Memory Stick PRO Duo" media 35 Menus 37 Movies 13, 17 O One Touch Disc Burn 23 Operation beeps 11 Operation flow 6 OPTION MENU 37, 40 P Parts and controls 50 Photos 15, 18 Playback 17 PMB (Picture Motion Browser)....21, 25 PMB Guide 25 R Recording 13 Recording and playback time....47 Recording media 34 Repair 42 RESET 50 S Screen indicators 49 Self-diagnosis display 43 Setting the date and time...........11 Software 21 Specifications 46 Supplied items 4 T Tripod 34 Troubleshooting 42 Turning the power...


