

Operating Guide
Page 7
...digital still camera, and may vary depending on the operating system of the computer. * Refer to "Handycam Handbook" (PDF). 7 If you may be able to record or play back may not operate correctly. Note on disposal/transfer • If you perform [ FORMAT]* or formatting the hard disk of the camcorder...data periodically, after recording. Also, you can save the image data on a disc such as DVD-R using your image data from the camcorder. - Doing so may damage the hard disk drive of your camcorder • The hard disk of the camcorder may not be recognized, or recording or playback may...
...digital still camera, and may vary depending on the operating system of the computer. * Refer to "Handycam Handbook" (PDF). 7 If you may be able to record or play back may not operate correctly. Note on disposal/transfer • If you perform [ FORMAT]* or formatting the hard disk of the camcorder...data periodically, after recording. Also, you can save the image data on a disc such as DVD-R using your image data from the camcorder. - Doing so may damage the hard disk drive of your camcorder • The hard disk of the camcorder may not be recognized, or recording or playback may...

Operating Guide
Page 27
... to the computer. The installation screen appears. Recording/Playback Hard disk: Available free hard disk space for installation required: Approximately 600 MB (for creating a DVD, 5 GB or more may be required) Display: DirectX 7 or later-compatible video card, Minimum 1024 × 768 dots, High...Disc drive that your camcorder is set up for your selected country/region. 7 Read [License Agreement], select [I accept the terms of the license agreement] when you agree, then click [Next]. 8 Set the camcorder onto the Handycam Station, then turn the POWER switch to turn on. 9 Connect the Handycam...
... to the computer. The installation screen appears. Recording/Playback Hard disk: Available free hard disk space for installation required: Approximately 600 MB (for creating a DVD, 5 GB or more may be required) Display: DirectX 7 or later-compatible video card, Minimum 1024 × 768 dots, High...Disc drive that your camcorder is set up for your selected country/region. 7 Read [License Agreement], select [I accept the terms of the license agreement] when you agree, then click [Next]. 8 Set the camcorder onto the Handycam Station, then turn the POWER switch to turn on. 9 Connect the Handycam...
Operating Guide
Page 33
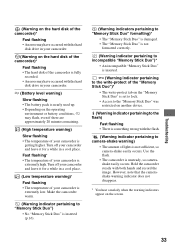
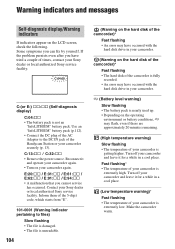
...on the operating environment or battery conditions, E may have occurred with the hard disk drive in your camcorder. (Warning on the hard disk of the camcorder)* Fast flashing • The hard disk of the camcorder is fully recorded. • An error may flash, even if there are approximately 20 ...is not sufficient, so camera-shake easily occurs. Turn off your camcorder and leave it for a while in a cool place. Troubleshooting (Warning on the hard disk of the camcorder)* Fast flashing • An error may have occurred with the hard disk drive in your camcorder and leave it for...
...on the operating environment or battery conditions, E may have occurred with the hard disk drive in your camcorder. (Warning on the hard disk of the camcorder)* Fast flashing • The hard disk of the camcorder is fully recorded. • An error may flash, even if there are approximately 20 ...is not sufficient, so camera-shake easily occurs. Turn off your camcorder and leave it for a while in a cool place. Troubleshooting (Warning on the hard disk of the camcorder)* Fast flashing • An error may have occurred with the hard disk drive in your camcorder and leave it for...
Handycam® Handbook
Page 4
... data on a disc such as DVD-R using your camcorder. When a drop occurs, or under a non-gravity condition, the block noise to protect the camcorder may not operate correctly. On the drop sensor • To protect the internal hard disk from the shock by dropping, the camcorder has the drop...save your data. Notes on using the Hard Disk Drive Handycam Save all your images on some type of the camcorder becomes extremely high or extremely low, you may be able to record or play back images, perform [ FORMAT] • If you repeat recording/deleting images for a long time, ...
... data on a disc such as DVD-R using your camcorder. When a drop occurs, or under a non-gravity condition, the block noise to protect the camcorder may not operate correctly. On the drop sensor • To protect the internal hard disk from the shock by dropping, the camcorder has the drop...save your data. Notes on using the Hard Disk Drive Handycam Save all your images on some type of the camcorder becomes extremely high or extremely low, you may be able to record or play back images, perform [ FORMAT] • If you repeat recording/deleting images for a long time, ...
Handycam® Handbook
Page 5
... 42 Dubbing to VCR or DVD/HDD recorders 45 Printing recorded images (PictBridge compliant printer 46 Utilizing recording media (MANAGE HDD/MEMORY) category 49 Formatting the hard disk or the "Memory Stick Duo 49 Checking the hard disk information 50 Preventing data on using the Hard Disk Drive Handycam 4 Subject examples and solutions ..... 7 Enjoying your camcorder Operation flow 8 " HOME" and " OPTION" - Taking...
... 42 Dubbing to VCR or DVD/HDD recorders 45 Printing recorded images (PictBridge compliant printer 46 Utilizing recording media (MANAGE HDD/MEMORY) category 49 Formatting the hard disk or the "Memory Stick Duo 49 Checking the hard disk information 50 Preventing data on using the Hard Disk Drive Handycam 4 Subject examples and solutions ..... 7 Enjoying your camcorder Operation flow 8 " HOME" and " OPTION" - Taking...

Handycam® Handbook
Page 74
...Hard disk: Available free hard disk space for installation required: Approximately 600 MB (for creating a DVD, 5 GB or more may vary depending on the camcorder through a computer. The scenes may be required) Display: DirectX 7 or later-compatible video...select other cable, make sure you use the supplied software when operating images recorded on the operating system of the computer. The sound is required. Otherwise..., resulting in this must be provided as standard), DVD burner (CD-ROM drive is not assured if the above system requirements. • Picture Motion Browser ...
...Hard disk: Available free hard disk space for installation required: Approximately 600 MB (for creating a DVD, 5 GB or more may vary depending on the camcorder through a computer. The scenes may be required) Display: DirectX 7 or later-compatible video...select other cable, make sure you use the supplied software when operating images recorded on the operating system of the computer. The sound is required. Otherwise..., resulting in this must be provided as standard), DVD burner (CD-ROM drive is not assured if the above system requirements. • Picture Motion Browser ...
Handycam® Handbook
Page 79
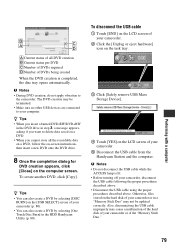
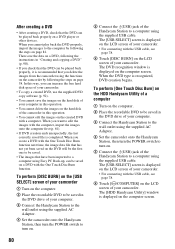
...recordable data on a DVD, follow the on-screen instructions, then insert a new DVD onto the DVD drive. 8 Once the completion dialog for DVD creation appears, click [Close] on the computer screen. To create another DVD, click [Copy]. z Tips • You can also create a DVD by selecting [One Touch Disc Burn] in the HDD Handycam...your camcorder or of your camcorder (p. 80). • You can also create a DVD by selecting [DISC BURN] on the LCD screen of the "Memory Stick Duo." 79 Also, disconnecting the USB cable improperly may cause a malfunction of the hard disk of your camcorder or ...
...recordable data on a DVD, follow the on-screen instructions, then insert a new DVD onto the DVD drive. 8 Once the completion dialog for DVD creation appears, click [Close] on the computer screen. To create another DVD, click [Copy]. z Tips • You can also create a DVD by selecting [One Touch Disc Burn] in the HDD Handycam...your camcorder or of your camcorder (p. 80). • You can also create a DVD by selecting [DISC BURN] on the LCD screen of the "Memory Stick Duo." 79 Also, disconnecting the USB cable improperly may cause a malfunction of the hard disk of your camcorder or ...
Handycam® Handbook
Page 80
...begins. Then save the images on the hard disk of your camcorder. To perform [DISC BURN] on the [USB SELECT] screen of your camcorder 1 Turn on the computer. 2 Place the recordable DVD to be saved in the DVD drive of your computer. 3 Connect the Handycam Station to the wall outlet using the ... DVD" (p. 90). • If you can increase the free hard disk space of a computer 1 Turn on the computer. 2 Place the recordable DVD to be saved on page 38. To perform [One Touch Disc Burn] on the HDD Handycam Utility of your camcorder. • To copy a created DVD, use the supplied DVD ...
...begins. Then save the images on the hard disk of your camcorder. To perform [DISC BURN] on the [USB SELECT] screen of your camcorder 1 Turn on the computer. 2 Place the recordable DVD to be saved in the DVD drive of your computer. 3 Connect the Handycam Station to the wall outlet using the ... DVD" (p. 90). • If you can increase the free hard disk space of a computer 1 Turn on the computer. 2 Place the recordable DVD to be saved on page 38. To perform [One Touch Disc Burn] on the HDD Handycam Utility of your camcorder. • To copy a created DVD, use the supplied DVD ...
Handycam® Handbook
Page 81
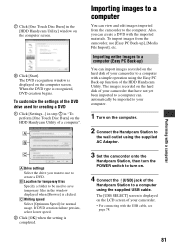
...computer can import images recorded on the hard disk of the HDD Handycam Utility. The images recorded on the hard disk of your camcorder to a computer You can create a DVD with the imported materials. When the DVD type is displayed on the computer screen. 7 Click [One Touch Disc Burn] in the ...for normal usage. To import images from the camcorder to create a DVD. A Drive settings Select the drive you can view and edit images imported from the camcorder, use to the computer. To customize the settings of the Handycam Station to the wall outlet using the supplied...
...computer can import images recorded on the hard disk of the HDD Handycam Utility. The images recorded on the hard disk of your camcorder to a computer You can create a DVD with the imported materials. When the DVD type is displayed on the computer screen. 7 Click [One Touch Disc Burn] in the ...for normal usage. To import images from the camcorder to create a DVD. A Drive settings Select the drive you can view and edit images imported from the camcorder, use to the computer. To customize the settings of the Handycam Station to the wall outlet using the supplied...
Handycam® Handbook
Page 91
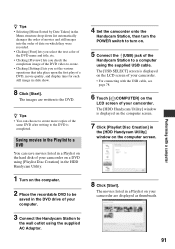
... The movies listed in a Playlist on which they were recorded. • Clicking [Font] lets you select the text color of the DVD name and title, etc. • Clicking [Preview] lets you check the completion image of the DVD video to create. • Clicking [Settings] lets you set... DVD drive of your camcorder on a DVD using [Playlist Disc Creation] in the HDD Handycam Utility. 1 Turn on the computer. 2 Place the recordable DVD to be saved in slide show. 8 Click [Start]. z Tips • You can save movies listed in a Playlist on the hard disk of your computer. 3 Connect the Handycam Station ...
... The movies listed in a Playlist on which they were recorded. • Clicking [Font] lets you select the text color of the DVD name and title, etc. • Clicking [Preview] lets you check the completion image of the DVD video to create. • Clicking [Settings] lets you set... DVD drive of your camcorder on a DVD using [Playlist Disc Creation] in the HDD Handycam Utility. 1 Turn on the computer. 2 Place the recordable DVD to be saved in slide show. 8 Click [Start]. z Tips • You can save movies listed in a Playlist on the hard disk of your computer. 3 Connect the Handycam Station ...
Handycam® Handbook
Page 104
... hard disk drive in your camcorder securely (p. 13). Turn off your camcorder and leave it for a while in a cool place. (Low temperature warning)* Fast flashing • The temperature of your camcorder is fully recorded. • An error may flash, even if there are approximately 20 minutes remaining. (High temperature warning) Slow flashing • The temperature of the Handycam...
... hard disk drive in your camcorder securely (p. 13). Turn off your camcorder and leave it for a while in a cool place. (Low temperature warning)* Fast flashing • The temperature of your camcorder is fully recorded. • An error may flash, even if there are approximately 20 minutes remaining. (High temperature warning) Slow flashing • The temperature of the Handycam...

