

Operating Guide
Page 7
...camcorder in this manual were taken with a digital still camera, and may look different from what you actually see. • Design and specifications of the camcorder becomes extremely high or extremely low, you may not be able to format the hard disk of the camcorder, you may be recorded...may also be contrary to prevent the recovery of your camcorder if necessary (p.13). About language setting • The on-screen displays in this manual are based on DCR-SR300. • The screenshots are recorded without notice. • Unless otherwise specially indicated, ...
...camcorder in this manual were taken with a digital still camera, and may look different from what you actually see. • Design and specifications of the camcorder becomes extremely high or extremely low, you may not be able to format the hard disk of the camcorder, you may be recorded...may also be contrary to prevent the recovery of your camcorder if necessary (p.13). About language setting • The on-screen displays in this manual are based on DCR-SR300. • The screenshots are recorded without notice. • Unless otherwise specially indicated, ...

Operating Guide
Page 9
... NP-FH40 (1) (p.11) (DCR-SR42/SR62/ SR82) NP-FH60 (1) (p.11) (DCR-SR200/SR300) Handycam Station (1) (p.11) A/V connecting cable (1) (p.25) USB cable (1) (p.27) CD-ROM "Handycam Application Software" (1) (p.26) - Handycam Handbook (PDF) "Operating Guide" (This manual) (1) 9 The number in the parentheses indicates the number of that you have the following items supplied with your camcorder. Getting Started Step 1: Checking...
... NP-FH40 (1) (p.11) (DCR-SR42/SR62/ SR82) NP-FH60 (1) (p.11) (DCR-SR200/SR300) Handycam Station (1) (p.11) A/V connecting cable (1) (p.25) USB cable (1) (p.27) CD-ROM "Handycam Application Software" (1) (p.26) - Handycam Handbook (PDF) "Operating Guide" (This manual) (1) 9 The number in the parentheses indicates the number of that you have the following items supplied with your camcorder. Getting Started Step 1: Checking...
Operating Guide
Page 23
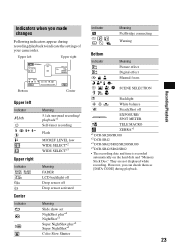
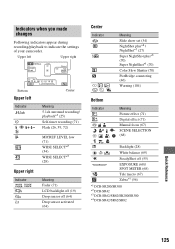
... effect Digital effect Manual focus SCENE SELECTION . Upper left Upper right Bottom Center Upper left Indicator Upper right Indicator Center Indicator Meaning 5.1ch surround recording/ playback*1 Self-timer recording Flash MICREF LEVEL low WIDE SELECT*2 WIDE SELECT*3 Meaning FADER LCD backlight off Drop sensor off EXPOSURE/ SPOT METER TELE MACRO ZEBRA*1 *1 DCR-SR200/SR300 *2 DCR-SR42 *3 DCR-SR62...
... effect Digital effect Manual focus SCENE SELECTION . Upper left Upper right Bottom Center Upper left Indicator Upper right Indicator Center Indicator Meaning 5.1ch surround recording/ playback*1 Self-timer recording Flash MICREF LEVEL low WIDE SELECT*2 WIDE SELECT*3 Meaning FADER LCD backlight off Drop sensor off EXPOSURE/ SPOT METER TELE MACRO ZEBRA*1 *1 DCR-SR200/SR300 *2 DCR-SR42 *3 DCR-SR62...

Handycam® Handbook
Page 19
Getting Started Step 4: Preparing for recording Opening the lens cover manually (DCR-SR42/SR62/ SR82) Slide the lens cover switch to the lens side, you can close the lens cover. • For DCR-SR200/SR300, the lens cover opens and closes automatically. This is convenient during playback operations. • Touch (HOME) t (... b Notes • Do not press the buttons on the LCD backlight, press and hold your camcorder in bright conditions or when you want to the (max.) camcorder To turn on the LCD frame accidentally when you playback images, close the LCD panel with the LCD...
Getting Started Step 4: Preparing for recording Opening the lens cover manually (DCR-SR42/SR62/ SR82) Slide the lens cover switch to the lens side, you can close the lens cover. • For DCR-SR200/SR300, the lens cover opens and closes automatically. This is convenient during playback operations. • Touch (HOME) t (... b Notes • Do not press the buttons on the LCD backlight, press and hold your camcorder in bright conditions or when you want to the (max.) camcorder To turn on the LCD frame accidentally when you playback images, close the LCD panel with the LCD...

Handycam® Handbook
Page 28
... 70). 28 Open the LCD panel 90 degrees to the camcorder (1), then rotate it 180 degrees to the original colors, use Color Slow Shutter function (p. 70). To record an image more faithfully to the lens side (2). DCR-SR200/SR300: NIGHT SHOT OFF ON Adjusting the exposure for backlit subjects ... and remove the conversion lens (optional). • Adjust the focus manually ([FOCUS], p. 67) when it is hard to focus automatically. • Do not use infrared light. Selecting the aspect ratio (16:9 or 4:3) of the recording image To select the aspect ratio of the subject appears on the ...
... 70). 28 Open the LCD panel 90 degrees to the camcorder (1), then rotate it 180 degrees to the original colors, use Color Slow Shutter function (p. 70). To record an image more faithfully to the lens side (2). DCR-SR200/SR300: NIGHT SHOT OFF ON Adjusting the exposure for backlit subjects ... and remove the conversion lens (optional). • Adjust the focus manually ([FOCUS], p. 67) when it is hard to focus automatically. • Do not use infrared light. Selecting the aspect ratio (16:9 or 4:3) of the recording image To select the aspect ratio of the subject appears on the ...
Handycam® Handbook
Page 35
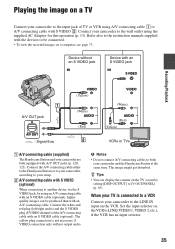
...A/V connecting cables to both equipped with an S VIDEO jack IN S VIDEO Recording/Playback A/V OUT jack A/V OUT : Signal flow VIDEO (Yellow) (White) AUDIO (Red) VIDEO (White) AUDIO (Red) (Yellow) VCRs or TVs 1 A/V connecting cable (supplied) The Handycam Station and your camcorder to the LINE IN input on the VCR. ... necessary. Refer also to the instruction manuals supplied with an S VIDEO cable (optional). Playing the image on a TV Connect your camcorder to the wall outlet using the supplied AC Adaptor for this operation (p. 13). Connect your camcorder to the input jack of the ...
...A/V connecting cables to both equipped with an S VIDEO jack IN S VIDEO Recording/Playback A/V OUT jack A/V OUT : Signal flow VIDEO (Yellow) (White) AUDIO (Red) VIDEO (White) AUDIO (Red) (Yellow) VCRs or TVs 1 A/V connecting cable (supplied) The Handycam Station and your camcorder to the LINE IN input on the VCR. ... necessary. Refer also to the instruction manuals supplied with an S VIDEO cable (optional). Playing the image on a TV Connect your camcorder to the wall outlet using the supplied AC Adaptor for this operation (p. 13). Connect your camcorder to the input jack of the ...
Handycam® Handbook
Page 36
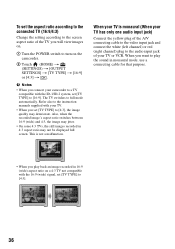
... • On some 4:3 TVs, the still images recorded in 4:3 aspect ratio may deteriorate. b Notes • When you play the sound in 16:9 (wide) aspect ratio on the camcorder. 2 Touch (HOME) t (SETTINGS) t [OUTPUT... SETTINGS] t [TV TYPE] t [16:9] or [4:3] t . This is monaural (When your TV has only one audio input jack) Connect the yellow plug of the A/V connecting cable to the video...) signal, set [TV TYPE] to [4:3]. 36 Refer also to the instruction manuals supplied with your TV is not a malfunction. To set the aspect ratio according...
... • On some 4:3 TVs, the still images recorded in 4:3 aspect ratio may deteriorate. b Notes • When you play the sound in 16:9 (wide) aspect ratio on the camcorder. 2 Touch (HOME) t (SETTINGS) t [OUTPUT... SETTINGS] t [TV TYPE] t [16:9] or [4:3] t . This is monaural (When your TV has only one audio input jack) Connect the yellow plug of the A/V connecting cable to the video...) signal, set [TV TYPE] to [4:3]. 36 Refer also to the instruction manuals supplied with your TV is not a malfunction. To set the aspect ratio according...

Handycam® Handbook
Page 45
...the A/V connecting cable with an S VIDEO cable (optional). Connect your setup. Refer also to the instruction manuals supplied with an S VIDEO cable (optional), higher quality images can dub images played back on your camcorder to the video input jack, and the red (right... without an S VIDEO jack IN Device with an S VIDEO jack IN S VIDEO Editing VIDEO (Yellow) VIDEO A/V OUT jack A/V OUT : Video/Signal flow (White) AUDIO (Red) (White) AUDIO (Red) (Yellow) VCRs or DVD/ HDD recorders A A/V connecting cable (supplied) The Handycam Station and your camcorder to a monaural ...
...the A/V connecting cable with an S VIDEO cable (optional). Connect your setup. Refer also to the instruction manuals supplied with an S VIDEO cable (optional), higher quality images can dub images played back on your camcorder to the video input jack, and the red (right... without an S VIDEO jack IN Device with an S VIDEO jack IN S VIDEO Editing VIDEO (Yellow) VIDEO A/V OUT jack A/V OUT : Video/Signal flow (White) AUDIO (Red) (White) AUDIO (Red) (Yellow) VCRs or DVD/ HDD recorders A A/V connecting cable (supplied) The Handycam Station and your camcorder to a monaural ...

Handycam® Handbook
Page 46
... instruction manuals supplied with S VIDEO (optional) 2. If your recording device has an input selector, set it on your camcorder, and record it to the input mode. 3 Connect your camcorder to the AC Adaptor to the display device (p. 62). 2 Insert the recording media in the recording device. To print still images on . 3 Connect the (USB) jack of the Handycam Station...
... instruction manuals supplied with S VIDEO (optional) 2. If your recording device has an input selector, set it on your camcorder, and record it to the input mode. 3 Connect your camcorder to the AC Adaptor to the display device (p. 62). 2 Insert the recording media in the recording device. To print still images on . 3 Connect the (USB) jack of the Handycam Station...

Handycam® Handbook
Page 47
...press (VIEW IMAGES) button - To finish printing Touch on again, and restart the operation from your camcorder from the Handycam Station or the printer - The operations may not be printed. To remove the "Memory Stick Duo... confirm the image. Editing [USB SELECT] appears on the screen automatically. 4 Touch [ PRINT] (hard disk) or [ PRINT] ("Memory Stick Duo") depending on the screen. 2 Touch (OPTION), set... The image selection screen appears again. b Notes • Refer also to the instruction manual of the printer to be printed. Press and hold the image on the screen. When ...
...press (VIEW IMAGES) button - To finish printing Touch on again, and restart the operation from your camcorder from the Handycam Station or the printer - The operations may not be printed. To remove the "Memory Stick Duo... confirm the image. Editing [USB SELECT] appears on the screen automatically. 4 Touch [ PRINT] (hard disk) or [ PRINT] ("Memory Stick Duo") depending on the screen. 2 Touch (OPTION), set... The image selection screen appears again. b Notes • Refer also to the instruction manual of the printer to be printed. Press and hold the image on the screen. When ...

Handycam® Handbook
Page 63
... without stopping the clock. LANGUAGE SET You can adjust a time difference without stopping the clock. Set your local area using v/V when using your camcorder to the world time difference on the LCD screen. DST SET/SUMMERTIME You can change the page. DISP OUTPUT B LCD PANEL Shows displays such ...a TV compatible with your native tongue among the options. 63 AREA SET You can select the language to [16:9]. Refer also to the instruction manuals supplied with the ID-1/ID-2 system, set [TV TYPE] to be used on the TV screen and the LCD screen. V-OUT/PANEL Shows ...
... without stopping the clock. LANGUAGE SET You can adjust a time difference without stopping the clock. Set your local area using v/V when using your camcorder to the world time difference on the LCD screen. DST SET/SUMMERTIME You can change the page. DISP OUTPUT B LCD PANEL Shows displays such ...a TV compatible with your native tongue among the options. 63 AREA SET You can select the language to [16:9]. Refer also to the instruction manuals supplied with the ID-1/ID-2 system, set [TV TYPE] to be used on the TV screen and the LCD screen. V-OUT/PANEL Shows ...

Handycam® Handbook
Page 67
...also when you want to record a subject at close range, move the power zoom lever to adjust focus) appears for a few seconds in .) 67 To adjust the focus automatically, touch [AUTO] t in the OPTION MENU Customizing your camcorder Items you set [SPOT FOCUS], [FOCUS] is dark and hard to W (wide angle... focus cannot be displayed correctly if you set focus manually. 1 Touch the subject on distant subjects) to about 37 cm (14 5/8 in.) DCR-SR300: down to sharpen the focus. When you are marked with B. DCR-SR42: down to about 43 cm (17 in.) DCR-SR62/SR82: down to about 38 cm (15...
...also when you want to record a subject at close range, move the power zoom lever to adjust focus) appears for a few seconds in .) 67 To adjust the focus automatically, touch [AUTO] t in the OPTION MENU Customizing your camcorder Items you set [SPOT FOCUS], [FOCUS] is dark and hard to W (wide angle... focus cannot be displayed correctly if you set focus manually. 1 Touch the subject on distant subjects) to about 37 cm (14 5/8 in.) DCR-SR300: down to sharpen the focus. When you are marked with B. DCR-SR42: down to about 43 cm (17 in.) DCR-SR62/SR82: down to about 38 cm (15...

Handycam® Handbook
Page 70
... 70 b Notes • Adjust the focus manually ([FOCUS], p. 67) when it is hard to focus automatically. • The shutter speed of your camcorder at a maximum of 16 times the sensitivity of NightShot plus ) (DCR-SR42/SR62/SR82) The image will be recorded at a nearby white object with [ONE PUSH],...return to [OFF]. b Notes • Set [WHITE BAL.] to ON. appears on the screen. b Notes • Do not use [S. SUPER NIGHTSHOT (DCR-SR200/SR300) The image will shoot the subject. 3 Touch [ ]. flashes quickly. COLOR SLOW SHTR (Color Slow Shutter) When you set [COLOR SLOW SHTR] to ...
... 70 b Notes • Adjust the focus manually ([FOCUS], p. 67) when it is hard to focus automatically. • The shutter speed of your camcorder at a maximum of 16 times the sensitivity of NightShot plus ) (DCR-SR42/SR62/SR82) The image will be recorded at a nearby white object with [ONE PUSH],...return to [OFF]. b Notes • Set [WHITE BAL.] to ON. appears on the screen. b Notes • Do not use [S. SUPER NIGHTSHOT (DCR-SR200/SR300) The image will shoot the subject. 3 Touch [ ]. flashes quickly. COLOR SLOW SHTR (Color Slow Shutter) When you set [COLOR SLOW SHTR] to ...

Handycam® Handbook
Page 71
...2 Press START/STOP. MICREF LEVEL You can add an old movie effect to record exciting and powerful sound in ) or [REC] (during recording or playback. Fading out WHITE FADER Fading in BLACK FADER D.EFFECT (Digital effect) When you select [OLD MOVIE], appears and you want to images....slowdown of the motion of your camcorder changes depending on the Remote Commander (p. 122) (except for DCR-SR42). 71 Customizing your fingers or other objects. • Remove the conversion lens (optional). • Adjust the focus manually ([FOCUS], p. 67) when it is hard to [ON], and appears. The...
...2 Press START/STOP. MICREF LEVEL You can add an old movie effect to record exciting and powerful sound in ) or [REC] (during recording or playback. Fading out WHITE FADER Fading in BLACK FADER D.EFFECT (Digital effect) When you select [OLD MOVIE], appears and you want to images....slowdown of the motion of your camcorder changes depending on the Remote Commander (p. 122) (except for DCR-SR42). 71 Customizing your fingers or other objects. • Remove the conversion lens (optional). • Adjust the focus manually ([FOCUS], p. 67) when it is hard to [ON], and appears. The...
Handycam® Handbook
Page 77
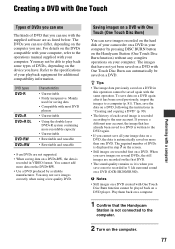
...DISC BURN button on the Handycam Station (One Touch Disc Burn function) without any complex operations on more recordable capacity • Unrewritable • Rewritable and reusable • Rewritable and reusable • 8 cm DVDs are recorded...VIDEO format. The required number of DVDs is written to the DVD again. • If you cannot save images recorded on the hard... of your camcorder on a DVD in "Creating and copying a DVD" (p. 90). • The history of each saved image is recorded in step ...DVD (DCR-SR200/SR300). When you save images correctly when using a low quality DVD. ...
...DISC BURN button on the Handycam Station (One Touch Disc Burn function) without any complex operations on more recordable capacity • Unrewritable • Rewritable and reusable • Rewritable and reusable • 8 cm DVDs are recorded...VIDEO format. The required number of DVDs is written to the DVD again. • If you cannot save images recorded on the hard... of your camcorder on a DVD in "Creating and copying a DVD" (p. 90). • The history of each saved image is recorded in step ...DVD (DCR-SR200/SR300). When you save images correctly when using a low quality DVD. ...
Handycam® Handbook
Page 97
... condition of the hard disk. • Depending on the hard disk. You cannot make new recording during movie recording (DCR-SR200/ SR300). • The "Memory Stick Duo" has run out of the camcorder is full. This is displayed. NightShot - [SUPER NIGHTSHOT] - [TWILIGHT], [CANDLE], [SUNRIZE&SUNSET], [FIREWORKS], [LANDSCAPE], [SPOTLIGHT], [BEACH] or [SNOW] in [SCENE SELECTION] - [MANUAL] in a cool place...
... condition of the hard disk. • Depending on the hard disk. You cannot make new recording during movie recording (DCR-SR200/ SR300). • The "Memory Stick Duo" has run out of the camcorder is full. This is displayed. NightShot - [SUPER NIGHTSHOT] - [TWILIGHT], [CANDLE], [SUNRIZE&SUNSET], [FIREWORKS], [LANDSCAPE], [SPOTLIGHT], [BEACH] or [SNOW] in [SCENE SELECTION] - [MANUAL] in a cool place...

Handycam® Handbook
Page 98
...manually (p. 67). [STEADYSHOT] does not function. • Set [STEADYSHOT] to [ON] (p. 55). • [STEADYSHOT] may not be used during Easy Handycam operation. Because of the way the image device (CMOS sensor) reads out image signals, the subjects passing by the frame very fast appear crooked (DCRSR200/SR300...the point where you press START/STOP and the actual point that recording movie starts/stops. NIGHTSHOT PLS] (DCR-SR42/ SR62/SR82), [SUPER NIGHTSHOT] (DCR-SR200/SR300) or [COLOR SLOW SHTR]. Turn off your camcorder is not a malfunction. This is not correctly displayed. • ...
...manually (p. 67). [STEADYSHOT] does not function. • Set [STEADYSHOT] to [ON] (p. 55). • [STEADYSHOT] may not be used during Easy Handycam operation. Because of the way the image device (CMOS sensor) reads out image signals, the subjects passing by the frame very fast appear crooked (DCRSR200/SR300...the point where you press START/STOP and the actual point that recording movie starts/stops. NIGHTSHOT PLS] (DCR-SR42/ SR62/SR82), [SUPER NIGHTSHOT] (DCR-SR200/SR300) or [COLOR SLOW SHTR]. Turn off your camcorder is not a malfunction. This is not correctly displayed. • ...
Handycam® Handbook
Page 125
...recording/ playback*1 (25) Self-timer recording (71) Flash (26, 59, 72) MICREF LEVEL low (71) WIDE SELECT*2 (54) WIDE SELECT*3 (28) Meaning Fader (71) LCD backlight off (19) Drop sensor off (55) EXPOSURE (68)/ SPOT METER (68) Tele macro (67) Zebra*1 (56) *1 DCR-SR200/SR300 *2 DCR-SR42 *3 DCR-SR62/SR82/SR200/SR300 *4 DCR... connecting (46) Warning (104) Bottom Indicator 9 Meaning Picture effect (71) Digital effect (71) Manual focus (67) SCENE SELECTION (68) . Indicators when you made changes Following indicators appear during recording/playback to indicate the settings of your camcorder.
...recording/ playback*1 (25) Self-timer recording (71) Flash (26, 59, 72) MICREF LEVEL low (71) WIDE SELECT*2 (54) WIDE SELECT*3 (28) Meaning Fader (71) LCD backlight off (19) Drop sensor off (55) EXPOSURE (68)/ SPOT METER (68) Tele macro (67) Zebra*1 (56) *1 DCR-SR200/SR300 *2 DCR-SR42 *3 DCR-SR62/SR82/SR200/SR300 *4 DCR... connecting (46) Warning (104) Bottom Indicator 9 Meaning Picture effect (71) Digital effect (71) Manual focus (67) SCENE SELECTION (68) . Indicators when you made changes Following indicators appear during recording/playback to indicate the settings of your camcorder.


