
Operating Guide
Page 1
3-098-548-11(1) Digital Video Camera Recorder Operating Guide DCR-SR42/SR62/SR82/SR200/SR300 For details on the advanced operations, please refer to "Handycam Handbook" (PDF). © 2007 Sony Corporation
3-098-548-11(1) Digital Video Camera Recorder Operating Guide DCR-SR42/SR62/SR82/SR200/SR300 For details on the advanced operations, please refer to "Handycam Handbook" (PDF). © 2007 Sony Corporation

Operating Guide
Page 2
This plug will fit into the power outlet only one blade wider than the other sources, refer to the operating instructions. If the plug should be of sufficient magnitude to constitute a risk of electric shock to your home, consult your dealer or local power company. Overloading Do not overload wall outlets, extension cords or convenience receptacles beyond their capacity, since this manual for future reference. Polarization This set should still fail to fit, contact your protection, please read these safety instructions completely before operating the appliance, and keep this ...
This plug will fit into the power outlet only one blade wider than the other sources, refer to the operating instructions. If the plug should be of sufficient magnitude to constitute a risk of electric shock to your home, consult your dealer or local power company. Overloading Do not overload wall outlets, extension cords or convenience receptacles beyond their capacity, since this manual for future reference. Polarization This set should still fail to fit, contact your protection, please read these safety instructions completely before operating the appliance, and keep this ...
Operating Guide
Page 3
The set may result in a wet basement, or near or over a radiator or heat register, or where it from the wall outlet and disconnect the antenna or cable system. Use only a cart, stand, tripod, bracket, or table recommended by the manufacturer) to determine that are specified in fire, electric shock, or other hazards. Never place the set . Service Damage Requiring Service Unplug the set . - If liquid has been spilled or objects have the same characteristics as a bookcase, or built-in safe operating condition. 3 Safety Check Upon completion of other materials. - ...
The set may result in a wet basement, or near or over a radiator or heat register, or where it from the wall outlet and disconnect the antenna or cable system. Use only a cart, stand, tripod, bracket, or table recommended by the manufacturer) to determine that are specified in fire, electric shock, or other hazards. Never place the set . Service Damage Requiring Service Unplug the set . - If liquid has been spilled or objects have the same characteristics as a bookcase, or built-in safe operating condition. 3 Safety Check Upon completion of other materials. - ...
Operating Guide
Page 4
Read this first Before operating the unit, please read this product, you may result. Owner's Record The model and serial numbers are recyclable. Address: 16530 Via Esprillo, San Diego, CA 92127 U.S.A Telephone number: 858-942-2230 This ...LITHIUM-ION BATTERIES Lithium-Ion batteries are located on the bottom. For customers in the U.S.A. Regulatory Information Declaration of Conformity Trade Name: SONY Model No.: DCR-SR62 Responsible Party: Sony Electronics Inc. Address: 16530 Via Esprillo, San Diego, CA 92127 U.S.A Telephone number: 858-942-2230 This device complies with the...
Read this first Before operating the unit, please read this product, you may result. Owner's Record The model and serial numbers are recyclable. Address: 16530 Via Esprillo, San Diego, CA 92127 U.S.A Telephone number: 858-942-2230 This ...LITHIUM-ION BATTERIES Lithium-Ion batteries are located on the bottom. For customers in the U.S.A. Regulatory Information Declaration of Conformity Trade Name: SONY Model No.: DCR-SR62 Responsible Party: Sony Electronics Inc. Address: 16530 Via Esprillo, San Diego, CA 92127 U.S.A Telephone number: 858-942-2230 This device complies with the...
Operating Guide
Page 5
... the instructions, may cause undesired operation. special handling may cause undesired operation. Declaration of Conformity Trade Name: SONY Model No.: DCR-SR300 Responsible Party: Sony Electronics Inc. CAUTION You are cautioned that may cause harmful interference to operate this device must accept any interference...can radiate radio frequency energy and, if not installed and used with the limits for a Class B digital device, pursuant to comply with the Handycam Station Model DCRA-C171 and AC Adaptor Model AC-L200/L200B. The supplied interface cable must accept any ...
... the instructions, may cause undesired operation. special handling may cause undesired operation. Declaration of Conformity Trade Name: SONY Model No.: DCR-SR300 Responsible Party: Sony Electronics Inc. CAUTION You are cautioned that may cause harmful interference to operate this device must accept any interference...can radiate radio frequency energy and, if not installed and used with the limits for a Class B digital device, pursuant to comply with the Handycam Station Model DCRA-C171 and AC Adaptor Model AC-L200/L200B. The supplied interface cable must accept any ...
Operating Guide
Page 6
and CANADA Battery pack This device complies with Canadian ICES-003. 6 For customers in the U.S.A. This Class B digital apparatus complies with Part 15 of the FCC Rules. Operation is subject to the following two conditions: (1) This device may not cause harmful interference, and (2) this device must accept any interference received, including interference that may cause undesired operation.
and CANADA Battery pack This device complies with Canadian ICES-003. 6 For customers in the U.S.A. This Class B digital apparatus complies with Part 15 of the FCC Rules. Operation is subject to the following two conditions: (1) This device may not cause harmful interference, and (2) this device must accept any interference received, including interference that may cause undesired operation.

Operating Guide
Page 7
... in this manual are based on DCR-SR300. • The screenshots are recorded without any problems. • Compensation...recorded. Unauthorized recording of your recordings on a TV, you need a NTSC system-based TV. • Television programs, films, video tapes, and other accessories are subject to record...Handycam Handbook" (PDF). 7 On the drop sensor • To protect the internal hard disk from the camcorder. - Note on operational temperatures • When the temperature of the camcorder, you may not be copyrighted. In this manual were taken with a digital still camera...
... in this manual are based on DCR-SR300. • The screenshots are recorded without any problems. • Compensation...recorded. Unauthorized recording of your recordings on a TV, you need a NTSC system-based TV. • Television programs, films, video tapes, and other accessories are subject to record...Handycam Handbook" (PDF). 7 On the drop sensor • To protect the internal hard disk from the camcorder. - Note on operational temperatures • When the temperature of the camcorder, you may not be copyrighted. In this manual were taken with a digital still camera...

Operating Guide
Page 8
... power on, and setting the date and time 13 Changing the language setting 13 Step 4: Preparing for recording 14 Recording/Playback Recording 15 Playback 17 Parts and functions used for the camcorder 19 Indicators displayed during recording/playback 22 Saving images 24 Deleting images 24 Playing the image on a TV 25 Performing with a computer...
... power on, and setting the date and time 13 Changing the language setting 13 Step 4: Preparing for recording 14 Recording/Playback Recording 15 Playback 17 Parts and functions used for the camcorder 19 Indicators displayed during recording/playback 22 Saving images 24 Deleting images 24 Playing the image on a TV 25 Performing with a computer...

Operating Guide
Page 9
... item supplied. The number in the parentheses indicates the number of that you have the following items supplied with your camcorder. Handycam Handbook (PDF) "Operating Guide" (This manual) (1) 9 Rechargeable battery pack NP-FH40 (1) (p.11) (DCR-SR42/SR62/ SR82) NP-FH60 (1) (p.11) (DCR-SR200/SR300) Handycam Station (1) (p.11) A/V connecting cable (1) (p.25) USB cable (1) (p.27) CD-ROM...
... item supplied. The number in the parentheses indicates the number of that you have the following items supplied with your camcorder. Handycam Handbook (PDF) "Operating Guide" (This manual) (1) 9 Rechargeable battery pack NP-FH40 (1) (p.11) (DCR-SR42/SR62/ SR82) NP-FH60 (1) (p.11) (DCR-SR200/SR300) Handycam Station (1) (p.11) A/V connecting cable (1) (p.25) USB cable (1) (p.27) CD-ROM...
Operating Guide
Page 10
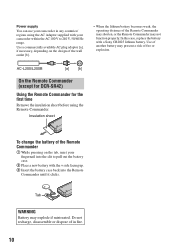
... may explode if mistreated. Power supply You can use your camcorder in fire. 10 AC-L200/L200B [a] [b] On the Remote Commander (except for DCR-SR42) Using the Remote Commander for the first time Remove the insulation sheet before using the AC Adaptor supplied with your camcorder within the AC... 100 V to pull out the battery case. 2 Place a new battery with a Sony CR2025 lithium battery. Do not recharge, disassemble or dispose of fire or explosion. In this case, replace the battery with the + side facing up. 3 ...
... may explode if mistreated. Power supply You can use your camcorder in fire. 10 AC-L200/L200B [a] [b] On the Remote Commander (except for DCR-SR42) Using the Remote Commander for the first time Remove the insulation sheet before using the AC Adaptor supplied with your camcorder within the AC... 100 V to pull out the battery case. 2 Place a new battery with a Sony CR2025 lithium battery. Do not recharge, disassemble or dispose of fire or explosion. In this case, replace the battery with the + side facing up. 3 ...
Operating Guide
Page 11
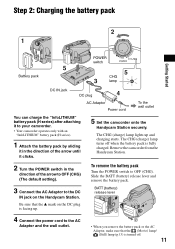
... AC Adaptor and the wall outlet. • When you remove the battery pack or the AC Adaptor, make sure that the v mark on the Handycam Station. Step 2: Charging the battery pack Getting Started POWER switch Battery pack CHG lamp DC IN jack DC plug AC Adaptor Power cord To the..."InfoLITHIUM" battery pack (H series). 1 Attach the battery pack by sliding it in the direction of the arrow until it clicks. 5 Set the camcorder onto the Handycam Station securely. The CHG (charge) lamp turns off . 11 To remove the battery pack Turn the POWER switch to OFF (CHG). The CHG (charge) lamp...
... AC Adaptor and the wall outlet. • When you remove the battery pack or the AC Adaptor, make sure that the v mark on the Handycam Station. Step 2: Charging the battery pack Getting Started POWER switch Battery pack CHG lamp DC IN jack DC plug AC Adaptor Power cord To the..."InfoLITHIUM" battery pack (H series). 1 Attach the battery pack by sliding it in the direction of the arrow until it clicks. 5 Set the camcorder onto the Handycam Station securely. The CHG (charge) lamp turns off . 11 To remove the battery pack Turn the POWER switch to OFF (CHG). The CHG (charge) lamp...

Operating Guide
Page 12
...*3 110*2 12 NP-FH60: (Unit:min.) DCR-SR200 DCR-SR300 Charging time 135 135 Recording time*1 Continuous recording time 115*2 120*3 95*2 100*3 Typical 55*2 45*2 recording time*4 60*3 50*3 Playback time*2 165 160 *1 When [REC MODE] is set to the DC IN jack of your camcorder or the Handycam Station, even when the power cord is...
...*3 110*2 12 NP-FH60: (Unit:min.) DCR-SR200 DCR-SR300 Charging time 135 135 Recording time*1 Continuous recording time 115*2 120*3 95*2 100*3 Typical 55*2 45*2 recording time*4 60*3 50*3 Playback time*2 165 160 *1 When [REC MODE] is set to the DC IN jack of your camcorder or the Handycam Station, even when the power cord is...

Operating Guide
Page 13
...is changed to show messages in the direction of the arrow repeatedly until the respective lamp lights up . (Movie): To record movies (Still): To record still images • When you turn the POWER switch repeatedly in a specified language. Changing the language setting You can...or [SUMMERTIME], [Y] (year), [M] (month), [D] (day), hour and minute. • The date and time does not appear during recording, but they are automatically recorded on the hard disc, and can be displayed during playback. POWER switch When using the camcorder for the first time, the [CLOCK SET] screen appears on...
...is changed to show messages in the direction of the arrow repeatedly until the respective lamp lights up . (Movie): To record movies (Still): To record still images • When you turn the POWER switch repeatedly in a specified language. Changing the language setting You can...or [SUMMERTIME], [Y] (year), [M] (month), [D] (day), hour and minute. • The date and time does not appear during recording, but they are automatically recorded on the hard disc, and can be displayed during playback. POWER switch When using the camcorder for the first time, the [CLOCK SET] screen appears on...
Operating Guide
Page 14
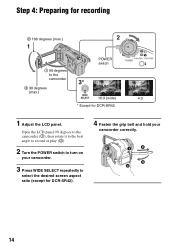
Open the LCD panel 90 degrees to the camcorder (1), then rotate it to the best angle to record or play (2). 2 Turn the POWER switch to turn on your camcorder. 3 Press WIDE SELECT repeatedly to the camcorder POWER switch 2 90 degrees (max.) 16:9 (wide) 4:3 * Except for DCR-SR42). 4 Fasten the grip belt and hold your camcorder correctly. 14 Step 4: Preparing for recording 2 180 degrees (max.) 1 90 degrees to select the desired screen aspect ratio (except for DCR-SR42. 1 Adjust the LCD panel.
Open the LCD panel 90 degrees to the camcorder (1), then rotate it to the best angle to record or play (2). 2 Turn the POWER switch to turn on your camcorder. 3 Press WIDE SELECT repeatedly to the camcorder POWER switch 2 90 degrees (max.) 16:9 (wide) 4:3 * Except for DCR-SR42). 4 Fasten the grip belt and hold your camcorder correctly. 14 Step 4: Preparing for recording 2 180 degrees (max.) 1 90 degrees to select the desired screen aspect ratio (except for DCR-SR42. 1 Adjust the LCD panel.
Operating Guide
Page 15
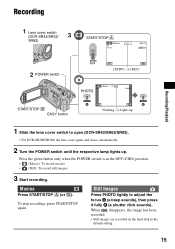
...or B). When disappears, the image has been recorded. • Still images are recorded on the hard disk in the OFF (CHG) position. • (Movie): To record movies • (Still): To record still images 3 Start recording. Recording Lens cover switch (DCR-SR42/SR62/ SR82) START/STOP A Recording/Playback POWER switch PHOTO [STBY] t [...when the POWER switch is in the default setting. 15 Still Images Press PHOTO lightly to open (DCR-SR42/SR62/SR82). • For DCR-SR200/SR300, the lens cover opens and closes automatically. 2 Turn the POWER switch until the respective lamp lights up.
...or B). When disappears, the image has been recorded. • Still images are recorded on the hard disk in the OFF (CHG) position. • (Movie): To record movies • (Still): To record still images 3 Start recording. Recording Lens cover switch (DCR-SR42/SR62/ SR82) START/STOP A Recording/Playback POWER switch PHOTO [STBY] t [...when the POWER switch is in the default setting. 15 Still Images Press PHOTO lightly to open (DCR-SR42/SR62/SR82). • For DCR-SR200/SR300, the lens cover opens and closes automatically. 2 Turn the POWER switch until the respective lamp lights up.

Operating Guide
Page 16
...is still being written onto the hard disk or "Memory Stick Duo." The number of recordable images varies depending on the recording environment. • The number ... still images by pressing PHOTO during Easy Handycam operation. Do not shake or knock your camcorder is reading/writing data. During Easy Handycam operation, appears on the image quality or...recordable images varies depending on the LCD screen. DCR-SR42: 5,900 ([VGA (0.3M)]) DCR-SR62/SR82: 1,800 ([1.0M]) DCR-SR200: 480 ([4.0M]) DCR-SR300: 315 ([6.1M]) • All numbers measured when using a "Memory Stick Duo" made by Sony...
...is still being written onto the hard disk or "Memory Stick Duo." The number of recordable images varies depending on the recording environment. • The number ... still images by pressing PHOTO during Easy Handycam operation. Do not shake or knock your camcorder is reading/writing data. During Easy Handycam operation, appears on the image quality or...recordable images varies depending on the LCD screen. DCR-SR42: 5,900 ([VGA (0.3M)]) DCR-SR62/SR82: 1,800 ([1.0M]) DCR-SR200: 480 ([4.0M]) DCR-SR300: 315 ([6.1M]) • All numbers measured when using a "Memory Stick Duo" made by Sony...
Operating Guide
Page 17
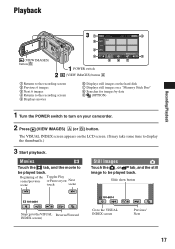
... (VIEW IMAGES) button B POWER switch (VIEW IMAGES) button A 1 Returns to the recording screen 2 Previous 6 images 3 Next 6 images 4 Returns to the recording screen 5 Displays movies 6 Displays still images on the hard disk 7 Displays still images on a "Memory Stick Duo" 8 Searches for images by date 9 (OPTION) 1 Turn the POWER switch to the VISUAL INDEX screen...
... (VIEW IMAGES) button B POWER switch (VIEW IMAGES) button A 1 Returns to the recording screen 2 Previous 6 images 3 Next 6 images 4 Returns to the recording screen 5 Displays movies 6 Displays still images on the hard disk 7 Displays still images on a "Memory Stick Duo" 8 Searches for images by date 9 (OPTION) 1 Turn the POWER switch to the VISUAL INDEX screen...
Operating Guide
Page 18
... i, you can play it back from the point you touch a movie marked with the image on each of the tab that was lastly played back/recorded (B for the still image) last time.
... i, you can play it back from the point you touch a movie marked with the image on each of the tab that was lastly played back/recorded (B for the still image) last time.
Operating Guide
Page 19
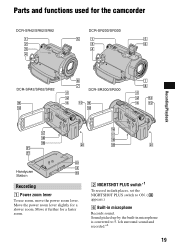
Move the power zoom lever slightly for the camcorder DCR-SR42/SR62/SR82 DCR-SR200/SR300 DCR-SR42/SR62/SR82 DCR-SR200/SR300 Recording/Playback Handycam Station Recording 1 Power zoom lever To use zoom, move the power zoom lever. Parts and functions used for a slower zoom. Move it further for a faster zoom. 2 NIGHTSHOT PLUS switch*1 To record in dark places, set the NIGHTSHOT PLUS switch to ON. ( appears.) 6 Built-in microphone is converted to 5.1ch surround sound and recorded.*2 19 Sound picked up by the built-in microphone Records sound.
Move the power zoom lever slightly for the camcorder DCR-SR42/SR62/SR82 DCR-SR200/SR300 DCR-SR42/SR62/SR82 DCR-SR200/SR300 Recording/Playback Handycam Station Recording 1 Power zoom lever To use zoom, move the power zoom lever. Parts and functions used for a slower zoom. Move it further for a faster zoom. 2 NIGHTSHOT PLUS switch*1 To record in dark places, set the NIGHTSHOT PLUS switch to ON. ( appears.) 6 Built-in microphone is converted to 5.1ch surround sound and recorded.*2 19 Sound picked up by the built-in microphone Records sound.

Operating Guide
Page 20
...battery. Zoom buttons Press for backlit subjects, press BACK LIGHT to optional accessories such as you operate the POWER switch on or off as a video light, a flash, or a microphone. qs DISP/BATT INFO button You can switch the screen display when you press while the power is ...Attach the shoulder belt (optional). Zoom buttons You can magnify still images from about 1.1 to the tripod receptacle using the flash. 9 LCD screen To record in .)) to 5 times the original size (Playback zoom). • When you touch the screen during playback zoom, the point you touched will be...
...battery. Zoom buttons Press for backlit subjects, press BACK LIGHT to optional accessories such as you operate the POWER switch on or off as a video light, a flash, or a microphone. qs DISP/BATT INFO button You can switch the screen display when you press while the power is ...Attach the shoulder belt (optional). Zoom buttons You can magnify still images from about 1.1 to the tripod receptacle using the flash. 9 LCD screen To record in .)) to 5 times the original size (Playback zoom). • When you touch the screen during playback zoom, the point you touched will be...
