Operating Guide
Page 10
... the settings (Reset) Other part names and functions Checking/Deleting the last scene (Review/Review deleting 38 Indicators displayed during recording/playback 39 Remote Commander 41 Playing the image on recording/playback (PICT. EFFECT/D. EFFECT, etc.) HDD SET 59 Settings for still images (BURST/QUALITY/IMAGE...images 44 Deleting images 45 Using the Setup items Using the Setup items 48 Setup items 50 CAMERA SET 52 Settings to adjust your camcorder to the recording conditions (EXPOSURE/WHITE BAL./STEADYSHOT, etc.) STILL SET 56 Settings for the hard disk (HDD FORMAT/HDD INFO, ...
... the settings (Reset) Other part names and functions Checking/Deleting the last scene (Review/Review deleting 38 Indicators displayed during recording/playback 39 Remote Commander 41 Playing the image on recording/playback (PICT. EFFECT/D. EFFECT, etc.) HDD SET 59 Settings for still images (BURST/QUALITY/IMAGE...images 44 Deleting images 45 Using the Setup items Using the Setup items 48 Setup items 50 CAMERA SET 52 Settings to adjust your camcorder to the recording conditions (EXPOSURE/WHITE BAL./STEADYSHOT, etc.) STILL SET 56 Settings for the hard disk (HDD FORMAT/HDD INFO, ...

Operating Guide
Page 15
AC Adaptor (1) (p.16) Rechargeable battery pack NP-FP60 (1) (p.17) Power cord (1) (p.16) CD-ROM "ImageMixer for HDD Camcorder" (1) "Camera Operating Guide" (This manual) (1) "Computer Application Guide" (1) A/V connecting cable (1) (p.42, 71, 73) USB cable (1) (p.75, 77) Wireless Remote Commander (1) (p.41) A button-type lithium battery is already installed. 15 Getting Started Getting Started Step 1: Checking supplied items Make sure that item supplied. The number in the parentheses indicates the number of that you have following items supplied with your camcorder.
AC Adaptor (1) (p.16) Rechargeable battery pack NP-FP60 (1) (p.17) Power cord (1) (p.16) CD-ROM "ImageMixer for HDD Camcorder" (1) "Camera Operating Guide" (This manual) (1) "Computer Application Guide" (1) A/V connecting cable (1) (p.42, 71, 73) USB cable (1) (p.75, 77) Wireless Remote Commander (1) (p.41) A button-type lithium battery is already installed. 15 Getting Started Getting Started Step 1: Checking supplied items Make sure that item supplied. The number in the parentheses indicates the number of that you have following items supplied with your camcorder.

Operating Guide
Page 37
...the screen for about seven seconds. qd Speaker Sounds come out from the speaker while playing back. • For how to operate your camcorder. 4 Recording lamp The recording lamp lights up in red during recording (p.63). To initialize the settings (Reset) ... If you press...INFO] (p.59). • During recording, the remaining recordable time/ number of the camcorder is connected, it takes precedence over the internal microphone. 4 Remote sensor Point the Remote Commander (p.41) towards the remote sensor to adjust the volume, see page 31. 37 The lamp flashes when the remaining...
...the screen for about seven seconds. qd Speaker Sounds come out from the speaker while playing back. • For how to operate your camcorder. 4 Recording lamp The recording lamp lights up in red during recording (p.63). To initialize the settings (Reset) ... If you press...INFO] (p.59). • During recording, the remaining recordable time/ number of the camcorder is connected, it takes precedence over the internal microphone. 4 Remote sensor Point the Remote Commander (p.41) towards the remote sensor to adjust the volume, see page 31. 37 The lamp flashes when the remaining...
Operating Guide
Page 41
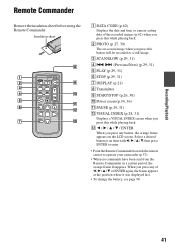
..., 30) q; Select a desired button or an item with b / B / v / V, then press ENTER to enter. • Point the Remote Commander towards the remote sensor to operate your camcorder (p.37). • When no commands have been sent from the Remote Commander in a certain period, the orange frame disappears. Power zoom (p.34, 36) qa PAUSE (p.29, 31) qs...
..., 30) q; Select a desired button or an item with b / B / v / V, then press ENTER to enter. • Point the Remote Commander towards the remote sensor to operate your camcorder (p.37). • When no commands have been sent from the Remote Commander in a certain period, the orange frame disappears. Power zoom (p.34, 36) qa PAUSE (p.29, 31) qs...

Operating Guide
Page 51
...) CLOCK SET z z z z*1 AREA SET z z z -*1 DST SET z z z -*1 LANGUAGE z z z -*1 *1 The setting values before Easy Handycam operation are maintained. *2 [USB SELECT] appears automatically when your camcorder is connected to a computer or other device with the USB cable. 51 USB SPEED z z z -*1 DATA CODE - - AUTO REMOTE CTRL z z z ON REC LAMP z z - ON BEEP z z z z*1 DISP OUTPUT z z z LCD PANEL SETUP ROTATE...
...) CLOCK SET z z z z*1 AREA SET z z z -*1 DST SET z z z -*1 LANGUAGE z z z -*1 *1 The setting values before Easy Handycam operation are maintained. *2 [USB SELECT] appears automatically when your camcorder is connected to a computer or other device with the USB cable. 51 USB SPEED z z z -*1 DATA CODE - - AUTO REMOTE CTRL z z z ON REC LAMP z z - ON BEEP z z z z*1 DISP OUTPUT z z z LCD PANEL SETUP ROTATE...
Operating Guide
Page 55
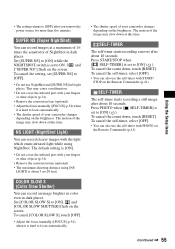
... images with the light which emits infrared light while using [NS LIGHT] is hard to focus automatically. • The shutter speed of your camcorder changes depending on the Remote Commander (p.41). Set [COLOR SLOW S] to [ON] ( ). To cancel [COLOR SLOW S], touch [OFF]. • Adjust the focus manually ([FOCUS], p.54), when it is... may slow down at a maximum of 16 times the sensitivity of the image may cause a malfunction. • Do not cover the infrared port with your camcorder changes depending on the Remote Commander (p.41).
... images with the light which emits infrared light while using [NS LIGHT] is hard to focus automatically. • The shutter speed of your camcorder changes depending on the Remote Commander (p.41). Set [COLOR SLOW S] to [ON] ( ). To cancel [COLOR SLOW S], touch [OFF]. • Adjust the focus manually ([FOCUS], p.54), when it is... may slow down at a maximum of 16 times the sensitivity of the image may cause a malfunction. • Do not cover the infrared port with your camcorder changes depending on the Remote Commander (p.41).

Operating Guide
Page 56
... 0.5 second intervals. Note that up to 20 × zoom is performed digitally. 120 × Up to normal recording. The right side of the camcorder. • [EXP. The numbers of the maximum recordable images are marked with B. The indicators in case you are using the digital zoom. BRKTG] ... the hard disk space is [ON]). Record the next still image after another by pressing PHOTO. BRKTG ( ) Records 3 images consecutively with the Remote Commander. • You may not be recorded in the self-timer mode or when you want to zoom to the maximum number depending on selecting...
... 0.5 second intervals. Note that up to 20 × zoom is performed digitally. 120 × Up to normal recording. The right side of the camcorder. • [EXP. The numbers of the maximum recordable images are marked with B. The indicators in case you are using the digital zoom. BRKTG] ... the hard disk space is [ON]). Record the next still image after another by pressing PHOTO. BRKTG ( ) Records 3 images consecutively with the Remote Commander. • You may not be recorded in the self-timer mode or when you want to zoom to the maximum number depending on selecting...

Operating Guide
Page 63
...not light up during recording when you remove the power source for movies - DISPLAY You can use the supplied Remote Commander (p.41). • Set to [OFF] to prevent your camcorder recognizes the free hard disk space, with the POWER switch is [ON].) Continued , 63 Using the Setup... items REMOTE CTRL (Remote control) The default setting is displayed on the TV screen, if you connect your camcorder.* 6IMAGES Displays thumbnails of 6 images. 12IMAGES Displays thumbnails of the hard disk remains less than ...
...not light up during recording when you remove the power source for movies - DISPLAY You can use the supplied Remote Commander (p.41). • Set to [OFF] to prevent your camcorder recognizes the free hard disk space, with the POWER switch is [ON].) Continued , 63 Using the Setup... items REMOTE CTRL (Remote control) The default setting is displayed on the TV screen, if you connect your camcorder.* 6IMAGES Displays thumbnails of 6 images. 12IMAGES Displays thumbnails of the hard disk remains less than ...

Operating Guide
Page 77
... connect external devices 2...Open the shoe cover. 456...Open the jack cover. 1 REMOTE jack • Connect other optional accessories. 2 Active Interface Shoe The Active Interface Shoe supplies power to optional accessories such as you are recording with your camcorder. The accessory can be turned on your accessory for details. • The Active...
... connect external devices 2...Open the shoe cover. 456...Open the jack cover. 1 REMOTE jack • Connect other optional accessories. 2 Active Interface Shoe The Active Interface Shoe supplies power to optional accessories such as you are recording with your camcorder. The accessory can be turned on your accessory for details. • The Active...

Operating Guide
Page 80
... • Adjust the screen ([CALIBRATION]) (p.97). • If you cannot turn the LCD backlight on the Remote Commander) (p.21, 41). An unknown indicator appears on the screen. • The camcorder is not a malfunction. The image in the viewfinder when the LCD screen is connected to the AC Adaptor.... • Turn off . • During Easy Handycam operation (p.24), you change the aspect ratio of the image, the ...
... • Adjust the screen ([CALIBRATION]) (p.97). • If you cannot turn the LCD backlight on the Remote Commander) (p.21, 41). An unknown indicator appears on the screen. • The camcorder is not a malfunction. The image in the viewfinder when the LCD screen is connected to the AC Adaptor.... • Turn off . • During Easy Handycam operation (p.24), you change the aspect ratio of the image, the ...

Operating Guide
Page 83
...it. Another DVD device malfunctions when you use the supplied Remote Commander. • Select a commander mode other than DVD 2 for your DVD device with the +/- Remote Commander The supplied Remote Commander does not function. • Set [REMOTE CTRL] to OFF (p.34). Tiny spots in white, ...image is not a malfunction. marks (p.98). • Remove any obstructions between the Remote Commander and the remote sensor. • Point the remote sensor away from strong light sources such as the remote sensor may not function properly. • Remove the conversion lens (optional) as ...
...it. Another DVD device malfunctions when you use the supplied Remote Commander. • Select a commander mode other than DVD 2 for your DVD device with the +/- Remote Commander The supplied Remote Commander does not function. • Set [REMOTE CTRL] to OFF (p.34). Tiny spots in white, ...image is not a malfunction. marks (p.98). • Remove any obstructions between the Remote Commander and the remote sensor. • Point the remote sensor away from strong light sources such as the remote sensor may not function properly. • Remove the conversion lens (optional) as ...
Operating Guide
Page 96
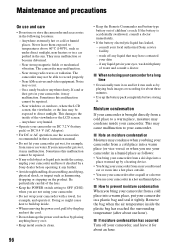
... example, and operate it . • Keep metal contacts clean. 96 • Keep the Remote Commander and button-type battery out of water and consult a doctor. If your camcorder. Be particularly careful of the viewfinder or the LCD screen. - x Note on moisture condensation ...a hot place outside. • You use or store the camcorder and accessories in your camcorder, it . Sometimes this malfunction cannot be able to prevent moisture condensation When you are not using your local authorized Sony service facility. - Sometimes this malfunction cannot be exposed to temperatures...
... example, and operate it . • Keep metal contacts clean. 96 • Keep the Remote Commander and button-type battery out of water and consult a doctor. If your camcorder. Be particularly careful of the viewfinder or the LCD screen. - x Note on moisture condensation ...a hot place outside. • You use or store the camcorder and accessories in your camcorder, it . Sometimes this malfunction cannot be able to prevent moisture condensation When you are not using your local authorized Sony service facility. - Sometimes this malfunction cannot be exposed to temperatures...
Operating Guide
Page 98
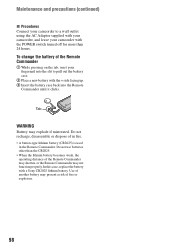
...continued) x Procedures Connect your camcorder with a Sony CR2025 lithium battery. Do not recharge, disassemble or dispose of fire or explosion. 98 Use of another battery may present a risk of in fire. • A button-type lithium battery (CR2025) is used in the Remote Commander. In this case, ... the lithium battery becomes weak, the operating distance of the Remote Commander 1 While pressing on the tab, inset your fingernail into the slit to a wall outlet using the AC Adaptor supplied with your camcorder, and leave your camcorder to pull out the battery case. 2 Place a new battery...
...continued) x Procedures Connect your camcorder with a Sony CR2025 lithium battery. Do not recharge, disassemble or dispose of fire or explosion. 98 Use of another battery may present a risk of in fire. • A button-type lithium battery (CR2025) is used in the Remote Commander. In this case, ... the lithium battery becomes weak, the operating distance of the Remote Commander 1 While pressing on the tab, inset your fingernail into the slit to a wall outlet using the AC Adaptor supplied with your camcorder, and leave your camcorder to pull out the battery case. 2 Place a new battery...
Operating Guide
Page 99
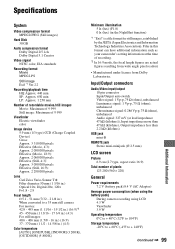
...wide angle pixel readout. • Manufactured under license from Dolby Laboratories. Files in this format can have additional information such as your camcorder's setting information at load impedance 47 kΩ (kilohms)), Input impedance more than 47 kΩ (kilohms), Output impedance less than 2.2... kΩ (kilohms) USB jack mini-B REMOTE jack Stereo mini-minijack (Ø 2.5 mm) LCD screen Picture 6.9 cm (2.7 type, aspect ratio 16:9) Total number of 9 999 Viewfinder Electric ...
...wide angle pixel readout. • Manufactured under license from Dolby Laboratories. Files in this format can have additional information such as your camcorder's setting information at load impedance 47 kΩ (kilohms)), Input impedance more than 47 kΩ (kilohms), Output impedance less than 2.2... kΩ (kilohms) USB jack mini-B REMOTE jack Stereo mini-minijack (Ø 2.5 mm) LCD screen Picture 6.9 cm (2.7 type, aspect ratio 16:9) Total number of 9 999 Viewfinder Electric ...

Operating Guide
Page 105
Recording time 17 REC CTRL 74 REC LAMP 63 REC MODE 61 REDEYE REDUC 54 REMAINING 63 Remaining battery 37 Remote Commander 41 REMOTE CTRL 63 REMOTE jack 77 Remote sensor 37 RESET 37 Review 38 Review deleting 38 S Saving images 14, 44 Searching for the images by date 32 Self-diagnosis display.............. messages 88 WHITE BAL. (White balance 53, 85 WHITE FADER 57 Wide angle 34 WIDE SELECT 23 WIPE 57 Wireless microphone 35 Wireless Remote Commander ...........See Remote Commander World time difference .......... 93 Z Zoom 34 Zoom lever 34 ZOOM LINK 63 105 Glossary, Index
Recording time 17 REC CTRL 74 REC LAMP 63 REC MODE 61 REDEYE REDUC 54 REMAINING 63 Remaining battery 37 Remote Commander 41 REMOTE CTRL 63 REMOTE jack 77 Remote sensor 37 RESET 37 Review 38 Review deleting 38 S Saving images 14, 44 Searching for the images by date 32 Self-diagnosis display.............. messages 88 WHITE BAL. (White balance 53, 85 WHITE FADER 57 Wide angle 34 WIDE SELECT 23 WIPE 57 Wireless microphone 35 Wireless Remote Commander ...........See Remote Commander World time difference .......... 93 Z Zoom 34 Zoom lever 34 ZOOM LINK 63 105 Glossary, Index


