
Operating Guide
Page 2
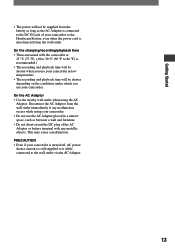
... causes data transfer to the following two conditions: (1) This device may cause undesired operation. and CANADA RECYCLING LITHIUM-ION BATTERIES Lithium-Ion batteries are recyclable. For more information regarding recycling of important operating and maintenance (servicing) instructions in the U.S.A. This Class B...or visit http://www.rbrc.org/ Caution: Do not handle damaged or leaking Lithium-Ion batteries. You can help preserve our environment by returning your used rechargeable batteries to rain or moisture. WARNING To prevent fire or shock hazard, do not ...
... causes data transfer to the following two conditions: (1) This device may cause undesired operation. and CANADA RECYCLING LITHIUM-ION BATTERIES Lithium-Ion batteries are recyclable. For more information regarding recycling of important operating and maintenance (servicing) instructions in the U.S.A. This Class B...or visit http://www.rbrc.org/ Caution: Do not handle damaged or leaking Lithium-Ion batteries. You can help preserve our environment by returning your used rechargeable batteries to rain or moisture. WARNING To prevent fire or shock hazard, do not ...
Operating Guide
Page 4
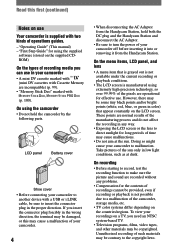
...LCD panel Battery cover Shoe cover • Before connecting your camcorder to another device with a USB or i.LINK cable, be sure to insert the connector plug in the wrong direction, the terminal may be damaged, or this first (continued) Notes on use Your camcorder is supplied...menu item that appear constantly on the countries/regions. Read this may cause a malfunction of your camcorder. 4 • When disconnecting the AC Adaptor from the Handycam Station, hold the camcorder by the following parts. If you insert the connector plug forcibly in the proper direction. However, ...
...LCD panel Battery cover Shoe cover • Before connecting your camcorder to another device with a USB or i.LINK cable, be sure to insert the connector plug in the wrong direction, the terminal may be damaged, or this first (continued) Notes on use Your camcorder is supplied...menu item that appear constantly on the countries/regions. Read this may cause a malfunction of your camcorder. 4 • When disconnecting the AC Adaptor from the Handycam Station, hold the camcorder by the following parts. If you insert the connector plug forcibly in the proper direction. However, ...
Operating Guide
Page 6
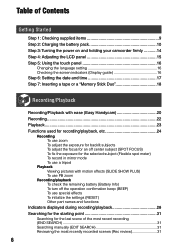
Table of Contents Getting Started Step 1: Checking supplied items 9 Step 2: Charging the battery pack 10 Step 3: Turning the power on and holding your camcorder firmly ...........14 Step 4: Adjusting the LCD panel 15 Step 5: Using the touch panel ...16 Changing the language setting 16 Checking the screen indicators (Display guide 16 Step 6: Setting the date and time 17 Step 7: Inserting a tape or a "Memory Stick Duo 18 Recording/Playback Recording/Playback with ease (Easy Handycam...
Table of Contents Getting Started Step 1: Checking supplied items 9 Step 2: Charging the battery pack 10 Step 3: Turning the power on and holding your camcorder firmly ...........14 Step 4: Adjusting the LCD panel 15 Step 5: Using the touch panel ...16 Changing the language setting 16 Checking the screen indicators (Display guide 16 Step 6: Setting the date and time 17 Step 7: Inserting a tape or a "Memory Stick Duo 18 Recording/Playback Recording/Playback with ease (Easy Handycam...
Operating Guide
Page 8
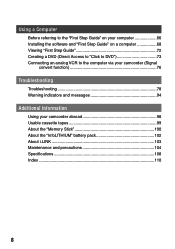
... 73 Connecting an analog VCR to the computer via your camcorder (Signal convert function 76 Troubleshooting Troubleshooting 78 Warning indicators and messages 94 Additional Information Using your camcorder abroad 98 Usable cassette tapes 99 About the "Memory Stick 100 About the "InfoLITHIUM" battery pack 102 About i.LINK 103 Maintenance and precautions 104 Speci...
... 73 Connecting an analog VCR to the computer via your camcorder (Signal convert function 76 Troubleshooting Troubleshooting 78 Warning indicators and messages 94 Additional Information Using your camcorder abroad 98 Usable cassette tapes 99 About the "Memory Stick 100 About the "InfoLITHIUM" battery pack 102 About i.LINK 103 Maintenance and precautions 104 Speci...
Operating Guide
Page 9
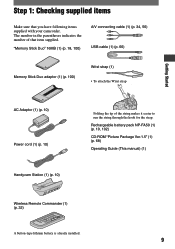
...; To attach the Wrist strap Getting Started AC Adaptor (1) (p. 10) Power cord (1) (p. 10) Handycam Station (1) (p. 10) Folding the tip of that you have following items supplied with your camcorder. Step 1: Checking supplied items Make sure that item supplied. Rechargeable battery pack NP-FA50 (1) (p. 10, 102) CD-ROM "Picture Package Ver.1.5" (1) (p. 68) Operating Guide...
...; To attach the Wrist strap Getting Started AC Adaptor (1) (p. 10) Power cord (1) (p. 10) Handycam Station (1) (p. 10) Folding the tip of that you have following items supplied with your camcorder. Step 1: Checking supplied items Make sure that item supplied. Rechargeable battery pack NP-FA50 (1) (p. 10, 102) CD-ROM "Picture Package Ver.1.5" (1) (p. 68) Operating Guide...
Operating Guide
Page 10
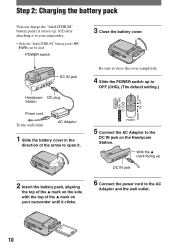
... Adaptor and the wall outlet. 10 DC IN jack Handycam DC plug Station Power cord To the wall outlet AC Adaptor 1 Slide the battery cover in the direction of the mark on your camcorder. • Only the "InfoLITHIUM" battery pack (NPFA50) can charge the "InfoLITHIUM" battery pack (A series) (p. 102) after attaching it to open...
... Adaptor and the wall outlet. 10 DC IN jack Handycam DC plug Station Power cord To the wall outlet AC Adaptor 1 Slide the battery cover in the direction of the mark on your camcorder. • Only the "InfoLITHIUM" battery pack (NPFA50) can charge the "InfoLITHIUM" battery pack (A series) (p. 102) after attaching it to open...
Operating Guide
Page 11
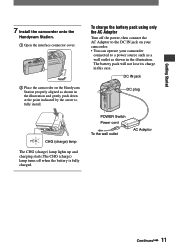
...camcorder onto the Handycam Station. Open the interface connector cover. Place the camcorder on your camcorder. • You can operate your camcorder connected to fully install. The battery pack will not lose its charge in the illustration. To charge the battery pack using only the AC Adaptor Turn off when the battery...charging starts.The CHG (charge) lamp turns off the power, then connect the AC Adaptor to the DC IN jack on the Handycam Station properly aligned as shown in the illustration and gently push down at the point indicated by the arrow to a power source ...
...camcorder onto the Handycam Station. Open the interface connector cover. Place the camcorder on your camcorder. • You can operate your camcorder connected to fully install. The battery pack will not lose its charge in the illustration. To charge the battery pack using only the AC Adaptor Turn off when the battery...charging starts.The CHG (charge) lamp turns off the power, then connect the AC Adaptor to the DC IN jack on the Handycam Station properly aligned as shown in the illustration and gently push down at the point indicated by the arrow to a power source ...
Operating Guide
Page 12
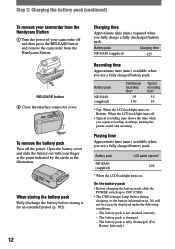
.... Playing time Approximate time (min.) available when you fully charge a fully discharged battery pack. The battery pack is not attached correctly. - Step 2: Charging the battery pack (continued) To remove your camcorder from the Handycam Station. Battery pack NP-FA50 (supplied) Continuous recording time* 95 110 Typical recording time* 55 65 * Top: When the LCD backlight turns...
.... Playing time Approximate time (min.) available when you fully charge a fully discharged battery pack. The battery pack is not attached correctly. - Step 2: Charging the battery pack (continued) To remove your camcorder from the Handycam Station. Battery pack NP-FA50 (supplied) Continuous recording time* 95 110 Typical recording time* 55 65 * Top: When the LCD backlight turns...
Operating Guide
Page 13
... turned off, AC power (house current) is still supplied to it while connected to the DC IN jack of the AC Adaptor or battery terminal with the camcorder at 25 °C (77 °F). (10 to 30 °C (50 °F to 86 °F) is recommended.) • The recording and playback time will be... Adaptor from the wall outlet. Getting Started • The power will be supplied from the battery as long as between a wall and furniture. • Do not short-circuit the DC plug of your camcorder or the Handycam Station, even when the power cord is connected to the wall outlet via the AC Adaptor...
... turned off, AC power (house current) is still supplied to it while connected to the DC IN jack of the AC Adaptor or battery terminal with the camcorder at 25 °C (77 °F). (10 to 30 °C (50 °F to 86 °F) is recommended.) • The recording and playback time will be... Adaptor from the wall outlet. Getting Started • The power will be supplied from the battery as long as between a wall and furniture. • Do not short-circuit the DC plug of your camcorder or the Handycam Station, even when the power cord is connected to the wall outlet via the AC Adaptor...
Operating Guide
Page 14
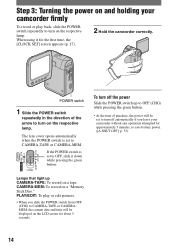
...Slide the POWER switch up CAMERA-TAPE: To record on the respective lamp. Step 3: Turning the power on and holding your camcorder without any operation attempted for approximately 5 minutes, to save battery power. ([A.SHUT OFF], p. 53). If the POWER switch is set to OFF, slide it for about 5 seconds. 14..., the power will be displayed on the LCD screen for the first time, the [CLOCK SET] screen appears (p. 17). 2 Hold the camcorder correctly. CAMERA-MEM: To record on the respective lamp. PLAY/EDIT: To play back, slide the POWER switch repeatedly to CAMERA-TAPE or CAMERA-MEM...
...Slide the POWER switch up CAMERA-TAPE: To record on the respective lamp. Step 3: Turning the power on and holding your camcorder without any operation attempted for approximately 5 minutes, to save battery power. ([A.SHUT OFF], p. 53). If the POWER switch is set to OFF, slide it for about 5 seconds. 14..., the power will be displayed on the LCD screen for the first time, the [CLOCK SET] screen appears (p. 17). 2 Hold the camcorder correctly. CAMERA-MEM: To record on the respective lamp. PLAY/EDIT: To play back, slide the POWER switch repeatedly to CAMERA-TAPE or CAMERA-MEM...

Operating Guide
Page 15
.... This setting is convenient during playback operations. This is practical when you use your camcorder in bright conditions or where you can close the LCD panel with the LCD screen ...until appears. Step 4: Adjusting the LCD panel The LCD panel Open the LCD panel 90 degrees to the camcorder (), then rotate it to the best angle to record or play (). 180 degrees (max.) 90... degrees (max.) 2 Getting Started 1 DISP/BATT INFO 90 Degrees to the camcorder • Do not press the buttons on the LCD backlight, press and hold DISP/BATT INFO for a ...
.... This setting is convenient during playback operations. This is practical when you use your camcorder in bright conditions or where you can close the LCD panel with the LCD screen ...until appears. Step 4: Adjusting the LCD panel The LCD panel Open the LCD panel 90 degrees to the camcorder (), then rotate it to the best angle to record or play (). 180 degrees (max.) 90... degrees (max.) 2 Getting Started 1 DISP/BATT INFO 90 Degrees to the camcorder • Do not press the buttons on the LCD backlight, press and hold DISP/BATT INFO for a ...
Operating Guide
Page 17
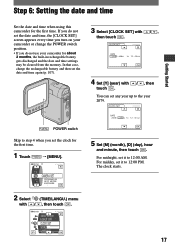
... step 4 when you set the date and time, the [CLOCK SET] screen appears every time you turn on your camcorder or change the POWER switch position. • If you do not use your camcorder for the first time. 1 Touch [MENU]. 60min -:--:-- CLOCK SET -:--:-- /, DATE 2005 Y JAN M ...107). DATE 2005Y JAN M 1D 12: 00 AM OK 5 Set [M] (month), [D] (day), hour and minute, then touch . In that case, charge the rechargeable battery and then set any year up to 12:00 AM. The clock starts. 17 DISPLAY MENU ROTATE A.SHUT OFF CLOCK SET WORLD --:--:-- Step 6: Setting the...
... step 4 when you set the date and time, the [CLOCK SET] screen appears every time you turn on your camcorder or change the POWER switch position. • If you do not use your camcorder for the first time. 1 Touch [MENU]. 60min -:--:-- CLOCK SET -:--:-- /, DATE 2005 Y JAN M ...107). DATE 2005Y JAN M 1D 12: 00 AM OK 5 Set [M] (month), [D] (day), hour and minute, then touch . In that case, charge the rechargeable battery and then set any year up to 12:00 AM. The clock starts. 17 DISPLAY MENU ROTATE A.SHUT OFF CLOCK SET WORLD --:--:-- Step 6: Setting the...

Operating Guide
Page 19
Getting Started To eject a "Memory Stick Duo" Lightly push the "Memory Stick Duo" in once. • When the access lamp is lit or flashing, your camcorder, turn the power off, eject the "Memory Stick Duo," or remove the battery pack. Do not shake or knock your camcorder is reading/writing data. Otherwise, image data may be damaged. 19
Getting Started To eject a "Memory Stick Duo" Lightly push the "Memory Stick Duo" in once. • When the access lamp is lit or flashing, your camcorder, turn the power off, eject the "Memory Stick Duo," or remove the battery pack. Do not shake or knock your camcorder is reading/writing data. Otherwise, image data may be damaged. 19

Operating Guide
Page 26
...58166; Remote sensor Point the Remote Commander (p. 32) towards the remote sensor to OFF (CHG), then press DISP/BATT INFO . Remaining battery (approx.) BATTERY INFO BATTERY CHARGE LEVEL 0% 50% 100% REC TIME AVAILABLE LCD SCREEN: 85 min Recording capacity (approx.) To use special effects See (PICT.APPLI.) ...• For how to adjust the volume, see page 23. REC lamp The REC lamp lights up to operate your camcorder. Internal stereo microphone When an external microphone is connected, the audio input from the external microphone takes precedence over others. ...
...58166; Remote sensor Point the Remote Commander (p. 32) towards the remote sensor to OFF (CHG), then press DISP/BATT INFO . Remaining battery (approx.) BATTERY INFO BATTERY CHARGE LEVEL 0% 50% 100% REC TIME AVAILABLE LCD SCREEN: 85 min Recording capacity (approx.) To use special effects See (PICT.APPLI.) ...• For how to adjust the volume, see page 23. REC lamp The REC lamp lights up to operate your camcorder. Internal stereo microphone When an external microphone is connected, the audio input from the external microphone takes precedence over others. ...
Operating Guide
Page 28
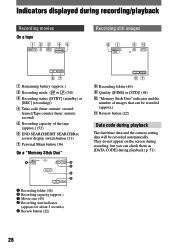
Indicators displayed during recording/playback Recording movies On a tape 123 45 Recording still images 81 60min 101 90 FINE 30 67 Remaining battery (approx.) Recording mode ( or ) (50) Recording status ([STBY] (standby) or [REC] (recording)) Time code (hour: minute: second: frame)/...
Indicators displayed during recording/playback Recording movies On a tape 123 45 Recording still images 81 60min 101 90 FINE 30 67 Remaining battery (approx.) Recording mode ( or ) (50) Recording status ([STBY] (standby) or [REC] (recording)) Time code (hour: minute: second: frame)/...
Operating Guide
Page 32
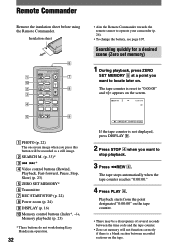
...counter. • Zero set memory) 1 During playback, press ZERO SET MEMORY at a point you want to operate your camcorder (p. 26). • To change the battery, see page 107. The tape counter is not displayed, press DISPLAY . 2 Press STOP when you want to stop... (p. 24) DISPLAY (p. 16) Memory control buttons (Index*, -/+, Memory playback) (p. 23) * These buttons do not work during Easy Handycam operation. 32 • Aim the Remote Commander towards the remote sensor to locate later on the screen. 60min 0:00:00 P-MENU If the tape counter...
...counter. • Zero set memory) 1 During playback, press ZERO SET MEMORY at a point you want to operate your camcorder (p. 26). • To change the battery, see page 107. The tape counter is not displayed, press DISPLAY . 2 Press STOP when you want to stop... (p. 24) DISPLAY (p. 16) Memory control buttons (Index*, -/+, Memory playback) (p. 23) * These buttons do not work during Easy Handycam operation. 32 • Aim the Remote Commander towards the remote sensor to locate later on the screen. 60min 0:00:00 P-MENU If the tape counter...
Operating Guide
Page 41
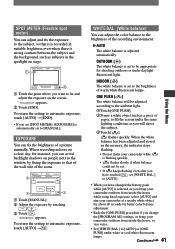
... house while using fixed exposure, select [AUTO] and aim your camcorder at a nearby white object for about 10 seconds for better color balance adjustment. • Redo the [ONE PUSH] procedure if you have changed the battery pack while [AUTO] is flashing quickly. • flashes... fill the screen under the same lighting conditions as subjects in the memory, the indicator stops flashing. • Do not shake your camcorder outdoors from inside the house, or vice versa. • Set [WHITE BAL.] to [AUTO] or [ONE PUSH] under daylight fluorescent light...
... house while using fixed exposure, select [AUTO] and aim your camcorder at a nearby white object for about 10 seconds for better color balance adjustment. • Redo the [ONE PUSH] procedure if you have changed the battery pack while [AUTO] is flashing quickly. • flashes... fill the screen under the same lighting conditions as subjects in the memory, the indicator stops flashing. • Do not shake your camcorder outdoors from inside the house, or vice versa. • Set [WHITE BAL.] to [AUTO] or [ONE PUSH] under daylight fluorescent light...
Operating Guide
Page 51
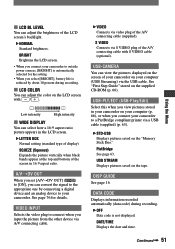
... computer (USB Streaming) via video plug of the A/V connecting cable with / . USB-PLY/EDT (USB-Play/Edit) Select this when you connect your camcorder to [ON], you can select how a 16:9 aspect ratio picture appears in the LCD screen. LETTER BOX Normal setting (standard type of display... CODE Displays information recorded automatically (data code) during recording. LCD COLOR You can adjust the brightness of the screen in your camcorder on your computer (p. 66), or when you connect your camcorder to connect when you select [BRIGHT], battery life is not displayed.
... computer (USB Streaming) via video plug of the A/V connecting cable with / . USB-PLY/EDT (USB-Play/Edit) Select this when you connect your camcorder to [ON], you can select how a 16:9 aspect ratio picture appears in the LCD screen. LETTER BOX Normal setting (standard type of display... CODE Displays information recorded automatically (data code) during recording. LCD COLOR You can adjust the brightness of the screen in your camcorder on your computer (p. 66), or when you connect your camcorder to connect when you select [BRIGHT], battery life is not displayed.
Operating Guide
Page 61
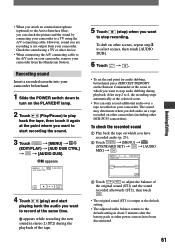
...ST2), then touch . • The original sound (ST1) is not output from the Handycam Station. The sound may deteriorate when you dub audio on a tape recorded on your camcorder beforehand. 1 Slide the POWER switch down to turn on the Remote Commander at the scene... check the picture and the sound by connecting your camcorder. Check the sound using the A/V connecting cable. • When you attach an external microphone (optional) to the Active Interface Shoe, you can only record additional audio over a tape recorded on other camcorders (including other DCR-PC55 camcorders).
...ST2), then touch . • The original sound (ST1) is not output from the Handycam Station. The sound may deteriorate when you dub audio on a tape recorded on your camcorder beforehand. 1 Slide the POWER switch down to turn on the Remote Commander at the scene... check the picture and the sound by connecting your camcorder. Check the sound using the A/V connecting cable. • When you attach an external microphone (optional) to the Active Interface Shoe, you can only record additional audio over a tape recorded on other camcorders (including other DCR-PC55 camcorders).

Operating Guide
Page 78
... low, or not attached to the camcorder. • Attach a charged battery pack to the camcorder (p. 10). • Use the AC Adaptor to connect to a wall outlet (p. 10). • Insert your Sony dealer. Troubleshooting If you run into the Handycam Station correctly (p. 10). Settings change during Easy Handycam operation. • During Easy Handycam operation, the settings of the...
... low, or not attached to the camcorder. • Attach a charged battery pack to the camcorder (p. 10). • Use the AC Adaptor to connect to a wall outlet (p. 10). • Insert your Sony dealer. Troubleshooting If you run into the Handycam Station correctly (p. 10). Settings change during Easy Handycam operation. • During Easy Handycam operation, the settings of the...


