Computer Applications Guide
Page 3
...trademarks of Sony Corporation. • Microsoft, Windows, and Windows Media are either registered trademarks or trademarks of Microsoft Corporation in this manual are trademarks or registered trademarks of Macromedia, Inc. About this manual • The name of the power switch on the camcorder varies ..., transferring, distributing, lending, licensing, selling and publishing) any license or right to the separate Camera Operations Guide supplied with your camcorder for details. • The screens shown in the United States and/or other countries. • Macintosh, iMac, Mac OS,...
...trademarks of Sony Corporation. • Microsoft, Windows, and Windows Media are either registered trademarks or trademarks of Microsoft Corporation in this manual are trademarks or registered trademarks of Macromedia, Inc. About this manual • The name of the power switch on the camcorder varies ..., transferring, distributing, lending, licensing, selling and publishing) any license or right to the separate Camera Operations Guide supplied with your camcorder for details. • The screens shown in the United States and/or other countries. • Macintosh, iMac, Mac OS,...
Camera Operations Guide
Page 2
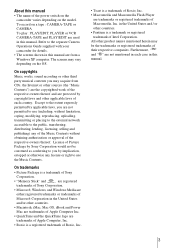
... 1-800-822- 8837, or visit http://www.rbrc.org/ Caution: Do not handle damaged or leaking LithiumIon batteries. This Class B digital apparatus complies with Part 15 of the FCC Rules. RECYCLING LITHIUM-ION BATTERIES Lithium-Ion batteries are recyclable. Operation is subject to the ...following two conditions: (1) This device may not cause harmful interference, and (2) this manual thoroughly, and retain it for future reference. You can help preserve our environment by returning your used rechargeable batteries to rain or moisture....
... 1-800-822- 8837, or visit http://www.rbrc.org/ Caution: Do not handle damaged or leaking LithiumIon batteries. This Class B digital apparatus complies with Part 15 of the FCC Rules. RECYCLING LITHIUM-ION BATTERIES Lithium-Ion batteries are recyclable. Operation is subject to the ...following two conditions: (1) This device may not cause harmful interference, and (2) this manual thoroughly, and retain it for future reference. You can help preserve our environment by returning your used rechargeable batteries to rain or moisture....

Camera Operations Guide
Page 3
...undesired operation. Consult a Sony dealer or an experienced radio/TV technician for a Class B digital device, pursuant to be...Handycam Station Model DCRA-C111 and AC Power Adaptor Model AC-L25A/L25B. b Note: DCR-PC109 is connected. - Use of "Memory Stick" you have any interference received, including interference that interference will not occur in accordance with the limits for help. Connect the equipment to an outlet on Cassette Memory Your camcorder...not cause harmful interference, and (2) this manual could void your camcorder. Address: 16450 W. Notes on the type...
...undesired operation. Consult a Sony dealer or an experienced radio/TV technician for a Class B digital device, pursuant to be...Handycam Station Model DCRA-C111 and AC Power Adaptor Model AC-L25A/L25B. b Note: DCR-PC109 is connected. - Use of "Memory Stick" you have any interference received, including interference that interference will not occur in accordance with the limits for help. Connect the equipment to an outlet on Cassette Memory Your camcorder...not cause harmful interference, and (2) this manual could void your camcorder. Address: 16450 W. Notes on the type...
Camera Operations Guide
Page 4
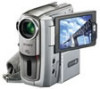
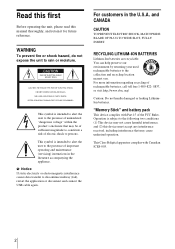
... not aim at dusk. Take pictures of the LCD screen and the viewfinder used on this manual are based on the back side of your recordings on a TV, you are manufactured using a digital still camera, and thus may cause a malfunction of the LCD panel to press buttons on ... device Before connecting your hand on the model DCR-PC109. Note on the LCD panel, viewfinder, and lens • The LCD screen and the viewfinder are using the camcorder • Hold the camcorder, putting your wrist through the belt and your camcorder to the copyright laws. Unauthorized recording of the...
... not aim at dusk. Take pictures of the LCD screen and the viewfinder used on this manual are based on the back side of your recordings on a TV, you are manufactured using a digital still camera, and thus may cause a malfunction of the LCD panel to press buttons on ... device Before connecting your hand on the model DCR-PC109. Note on the LCD panel, viewfinder, and lens • The LCD screen and the viewfinder are using the camcorder • Hold the camcorder, putting your wrist through the belt and your camcorder to the copyright laws. Unauthorized recording of the...
Camera Operations Guide
Page 7
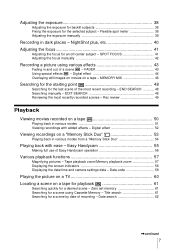
... - Flexible spot meter 38 Adjusting the exposure manually 39 Recording in and out of Easy Handycam operation 56 Various playback functions 57 Magnifying pictures - FADER 43 Using special effects - END SEARCH 48 Searching manually - EDIT SEARCH 48 Reviewing the most recent recording - Date search 62 ,continued 7 Digital effect 44 Overlaying still images on movies...
... - Flexible spot meter 38 Adjusting the exposure manually 39 Recording in and out of Easy Handycam operation 56 Various playback functions 57 Magnifying pictures - FADER 43 Using special effects - END SEARCH 48 Searching manually - EDIT SEARCH 48 Reviewing the most recent recording - Date search 62 ,continued 7 Digital effect 44 Overlaying still images on movies...
Camera Operations Guide
Page 15
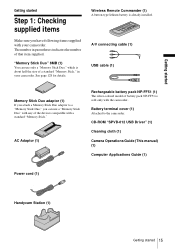
Battery terminal cover (1) Attached to a "Memory Stick Duo," you have following items supplied with your camcorder. CD-ROM "SPVD-012 USB Driver" (1) Cleaning cloth (1) Camera Operations Guide (This manual) (1) Computer Applications Guide (1) Power cord (1) Handycam Station (1) Getting started Step 1: Checking supplied items Make sure you can use a "Memory Stick Duo" with any of battery...
Battery terminal cover (1) Attached to a "Memory Stick Duo," you have following items supplied with your camcorder. CD-ROM "SPVD-012 USB Driver" (1) Cleaning cloth (1) Camera Operations Guide (This manual) (1) Computer Applications Guide (1) Power cord (1) Handycam Station (1) Getting started Step 1: Checking supplied items Make sure you can use a "Memory Stick Duo" with any of battery...
Camera Operations Guide
Page 38
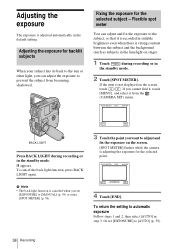
... canceled when you want to [AUTO] (p. 39). 38 Recording If the item is adjusting the exposure for the selected subject - appears. Or set [EXPOSURE] to [MANUAL] (p. 39) or select [SPOT METER] (p. 38). 3 Touch the point you set [EXPOSURE] to adjust and fix the exposure on the screen. [SPOT METER] flashes while...
... canceled when you want to [AUTO] (p. 39). 38 Recording If the item is adjusting the exposure for the selected subject - appears. Or set [EXPOSURE] to [MANUAL] (p. 39) or select [SPOT METER] (p. 38). 3 Touch the point you set [EXPOSURE] to adjust and fix the exposure on the screen. [SPOT METER] flashes while...
Camera Operations Guide
Page 39
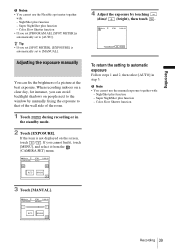
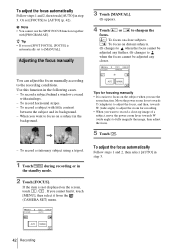
... cannot find it, touch [MENU], and select it from the (CAMERA SET) menu. 60min EXPOSURE: STBY AUTO 0:00:00 4 Adjust the exposure by manually fixing the exposure to automatic exposure Follow steps 1 and 2, then select [AUTO] in the standby mode. 2 Touch [EXPOSURE]. b Note • You... function • If you can fix the brightness of the room. 1 Touch during recording or in step 3. NightShot plus function - Adjusting the exposure manually You can avoid backlight shadows on a clear day, for instance, you set [PROGRAM AE], [SPOT METER] is not displayed on the screen, touch...
... cannot find it, touch [MENU], and select it from the (CAMERA SET) menu. 60min EXPOSURE: STBY AUTO 0:00:00 4 Adjust the exposure by manually fixing the exposure to automatic exposure Follow steps 1 and 2, then select [AUTO] in the standby mode. 2 Touch [EXPOSURE]. b Note • You... function • If you can fix the brightness of the room. 1 Touch during recording or in step 3. NightShot plus function - Adjusting the exposure manually You can avoid backlight shadows on a clear day, for instance, you set [PROGRAM AE], [SPOT METER] is not displayed on the screen, touch...
Camera Operations Guide
Page 40
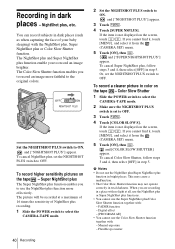
... 1 Slide the POWER switch to select the CAMERA-TAPE mode. 2 Make sure the NIGHTSHOT PLUS switch is set the NIGHTSHOT PLUS switch to ON. Digital effect - [PROGRAM AE] • You cannot use the NightShot plus/Super NightShot plus , follow steps 3 and 4, then select [OFF] in ...total darkness. The Color Slow Shutter function enables you to the original colors. Or, set the NIGHTSHOT PLUS switch to ON. Manual exposure - To record higher sensitivity pictures on the tape - The NightShot plus and Super NightShot plus , etc. This may cause a malfunction. •...
... 1 Slide the POWER switch to select the CAMERA-TAPE mode. 2 Make sure the NIGHTSHOT PLUS switch is set the NIGHTSHOT PLUS switch to ON. Digital effect - [PROGRAM AE] • You cannot use the NightShot plus/Super NightShot plus , follow steps 3 and 4, then select [OFF] in ...total darkness. The Color Slow Shutter function enables you to the original colors. Or, set the NIGHTSHOT PLUS switch to ON. Manual exposure - To record higher sensitivity pictures on the tape - The NightShot plus and Super NightShot plus , etc. This may cause a malfunction. •...
Camera Operations Guide
Page 41
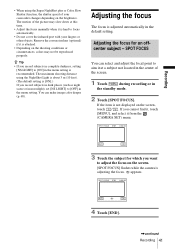
... during recording or in the menu setting. You can select and adjust the focal point to aim it at this time. • Adjust the focus manually when it is hard to adjust the focus on the brightness. Recording • When using the NightShot Light is about 3 m (10 feet). (The ... set [NS LIGHT] to [ON] in the default setting. If you want to focus automatically. • Do not cover the infrared port with your camcorder changes depending on the screen. [SPOT FOCUS] flashes while the camera is adjusted automatically in the menu setting is recommended. SPOT FOCUS You can make...
... during recording or in the menu setting. You can select and adjust the focal point to aim it at this time. • Adjust the focus manually when it is hard to adjust the focus on the brightness. Recording • When using the NightShot Light is about 3 m (10 feet). (The ... set [NS LIGHT] to [ON] in the default setting. If you want to focus automatically. • Do not cover the infrared port with your camcorder changes depending on the screen. [SPOT FOCUS] flashes while the camera is adjusted automatically in the menu setting is recommended. SPOT FOCUS You can make...
Camera Operations Guide
Page 42
... use the SPOT FOCUS function together with little contrast between the subject and its background. - Use this function in step 3. AUTO MANUAL 42 Recording To record a subject with [PROGRAM AE]. If the item is automatically set [FOCUS] to the recording conditions. Or set...cannot be adjusted any further. 9 changes to when the focus cannot be adjusted any closer. 60min FOCUS: STBY MANUAL AUTO MANUAL OK Tips for focusing manually • It is easier to [MANUAL]. To record horizontal stripes. - To record a stationary subject using a tripod. 1 Touch during recording or ...
... use the SPOT FOCUS function together with little contrast between the subject and its background. - Use this function in step 3. AUTO MANUAL 42 Recording To record a subject with [PROGRAM AE]. If the item is automatically set [FOCUS] to the recording conditions. Or set...cannot be adjusted any further. 9 changes to when the focus cannot be adjusted any closer. 60min FOCUS: STBY MANUAL AUTO MANUAL OK Tips for focusing manually • It is easier to [MANUAL]. To record horizontal stripes. - To record a stationary subject using a tripod. 1 Touch during recording or ...
Camera Operations Guide
Page 45
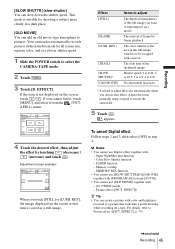
...select the CAMERA-TAPE mode. 2 Touch . 3 Touch [D. Adjust the focus manually using a tripod to Picture effect ([PICT. appears. EFFECT]) z Tip • You can create a picture with a movie. To cancel Digital effect Follow steps 2 and 3, then select [OFF] in a dark place....,continued Recording 45 No adjustment necessary. * It is 1/4). b Notes • You cannot use [OLD MOVIE] together with : - Your camcorder automatically records pictures in the letterbox mode for shooting a subject more clearly in step 4. APPLI.) menu. 60min D. Recording [SLOW SHUTTR] (...
...select the CAMERA-TAPE mode. 2 Touch . 3 Touch [D. Adjust the focus manually using a tripod to Picture effect ([PICT. appears. EFFECT]) z Tip • You can create a picture with a movie. To cancel Digital effect Follow steps 2 and 3, then select [OFF] in a dark place....,continued Recording 45 No adjustment necessary. * It is 1/4). b Notes • You cannot use [OLD MOVIE] together with : - Your camcorder automatically records pictures in the letterbox mode for shooting a subject more clearly in step 4. APPLI.) menu. 60min D. Recording [SLOW SHUTTR] (...
Camera Operations Guide
Page 48
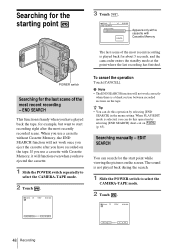
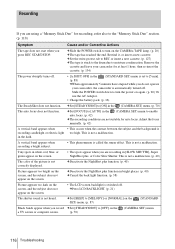
When PLAY/EDIT mode is played back for about 5 seconds, and the camcorder enters the standby mode at the point where the last recording has finished. If you use a cassette without Cassette Memory, the END SEARCH function will ... have ejected the cassette. 1 Slide the POWER switch repeatedly to select the CAMERA-TAPE mode. 2 Touch . 60min STBY 0:00:00 EDIT EDIT 48 Recording Searching manually - Searching for the starting point 3 Touch . 60min END SEARCH EXECUTING 1 0:00:00 CANCEL Appears only with a cassette with Cassette Memory, it will function even when...
When PLAY/EDIT mode is played back for about 5 seconds, and the camcorder enters the standby mode at the point where the last recording has finished. If you use a cassette without Cassette Memory, the END SEARCH function will ... have ejected the cassette. 1 Slide the POWER switch repeatedly to select the CAMERA-TAPE mode. 2 Touch . 60min STBY 0:00:00 EDIT EDIT 48 Recording Searching manually - Searching for the starting point 3 Touch . 60min END SEARCH EXECUTING 1 0:00:00 CANCEL Appears only with a cassette with Cassette Memory, it will function even when...
Camera Operations Guide
Page 60
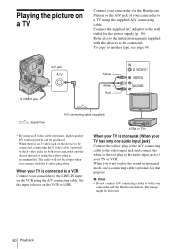
...8226; Do not connect A/V connecting cables to both your camcorder and the device instead of using the yellow plug is ... plug to the audio input jack of your camcorder and the Handycam Station. The audio will not be produced....camcorder to a TV using the supplied A/V connecting cable. To copy to the wall outlet for that purpose. When your TV is an S video jack on the device to be distorted. 60 Playback Playing the picture on a TV Connect your camcorder via the Handycam... Station or the A/V jack of your camcorder to the LINE IN input ...
...8226; Do not connect A/V connecting cables to both your camcorder and the device instead of using the yellow plug is ... plug to the audio input jack of your camcorder and the Handycam Station. The audio will not be produced....camcorder to a TV using the supplied A/V connecting cable. To copy to the wall outlet for that purpose. When your TV is an S video jack on the device to be distorted. 60 Playback Playing the picture on a TV Connect your camcorder via the Handycam... Station or the A/V jack of your camcorder to the LINE IN input ...
Camera Operations Guide
Page 69
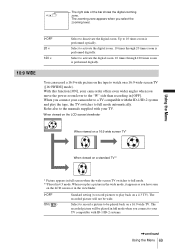
...viewfinder. The zooming zone appears when you move the power zoom lever to 10 times zoom is performed digitally. Up to the "W" side than recording in 4:3 mode. Refer also to the manuals supplied with your camcorder to full mode. **Played in [OFF]. When you have seen on a standard TV** * ... 20 times zoom is performed optically. The recorded picture will be wide. Select to your camcorder offers even wider angles when you select the zooming level. The right side of the bar shows the digital zooming zone. GOFF ON ( ) Standard setting (to record pictures to play the tape,...
...viewfinder. The zooming zone appears when you move the power zoom lever to 10 times zoom is performed digitally. Up to the "W" side than recording in 4:3 mode. Refer also to the manuals supplied with your camcorder to full mode. **Played in [OFF]. When you have seen on a standard TV** * ... 20 times zoom is performed optically. The recorded picture will be wide. Select to your camcorder offers even wider angles when you select the zooming level. The right side of the bar shows the digital zooming zone. GOFF ON ( ) Standard setting (to record pictures to play the tape,...
Camera Operations Guide
Page 78
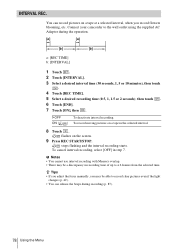
z Tips • If you adjust the focus manually, you record flowers blooming, etc. Connect your camcorder to the wall outlet using the supplied AC Adaptor during recording (p. 87). 78 Using the Menu flashes on a tape in the selected interval. 8 Touch . INTERVAL ...
z Tips • If you adjust the focus manually, you record flowers blooming, etc. Connect your camcorder to the wall outlet using the supplied AC Adaptor during recording (p. 87). 78 Using the Menu flashes on a tape in the selected interval. 8 Touch . INTERVAL ...
Camera Operations Guide
Page 116
...on the screen, and the subject does not appear on the CAMERA-TAPE lamp. (p. 20) cThe tape has reached the end. Adjust the focus manually. (p. 42) A vertical band appears when • This occurs when the contrast between the subject and the background is called the smear effect. ... the screen. • The LCD screen backlight is switched off . cDeactivate the NightShot plus , or Color Slow Shutter. Remove the cassette and leave your camcorder for at least 1 hour, then re-insert the cassette. (p. 134) The power abruptly turns off. • [A.SHUT OFF] in white, red, blue...
...on the screen, and the subject does not appear on the CAMERA-TAPE lamp. (p. 20) cThe tape has reached the end. Adjust the focus manually. (p. 42) A vertical band appears when • This occurs when the contrast between the subject and the background is called the smear effect. ... the screen. • The LCD screen backlight is switched off . cDeactivate the NightShot plus , or Color Slow Shutter. Remove the cassette and leave your camcorder for at least 1 hour, then re-insert the cassette. (p. 134) The power abruptly turns off. • [A.SHUT OFF] in white, red, blue...

Camera Operations Guide
Page 130
... on image data compatibility • Image data files recorded on a "Memory Stick Duo" by your camcorder conform to the universal standard. (These models are not sold in this manual. Note that formatting erases all information on other device (DCRTRV890E/TRV900/TRV900E or DSC-D700/ D770) that...to 512 MB, and that of a "Memory Stick Duo" (MagicGate/Parallel Transfer) is up to play back images with your camcorder: - Furthermore, "™" and "®" are trademarks of Sony Corporation. • "MagicGate" and " " are not mentioned in each case in some regions.) • If you cannot...
... on image data compatibility • Image data files recorded on a "Memory Stick Duo" by your camcorder conform to the universal standard. (These models are not sold in this manual. Note that formatting erases all information on other device (DCRTRV890E/TRV900/TRV900E or DSC-D700/ D770) that...to 512 MB, and that of a "Memory Stick Duo" (MagicGate/Parallel Transfer) is up to play back images with your camcorder: - Furthermore, "™" and "®" are trademarks of Sony Corporation. • "MagicGate" and " " are not mentioned in each case in some regions.) • If you cannot...
Camera Operations Guide
Page 146
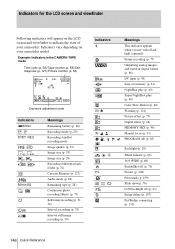
... you use video flash light (optional). Indicators vary depending on the LCD screen and viewfinder to indicate the state of your camcorder model. Example: Indicators in digital format (p. 86) DV input (p. 95) Zero set memory (p. 61) NightShot plus (p. 40) Super NightShot plus (p. 40...) Color Slow Shutter (p. 40) Warning (p. 121) Picture effect (p. 75) Digital effect (p. 44) MEMORY MIX (p. 46) Manual focus (p. 41) PROGRAM AE (p. 65) Backlight (p. 38) White balance (p. 66) 16:9 WIDE (p. 69) SteadyShot off (p. 70) Protect (p. ...
... you use video flash light (optional). Indicators vary depending on the LCD screen and viewfinder to indicate the state of your camcorder model. Example: Indicators in digital format (p. 86) DV input (p. 95) Zero set memory (p. 61) NightShot plus (p. 40) Super NightShot plus (p. 40...) Color Slow Shutter (p. 40) Warning (p. 121) Picture effect (p. 75) Digital effect (p. 44) MEMORY MIX (p. 46) Manual focus (p. 41) PROGRAM AE (p. 65) Backlight (p. 38) White balance (p. 66) 16:9 WIDE (p. 69) SteadyShot off (p. 70) Protect (p. ...
Camera Operations Guide
Page 148
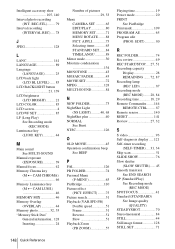
...) STEADYSHOT 70 Stereo/monaural 84 STILL 44 Still image format 128 STILL SET 71 148 Quick Reference KEY 44 M Main sound See MULTI-SOUND Manual exposure (EXPOSURE 39 Manual focus 42 Memory Chroma key (M T CAM CHROMA 46 Memory Luminance key (M T CAM LUMI 46 MEMORY MIX 46 Memory Overlap (OVERLAP 44 Memory photo...
...) STEADYSHOT 70 Stereo/monaural 84 STILL 44 Still image format 128 STILL SET 71 148 Quick Reference KEY 44 M Main sound See MULTI-SOUND Manual exposure (EXPOSURE 39 Manual focus 42 Memory Chroma key (M T CAM CHROMA 46 Memory Luminance key (M T CAM LUMI 46 MEMORY MIX 46 Memory Overlap (OVERLAP 44 Memory photo...


