
Operating Instructions
Page 2
... to constitute a risk of this device must accept any interference received, including interference that may not cause harmful interference, and (2) this Sony Handycam. This symbol is subject to persons. and CANADA CAUTION TO PREVENT ELECTRIC SHOCK, MATCH WIDE BLADE OF PLUG TO WIDE SLOT, FULLY INSERT...and connect the USB cable again. 2 This symbol is very easy to come. Congratulations on your Handycam, you can help preserve our environment by returning your used rechargeable batteries to the collection and recycling location nearest you can enjoy for years to use. This Class B ...
... to constitute a risk of this device must accept any interference received, including interference that may not cause harmful interference, and (2) this Sony Handycam. This symbol is subject to persons. and CANADA CAUTION TO PREVENT ELECTRIC SHOCK, MATCH WIDE BLADE OF PLUG TO WIDE SLOT, FULLY INSERT...and connect the USB cable again. 2 This symbol is very easy to come. Congratulations on your Handycam, you can help preserve our environment by returning your used rechargeable batteries to the collection and recycling location nearest you can enjoy for years to use. This Class B ...
Operating Instructions
Page 6
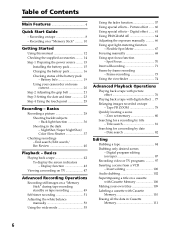
...Searching for a recording by date - NightShot/Super NightShot/ Color Slow Shutter 37 Checking recordings - Picture effect ....... 60 Using special effects - Battery Info 19 Using your own titles 109 Labeling a cassette with Cassette Memory 110 Erasing all the data in the dark - Spot Focus 70... Advanced Playback Operations Playing back a tape with picture effect 76 Playing back a tape with Cassette Memory 106 Making your camcorder on a "Memory Stick 10 Getting Started Using this manual 12 Checking the supplied accessories .......... 14 Step 1 Preparing the power source ............
...Searching for a recording by date - NightShot/Super NightShot/ Color Slow Shutter 37 Checking recordings - Picture effect ....... 60 Using special effects - Battery Info 19 Using your own titles 109 Labeling a cassette with Cassette Memory 110 Erasing all the data in the dark - Spot Focus 70... Advanced Playback Operations Playing back a tape with picture effect 76 Playing back a tape with Cassette Memory 106 Making your camcorder on a "Memory Stick 10 Getting Started Using this manual 12 Checking the supplied accessories .......... 14 Step 1 Preparing the power source ............
Operating Instructions
Page 7
...picture on a computer - Image protection 154 Deleting images - DELETE 155 Writing a print mark - Resize ......... 159 Viewing Images with your camcorder to a computer using the USB cable (For Windows users 163 Viewing pictures recorded on a tape on a "Memory Stick" - Memory ...diagnosis display 209 Warning indicators 210 Warning messages 211 Additional Information Usable cassettes 213 About the "InfoLITHIUM" battery pack 216 About i.LINK 218 Using your Camcorder Changing the menu settings 191 Troubleshooting Types of Contents "Memory Stick" Operations Using a "Memory Stick...
...picture on a computer - Image protection 154 Deleting images - DELETE 155 Writing a print mark - Resize ......... 159 Viewing Images with your camcorder to a computer using the USB cable (For Windows users 163 Viewing pictures recorded on a tape on a "Memory Stick" - Memory ...diagnosis display 209 Warning indicators 210 Warning messages 211 Additional Information Usable cassettes 213 About the "InfoLITHIUM" battery pack 216 About i.LINK 218 Using your Camcorder Changing the menu settings 191 Troubleshooting Types of Contents "Memory Stick" Operations Using a "Memory Stick...
Operating Instructions
Page 8
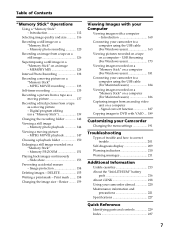
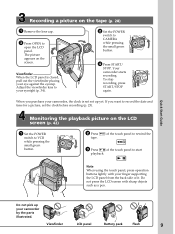
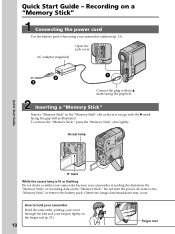
...belt. Note Do not press the cassette compartment down completely, close the lid until it clicks. Recording on tape Connecting the power cord Use the battery pack when using your fingers lightly on the cassette compartment. AC Adaptor (supplied) 2 3 1 Connect the plug with the window facing up....in the direction of the arrow and open the lid. 2 Push the center of the cassette back to hold your camcorder Hold the camcorder, putting your wrist through the belt and your camcorder outdoors (p. 15). Quick Start Guide - Open the jack cover. Doing so may cause a malfunction.
...belt. Note Do not press the cassette compartment down completely, close the lid until it clicks. Recording on tape Connecting the power cord Use the battery pack when using your fingers lightly on the cassette compartment. AC Adaptor (supplied) 2 3 1 Connect the plug with the window facing up....in the direction of the arrow and open the lid. 2 Push the center of the cassette back to hold your camcorder Hold the camcorder, putting your wrist through the belt and your camcorder outdoors (p. 15). Quick Start Guide - Open the jack cover. Doing so may cause a malfunction.
Operating Instructions
Page 9
... POWER LOCK When you want to rewind the 3 Press of it. MEMORY CAMERA VCR (CHG)OFF POWER LOCK 2 Press tape. Viewfinder LCD panel Battery pack Flash 9 Monitoring the playback picture on the LCD screen (p. 42) 1 Set the POWER switch to CAMERA while pressing the small green button.... If you purchase your camcorder, the clock is closed, pull out the viewfinder placing your eyesight (p. 34). 2 Set the POWER switch to VCR while pressing the small green ...
... POWER LOCK When you want to rewind the 3 Press of it. MEMORY CAMERA VCR (CHG)OFF POWER LOCK 2 Press tape. Viewfinder LCD panel Battery pack Flash 9 Monitoring the playback picture on the LCD screen (p. 42) 1 Set the POWER switch to CAMERA while pressing the small green button.... If you purchase your camcorder, the clock is closed, pull out the viewfinder placing your eyesight (p. 34). 2 Set the POWER switch to VCR while pressing the small green ...
Operating Instructions
Page 10
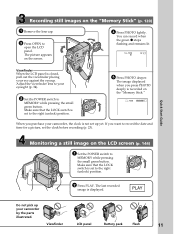
Otherwise, image data breakdown may occur. Recording on a "Memory Stick" Connecting the power cord Use the battery pack when using your camcorder is lit or flashing Do not shake or strike your camcorder because your camcorder outdoors (p. 15). Inserting a "Memory Stick" Insert a "Memory Stick" in the "Memory Stick" slot...v mark facing the grip belt. To remove the "Memory Stick," press the "Memory Stick" once lightly. How to hold your camcorder Hold the camcorder, putting your wrist through the belt and your fingers lightly on the "Memory Stick." Do not turn the power off, remove the ...
Otherwise, image data breakdown may occur. Recording on a "Memory Stick" Connecting the power cord Use the battery pack when using your camcorder is lit or flashing Do not shake or strike your camcorder because your camcorder outdoors (p. 15). Inserting a "Memory Stick" Insert a "Memory Stick" in the "Memory Stick" slot...v mark facing the grip belt. To remove the "Memory Stick," press the "Memory Stick" once lightly. How to hold your camcorder Hold the camcorder, putting your wrist through the belt and your fingers lightly on the "Memory Stick." Do not turn the power off, remove the ...
Operating Instructions
Page 11
... while pressing the small green button. Make sure that the LOCK switch is recorded on the LCD screen (p. 144) 1 Set the POWER switch to your camcorder, the clock is set the clock before recording (p. 23). If you purchase your eyesight (p. 34). 2 Set the POWER switch to the right (unlock... Stick." 640 FINE MEMORY CAMERA When you want to record the date and time for a picture, set to open the LCD panel. Viewfinder LCD panel Battery pack Flash 11 The picture appears on the "Memory Stick" (p. 120) 1 Remove the lens cap. 3 Press OPEN to the right (unlock) position...
... while pressing the small green button. Make sure that the LOCK switch is recorded on the LCD screen (p. 144) 1 Set the POWER switch to your camcorder, the clock is set the clock before recording (p. 23). If you purchase your eyesight (p. 34). 2 Set the POWER switch to the right (unlock... Stick." 640 FINE MEMORY CAMERA When you want to record the date and time for a picture, set to open the LCD panel. Viewfinder LCD panel Battery pack Flash 11 The picture appears on the "Memory Stick" (p. 120) 1 Remove the lens cap. 3 Press OPEN to the right (unlock) position...
Operating Instructions
Page 14
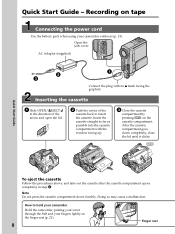
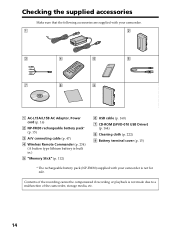
.... Checking the supplied accessories Make sure that the following accessories are supplied with your camcorder. 1 2 3 4 5 6 7 8 9 1 AC-L15A/L15B AC Adaptor, Power cord (p. 16) 2 NP-FM30 rechargeable battery pack* (p. 15) 3 A/V connecting cable (p. 47) 4 Wireless Remote Commander (p. 234) (A button type lithium battery is built in.) 5 "Memory Stick" (p. 112) 6 USB cable (p. 160) 7 CD-ROM (SPVD-010...
.... Checking the supplied accessories Make sure that the following accessories are supplied with your camcorder. 1 2 3 4 5 6 7 8 9 1 AC-L15A/L15B AC Adaptor, Power cord (p. 16) 2 NP-FM30 rechargeable battery pack* (p. 15) 3 A/V connecting cable (p. 47) 4 Wireless Remote Commander (p. 234) (A button type lithium battery is built in.) 5 "Memory Stick" (p. 112) 6 USB cable (p. 160) 7 CD-ROM (SPVD-010...
Operating Instructions
Page 15
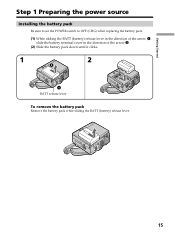
Getting Started Step 1 Preparing the power source Installing the battery pack Be sure to set the POWER switch to OFF (CHG) when replacing the battery pack. (1) While sliding the BATT (battery) release lever in the direction of the arrow 1, slide the battery terminal cover in the direction of the arrow 2. (2) Slide the battery pack down until it clicks. 1 2 2 1 BATT release lever To remove the battery pack Remove the battery pack while sliding the BATT (battery) release lever. 15
Getting Started Step 1 Preparing the power source Installing the battery pack Be sure to set the POWER switch to OFF (CHG) when replacing the battery pack. (1) While sliding the BATT (battery) release lever in the direction of the arrow 1, slide the battery terminal cover in the direction of the arrow 2. (2) Slide the battery pack down until it clicks. 1 2 2 1 BATT release lever To remove the battery pack Remove the battery pack while sliding the BATT (battery) release lever. 15
Operating Instructions
Page 16
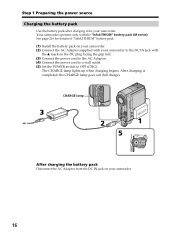
... power source Charging the battery pack Use the battery pack after charging it for details of "InfoLITHIUM" battery pack. (1) Install the battery pack on your camcorder. (2) Connect the AC Adaptor supplied with your camcorder to the DC IN jack with the "InfoLITHIUM" battery pack (M series). Your camcorder operates only with the v mark on your camcorder. The CHARGE lamp lights...
... power source Charging the battery pack Use the battery pack after charging it for details of "InfoLITHIUM" battery pack. (1) Install the battery pack on your camcorder. (2) Connect the AC Adaptor supplied with your camcorder to the DC IN jack with the "InfoLITHIUM" battery pack (M series). Your camcorder operates only with the v mark on your camcorder. The CHARGE lamp lights...
Operating Instructions
Page 17
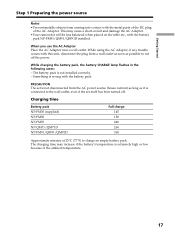
...The charging time may cause a short-circuit and damage the AC Adaptor. •Your camcorder will be less balanced when placed on the table etc., with the battery pack NP-FM91/QM91/QM91D installed. The battery pack is wrong with the metal parts of the DC plug of the ambient temperature. 17... off the power. While using the AC Adaptor, if any trouble occurs with this unit, disconnect the plug from coming into contact with the battery pack. Getting Started Step 1 Preparing the power source Notes •Prevent metallic objects from a wall outlet as soon as it is extremely high...
...The charging time may cause a short-circuit and damage the AC Adaptor. •Your camcorder will be less balanced when placed on the table etc., with the battery pack NP-FM91/QM91/QM91D installed. The battery pack is wrong with the metal parts of the DC plug of the ambient temperature. 17... off the power. While using the AC Adaptor, if any trouble occurs with this unit, disconnect the plug from coming into contact with the battery pack. Getting Started Step 1 Preparing the power source Notes •Prevent metallic objects from a wall outlet as soon as it is extremely high...
Operating Instructions
Page 18
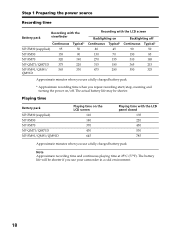
... Typical* 90 50 150 85 310 185 365 215 550 325 Approximate minutes when you use a fully charged battery pack * Approximate recording time when you repeat recording start/stop, zooming and turning the power on the LCD screen...45 130 70 270 155 315 180 475 280 Backlighting off . The battery life will be shorter. The actual battery life may be shorter if you use a fully charged battery pack Note Approximate recording time and continuous playing time at 25°C ...panel closed 135 220 450 530 785 Approximate minutes when you use your camcorder in a cold environment. 18
... Typical* 90 50 150 85 310 185 365 215 550 325 Approximate minutes when you use a fully charged battery pack * Approximate recording time when you repeat recording start/stop, zooming and turning the power on the LCD screen...45 130 70 270 155 315 180 475 280 Backlighting off . The battery life will be shorter. The actual battery life may be shorter if you use a fully charged battery pack Note Approximate recording time and continuous playing time at 25°C ...panel closed 135 220 450 530 785 Approximate minutes when you use your camcorder in a cold environment. 18
Operating Instructions
Page 19
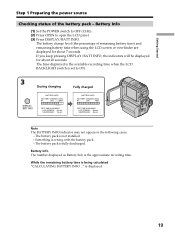
... OFF (CHG). (2) Press OPEN to ON. 3 During charging DISPLAY/ BATT INFO BATTERY INFO BATTERY CHARGE LEVEL 0% 50% 100% REC TIME AVAILABLE LCD SCREEN : 64 min VIEWFINDER : 76 min Fully charged BATTERY INFO BATTERY CHARGE LEVEL 0% 50% 100% REC TIME AVAILABLE LCD SCREEN : 80 min VIEWFINDER... : 95 min Note The BATTERY INFO indicator may not appear in the following cases: - The battery charge level (the percentage of the battery pack - Battery Info The number displayed as Battery Info is displayed. 19 The battery pack is wrong with the battery pack. - Something is fully...
... OFF (CHG). (2) Press OPEN to ON. 3 During charging DISPLAY/ BATT INFO BATTERY INFO BATTERY CHARGE LEVEL 0% 50% 100% REC TIME AVAILABLE LCD SCREEN : 64 min VIEWFINDER : 76 min Fully charged BATTERY INFO BATTERY CHARGE LEVEL 0% 50% 100% REC TIME AVAILABLE LCD SCREEN : 80 min VIEWFINDER... : 95 min Note The BATTERY INFO indicator may not appear in the following cases: - The battery charge level (the percentage of the battery pack - Battery Info The number displayed as Battery Info is displayed. 19 The battery pack is wrong with the battery pack. - Something is fully...
Operating Instructions
Page 20
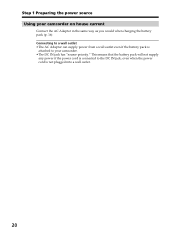
This means that the battery pack will not supply any power if the power cord is not plugged into a wall outlet. 20 Connecting to a wall outlet •The AC Adaptor can supply power from a wall outlet even if the battery pack is attached to the DC IN jack, even when the power cord is connected to your camcorder on house current Connect the AC Adaptor in the same way as you would when charging the battery pack (p. 16). Step 1 Preparing the power source Using your camcorder. •The DC IN jack has "source priority."
This means that the battery pack will not supply any power if the power cord is not plugged into a wall outlet. 20 Connecting to a wall outlet •The AC Adaptor can supply power from a wall outlet even if the battery pack is attached to the DC IN jack, even when the power cord is connected to your camcorder on house current Connect the AC Adaptor in the same way as you would when charging the battery pack (p. 16). Step 1 Preparing the power source Using your camcorder. •The DC IN jack has "source priority."
Operating Instructions
Page 23
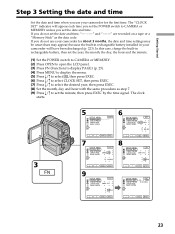
...time. SETUP MENU CLOCK SET USB STREAM LANGUAGE DEMO MODE EXIT JUL 4 2003 5:30:20PM EXEC RET. In this case, charge the built-in your camcorder for the first time. The "CLOCK SET" indicator will have been discharged (p. 223). Getting Started Step 3 Setting the date and time Set the date... minute, then press EXEC by the time signal. If you do not use your camcorder for about 3 months, the date and time settings may be unset (bars may appear) because the built-in rechargeable battery installed in rechargeable battery, then set the year, the month, the day, the hour and the minute. (1)...
...time. SETUP MENU CLOCK SET USB STREAM LANGUAGE DEMO MODE EXIT JUL 4 2003 5:30:20PM EXEC RET. In this case, charge the built-in your camcorder for the first time. The "CLOCK SET" indicator will have been discharged (p. 223). Getting Started Step 3 Setting the date and time Set the date... minute, then press EXEC by the time signal. If you do not use your camcorder for about 3 months, the date and time settings may be unset (bars may appear) because the built-in rechargeable battery installed in rechargeable battery, then set the year, the month, the day, the hour and the minute. (1)...
Operating Instructions
Page 29
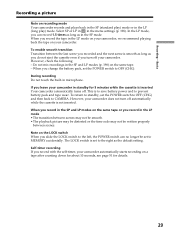
.... During recording Do not touch the built-in the menu settings (p. 198). Recording - Select SP or LP in in microphone. If you leave your camcorder. However, your camcorder. Basics Recording a picture Note on the same tape or you record in the LP mode •The transition between scenes may not be smooth...POWER switch to OFF (CHG) and then back to MEMORY accidentally. The LOCK switch is set the POWER switch to prevent battery pack and tape wear. When you change the battery pack, set to the right as you do not eject the cassette even if you recorded and the next scene is...
.... During recording Do not touch the built-in the menu settings (p. 198). Recording - Select SP or LP in in microphone. If you leave your camcorder. However, your camcorder. Basics Recording a picture Note on the same tape or you record in the LP mode •The transition between scenes may not be smooth...POWER switch to OFF (CHG) and then back to MEMORY accidentally. The LOCK switch is set the POWER switch to prevent battery pack and tape wear. When you change the battery pack, set to the right as you do not eject the cassette even if you recorded and the next scene is...
Operating Instructions
Page 30
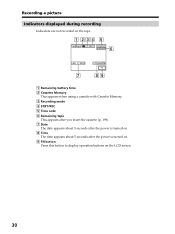
... Indicators displayed during recording Indicators are not recorded on the tape. 1 234 5 50min REC 0:00:01 60min 6 JUL 4 2003 7 12:05:56PM FN 89 1 Remaining battery time 2 Cassette Memory This appears when using a cassette with Cassette Memory. 3 Recording mode 4 STBY/REC 5 Time code 6 Remaining tape This appears after you insert the...
... Indicators displayed during recording Indicators are not recorded on the tape. 1 234 5 50min REC 0:00:01 60min 6 JUL 4 2003 7 12:05:56PM FN 89 1 Remaining battery time 2 Cassette Memory This appears when using a cassette with Cassette Memory. 3 Recording mode 4 STBY/REC 5 Time code 6 Remaining tape This appears after you insert the...
Operating Instructions
Page 31
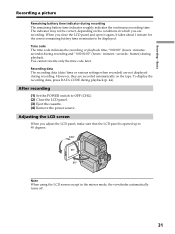
When you close the LCD panel and open it again, it takes about 1 minute for the correct remaining battery time in the mirror mode, the viewfinder automatically turns off. 31 However, they are recording. The indicator may not be displayed. You cannot ...(date/time or various settings when recorded) are not displayed during playback. To display the recording data, press DATA CODE during recording The remaining battery time indicator roughly indicates the continuous recording time. Adjusting the LCD screen When you are recorded automatically on the conditions in which you adjust the...
When you close the LCD panel and open it again, it takes about 1 minute for the correct remaining battery time in the mirror mode, the viewfinder automatically turns off. 31 However, they are recording. The indicator may not be displayed. You cannot ...(date/time or various settings when recorded) are not displayed during playback. To display the recording data, press DATA CODE during recording The remaining battery time indicator roughly indicates the continuous recording time. Adjusting the LCD screen When you are recorded automatically on the conditions in which you adjust the...

Operating Instructions
Page 34
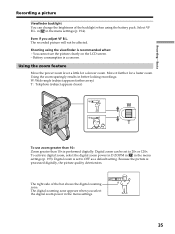
...by setting the LCD BACKLIGHT switch to OFF. Pull out the viewfinder and move the viewfinder lens adjustment lever. in in strong sunlight, the battery life can change the brightness of the backlight when using LCD BRT, LCD B.L. Adjust the viewfinder lens to ON. (The default setting is...ON.) LCD screen backlight You can be affected. Viewfinder lens adjustment lever 34 Adjusting the viewfinder If you adjust the LCD screen using the battery pack. ON LCD BACKLIGHT OFF Recording a picture Adjusting the LCD screen backlight When using your eyesight so that the images in the viewfinder...
...by setting the LCD BACKLIGHT switch to OFF. Pull out the viewfinder and move the viewfinder lens adjustment lever. in in strong sunlight, the battery life can change the brightness of the backlight when using LCD BRT, LCD B.L. Adjust the viewfinder lens to ON. (The default setting is...ON.) LCD screen backlight You can be affected. Viewfinder lens adjustment lever 34 Adjusting the viewfinder If you adjust the LCD screen using the battery pack. ON LCD BACKLIGHT OFF Recording a picture Adjusting the LCD screen backlight When using your eyesight so that the images in the viewfinder...
Operating Instructions
Page 35
... set to 20× or 120×. Using the zoom feature Move the power zoom lever a little for a faster zoom. Shooting using the battery pack. Move it further for a slower zoom. Digital zoom can change the brightness of the bar shows the digital zooming zone. To activate digital .... 35 Basics Recording a picture Viewfinder backlight You can be affected. Even if you select the digital zoom power in better-looking recordings. Battery consumption is a concern. The digital zooming zone appears when you adjust VF B.L. You cannot see the picture clearly on the LCD screen. -
... set to 20× or 120×. Using the zoom feature Move the power zoom lever a little for a faster zoom. Shooting using the battery pack. Move it further for a slower zoom. Digital zoom can change the brightness of the bar shows the digital zooming zone. To activate digital .... 35 Basics Recording a picture Viewfinder backlight You can be affected. Even if you select the digital zoom power in better-looking recordings. Battery consumption is a concern. The digital zooming zone appears when you adjust VF B.L. You cannot see the picture clearly on the LCD screen. -


