Operating Instructions
Page 7
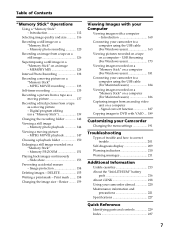
...Superimposing a still image in a "Memory Stick" on a computer - Image protection 154 Deleting images - Introduction 160 Connecting your camcorder to a computer using the USB cable (For Macintosh users 184 Viewing images recorded on a "Memory Stick" on a computer (For Macintosh users 186 Capturing ... (on a computer - DELETE 155 Writing a print mark - USB Streaming (For Windows users 173 Viewing images recorded on a "Memory Stick" on a computer (For Windows users 181 Connecting your camcorder to correct trouble 201 Self-diagnosis display 209 Warning indicators 210 Warning...
...Superimposing a still image in a "Memory Stick" on a computer - Image protection 154 Deleting images - Introduction 160 Connecting your camcorder to a computer using the USB cable (For Macintosh users 184 Viewing images recorded on a "Memory Stick" on a computer (For Macintosh users 186 Capturing ... (on a computer - DELETE 155 Writing a print mark - USB Streaming (For Windows users 173 Viewing images recorded on a "Memory Stick" on a computer (For Windows users 181 Connecting your camcorder to correct trouble 201 Self-diagnosis display 209 Warning indicators 210 Warning...
Operating Instructions
Page 23
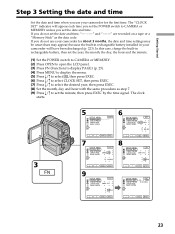
...hour with the same procedure as the data code. If you do not use your camcorder will appear each time you set the POWER switch to set the date and time. SETUP MENU CLOCK SET USB STREAM LANGUAGE DEMO MODE EXIT JUL 4 2003 5:30:20PM EXEC RET. Getting Started Step ...date and time when you use your camcorder for the first time. The "CLOCK SET" indicator will have been discharged (p. 223). EXEC RET. 23 The clock starts. 3 FN 5 SETUP MENU EXIT CLOCK SET USB STREAM LANGUAGE DEMO MODE 6 SETUP MENU EXIT CLOCK SET USB STREAM LANGUAGE 2003 JAN 1 DEMO MODE 12...
...hour with the same procedure as the data code. If you do not use your camcorder will appear each time you set the POWER switch to set the date and time. SETUP MENU CLOCK SET USB STREAM LANGUAGE DEMO MODE EXIT JUL 4 2003 5:30:20PM EXEC RET. Getting Started Step ...date and time when you use your camcorder for the first time. The "CLOCK SET" indicator will have been discharged (p. 223). EXEC RET. 23 The clock starts. 3 FN 5 SETUP MENU EXIT CLOCK SET USB STREAM LANGUAGE DEMO MODE 6 SETUP MENU EXIT CLOCK SET USB STREAM LANGUAGE 2003 JAN 1 DEMO MODE 12...
Operating Instructions
Page 163
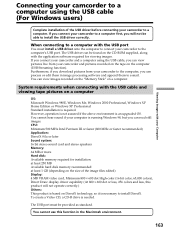
... product is based on the size of the USB driver before connecting your computer is needed. If you connect your camcorder to the computer, you can view images recorded on the "Memory Stick" on the computer (USB Streaming function). When connecting to a computer with your... Computer Connecting your camcorder and pictures recorded on the tape on a computer. The USB driver can view pictures live from your camcorder to e-mail. You can read still images. To ...
... product is based on the size of the USB driver before connecting your computer is needed. If you connect your camcorder to the computer, you can view images recorded on the "Memory Stick" on the computer (USB Streaming function). When connecting to a computer with your... Computer Connecting your camcorder and pictures recorded on the tape on a computer. The USB driver can view pictures live from your camcorder to e-mail. You can read still images. To ...

Operating Instructions
Page 168
... details on the operation procedure, refer to the on the tape (1) Connect the AC Adaptor to your camcorder. (2) Set the POWER switch to . (3) Press FN to display PAGE1. (4) Press MENU to display the menu. (5) Select USB STREAM in with permission of "ImageMixer" and sample images are using Windows 2000, log in MEMORY MIX...
... details on the operation procedure, refer to the on the tape (1) Connect the AC Adaptor to your camcorder. (2) Set the POWER switch to . (3) Press FN to display PAGE1. (4) Press MENU to display the menu. (5) Select USB STREAM in with permission of "ImageMixer" and sample images are using Windows 2000, log in MEMORY MIX...
Operating Instructions
Page 173
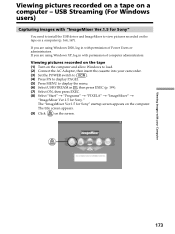
USB Streaming (For Windows users) Capturing images with your camcorder. (3) Set the POWER switch to . (4) Press FN to display PAGE1. (5) Press MENU to load. (2) Connect the AC Adaptor, then insert the cassette into your Computer 173 Viewing Images with "ImageMixer Ver.1.5 for Sony" You need to install the USB... the menu. (6) Select USB STREAM in with permission of computer administrators. The title screen appears. (9) Click on a computer (p. 164, 167). Viewing pictures recorded on a tape on the computer. The "ImageMixer Ver.1.5 for Sony." If you are using ...
USB Streaming (For Windows users) Capturing images with your camcorder. (3) Set the POWER switch to . (4) Press FN to display PAGE1. (5) Press MENU to load. (2) Connect the AC Adaptor, then insert the cassette into your Computer 173 Viewing Images with "ImageMixer Ver.1.5 for Sony" You need to install the USB... the menu. (6) Select USB STREAM in with permission of computer administrators. The title screen appears. (9) Click on a computer (p. 164, 167). Viewing pictures recorded on a tape on the computer. The "ImageMixer Ver.1.5 for Sony." If you are using ...
Operating Instructions
Page 174
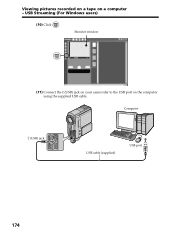
Computer (USB) jack USB cable (supplied) USB port 174 Monitor window (11) Connect the (USB) jack on your camcorder to the USB port on a computer - Viewing pictures recorded on a tape on the computer using the supplied USB cable. USB Streaming (For Windows users) (10) Click .
Computer (USB) jack USB cable (supplied) USB port 174 Monitor window (11) Connect the (USB) jack on your camcorder to the USB port on a computer - Viewing pictures recorded on a tape on the computer using the supplied USB cable. USB Streaming (For Windows users) (10) Click .
Operating Instructions
Page 175
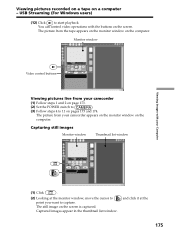
The picture from your camcorder appears on the monitor window on the computer. The still image on pages 173 and 174. USB Streaming (For Windows users) (12) Click to 11 on the screen is captured. The picture from the tape appears on the monitor window on the computer. ... on a computer - Captured images appear in the thumbnail list window. Viewing pictures recorded on a tape on the screen. You can control video operations with your camcorder (1) Follow steps 1 and 2 on page 173. (2) Set the POWER switch to . (3) Follow steps 4 to start playback.
The picture from your camcorder appears on the monitor window on the computer. The still image on pages 173 and 174. USB Streaming (For Windows users) (12) Click to 11 on the screen is captured. The picture from the tape appears on the monitor window on the computer. ... on a computer - Captured images appear in the thumbnail list window. Viewing pictures recorded on a tape on the screen. You can control video operations with your camcorder (1) Follow steps 1 and 2 on page 173. (2) Set the POWER switch to . (3) Follow steps 4 to start playback.
Operating Instructions
Page 176
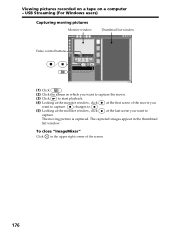
USB Streaming (For Windows users) Capturing moving picture is captured. The moving pictures Monitor window Thumbnail list window Video control buttons (1) Click . (2) Click the album in the ...
USB Streaming (For Windows users) Capturing moving picture is captured. The moving pictures Monitor window Thumbnail list window Video control buttons (1) Click . (2) Click the album in the ...

Operating Instructions
Page 177
... image shakes up and down. - Images of different color systems to that are not displayed correctly. •When your camcorder before installation of the USB driver was complete. If any "Memory Stick" operations during USB Streaming. You can make the picture move smoothly. Some images are displayed with a cracking noise. - Viewing Images with your...
... image shakes up and down. - Images of different color systems to that are not displayed correctly. •When your camcorder before installation of the USB driver was complete. If any "Memory Stick" operations during USB Streaming. You can make the picture move smoothly. Some images are displayed with a cracking noise. - Viewing Images with your...
Operating Instructions
Page 178
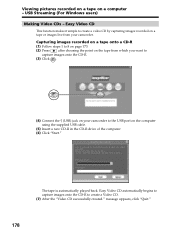
...recorded on a tape or images live from which you want to capture images onto the CD-R. (3) Click . (4) Connect the (USB) jack on the computer using the supplied USB cable. (5) Insert a new CD-R in the CD-R drive of the computer. (6) Click "Start." Easy Video CD automatically ...onto the CD-R to 8 on page 173. (2) Press after choosing the point on the tape from your camcorder to the USB port on your camcorder. message appears, click "Quit." 178 The tape is automatically played back. Capturing images recorded on a computer - USB Streaming (For Windows users) Making Video CDs -
...recorded on a tape or images live from which you want to capture images onto the CD-R. (3) Click . (4) Connect the (USB) jack on the computer using the supplied USB cable. (5) Insert a new CD-R in the CD-R drive of the computer. (6) Click "Start." Easy Video CD automatically ...onto the CD-R to 8 on page 173. (2) Press after choosing the point on the tape from your camcorder to the USB port on your camcorder. message appears, click "Quit." 178 The tape is automatically played back. Capturing images recorded on a computer - USB Streaming (For Windows users) Making Video CDs -
Operating Instructions
Page 179
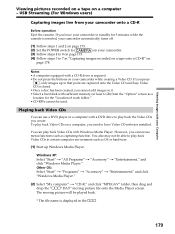
...with sufficient memory (at least 6 GB) from your camcorder onto a CD-R Before operation Eject the cassette. Windows XP: Select "Start" t "All Programs" t "Accessory" t "Entertainment," and click "Windows Media Player." USB Streaming (For Windows users) Capturing images live from the "...Option" screen as a location for 5 minutes while the cassette is inserted, your camcorder automatically turns off. (1) Follow steps 1 and 2 on page 173....
...with sufficient memory (at least 6 GB) from your camcorder onto a CD-R Before operation Eject the cassette. Windows XP: Select "Start" t "All Programs" t "Accessory" t "Entertainment," and click "Windows Media Player." USB Streaming (For Windows users) Capturing images live from the "...Option" screen as a location for 5 minutes while the cassette is inserted, your camcorder automatically turns off. (1) Follow steps 1 and 2 on page 173....
Operating Instructions
Page 180
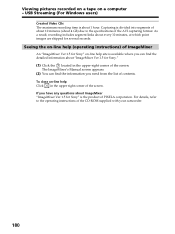
... supplied with your camcorder. 180 The ImageMixer's Manual screen appears. (2) You can find the information you have any questions about 4 GB) due to the operating instructions of contents. Capturing is divided into segments of PIXELA corporation. USB Streaming (For Windows users...) Created Video CDs The maximum recording time is the product of about 10 minutes (about ImageMixer "ImageMixer Ver.1.5 for Sony" is about "ImageMixer Ver.1.5 for several seconds. Viewing ...
... supplied with your camcorder. 180 The ImageMixer's Manual screen appears. (2) You can find the information you have any questions about 4 GB) due to the operating instructions of contents. Capturing is divided into segments of PIXELA corporation. USB Streaming (For Windows users...) Created Video CDs The maximum recording time is the product of about 10 minutes (about ImageMixer "ImageMixer Ver.1.5 for Sony" is about "ImageMixer Ver.1.5 for several seconds. Viewing ...
Operating Instructions
Page 199
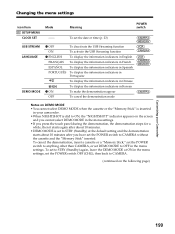
...NIGHTSHOT" indicator appears on DEMO MODE •You cannot select DEMO MODE when the cassette or the "Memory Stick" is inserted in your Camcorder 199 Changing the menu settings Icon/item SETUP MENU CLOCK SET Mode -- To cancel the demonstration, insert a cassette or a "Memory Stick,"..., then it starts again after you have set the date or time (p. 23) POWER switch USB STREAM LANGUAGE DEMO MODE z OFF To deactivate the USB Streaming function ON To activate the USB Streaming function z ENGLISH To display the information indicators in English FRANÇAIS To display the information ...
...NIGHTSHOT" indicator appears on DEMO MODE •You cannot select DEMO MODE when the cassette or the "Memory Stick" is inserted in your Camcorder 199 Changing the menu settings Icon/item SETUP MENU CLOCK SET Mode -- To cancel the demonstration, insert a cassette or a "Memory Stick,"..., then it starts again after you have set the date or time (p. 23) POWER switch USB STREAM LANGUAGE DEMO MODE z OFF To deactivate the USB Streaming function ON To activate the USB Streaming function z ENGLISH To display the information indicators in English FRANÇAIS To display the information ...

Operating Instructions
Page 208
...battery pack is not properly installed. c Adjust the screen (CALIBRATION) (p. 224). Image data cannot be transferred to your Sony dealer or local authorized Sony service facility. The melody or beep sounds for at least 1 hour to acclimatize (p. 221). • Some troubles ...cable. • VIDEOINPUT is not set to OFF in your camcorder. c Install it properly (p. 15). • Something is not a malfunction. c Uninstall the incorrect USB driver and reinstall the USB driver (p. 164, 170). • USB STREAM is because some functions use a linear mechanism. c Install it...
...battery pack is not properly installed. c Adjust the screen (CALIBRATION) (p. 224). Image data cannot be transferred to your Sony dealer or local authorized Sony service facility. The melody or beep sounds for at least 1 hour to acclimatize (p. 221). • Some troubles ...cable. • VIDEOINPUT is not set to OFF in your camcorder. c Install it properly (p. 15). • Something is not a malfunction. c Uninstall the incorrect USB driver and reinstall the USB driver (p. 164, 170). • USB STREAM is because some functions use a linear mechanism. c Install it...
Operating Instructions
Page 212
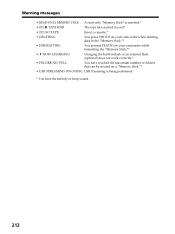
... maximum number of folders that can be created on a "Memory Stick."* • USB STREAMING ON GOING USB Streaming is inserted.* • Q Z TAPE END The tape has reached its end.* • Q NO TAPE Insert a cassette.* • DELETING You press PHOTO on your camcorder while deleting data in the "Memory Stick."* • FORMATTING You pressed PHOTO on...
... maximum number of folders that can be created on a "Memory Stick."* • USB STREAMING ON GOING USB Streaming is inserted.* • Q Z TAPE END The tape has reached its end.* • Q NO TAPE Insert a cassette.* • DELETING You press PHOTO on your camcorder while deleting data in the "Memory Stick."* • FORMATTING You pressed PHOTO on...

Operating Instructions
Page 237
... PB ZOOM 78 Telephoto 35 Time code 31 Title 106 Title search 81 Touch panel 25 TRAIL 61 Transition 29 TV color systems 220 USB jack 160 USB Streaming 173 W, X, Y, Z Warning indicators 210 Warning messages 211 White balance 53 Wide-angle 35 Wide mode 55 WIPE 57 Write-protect tab 113 Zero set...
... PB ZOOM 78 Telephoto 35 Time code 31 Title 106 Title search 81 Touch panel 25 TRAIL 61 Transition 29 TV color systems 220 USB jack 160 USB Streaming 173 W, X, Y, Z Warning indicators 210 Warning messages 211 White balance 53 Wide-angle 35 Wide mode 55 WIPE 57 Write-protect tab 113 Zero set...


