Operating Instructions
Page 2
...to use. Operation is intended to alert the user to discontinue midway (fail), restart the application or disconnect and connect the USB cable again. 2 This Class B digital apparatus complies with advanced features, but at the same time it is intended to alert the...constitute a risk of this device must accept any interference received, including interference that may not cause harmful interference, and (2) this Sony Handycam. For customers in the literature accompanying the appliance. Notice If static electricity or electromagnetism causes data transfer to the presence of ...
...to use. Operation is intended to alert the user to discontinue midway (fail), restart the application or disconnect and connect the USB cable again. 2 This Class B digital apparatus complies with advanced features, but at the same time it is intended to alert the...constitute a risk of this device must accept any interference received, including interference that may not cause harmful interference, and (2) this Sony Handycam. For customers in the literature accompanying the appliance. Notice If static electricity or electromagnetism causes data transfer to the presence of ...
Operating Instructions
Page 4
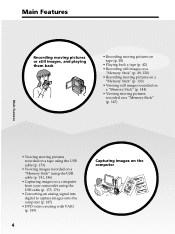
... a "Memory Stick" (p. 147) Main Features • Viewing moving pictures recorded on a tape using the USB cable (p. 173) • Viewing images recorded on a "Memory Stick" using the USB cable (p. 181, 186) • Capturing images on a computer from your camcorder using the USB cable (p. 175, 176) • Converting an analog signal into digital to capture images onto the computer...
... a "Memory Stick" (p. 147) Main Features • Viewing moving pictures recorded on a tape using the USB cable (p. 173) • Viewing images recorded on a "Memory Stick" using the USB cable (p. 181, 186) • Capturing images on a computer from your camcorder using the USB cable (p. 175, 176) • Converting an analog signal into digital to capture images onto the computer...
Operating Instructions
Page 7
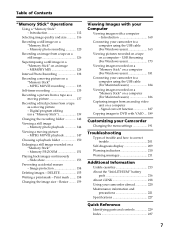
... MOVIE playback 147 Choosing a playback folder 150 Enlarging a still image recorded on a computer - Introduction 160 Connecting your camcorder to a computer using the USB cable (For Windows users 163 Viewing pictures recorded on a tape on a "Memory Stick" - Slide show 153 Preventing accidental...139 Changing the recording folder 142 Viewing a still image - Signal convert function 187 Copying images to a computer using the USB cable (For Macintosh users 184 Viewing images recorded on a "Memory Stick" on a computer (For Macintosh users 186 Capturing images from a tape...
... MOVIE playback 147 Choosing a playback folder 150 Enlarging a still image recorded on a computer - Introduction 160 Connecting your camcorder to a computer using the USB cable (For Windows users 163 Viewing pictures recorded on a tape on a "Memory Stick" - Slide show 153 Preventing accidental...139 Changing the recording folder 142 Viewing a still image - Signal convert function 187 Copying images to a computer using the USB cable (For Macintosh users 184 Viewing images recorded on a "Memory Stick" on a computer (For Macintosh users 186 Capturing images from a tape...
Operating Instructions
Page 12
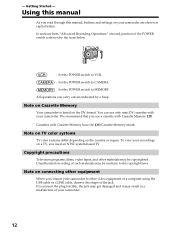
... forcibly, the jack may get damaged and it may be copyrighted. You can use a cassette with your camcorder are indicated by the icons below. Note on your camcorder. We recommend that you carry out are shown in a malfunction of such materials may result in capital letters... on the DV format. Using this manual As you connect your camcorder. 12 Unauthorized recording of your camcorder to MEMORY. Getting Started - Note on connecting other video equipment or a computer using the USB cable or i.LINK cable, observe the shape of the POWER switch is based on the ...
... forcibly, the jack may get damaged and it may be copyrighted. You can use a cassette with your camcorder are indicated by the icons below. Note on your camcorder. We recommend that you carry out are shown in a malfunction of such materials may result in capital letters... on the DV format. Using this manual As you connect your camcorder. 12 Unauthorized recording of your camcorder to MEMORY. Getting Started - Note on connecting other video equipment or a computer using the USB cable or i.LINK cable, observe the shape of the POWER switch is based on the ...
Operating Instructions
Page 14
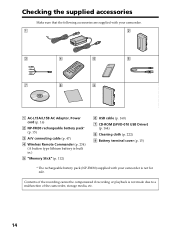
... Remote Commander (p. 234) (A button type lithium battery is built in.) 5 "Memory Stick" (p. 112) 6 USB cable (p. 160) 7 CD-ROM (SPVD-010 USB Driver) (p. 164) 8 Cleaning cloth (p. 222) 9 Battery terminal cover (p. 15) * The rechargeable battery pack (NP-FM30) supplied with your camcorder is not made due to a malfunction of the recording cannot be compensated if recording...
... Remote Commander (p. 234) (A button type lithium battery is built in.) 5 "Memory Stick" (p. 112) 6 USB cable (p. 160) 7 CD-ROM (SPVD-010 USB Driver) (p. 164) 8 Cleaning cloth (p. 222) 9 Battery terminal cover (p. 15) * The rechargeable battery pack (NP-FM30) supplied with your camcorder is not made due to a malfunction of the recording cannot be compensated if recording...
Operating Instructions
Page 160
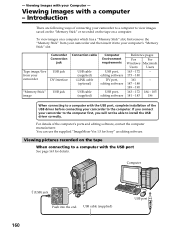
... to the computer first, you connect your Computer - USB cable (supplied) 160 USB port Viewing images with the USB port See page 163 for Sony" as editing software. Computer (USB) jack Push into your camcorder to install the USB driver correctly. Viewing Images with the USB port, complete installation of the USB driver before connecting your computer's "Memory Stick" slot...
... to the computer first, you connect your Computer - USB cable (supplied) 160 USB port Viewing images with the USB port See page 163 for Sony" as editing software. Computer (USB) jack Push into your camcorder to install the USB driver correctly. Viewing Images with the USB port, complete installation of the USB driver before connecting your computer's "Memory Stick" slot...
Operating Instructions
Page 162
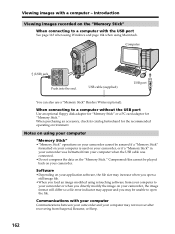
... •Depending on your application software, the file size may increase when you open the file. USB cable (supplied) USB port You can also use a "Memory Stick" Reader/Writer (optional). Communications with your computer Communications between your camcorder and your computer may be assured if a "Memory Stick" formatted on your computer is used on...
... •Depending on your application software, the file size may increase when you open the file. USB cable (supplied) USB port You can also use a "Memory Stick" Reader/Writer (optional). Communications with your computer Communications between your camcorder and your computer may be assured if a "Memory Stick" formatted on your computer is used on...
Operating Instructions
Page 163
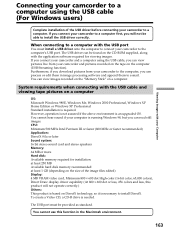
When connecting to a computer with the USB port You must be able to install the USB driver correctly. The USB driver can be found on the computer (USB Streaming function). If you connect your camcorder and a computer using the USB cable (For Windows users) Complete installation of the ... Connecting your camcorder to a computer using the USB cable, you can process or edit them in the Macintosh environment. 163 The USB port must install a USB driver onto the computer to connect your camcorder to a computer. Furthermore, if you download pictures from your camcorder to install ...
When connecting to a computer with the USB port You must be able to install the USB driver correctly. The USB driver can be found on the computer (USB Streaming function). If you connect your camcorder and a computer using the USB cable (For Windows users) Complete installation of the ... Connecting your camcorder to a computer using the USB cable, you can process or edit them in the Macintosh environment. 163 The USB port must install a USB driver onto the computer to connect your camcorder to a computer. Furthermore, if you download pictures from your camcorder to install ...
Operating Instructions
Page 164
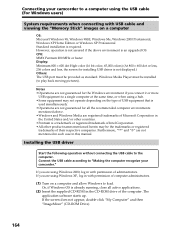
... at the same time, or when using Windows XP, log in with permission of the computer. Connect the USB cable according to "Making the computer recognize your camcorder to play back moving pictures). CPU: MMX Pentium 200 MHz or faster Display: Minimum 800 × 600 dot...other countries. •Pentium is not assured if the above . •Windows and Windows Media are using the USB cable (For Windows users) System requirements when connecting with USB cable and viewing the "Memory Stick" images on a computer and allow Windows to the computer. Connecting your camcorder."
... at the same time, or when using Windows XP, log in with permission of the computer. Connect the USB cable according to "Making the computer recognize your camcorder to play back moving pictures). CPU: MMX Pentium 200 MHz or faster Display: Minimum 800 × 600 dot...other countries. •Pentium is not assured if the above . •Windows and Windows Media are using the USB cable (For Windows users) System requirements when connecting with USB cable and viewing the "Memory Stick" images on a computer and allow Windows to the computer. Connecting your camcorder."
Operating Instructions
Page 165
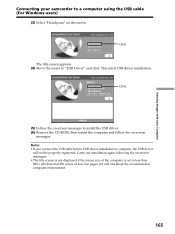
...on the screen. Notes •If you connect the USB cable before USB driver installation is set to a computer using the USB cable (For Windows users) (3) Select "Handycam" on -screen messages. Carry out installation again following the on -screen messages to "USB Driver" and click. Click (5) Follow the on -...size of the computer is complete, the USB driver will not be properly registered. This starts USB driver installation. See pages 163 and 164 about the recommended computer environment. 165 Viewing Images with your Computer Connecting your camcorder to less than 800 × 600 ...
...on the screen. Notes •If you connect the USB cable before USB driver installation is set to a computer using the USB cable (For Windows users) (3) Select "Handycam" on -screen messages. Carry out installation again following the on -screen messages to "USB Driver" and click. Click (5) Follow the on -...size of the computer is complete, the USB driver will not be properly registered. This starts USB driver installation. See pages 163 and 164 about the recommended computer environment. 165 Viewing Images with your Computer Connecting your camcorder to less than 800 × 600 ...

Operating Instructions
Page 166
... The Install Wizard program starts up . (3) Select "Handycam" on your computer and allow Windows to load. Connecting your camcorder to a computer using Windows XP, log in with permission of administrators. This function enables image data recorded on -screen messages. If you are using the USB cable (For Windows users) Installing Image Transfer Make sure...
... The Install Wizard program starts up . (3) Select "Handycam" on your computer and allow Windows to load. Connecting your camcorder to a computer using Windows XP, log in with permission of administrators. This function enables image data recorded on -screen messages. If you are using the USB cable (For Windows users) Installing Image Transfer Make sure...
Operating Instructions
Page 167
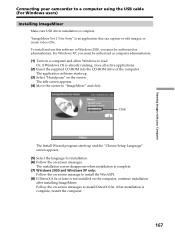
... cursor to a computer using the USB cable (For Windows users) Installing ImageMixer Make sure USB driver installation is complete. The installation...the language for Sony" is complete, restart the computer. 167 Click The Install Wizard program starts up . (3) Select "Handycam" on a ...computer and allow Windows to install DirectX 8.0a. After installation is an application that can capture or edit images, or create video CDs. "ImageMixer Ver.1.5 for installation. (6) Follow the on -screen messages to load. Viewing Images with your Computer Connecting your camcorder...
... cursor to a computer using the USB cable (For Windows users) Installing ImageMixer Make sure USB driver installation is complete. The installation...the language for Sony" is complete, restart the computer. 167 Click The Install Wizard program starts up . (3) Select "Handycam" on a ...computer and allow Windows to install DirectX 8.0a. After installation is an application that can capture or edit images, or create video CDs. "ImageMixer Ver.1.5 for installation. (6) Follow the on -screen messages to load. Viewing Images with your Computer Connecting your camcorder...

Operating Instructions
Page 168
... with permission of "ImageMixer" and sample images are using the supplied USB cable. If you are using Windows XP, log in there. Viewing pictures recorded on the tape (1) Connect the AC Adaptor to your camcorder. (2) Set the POWER switch to . (3) Press FN to display... PAGE1. (4) Press MENU to display the menu. (5) Select USB STREAM in MEMORY MIX (p. 128). For details on your camcorder, and the Windows Add Hardware Wizard starts. Computer (USB) jack USB cable (supplied) USB port 168 If a different writing application was already installed, its writing function...
... with permission of "ImageMixer" and sample images are using the supplied USB cable. If you are using Windows XP, log in there. Viewing pictures recorded on the tape (1) Connect the AC Adaptor to your camcorder. (2) Set the POWER switch to . (3) Press FN to display... PAGE1. (4) Press MENU to display the menu. (5) Select USB STREAM in MEMORY MIX (p. 128). For details on your camcorder, and the Windows Add Hardware Wizard starts. Computer (USB) jack USB cable (supplied) USB port 168 If a different writing application was already installed, its writing function...
Operating Instructions
Page 169
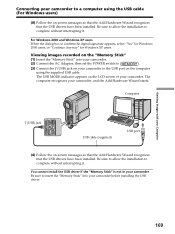
... box to complete without interrupting it . Viewing images recorded on the "Memory Stick" (1) Insert the "Memory Stick" into your camcorder before installing the USB driver. 169 The USB MODE indicator appears on the computer using the USB cable (For Windows users) (8) Follow the on -screen messages so that the Add Hardware Wizard recognizes that the...
... box to complete without interrupting it . Viewing images recorded on the "Memory Stick" (1) Insert the "Memory Stick" into your camcorder before installing the USB driver. 169 The USB MODE indicator appears on the computer using the USB cable (For Windows users) (8) Follow the on -screen messages so that the Add Hardware Wizard recognizes that the...
Operating Instructions
Page 170
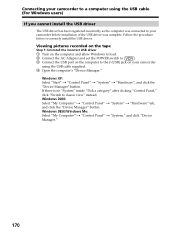
...the tape Step 1: Uninstall the incorrect USB driver 1 Turn on the computer and allow Windows to load. 2 Connect the AC Adaptor and set the POWER switch to . 3 Connect the USB port on the computer to the (USB) jack on your camcorder using the USB cable (For Windows users) If you ...cannot install the USB driver The USB driver has been registered incorrectly as the computer was complete. Windows 2000: Select ...
...the tape Step 1: Uninstall the incorrect USB driver 1 Turn on the computer and allow Windows to load. 2 Connect the AC Adaptor and set the POWER switch to . 3 Connect the USB port on the computer to the (USB) jack on your camcorder using the USB cable (For Windows users) If you ...cannot install the USB driver The USB driver has been registered incorrectly as the computer was complete. Windows 2000: Select ...
Operating Instructions
Page 171
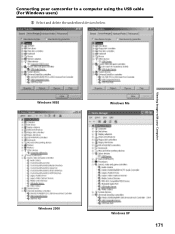
Windows 98SE Windows Me Viewing Images with your camcorder to a computer using the USB cable (For Windows users) 5 Select and delete the underlined devices below. Connecting your Computer Windows 2000 Windows XP 171
Windows 98SE Windows Me Viewing Images with your camcorder to a computer using the USB cable (For Windows users) 5 Select and delete the underlined devices below. Connecting your Computer Windows 2000 Windows XP 171
Operating Instructions
Page 172
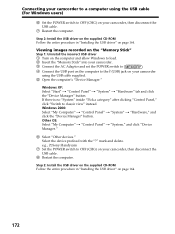
..." into your camcorder. 3 Connect the AC Adaptor and set the POWER switch to . 4 Connect the USB port on the computer to OFF (CHG) on your camcorder, then disconnect the USB cable. 7 Restart the...camcorder, then disconnect the USB cable. 8 Restart the computer. Other OS: Select "My Computer" t "Control Panel" t "System," and click "Device Manager." 6 Select "Other devices." Select the device prefixed with the "?" Step 2: Install the USB driver on the supplied CD-ROM Follow the entire procedure in "Installing the USB driver" on page 164. mark and delete. e.g., (?)Sony Handycam...
..." into your camcorder. 3 Connect the AC Adaptor and set the POWER switch to . 4 Connect the USB port on the computer to OFF (CHG) on your camcorder, then disconnect the USB cable. 7 Restart the...camcorder, then disconnect the USB cable. 8 Restart the computer. Other OS: Select "My Computer" t "Control Panel" t "System," and click "Device Manager." 6 Select "Other devices." Select the device prefixed with the "?" Step 2: Install the USB driver on the supplied CD-ROM Follow the entire procedure in "Installing the USB driver" on page 164. mark and delete. e.g., (?)Sony Handycam...
Operating Instructions
Page 174
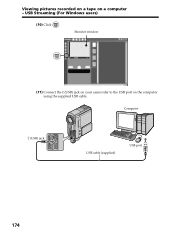
Monitor window (11) Connect the (USB) jack on your camcorder to the USB port on a computer - USB Streaming (For Windows users) (10) Click . Computer (USB) jack USB cable (supplied) USB port 174 Viewing pictures recorded on a tape on the computer using the supplied USB cable.
Monitor window (11) Connect the (USB) jack on your camcorder to the USB port on a computer - USB Streaming (For Windows users) (10) Click . Computer (USB) jack USB cable (supplied) USB port 174 Viewing pictures recorded on a tape on the computer using the supplied USB cable.

Operating Instructions
Page 177
... correctly due to that are not displayed correctly. •When your camcorder are captured into the computer. •If you view images on page 170. Disconnect the USB cable. - Reinstall the USB driver following operations after 5 minutes. •We recommend setting DEMO MODE... to your camcorder is in the menu settings when your camcorder before installation of different color systems to noise, etc. -...
... correctly due to that are not displayed correctly. •When your camcorder are captured into the computer. •If you view images on page 170. Disconnect the USB cable. - Reinstall the USB driver following operations after 5 minutes. •We recommend setting DEMO MODE... to your camcorder is in the menu settings when your camcorder before installation of different color systems to noise, etc. -...
Operating Instructions
Page 178
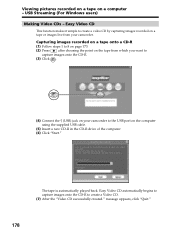
... capturing images recorded on a tape or images live from which you want to capture images onto the CD-R. (3) Click . (4) Connect the (USB) jack on your camcorder. Capturing images recorded on a tape onto a CD-R (1) Follow steps 1 to 8 on page 173. (2) Press after choosing the point on...your camcorder to create a Video CD. (7) After the "Video CD successfully created." Easy Video CD automatically begins to capture images onto the CD-R to the USB port on a computer - The tape is automatically played back. Viewing pictures recorded on a tape on the computer using the supplied USB cable. ...
... capturing images recorded on a tape or images live from which you want to capture images onto the CD-R. (3) Click . (4) Connect the (USB) jack on your camcorder. Capturing images recorded on a tape onto a CD-R (1) Follow steps 1 to 8 on page 173. (2) Press after choosing the point on...your camcorder to create a Video CD. (7) After the "Video CD successfully created." Easy Video CD automatically begins to capture images onto the CD-R to the USB port on a computer - The tape is automatically played back. Viewing pictures recorded on a tape on the computer using the supplied USB cable. ...


