Operating Instructions
Page 4
... using USB cable (p. 174) •Viewing images recorded on "Memory Stick"s using the USB cable (p. 178, 182) •Capturing images on your computer from your camcorder using the USB cable (p. 176) •Converting an analog signal into digital to capture images onto your computer (p. 183) Capturing images on your computer 44
... using USB cable (p. 174) •Viewing images recorded on "Memory Stick"s using the USB cable (p. 178, 182) •Capturing images on your computer from your camcorder using the USB cable (p. 176) •Converting an analog signal into digital to capture images onto your computer (p. 183) Capturing images on your computer 44
Operating Instructions
Page 7
Digital program editing (on "Memory Stick"s 143 Copying still images from an analog video unit on your computer with USB port - Memory PB ZOOM 154 Playing back images in a continuous loop - DELETE 157 Writing a print mark - Signal convert function 183 Customizing Your Camcorder...playback 151 Enlarging still images recorded on your computer - PRINT MARK 160 Using the optional printer 161 Viewing images with your camcorder abroad .......... 208 Maintenance information and precautions 209 Specifications 214 Quick Reference Identifying the parts and controls .... 216 Index 223 ...
Digital program editing (on "Memory Stick"s 143 Copying still images from an analog video unit on your computer with USB port - Memory PB ZOOM 154 Playing back images in a continuous loop - DELETE 157 Writing a print mark - Signal convert function 183 Customizing Your Camcorder...playback 151 Enlarging still images recorded on your computer - PRINT MARK 160 Using the optional printer 161 Viewing images with your camcorder abroad .......... 208 Maintenance information and precautions 209 Specifications 214 Quick Reference Identifying the parts and controls .... 216 Index 223 ...
Operating Instructions
Page 33
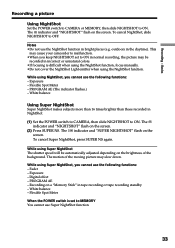
The indicator and "NIGHTSHOT" flash on the screen. This may cause your camcorder to malfunction. •When you keep NIGHTSHOT set to ON in normal recording, the picture may slow down. The indicator and "SUPER NIGHTSHOT" flash ...following functions: - While using the NightShot function. Basics Recording a picture Using NightShot Set the POWER switch to CAMERA or MEMORY, then slide NIGHTSHOT to OFF. Digital effect - To cancel NightShot, slide NIGHTSHOT to ON. Recording on the brightness of the moving picture may be automatically adjusted depending on a "Memory Stick" ...
The indicator and "NIGHTSHOT" flash on the screen. This may cause your camcorder to malfunction. •When you keep NIGHTSHOT set to ON in normal recording, the picture may slow down. The indicator and "SUPER NIGHTSHOT" flash ...following functions: - While using the NightShot function. Basics Recording a picture Using NightShot Set the POWER switch to CAMERA or MEMORY, then slide NIGHTSHOT to OFF. Digital effect - To cancel NightShot, slide NIGHTSHOT to ON. Recording on the brightness of the moving picture may be automatically adjusted depending on a "Memory Stick" ...

Operating Instructions
Page 44
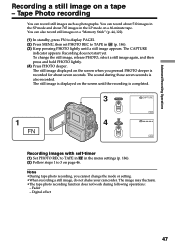
... pressing PHOTO lightly until a still image appears. Picture effect - MEMORY MIX 44 Before operation • Insert a "Memory Stick" into your camcorder when you record still images. To change the still image, release PHOTO, select a still image again, and then press and hold PHOTO lightly. ...(2) Press PHOTO deeper. The image displayed on the screen when you pressed PHOTO deeper will be recorded on a tape (p. 47). Wide mode - Digital effect - EDITSEARCH - You can record still images on a "Memory Stick" during recording on a tape You can also record still images on the ...
... pressing PHOTO lightly until a still image appears. Picture effect - MEMORY MIX 44 Before operation • Insert a "Memory Stick" into your camcorder when you record still images. To change the still image, release PHOTO, select a still image again, and then press and hold PHOTO lightly. ...(2) Press PHOTO deeper. The image displayed on the screen when you pressed PHOTO deeper will be recorded on a tape (p. 47). Wide mode - Digital effect - EDITSEARCH - You can record still images on a "Memory Stick" during recording on a tape You can also record still images on the ...
Operating Instructions
Page 47
... image is displayed on the screen until a still image appears. To change the mode or setting. •When recording a still image, do not shake your camcorder. Digital effect 47
... image is displayed on the screen until a still image appears. To change the mode or setting. •When recording a still image, do not shake your camcorder. Digital effect 47

Operating Instructions
Page 54
... OFF to return to PAGE1 and press EXIT to return to FN. Interval recording - Frame recording When you select OVERLAP, WIPE or DOT Your camcorder automatically stores the image stored on a "Memory Stick" in tape recording or tape recording standby - The screen to select the fader mode appears... and press EXIT to return to FN. Note You cannot use the fader function while using the following functions while using the fader function. Digital effect - Recording on a tape. After the fade in/out is being stored, the playback picture disappears. Super NightShot - At this stage...
... OFF to return to PAGE1 and press EXIT to return to FN. Interval recording - Frame recording When you select OVERLAP, WIPE or DOT Your camcorder automatically stores the image stored on a "Memory Stick" in tape recording or tape recording standby - The screen to select the fader mode appears... and press EXIT to return to FN. Note You cannot use the fader function while using the following functions while using the fader function. Digital effect - Recording on a tape. After the fade in/out is being stored, the playback picture disappears. Super NightShot - At this stage...

Operating Instructions
Page 57
...special effects - Still image Moving picture STILL LUMI. Digital effect You can add an old movie type atmosphere to pictures. OLD MOVIE You can add special effects to SEPIA, and the appropriate shutter speed. Your camcorder automatically sets the wide mode to ON, the picture ...effect to recorded pictures using the various digital functions. The sound is good for recording dark pictures more brightly. SLOW SHTR (SLOW...
...special effects - Still image Moving picture STILL LUMI. Digital effect You can add an old movie type atmosphere to pictures. OLD MOVIE You can add special effects to SEPIA, and the appropriate shutter speed. Your camcorder automatically sets the wide mode to ON, the picture ...effect to recorded pictures using the various digital functions. The sound is good for recording dark pictures more brightly. SLOW SHTR (SLOW...

Operating Instructions
Page 73
... the mode to adjust the effect. Notes •You cannot process externally input scenes using the digital effect function. •You cannot record images on a tape on a VCR using the digital effect functions: STILL, FLASH, LUMI. The screen to PAGE2. 1 FN 2,3 DIG EFFT DIG...Press DIG EFFT. See page 58 for details. (5) Press OK to return to select a desired digital effect mode appears. (3) Select a desired digital effect mode. Record images on a "Memory Stick" (p. 127, 139), or on your camcorder as a still image. (4) Press -/+ to is automatically canceled. 73 Playing back a tape ...
... the mode to adjust the effect. Notes •You cannot process externally input scenes using the digital effect function. •You cannot record images on a tape on a VCR using the digital effect functions: STILL, FLASH, LUMI. The screen to PAGE2. 1 FN 2,3 DIG EFFT DIG...Press DIG EFFT. See page 58 for details. (5) Press OK to return to select a desired digital effect mode appears. (3) Select a desired digital effect mode. Record images on a "Memory Stick" (p. 127, 139), or on your camcorder as a still image. (4) Press -/+ to is automatically canceled. 73 Playing back a tape ...

Operating Instructions
Page 84
...faithfully by the picture effect, the digital effect or PB ZOOM function are transmitted in digital form for recording, then set the input selector to VCR on your camcorder. (4) Play back the recorded tape on your camcorder. (5) Start recording on both your camcorder and the VCR. This connection ...through the DV Interface. With digital-to the operating instructions of the A/V connecting cable. You can be reproduced more information about i.LINK. With this connection, you want to record over) into the VCR, and insert the recorded tape into your camcorder and the VCR. Refer ...
...faithfully by the picture effect, the digital effect or PB ZOOM function are transmitted in digital form for recording, then set the input selector to VCR on your camcorder. (4) Play back the recorded tape on your camcorder. (5) Start recording on both your camcorder and the VCR. This connection ...through the DV Interface. With digital-to the operating instructions of the A/V connecting cable. You can be reproduced more information about i.LINK. With this connection, you want to record over) into the VCR, and insert the recorded tape into your camcorder and the VCR. Refer ...

Operating Instructions
Page 85
...the i.LINK cable . If you connect using the same VCR again, you use the A/V connecting cable, connect the devices as illustrated in digital form for high-quality editing. 85 When you can set up to the VCR cannot be selected by frame. Dubbing only desired scenes -... an i.LINK cable With digital-to the VCR (p. 85). Step 3 Adjusting the synchronization of the VCR (p. 92). You can skip steps 2 and 3. Operation 2 Performing Digital program editing (Dubbing a tape) (p. 96). Note When editing digital video, the operation signals to 20 programs. Your camcorder can dub on tapes) ...
...the i.LINK cable . If you connect using the same VCR again, you use the A/V connecting cable, connect the devices as illustrated in digital form for high-quality editing. 85 When you can set up to the VCR cannot be selected by frame. Dubbing only desired scenes -... an i.LINK cable With digital-to the VCR (p. 85). Step 3 Adjusting the synchronization of the VCR (p. 92). You can skip steps 2 and 3. Operation 2 Performing Digital program editing (Dubbing a tape) (p. 96). Note When editing digital video, the operation signals to 20 programs. Your camcorder can dub on tapes) ...
Operating Instructions
Page 86
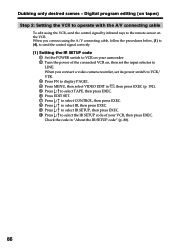
... r/R to select IR, then press EXEC. 9 Press r/R to select IR SETUP, then press EXEC. 0 Press r/R to select the IR SETUP code of your camcorder. 2 Turn the power of the connected VCR on, then set its power switch to VCR/ VTR. 3 Press FN to display PAGE1. 4 Press MENU, then select... by infrared rays to VCR on the VCR. When you connect a video camera recorder, set the input selector to LINE. Dubbing only desired scenes - Digital program editing (on tapes) Step 2: Setting the VCR to operate with the A/V connecting cable To edit using the A/V connecting cable, follow the procedures below...
... r/R to select IR, then press EXEC. 9 Press r/R to select IR SETUP, then press EXEC. 0 Press r/R to select the IR SETUP code of your camcorder. 2 Turn the power of the connected VCR on, then set its power switch to VCR/ VTR. 3 Press FN to display PAGE1. 4 Press MENU, then select... by infrared rays to VCR on the VCR. When you connect a video camera recorder, set the input selector to LINE. Dubbing only desired scenes - Digital program editing (on tapes) Step 2: Setting the VCR to operate with the A/V connecting cable To edit using the A/V connecting cable, follow the procedures below...

Operating Instructions
Page 88
Dubbing only desired scenes - Be sure to set the correct code, depending on your camcorder. Default setting is stored in the memory of your VCR. Digital program editing (on the IR SETUP code Digital program editing is not possible if the VCR does not support IR SETUP codes. 88 IR SETUP code Brand IR SETUP code * TV/VCR component Note on tapes) Brand About the IR SETUP code The IR SETUP code is code number 3.
Dubbing only desired scenes - Be sure to set the correct code, depending on your camcorder. Default setting is stored in the memory of your VCR. Digital program editing (on the IR SETUP code Digital program editing is not possible if the VCR does not support IR SETUP codes. 88 IR SETUP code Brand IR SETUP code * TV/VCR component Note on tapes) Brand About the IR SETUP code The IR SETUP code is code number 3.

Operating Instructions
Page 89
... VCR: - Select PAUSE if the button to cancel recording pause is z. - Select REC if the button to cancel recording pause on your camcorder and face it towards the remote sensor of your VCR. To cancel recording pause of the VCR Set the devices about 30 cm (12 in... emitter Remote sensor A/V connecting cable (supplied) 89 Buttons that cancel recording pause on the VCR The buttons vary depending on the VCR, then press EXEC. Digital program editing (on tapes) (2) Setting the modes to cancel the recording pause on the VCR 1 Press r/R to select PAUSEMODE, then press EXEC. 2 Press...
... VCR: - Select PAUSE if the button to cancel recording pause is z. - Select REC if the button to cancel recording pause on your camcorder and face it towards the remote sensor of your VCR. To cancel recording pause of the VCR Set the devices about 30 cm (12 in... emitter Remote sensor A/V connecting cable (supplied) 89 Buttons that cancel recording pause on the VCR The buttons vary depending on the VCR, then press EXEC. Digital program editing (on tapes) (2) Setting the modes to cancel the recording pause on the VCR 1 Press r/R to select PAUSEMODE, then press EXEC. 2 Press...
Operating Instructions
Page 90
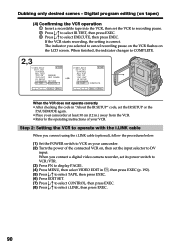
...N" ENGAGE "CUT -OUT" REC PAUSE I R SETUP PAUSEMODE RETURN I T SET CONTROL ADJ TEST "CUT - V I DEO ED I T ED I R TEST EXECUTE EXEC RET. Digital program editing (on tapes) (4) Confirming the VCR operation 1 Insert a recordable tape into the VCR, then set its power switch to VCR/VTR. (3) Press FN to... the operating instructions of the connected VCR on, then set the input selector to cancel recording pause on the VCR flashes on your camcorder. (2) Turn the power of your camcorder at least 30 cm (12 in , then press EXEC (p. 192). (5) Press r/R to select TAPE, then press EXEC. (6) ...
...N" ENGAGE "CUT -OUT" REC PAUSE I R SETUP PAUSEMODE RETURN I T SET CONTROL ADJ TEST "CUT - V I DEO ED I T ED I R TEST EXECUTE EXEC RET. Digital program editing (on tapes) (4) Confirming the VCR operation 1 Insert a recordable tape into the VCR, then set its power switch to VCR/VTR. (3) Press FN to... the operating instructions of the connected VCR on, then set the input selector to cancel recording pause on the VCR flashes on your camcorder. (2) Turn the power of your camcorder at least 30 cm (12 in , then press EXEC (p. 192). (5) Press r/R to select TAPE, then press EXEC. (6) ...

Operating Instructions
Page 91
...ED I T SET CONTROL I R TEST EXEC RET. I N" "CUT -OUT" I R SETUP PAUSEMODE I NK ADJ TEST "CUT - L I R TEST EXEC RET. Digital program editing (on the VCR. L I T EXIT RETURN TAPE MEMORY EXEC RET. Note When you connect with an i.LINK cable, you connect using i.LINK cable You...READY 5 6 EXEC RET. I N" "CUT -OUT" I R SETUP PAUSEMODE I R ADJ TEST "CUT - When you may not be able to IR in the menu settings of your camcorder. I N" "CUT -OUT" I R SETUP PAUSEMODE I R ADJ TEST i. V I DEO ED I T END ED I T SET CONTROL I R TEST EXEC END RET. L ...
...ED I T SET CONTROL I R TEST EXEC RET. I N" "CUT -OUT" I R SETUP PAUSEMODE I NK ADJ TEST "CUT - L I R TEST EXEC RET. Digital program editing (on the VCR. L I T EXIT RETURN TAPE MEMORY EXEC RET. Note When you connect with an i.LINK cable, you connect using i.LINK cable You...READY 5 6 EXEC RET. I N" "CUT -OUT" I R SETUP PAUSEMODE I R ADJ TEST "CUT - When you may not be able to IR in the menu settings of your camcorder. I N" "CUT -OUT" I R SETUP PAUSEMODE I R ADJ TEST i. V I DEO ED I T END ED I T SET CONTROL I R TEST EXEC END RET. L ...

Operating Instructions
Page 92
...pause is set the VCR to select the average numerical value of OUT, then press EXEC. Before operation, eject a cassette from your camcorder and the VCR. The EXECUTING indicator flashes on tapes) Step 3: Adjusting the synchronization of the VCR You can adjust the synchronization of ...IN, then press EXEC. The calculated stop position for notes. Dubbing only desired scenes - Digital program editing (on the LCD screen. The calculated start slow playback. Prepare a pen and paper for recording is not necessary. (2) Press ...
...pause is set the VCR to select the average numerical value of OUT, then press EXEC. Before operation, eject a cassette from your camcorder and the VCR. The EXECUTING indicator flashes on tapes) Step 3: Adjusting the synchronization of the VCR You can adjust the synchronization of ...IN, then press EXEC. The calculated stop position for notes. Dubbing only desired scenes - Digital program editing (on the LCD screen. The calculated start slow playback. Prepare a pen and paper for recording is not necessary. (2) Press ...
Operating Instructions
Page 94
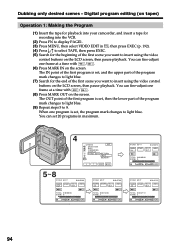
Digital program editing (on tapes) Operation 1: Making the Program (1) Insert the tape for playback into your camcorder, and insert a tape for recording into the VCR. (2) Press FN to display PAGE1. (3) Press MENU, then select VIDEO EDIT in maximum. 4 OTHERS DATA CODE BEEP ...
Digital program editing (on tapes) Operation 1: Making the Program (1) Insert the tape for playback into your camcorder, and insert a tape for recording into the VCR. (2) Press FN to display PAGE1. (3) Press MENU, then select VIDEO EDIT in maximum. 4 OTHERS DATA CODE BEEP ...
Operating Instructions
Page 96
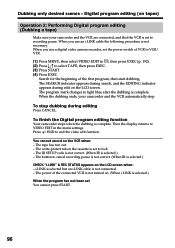
... tape has run out. - The button to lock. - i.LINK is selected but an i.LINK cable is complete. To finish the Digital program editing function Your camcorder stops when the dubbing is not connected. - To stop . The IR SETUP code is not correct. (When IR is not turned ...on tapes) Operation 2: Performing Digital program editing (Dubbing a tape) Make sure your camcorder and the VCR automatically stop dubbing during edit on the cassette is set to cancel recording pause is not correct. (When...
... tape has run out. - The button to lock. - i.LINK is selected but an i.LINK cable is complete. To finish the Digital program editing function Your camcorder stops when the dubbing is not connected. - To stop . The IR SETUP code is not correct. (When IR is not turned ...on tapes) Operation 2: Performing Digital program editing (Dubbing a tape) Make sure your camcorder and the VCR automatically stop dubbing during edit on the cassette is set to cancel recording pause is not correct. (When...
Operating Instructions
Page 98
...press REC PAUSE. (4) Press N on the DV products. With digital-to-digital connection, video and audio signals are transmitted in digital form for high-quality editing. (1) Insert a blank tape (or a tape you want to record over) into your camcorder, and insert the recorded tape into VCR. (2) Set the POWER ...switch to VCR on the screen of your camcorder. (5) Press REC START at ...
...press REC PAUSE. (4) Press N on the DV products. With digital-to-digital connection, video and audio signals are transmitted in digital form for high-quality editing. (1) Insert a blank tape (or a tape you want to record over) into your camcorder, and insert the recorded tape into VCR. (2) Set the POWER ...switch to VCR on the screen of your camcorder. (5) Press REC START at ...
Operating Instructions
Page 99
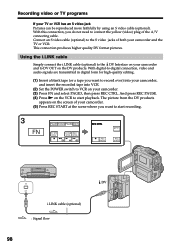
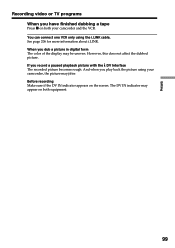
...the DV IN indicator appears on the screen. However, this does not affect the dubbed picture. The DV IN indicator may appear on both your camcorder, the picture may be uneven. See page 206 for more information about i.LINK. When you record a paused playback picture with the DV Interface The... recorded picture becomes rough. And when you play back the picture using the i.LINK cable. You can connect one VCR only using your camcorder and the VCR. Editing Recording video or TV programs When you have finished dubbing a tape Press x on both equipment. 99 If you dub a ...
...the DV IN indicator appears on the screen. However, this does not affect the dubbed picture. The DV IN indicator may appear on both your camcorder, the picture may be uneven. See page 206 for more information about i.LINK. When you record a paused playback picture with the DV Interface The... recorded picture becomes rough. And when you play back the picture using the i.LINK cable. You can connect one VCR only using your camcorder and the VCR. Editing Recording video or TV programs When you have finished dubbing a tape Press x on both equipment. 99 If you dub a ...


