MovieShaker v3.1 Operating Instructions
Page 2
Microsoft, MS-DOS and Windows are prohibited by copyright laws. ❒ The Company cannot accept liability for damage or loss resulting from the use of Sony Corporation. MovieShaker is registered in other countries. About the screenshots used in this software, or for ...and product names appearing in this manual may arise due to change without authorization are registered trademarks of Sony Corporation. About the copyright: Video or audio files recorded using this document are generally registered trademarks or trademarks of their manufacturers, although ™ and &#...
Microsoft, MS-DOS and Windows are prohibited by copyright laws. ❒ The Company cannot accept liability for damage or loss resulting from the use of Sony Corporation. MovieShaker is registered in other countries. About the screenshots used in this software, or for ...and product names appearing in this manual may arise due to change without authorization are registered trademarks of Sony Corporation. About the copyright: Video or audio files recorded using this document are generally registered trademarks or trademarks of their manufacturers, although ™ and &#...

MovieShaker v3.1 Operating Instructions
Page 3
... Help 9 Installing the software 11 To install MovieShaker 11 To Install QuickTime 5 16 To Install DirectX 8.0a 17 If you are running Windows 2000 17 If you are running Windows Me 17 Basic Operation Starting MovieShaker 18 Workflow ...19 Collecting clips 20 To capture multiple images (Batch Capture 20 To capture an...
... Help 9 Installing the software 11 To install MovieShaker 11 To Install QuickTime 5 16 To Install DirectX 8.0a 17 If you are running Windows 2000 17 If you are running Windows Me 17 Basic Operation Starting MovieShaker 18 Workflow ...19 Collecting clips 20 To capture multiple images (Batch Capture 20 To capture an...
MovieShaker v3.1 Operating Instructions
Page 6
... the same used with BS digital broadcasting. 6 MovieShaker allows you to capture or process images efficiently using MovieShaker are as the DV device (digital video camcorder). • All MICROMV..., Italian, Spanish, and Portuguese About the MICROMV • The MICROMV device can record and play back about 60 minutes of ATA66 or better (needed during capturing) -... Operating System Microsoft® Windows® 2000 Professional (hereafter, Windows 2000), Microsoft® Windows® MillenniumEdition (hereafter, Windows Me), or Microsoft® Windows® XP Home/Professional It...
... the same used with BS digital broadcasting. 6 MovieShaker allows you to capture or process images efficiently using MovieShaker are as the DV device (digital video camcorder). • All MICROMV..., Italian, Spanish, and Portuguese About the MICROMV • The MICROMV device can record and play back about 60 minutes of ATA66 or better (needed during capturing) -... Operating System Microsoft® Windows® 2000 Professional (hereafter, Windows 2000), Microsoft® Windows® MillenniumEdition (hereafter, Windows Me), or Microsoft® Windows® XP Home/Professional It...
MovieShaker v3.1 Operating Instructions
Page 7
... QuickTimeVR, QuickTime3D, and VECTOR files are referring. Still images with any screen setting in MovieShaker, or if you open a project file in the Windows "Display Properties" while running MovieShaker. Before Use Using MovieShaker • The following display settings: Screen area: 800 x 600 pixels or 1024 ... (the upper left part) to adjust the screen size to 4:3 aspect. • If the movie is captured from a MICROMV device recorded in widescreen mode (aspect ratio 16:9), its aspect ratio for display on the Product tray are not supported. • To use MovieShaker,...
... QuickTimeVR, QuickTime3D, and VECTOR files are referring. Still images with any screen setting in MovieShaker, or if you open a project file in the Windows "Display Properties" while running MovieShaker. Before Use Using MovieShaker • The following display settings: Screen area: 800 x 600 pixels or 1024 ... (the upper left part) to adjust the screen size to 4:3 aspect. • If the movie is captured from a MICROMV device recorded in widescreen mode (aspect ratio 16:9), its aspect ratio for display on the Product tray are not supported. • To use MovieShaker,...
MovieShaker v3.1 Operating Instructions
Page 8
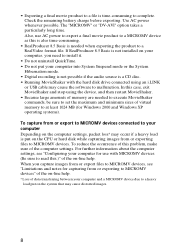
...needed to execute MovieShaker commands, be sure to set the maximum and minimum sizes of virtual memory to at least 1024 MB (for Windows 2000 and Windows XP operating systems). To capture from or export to MICROMV devices connected to your computer for capturing from or exporting to malfunction. ...this .)" of the on-line help . * Loss of data transferring between your computer into System Suspend mode or the System Hibernation mode. • Digital recording is not possible if the audio source is put on the CPU or hard disk while capturing images from or export files to MICROMV devices...
...needed to execute MovieShaker commands, be sure to set the maximum and minimum sizes of virtual memory to at least 1024 MB (for Windows 2000 and Windows XP operating systems). To capture from or export to MICROMV devices connected to your computer for capturing from or exporting to malfunction. ...this .)" of the on-line help . * Loss of data transferring between your computer into System Suspend mode or the System Hibernation mode. • Digital recording is not possible if the audio source is put on the CPU or hard disk while capturing images from or export files to MICROMV devices...
MovieShaker v3.1 Operating Instructions
Page 11
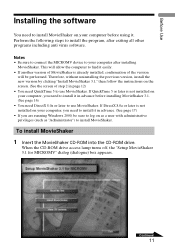
... MovieShaker. Therefore, without uninstalling the previous version, install the new version by clicking "Install MovieShaker 3.1," then follow the instructions on your computer, you are running Windows 2000, be performed. Continued 11 Before Use Installing the software You need to install MovieShaker on the screen. (See the screen of step 2 in advance...
... MovieShaker. Therefore, without uninstalling the previous version, install the new version by clicking "Install MovieShaker 3.1," then follow the instructions on your computer, you are running Windows 2000, be performed. Continued 11 Before Use Installing the software You need to install MovieShaker on the screen. (See the screen of step 2 in advance...
MovieShaker v3.1 Operating Instructions
Page 12
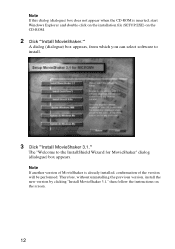
... will be performed. Note If this dialog (dialogue) box does not appear when the CD-ROM is already installed, confirmation of MovieShaker is inserted, start Windows Explorer and double-click on the installation file (SETUP.EXE) on the screen. 12
... will be performed. Note If this dialog (dialogue) box does not appear when the CD-ROM is already installed, confirmation of MovieShaker is inserted, start Windows Explorer and double-click on the installation file (SETUP.EXE) on the screen. 12

MovieShaker v3.1 Operating Instructions
Page 14
5 Click "Next" if the displayed destination folder is Windows 2000, a dialog (dialogue) box may appear. After the files are copied, the "InstallShield Wizard Complete" dialog (dialogue) box appears. After you click "OK" to finish .... The necessary files will be displayed inviting you install MovieShaker without installing QuickTime 5, the warning dialog (dialogue) box shown below may be copied from the Windows "Start" menu, and point to "MovieShaker," then click "NTSC-PAL Switcher" to display the "Choose Folder" dialog (dialogue) box. z Hints • If you select a television...
5 Click "Next" if the displayed destination folder is Windows 2000, a dialog (dialogue) box may appear. After the files are copied, the "InstallShield Wizard Complete" dialog (dialogue) box appears. After you click "OK" to finish .... The necessary files will be displayed inviting you install MovieShaker without installing QuickTime 5, the warning dialog (dialogue) box shown below may be copied from the Windows "Start" menu, and point to "MovieShaker," then click "NTSC-PAL Switcher" to display the "Choose Folder" dialog (dialogue) box. z Hints • If you select a television...
MovieShaker v3.1 Operating Instructions
Page 17
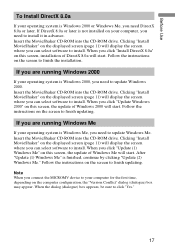
...installed on the screen to finish updating. Insert the MovieShaker CD-ROM into the CD-ROM drive. If you are running Windows 2000 If your operating system is Windows 2000, you need DirectX 8.0a or later. Follow the instructions on your computer, you can select software to install. ... dialog (dialogue) box appears, be sure to finish the installation. Before Use To Install DirectX 8.0a If your operating system is Windows 2000 or Windows Me, you need to update Windows 2000. Note When you connect the MICROMV device to your operating system is finished, continue by clicking "Update...
...installed on the screen to finish updating. Insert the MovieShaker CD-ROM into the CD-ROM drive. If you are running Windows 2000 If your operating system is Windows 2000, you need DirectX 8.0a or later. Follow the instructions on your computer, you can select software to install. ... dialog (dialogue) box appears, be sure to finish the installation. Before Use To Install DirectX 8.0a If your operating system is Windows 2000 or Windows Me, you need to update Windows 2000. Note When you connect the MICROMV device to your operating system is finished, continue by clicking "Update...
MovieShaker v3.1 Operating Instructions
Page 18
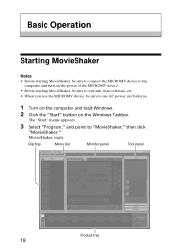
The "Start" menu appears. 3 Select "Program," and point to use AC power, not batteries. 1 Turn on the computer and load Windows. 2 Click the "Start" button on the power of the MICROMV device. • Before starting MovieShaker, be sure to exit anti virus software, etc. • When ... tray 18 Basic Operation Starting MovieShaker Notes • Before starting MovieShaker, be sure to connect the MICROMV device to the computer and turn on the Windows Taskbar.
The "Start" menu appears. 3 Select "Program," and point to use AC power, not batteries. 1 Turn on the computer and load Windows. 2 Click the "Start" button on the power of the MICROMV device. • Before starting MovieShaker, be sure to exit anti virus software, etc. • When ... tray 18 Basic Operation Starting MovieShaker Notes • Before starting MovieShaker, be sure to connect the MICROMV device to the computer and turn on the Windows Taskbar.
MovieShaker v3.1 Operating Instructions
Page 19
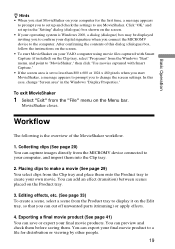
...start MovieShaker on your computer for distribution or viewing by other people. 19 Workflow The following is Windows 2000, a dialog (dialogue) box may be displayed inviting you to confirm your digital signature when you can export your final movie product to your computer, and import them onto ... select clips from the MICROMV device connected to a file for the first time, a message appears to prompt you to set up in the Windows "Display Properties." You can cut off unwanted parts (trimming) or apply effects. 4. MovieShaker closes. You can capture images directly from the Clip...
...start MovieShaker on your computer for distribution or viewing by other people. 19 Workflow The following is Windows 2000, a dialog (dialogue) box may be displayed inviting you to confirm your digital signature when you can export your final movie product to your computer, and import them onto ... select clips from the MICROMV device connected to a file for the first time, a message appears to prompt you to set up in the Windows "Display Properties." You can cut off unwanted parts (trimming) or apply effects. 4. MovieShaker closes. You can capture images directly from the Clip...

MovieShaker v3.1 Operating Instructions
Page 30
... then click on the Scene palettes. The scenes appear in the order in which the clips are placed on the Scene palettes in the MovieShaker window. All clips between the palettes) to insert a narration into a movie. To remove a scene To remove a scene from the Storyboard, drag and drop it in the...
... then click on the Scene palettes. The scenes appear in the order in which the clips are placed on the Scene palettes in the MovieShaker window. All clips between the palettes) to insert a narration into a movie. To remove a scene To remove a scene from the Storyboard, drag and drop it in the...
MovieShaker v3.1 Operating Instructions
Page 32
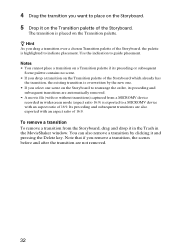
... the transition you want to place on the Storyboard. 5 Drop it and pressing the Delete key. To remove a transition To remove a transition from a MICROMV device recorded in the MovieShaker window.
... the transition you want to place on the Storyboard. 5 Drop it and pressing the Delete key. To remove a transition To remove a transition from a MICROMV device recorded in the MovieShaker window.
MovieShaker v3.1 Operating Instructions
Page 36
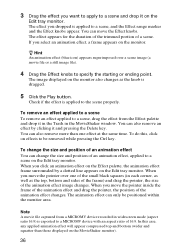
... or ending point. To remove an effect applied to a scene To remove an effect applied to a scene, drag the effect from a MICROMV device recorded in the MovieShaker window. Check if the effect is applied to a scene, and the Effect range marker and the Effect knobs appear. 3 Drag the effect you want to...
... or ending point. To remove an effect applied to a scene To remove an effect applied to a scene, drag the effect from a MICROMV device recorded in the MovieShaker window. Check if the effect is applied to a scene, and the Effect range marker and the Effect knobs appear. 3 Drag the effect you want to...

MovieShaker v3.1 Operating Instructions
Page 39
... Basic Operation To remove a text effect applied to a scene To remove a text effect applied to a scene, drag the text effect from a MICROMV device recorded in widescreen mode (aspect ratio 16:9) is used for adjusting the playback speed of a scene. When you move the pointer inside the frame of the... . For further information, see the on the Effect palette, the text effect frame surrounded by clicking it in the Trash in the MovieShaker window. Note The movie file captured from the Effect palette and drop it and pressing the Delete key. Almost the same procedure is exported to ...
... Basic Operation To remove a text effect applied to a scene To remove a text effect applied to a scene, drag the text effect from a MICROMV device recorded in widescreen mode (aspect ratio 16:9) is used for adjusting the playback speed of a scene. When you move the pointer inside the frame of the... . For further information, see the on the Effect palette, the text effect frame surrounded by clicking it in the Trash in the MovieShaker window. Note The movie file captured from the Effect palette and drop it and pressing the Delete key. Almost the same procedure is exported to ...
Operating Instructions
Page 7
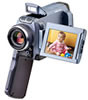
... 208 Index 215 Viewing Images Using your Computer Viewing images on an image - For Windows users 161 Viewing images recorded on a "Memory Stick" on a "Memory Stick" - Memory photo recording 114 Recording an image from a tape as a still image 122 Superimposing a still image in ...Using a "Memory Stick" - MEMORY MIX 125 Recording moving picture 132 Viewing a still image - Memory photo playback 135 Viewing a moving picture - DELETE 147 Writing a print mark - For Macintosh users 171 Using the Network function (DCR-IP55 only) Accessing the network 172 Customising your computer...
... 208 Index 215 Viewing Images Using your Computer Viewing images on an image - For Windows users 161 Viewing images recorded on a "Memory Stick" on a "Memory Stick" - Memory photo recording 114 Recording an image from a tape as a still image 122 Superimposing a still image in ...Using a "Memory Stick" - MEMORY MIX 125 Recording moving picture 132 Viewing a still image - Memory photo playback 135 Viewing a moving picture - DELETE 147 Writing a print mark - For Macintosh users 171 Using the Network function (DCR-IP55 only) Accessing the network 172 Customising your computer...

Operating Instructions
Page 10
...Insert the cassette in parentheses "( )" for more information. Cassette window OPEN/EJECT 10 Cassette compartment AC power adaptor Connect the plug with the cassette window facing out. 4 Press the cassette compartment lightly to record pictures on tepes of the cassette into it clicks. Inserting ...a cassette (p. 25) 1 Turn the grip to prevent the camera from dropping as illustrated. Connecting the...
...Insert the cassette in parentheses "( )" for more information. Cassette window OPEN/EJECT 10 Cassette compartment AC power adaptor Connect the plug with the cassette window facing out. 4 Press the cassette compartment lightly to record pictures on tepes of the cassette into it clicks. Inserting ...a cassette (p. 25) 1 Turn the grip to prevent the camera from dropping as illustrated. Connecting the...

Operating Instructions
Page 15
...green in low light conditions such as in a car parked in the sun or under direct sunlight [b]. •Be careful when placing the camera near a window or outdoors. Take pictures of the sun in color) that constantly appear on camcorder care Lens and LCD screen/finder •The LCD ... manufactured using extremely high-precision technology, so over 99.99% of the pixels are normal in the manufacturing process and do not affect the recording in any way. •Do not let your camcorder exposed to malfunction. Keep your camcorder to direct sunlight for effective use. Doing so...
...green in low light conditions such as in a car parked in the sun or under direct sunlight [b]. •Be careful when placing the camera near a window or outdoors. Take pictures of the sun in color) that constantly appear on camcorder care Lens and LCD screen/finder •The LCD ... manufactured using extremely high-precision technology, so over 99.99% of the pixels are normal in the manufacturing process and do not affect the recording in any way. •Do not let your camcorder exposed to malfunction. Keep your camcorder to direct sunlight for effective use. Doing so...

Operating Instructions
Page 25
... started Step 3 Inserting a cassette (1) Prepare the power source. (2) Turn the grip to close the lid until it with the cassette window facing out. (5) Press the cassette compartment lightly to the cassette inserting/ejecting position. The cassette compartment automatically lifts up and opens. (4) ...Push the middle portion of the back of the cassette into it clicks. 2 3 Cassette lid OPEN/ EJECT 4 5,6 Cassette window Cassette compartment To eject a cassette Follow the procedures above, and take out the cassette after the cassette compartment opens completely in the direction...
... started Step 3 Inserting a cassette (1) Prepare the power source. (2) Turn the grip to close the lid until it with the cassette window facing out. (5) Press the cassette compartment lightly to the cassette inserting/ejecting position. The cassette compartment automatically lifts up and opens. (4) ...Push the middle portion of the back of the cassette into it clicks. 2 3 Cassette lid OPEN/ EJECT 4 5,6 Cassette window Cassette compartment To eject a cassette Follow the procedures above, and take out the cassette after the cassette compartment opens completely in the direction...

Operating Instructions
Page 65
... as mountains. Beach & ski This mode prevents people's faces from appearing dark in the theater. Also it prevents your specific shooting requirements. Advanced Recording Operations Using the PROGRAM AE You can select PROGRAM AE (Auto Exposure) mode to maintain atmosphere when you are...on a ski slope. Spotlight This mode prevents people's faces, for subjects such as at a beach in midsummer or on glass or metal mesh in windows when you to suit your camcorder from appearing excessively white when shooting subjects lit by strong light in strong light or reflected light, such as...
... as mountains. Beach & ski This mode prevents people's faces from appearing dark in the theater. Also it prevents your specific shooting requirements. Advanced Recording Operations Using the PROGRAM AE You can select PROGRAM AE (Auto Exposure) mode to maintain atmosphere when you are...on a ski slope. Spotlight This mode prevents people's faces, for subjects such as at a beach in midsummer or on glass or metal mesh in windows when you to suit your camcorder from appearing excessively white when shooting subjects lit by strong light in strong light or reflected light, such as...


