Operating Instructions
Page 2
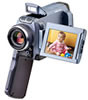
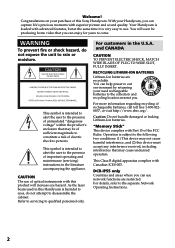
... hazard, do not attempt to the presence of optical instruments with this Sony Handycam. This symbol is subject to the following two conditions: (1) This... "dangerous voltage" within the product's enclosure that may be producing home video that may not cause harmful interference, and (2) this device must accept ...DCR-IP55 only Countries and areas where you . CAUTION The use network functions are recyclable. RECYCLING LITHIUM-ION BATTERIES Lithium-Ion batteries are restricted. "Memory Stick" This device complies with superior picture and sound quality. This Class B digital...
... hazard, do not attempt to the presence of optical instruments with this Sony Handycam. This symbol is subject to the following two conditions: (1) This... "dangerous voltage" within the product's enclosure that may be producing home video that may not cause harmful interference, and (2) this device must accept ...DCR-IP55 only Countries and areas where you . CAUTION The use network functions are recyclable. RECYCLING LITHIUM-ION BATTERIES Lithium-Ion batteries are restricted. "Memory Stick" This device complies with superior picture and sound quality. This Class B digital...
Operating Instructions
Page 5
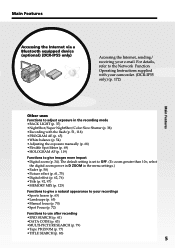
... device (optional) (DCR-IP55 only) Accessing the Internet, sending/ receiving your camcorder. (DCR-IP55 only) (p. 172) Main Features Other uses Functions to adjust exposure in the menu settings.) •Fader (p. 58) •Picture effect (p. 61, 75) •Digital effect (p. 62, 76) •Title (p. 92, 97) •MEMORY MIX (p. 125) Functions to use after recording •END SEARCH...
... device (optional) (DCR-IP55 only) Accessing the Internet, sending/ receiving your camcorder. (DCR-IP55 only) (p. 172) Main Features Other uses Functions to adjust exposure in the menu settings.) •Fader (p. 58) •Picture effect (p. 61, 75) •Digital effect (p. 62, 76) •Title (p. 92, 97) •MEMORY MIX (p. 125) Functions to use after recording •END SEARCH...
Operating Instructions
Page 7
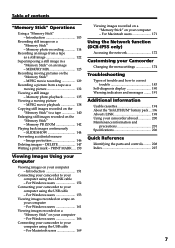
... Preventing accidental erasure - For Macintosh users 171 Using the Network function (DCR-IP55 only) Accessing the network 172 Customising your Camcorder Changing the menu settings 174 Troubleshooting Types of contents "Memory Stick" Operations Using a "Memory Stick" - For Windows users 161 Viewing images recorded on a "Memory Stick" on your computer - For Windows users 152 Connecting your camcorder...
... Preventing accidental erasure - For Macintosh users 171 Using the Network function (DCR-IP55 only) Accessing the network 172 Customising your Camcorder Changing the menu settings 174 Troubleshooting Types of contents "Memory Stick" Operations Using a "Memory Stick" - For Windows users 161 Viewing images recorded on a "Memory Stick" on your computer - For Windows users 152 Connecting your camcorder...

Operating Instructions
Page 8
The camcorder is turned on a tape or "Memory Stick". 8 MEMORY/NETWORK (DCR-IP55) MEMORY: Use this mode when you record on page 17. 1,2 CAMERA MEMORY/ NET- CAMERA Use this mode when you play back or edit an image in a "Memory Stick." Basic operations This section describes the basic operations to the CAMERA mode so that the CAMERA lamp lights up . How to the...
The camcorder is turned on a tape or "Memory Stick". 8 MEMORY/NETWORK (DCR-IP55) MEMORY: Use this mode when you record on page 17. 1,2 CAMERA MEMORY/ NET- CAMERA Use this mode when you play back or edit an image in a "Memory Stick." Basic operations This section describes the basic operations to the CAMERA mode so that the CAMERA lamp lights up . How to the...

Operating Instructions
Page 11
... touch panel to your camcorder by the LCD panel, the battery pack, the flash or the jack cover. To stop recording, press START/ STOP again. CAMERA MEMORY/ NET- WORK VCR (CHG) OFF ON MODE POWER 2 Press of the touch panel to rewind the tape. 3 ...Recording a picture (p. 29) Viewfinder When the LCD panel is not set up yet. The CAMERA lamp lights up. Your camcorder starts recording. CAMERA MEMORY/ NET- Set the clock setting before recording (p. 22). Note When using the touch panel, press operation buttons lightly with sharp objects other than the stylus supplied (DCR-IP55...
... touch panel to your camcorder by the LCD panel, the battery pack, the flash or the jack cover. To stop recording, press START/ STOP again. CAMERA MEMORY/ NET- WORK VCR (CHG) OFF ON MODE POWER 2 Press of the touch panel to rewind the tape. 3 ...Recording a picture (p. 29) Viewfinder When the LCD panel is not set up yet. The CAMERA lamp lights up. Your camcorder starts recording. CAMERA MEMORY/ NET- Set the clock setting before recording (p. 22). Note When using the touch panel, press operation buttons lightly with sharp objects other than the stylus supplied (DCR-IP55...

Operating Instructions
Page 13
...up your camcorder through the wrist strap. 5 Press PHOTO lightly. Quick Start Guide Recording a still image on the LCD screen. If you purchase your eyesight (p. 33). 3 Set the POWER switch to MEMORY/NETWORK (DCR-IP55 only) or VCR. WORK VCR (CHG) OFF ON MODE POWER 2 Press PLAY ...camcorder, the clock setting is not set the clock setting before recording (p. 22). 1 Remove the lens cap. 2 Turn the grip to open the LCD panel. The MEMORY/ NETWORK lamp lights up . The picture appears on a "Memory Stick" (p. 114) Viewfinder When the LCD panel is displayed. CAMERA MEMORY/ NET-
...up your camcorder through the wrist strap. 5 Press PHOTO lightly. Quick Start Guide Recording a still image on the LCD screen. If you purchase your eyesight (p. 33). 3 Set the POWER switch to MEMORY/NETWORK (DCR-IP55 only) or VCR. WORK VCR (CHG) OFF ON MODE POWER 2 Press PLAY ...camcorder, the clock setting is not set the clock setting before recording (p. 22). 1 Remove the lens cap. 2 Turn the grip to open the LCD panel. The MEMORY/ NETWORK lamp lights up . The picture appears on a "Memory Stick" (p. 114) Viewfinder When the LCD panel is displayed. CAMERA MEMORY/ NET-
Operating Instructions
Page 14
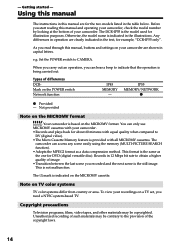
...CAMERA. The DCR-IP55 is the same as a data compression method. The camcorder can only use MICROMV cassettes with your recordings on TV color systems TV color systems differ from country or area. This format is the model used for DVD (digital versatile disc). Unauthorized recording of such materials may be contrary to DV (digital video...). •The Micro Cassette Memory feature is the still image. Before you need a NTSC system-based TV. IP55 MEMORY/NETWORK z z...
...CAMERA. The DCR-IP55 is the same as a data compression method. The camcorder can only use MICROMV cassettes with your recordings on TV color systems TV color systems differ from country or area. This format is the model used for DVD (digital versatile disc). Unauthorized recording of such materials may be contrary to DV (digital video...). •The Micro Cassette Memory feature is the still image. Before you need a NTSC system-based TV. IP55 MEMORY/NETWORK z z...

Operating Instructions
Page 16
... Remote Commander (1) (p. 212) 5 Size AA (R6) batteries for MICROMV) (1) (p. 152) qa Battery terminal cover (1) (p. 17) qs Cleaning cloth (1) (p. 202) qd Stylus (1) (DCR-IP55 only) Contents of the recording cannot be compensated if recording or playback is not made due to a malfunction of the camcorder, storage media, etc. 16 CD-ROM (MovieShaker Ver.3.1 for the...
... Remote Commander (1) (p. 212) 5 Size AA (R6) batteries for MICROMV) (1) (p. 152) qa Battery terminal cover (1) (p. 17) qs Cleaning cloth (1) (p. 202) qd Stylus (1) (DCR-IP55 only) Contents of the recording cannot be compensated if recording or playback is not made due to a malfunction of the camcorder, storage media, etc. 16 CD-ROM (MovieShaker Ver.3.1 for the...

Operating Instructions
Page 22
...may appear) because the built-in rechargeable battery installed in your camcorder will be displayed each time you set the POWER switch to CAMERA or MEMORY/ NETWORK (DCR-IP55 only) unless you use your area, the daylight saving time (DST), the year, the month, the day, the hour ... press EXEC. (5) Press r/R to select CLOCK SET, then press EXEC. (6) Press r/R to select your area, then press EXEC. (7) Press r/R to CAMERA or MEMORY/NETWORK (DCR-IP55 only). "CLOCK SET" will have been discharged (p. 203). In this case, charge the built-in daylight saving time or not, then press EXEC. (8) ...
...may appear) because the built-in rechargeable battery installed in your camcorder will be displayed each time you set the POWER switch to CAMERA or MEMORY/ NETWORK (DCR-IP55 only) unless you use your area, the daylight saving time (DST), the year, the month, the day, the hour ... press EXEC. (5) Press r/R to select CLOCK SET, then press EXEC. (6) Press r/R to select your area, then press EXEC. (7) Press r/R to CAMERA or MEMORY/NETWORK (DCR-IP55 only). "CLOCK SET" will have been discharged (p. 203). In this case, charge the built-in daylight saving time or not, then press EXEC. (8) ...
Operating Instructions
Page 27
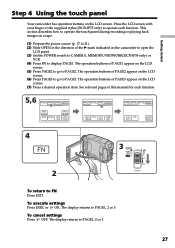
... display returns to PAGE1, 2 or 3. 27 The display returns to PAGE1, 2 or 3. This section describes how to operate the touch panel during recording or playing back images on a tape. (1) Prepare the power source (p. 17 to PAGE2. To execute settings Press EXEC or OK. The operation buttons... go to 21). (2) Slide OPEN in the direction of PAGE3 appear on the camcorder to open the LCD panel. (3) Set the POWER switch to CAMERA, MEMORY/NETWORK(DCR-IP55 only) or VCR. (4) Press FN to PAGE3. To cancel settings Press OFF. The operation buttons of the B mark indicated on the LCD screen....
... display returns to PAGE1, 2 or 3. 27 The display returns to PAGE1, 2 or 3. This section describes how to operate the touch panel during recording or playing back images on a tape. (1) Prepare the power source (p. 17 to PAGE2. To execute settings Press EXEC or OK. The operation buttons... go to 21). (2) Slide OPEN in the direction of PAGE3 appear on the camcorder to open the LCD panel. (3) Set the POWER switch to CAMERA, MEMORY/NETWORK(DCR-IP55 only) or VCR. (4) Press FN to PAGE3. To cancel settings Press OFF. The operation buttons of the B mark indicated on the LCD screen....
Operating Instructions
Page 28
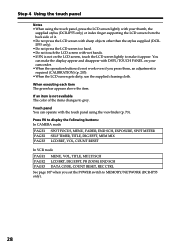
...bar appears above the item. Step 4 Using the touch panel Notes •When using the viewfinder (p. 73). Press FN to display the following buttons: In CAMERA mode PAGE1 PAGE2 PAGE3 SPOT FOCUS, MENU, FADER, END SCH, EXPOSURE, SPOT METER SELF TIMER, TITLE, DIG EFFT, MEM MIX LCD BRT, VOL, ...panel using the touch panel, press the LCD screen lightly with your thumb, the supplied stylus (DCR-IP55 only) or index finger supporting the LCD screen from the back side of the items changes to MEMORY/NETWORK (DCR-IP55 only). 28 Touch panel You can make it . •Do not press the LCD screen...
...bar appears above the item. Step 4 Using the touch panel Notes •When using the viewfinder (p. 73). Press FN to display the following buttons: In CAMERA mode PAGE1 PAGE2 PAGE3 SPOT FOCUS, MENU, FADER, END SCH, EXPOSURE, SPOT METER SELF TIMER, TITLE, DIG EFFT, MEM MIX LCD BRT, VOL, ...panel using the touch panel, press the LCD screen lightly with your thumb, the supplied stylus (DCR-IP55 only) or index finger supporting the LCD screen from the back side of the items changes to MEMORY/NETWORK (DCR-IP55 only). 28 Touch panel You can make it . •Do not press the LCD screen...
Operating Instructions
Page 32
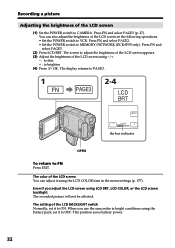
...the bar indicator OPEN To return to MEMORY/NETWORK (DCR-IP55 only). Press FN and select PAGE3 (p. 27). Press FN and select PAGE3. (2) Press LCD BRT. Even if you use the camcorder in bright conditions using LCD BRT, LCD COLOR, or the LCD screen backlight The recorded picture will not be affected. The... using the battery pack, set it to OFF. The setting of the LCD BACKLIGHT switch Normally, set it using -/+. - : to dim + : to CAMERA. The screen to adjust the brightness of the LCD screen appears. (3) Adjust the brightness of the LCD screen using the LCD COLOR item in the...
...the bar indicator OPEN To return to MEMORY/NETWORK (DCR-IP55 only). Press FN and select PAGE3 (p. 27). Press FN and select PAGE3. (2) Press LCD BRT. Even if you use the camcorder in bright conditions using LCD BRT, LCD COLOR, or the LCD screen backlight The recorded picture will not be affected. The... using the battery pack, set it to OFF. The setting of the LCD BACKLIGHT switch Normally, set it using -/+. - : to dim + : to CAMERA. The screen to adjust the brightness of the LCD screen appears. (3) Adjust the brightness of the LCD screen using the LCD COLOR item in the...
Operating Instructions
Page 33
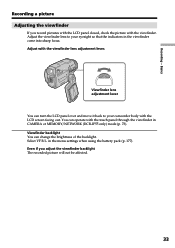
Select VF B.L. in CAMERA or MEMORY/NETWORK (DCR-IP55 only) mode (p. 73). Adjust the viewfinder lens to your eyesight so that the indicators in the viewfinder come into sharp focus. Adjust with the LCD screen facing out. Even if you record pictures with the LCD panel closed, check the picture with the touch panel through... body with the viewfinder lens adjustment lever. You can change the brightness of the backlight. Viewfinder backlight You can operate with the viewfinder. Basics Recording a picture Adjusting the viewfinder If you adjust the viewfinder backlight The...
Select VF B.L. in CAMERA or MEMORY/NETWORK (DCR-IP55 only) mode (p. 73). Adjust the viewfinder lens to your eyesight so that the indicators in the viewfinder come into sharp focus. Adjust with the LCD screen facing out. Even if you record pictures with the LCD panel closed, check the picture with the touch panel through... body with the viewfinder lens adjustment lever. You can change the brightness of the backlight. Viewfinder backlight You can operate with the viewfinder. Basics Recording a picture Adjusting the viewfinder If you adjust the viewfinder backlight The...

Operating Instructions
Page 34
... W T W W T T Using the zoom function sparingly results in the wide-angle position. The digital zoom function is set to MEMORY/NETWORK (DCR-IP55 only) You cannot use the digital zoom. 34 To zoom greater than 10× Zoom greater than 10× is at least about 80... cm (about 2 feet 5/8 inch) away from the lens surface in the telephoto position, or about 1 cm (about 1/2 inch) away in better-looking recordings. W T The digital...
... W T W W T T Using the zoom function sparingly results in the wide-angle position. The digital zoom function is set to MEMORY/NETWORK (DCR-IP55 only) You cannot use the digital zoom. 34 To zoom greater than 10× Zoom greater than 10× is at least about 80... cm (about 2 feet 5/8 inch) away from the lens surface in the telephoto position, or about 1 cm (about 1/2 inch) away in better-looking recordings. W T The digital...
Operating Instructions
Page 35
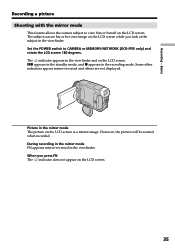
... and on the LCD screen. 35 However, the picture will be normal when recorded. Xz appears in the standby mode, and z appears in the viewfinder. During recording in the mirror mode FN appears mirror-reversed in the recording mode. The subject can see his or her own image on the LCD screen... FN The indicator does not appear on the LCD screen. Set the POWER switch to view him or herself on the LCD screen. Basics Recording a picture Shooting with the mirror mode This feature allows the camera subject to CAMERA or MEMORY/NETWORK (DCR-IP55 only) and rotate the LCD screen 180 degrees...
... and on the LCD screen. 35 However, the picture will be normal when recorded. Xz appears in the standby mode, and z appears in the viewfinder. During recording in the mirror mode FN appears mirror-reversed in the recording mode. The subject can see his or her own image on the LCD screen... FN The indicator does not appear on the LCD screen. Set the POWER switch to view him or herself on the LCD screen. Basics Recording a picture Shooting with the mirror mode This feature allows the camera subject to CAMERA or MEMORY/NETWORK (DCR-IP55 only) and rotate the LCD screen 180 degrees...
Operating Instructions
Page 37
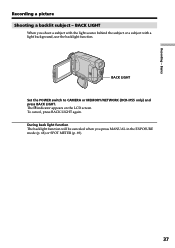
The . During back light function The backlight function will be canceled when you shoot a subject with the light source behind the subject or a subject with a light background, use the backlight function. Recording - indicator appears on the LCD screen. BACK LIGHT When you press MANUAL in the EXPOSURE mode (p. 68) or SPOT METER (p. 69). 37 To cancel, press BACK LIGHT again. Basics Recording a picture Shooting a backlit subject - BACK LIGHT Set the POWER switch to CAMERA or MEMORY/NETWORK (DCR-IP55 only) and press BACK LIGHT.
The . During back light function The backlight function will be canceled when you shoot a subject with the light source behind the subject or a subject with a light background, use the backlight function. Recording - indicator appears on the LCD screen. BACK LIGHT When you press MANUAL in the EXPOSURE mode (p. 68) or SPOT METER (p. 69). 37 To cancel, press BACK LIGHT again. Basics Recording a picture Shooting a backlit subject - BACK LIGHT Set the POWER switch to CAMERA or MEMORY/NETWORK (DCR-IP55 only) and press BACK LIGHT.
Operating Instructions
Page 38
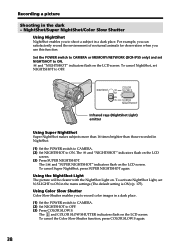
... on the LCD screen. Using Color Slow Shutter Color Slow Shutter enables you to record color images in NightShot. (1) Set the POWER switch to CAMERA. (2) Set NIGHTSHOT to OFF. (3) Press COLOR SLOW S. Set the POWER switch to CAMERA or MEMORY/NETWORK (DCR-IP55 only) and set NIGHTSHOT to OFF. and "NIGHTSHOT" indicators flash on . NIGHTSHOT COLOR...
... on the LCD screen. Using Color Slow Shutter Color Slow Shutter enables you to record color images in NightShot. (1) Set the POWER switch to CAMERA. (2) Set NIGHTSHOT to OFF. (3) Press COLOR SLOW S. Set the POWER switch to CAMERA or MEMORY/NETWORK (DCR-IP55 only) and set NIGHTSHOT to OFF. and "NIGHTSHOT" indicators flash on . NIGHTSHOT COLOR...
Operating Instructions
Page 39
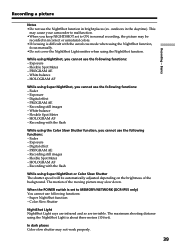
... Color slow shutter may slow down. White balance - Fader - Digital effect - Super NightShot function - Basics Recording a picture Notes •Do not use the following functions: - Fader - PROGRAM AE - Recording with the autofocus mode when using the NightShot function, focus manually.... - Recording with the flash While using the NightShot Light is set to ON in the daytime). Recording still images - Flexible Spot Meter - PROGRAM AE - The maximum shooting distance using the Color Slow Shutter function, you keep NIGHTSHOT set to MEMORY/NETWORK (DCR-IP55 only...
... Color slow shutter may slow down. White balance - Fader - Digital effect - Super NightShot function - Basics Recording a picture Notes •Do not use the following functions: - Fader - PROGRAM AE - Recording with the autofocus mode when using the NightShot function, focus manually.... - Recording with the flash While using the NightShot Light is set to ON in the daytime). Recording still images - Flexible Spot Meter - PROGRAM AE - The maximum shooting distance using the Color Slow Shutter function, you keep NIGHTSHOT set to MEMORY/NETWORK (DCR-IP55 only...

Operating Instructions
Page 40
... countdown Press START/STOP. To cancel self-timer recording Press SELFTIMER so that the (self-timer) indicator disappears from 10 with the self-timer (p. 121). 40 The POWER switch is in 10 seconds after you set to MEMORY/NETWORK (DCR-IP55 only) You can also use the Remote Commander ...for this operation. (1) In the standby mode, press FN and select PAGE2 (p. 27). (2) Press SELFTIMER. When the POWER switch is automatically canceled when: - Note The self-timer recording mode is set to OFF...
... countdown Press START/STOP. To cancel self-timer recording Press SELFTIMER so that the (self-timer) indicator disappears from 10 with the self-timer (p. 121). 40 The POWER switch is in 10 seconds after you set to MEMORY/NETWORK (DCR-IP55 only) You can also use the Remote Commander ...for this operation. (1) In the standby mode, press FN and select PAGE2 (p. 27). (2) Press SELFTIMER. When the POWER switch is automatically canceled when: - Note The self-timer recording mode is set to OFF...

Operating Instructions
Page 54
Normally white balance is automatically adjusted. (1) Set the POWER switch to CAMERA or MEMORY/NETWORK (DCR-IP55 only) . (2) Press FN to display PAGE1. (3) Press MENU, then select WHT BAL in in the menu settings to select a desired white ...HOLD OUTDOOR INDOOR EXEC RET. 1 54 S. Adjusting the white balance manually You can manually adjust and set the white balance. HOLD : Recording a single-colored subject or background (OUTDOOR) : •Recording a sunset/sunrise, just after sunset, just before sunrise, neon signs, or fireworks •Under a color matching fluorescent lamp n (INDOOR...
Normally white balance is automatically adjusted. (1) Set the POWER switch to CAMERA or MEMORY/NETWORK (DCR-IP55 only) . (2) Press FN to display PAGE1. (3) Press MENU, then select WHT BAL in in the menu settings to select a desired white ...HOLD OUTDOOR INDOOR EXEC RET. 1 54 S. Adjusting the white balance manually You can manually adjust and set the white balance. HOLD : Recording a single-colored subject or background (OUTDOOR) : •Recording a sunset/sunrise, just after sunset, just before sunrise, neon signs, or fireworks •Under a color matching fluorescent lamp n (INDOOR...


