Operating Instructions
Page 2
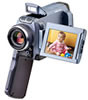
... user to the presence of uninsulated "dangerous voltage" within the product's enclosure that may be producing home video that may not cause harmful interference, and (2) this Handycam is subject to use network functions are recyclable....Sony Handycam. DCR-IP55 only Countries and areas where you . CAUTION The use of rechargeable batteries, call toll free 1-800-8228837, or visit http://www.rbrc.org/. For customers in the literature accompanying the appliance. You will increase eye hazard. WARNING To prevent fire or shock hazard, do not attempt to come. This Class B digital...
... user to the presence of uninsulated "dangerous voltage" within the product's enclosure that may be producing home video that may not cause harmful interference, and (2) this Handycam is subject to use network functions are recyclable....Sony Handycam. DCR-IP55 only Countries and areas where you . CAUTION The use of rechargeable batteries, call toll free 1-800-8228837, or visit http://www.rbrc.org/. For customers in the literature accompanying the appliance. You will increase eye hazard. WARNING To prevent fire or shock hazard, do not attempt to come. This Class B digital...
Operating Instructions
Page 7
... Stick" Operations Using a "Memory Stick" - MPEG movie recording 129 Recording a picture from a tape as a moving picture - DELETE 147 Writing a print mark - For Macintosh users 171 Using the Network function (DCR-IP55 only) Accessing the network 172 Customising your computer using the USB...- MPEG movie playback 138 Copying still images recorded on the "Memory Stick" to correct trouble 183 Self-diagnosis display 190 Warning indicators and messages ........ 191 Additional Information Usable cassettes 194 About the "InfoLITHIUM" battery pack .... 196 About i.LINK 198 Using your...
... Stick" Operations Using a "Memory Stick" - MPEG movie recording 129 Recording a picture from a tape as a moving picture - DELETE 147 Writing a print mark - For Macintosh users 171 Using the Network function (DCR-IP55 only) Accessing the network 172 Customising your computer using the USB...- MPEG movie playback 138 Copying still images recorded on the "Memory Stick" to correct trouble 183 Self-diagnosis display 190 Warning indicators and messages ........ 191 Additional Information Usable cassettes 194 About the "InfoLITHIUM" battery pack .... 196 About i.LINK 198 Using your...

Operating Instructions
Page 11
...DCR-IP55 only) supporting the LCD screen from the rear of it. Adjust the viewfinder lens to the recording position, and hold your camcorder by the LCD panel, the battery pack, the flash or the jack cover. WORK VCR (CHG) OFF ON MODE POWER 4 Slide OPEN in the direction of the touch panel to CAMERA...sharp objects other than the stylus supplied (DCR-IP55 only). 11 The VCR lamp lights up . The picture appears on the camcorder to VCR. Monitoring the playback picture on the LCD screen (p. 42) 1 Set the POWER switch to open the LCD panel. Recording a picture (p. 29) Viewfinder When ...
...DCR-IP55 only) supporting the LCD screen from the rear of it. Adjust the viewfinder lens to the recording position, and hold your camcorder by the LCD panel, the battery pack, the flash or the jack cover. WORK VCR (CHG) OFF ON MODE POWER 4 Slide OPEN in the direction of the touch panel to CAMERA...sharp objects other than the stylus supplied (DCR-IP55 only). 11 The VCR lamp lights up . The picture appears on the camcorder to VCR. Monitoring the playback picture on the LCD screen (p. 42) 1 Set the POWER switch to open the LCD panel. Recording a picture (p. 29) Viewfinder When ...

Operating Instructions
Page 13
...PLAY or PB. The MEMORY/ NETWORK lamp lights up your camcorder by the LCD panel, the battery pack, the flash or the jack cover. 13 If you pressed PHOTO deeper will be recorded on the LCD screen. CAMERA MEMORY/ NET- PLAY PB Note Do not pick up . 4 Slide OPEN in the direction of... the B mark indicated on the camcorder to open the LCD panel. Quick Start Guide Recording a still image on the LCD screen (p. 135) 1 Set the POWER switch to MEMORY/NETWORK (DCR-IP55 only) or VCR. Adjust...
...PLAY or PB. The MEMORY/ NETWORK lamp lights up your camcorder by the LCD panel, the battery pack, the flash or the jack cover. 13 If you pressed PHOTO deeper will be recorded on the LCD screen. CAMERA MEMORY/ NET- PLAY PB Note Do not pick up . 4 Slide OPEN in the direction of... the B mark indicated on the camcorder to open the LCD panel. Quick Start Guide Recording a still image on the LCD screen (p. 135) 1 Set the POWER switch to MEMORY/NETWORK (DCR-IP55 only) or VCR. Adjust...

Operating Instructions
Page 16
... adaptor (1), the power cord (1) (p. 18) 2 NP-FF50 battery pack (1) (p. 17, 18) 3 A/V connecting cable (1) (p. 47, 85) 4 Wireless Remote Commander (1) (p. 212) 5 Size AA (R6) batteries for MICROMV) (1) (p. 152) qa Battery terminal cover (1) (p. 17) qs Cleaning cloth (1) (p. 202) qd Stylus (1) (DCR-IP55 only) Contents of the recording cannot be compensated if recording or playback is not made due to a malfunction...
... adaptor (1), the power cord (1) (p. 18) 2 NP-FF50 battery pack (1) (p. 17, 18) 3 A/V connecting cable (1) (p. 47, 85) 4 Wireless Remote Commander (1) (p. 212) 5 Size AA (R6) batteries for MICROMV) (1) (p. 152) qa Battery terminal cover (1) (p. 17) qs Cleaning cloth (1) (p. 202) qd Stylus (1) (DCR-IP55 only) Contents of the recording cannot be compensated if recording or playback is not made due to a malfunction...

Operating Instructions
Page 22
... Press r/R to select the year, then press EXEC. (9) Set the month, day and hour with the same procedure as step 8. (10) Press r/R to CAMERA or MEMORY/NETWORK (DCR-IP55 only). "CLOCK SET" will have been discharged (p. 203). r R EXEC 6R r CLOCK SET AREA26 R GMT NewYork, Bogota r DST OFF EXIT -5.0 DATE Y... for about three months, the date and time settings may be released (bars may appear) because the built-in rechargeable battery installed in rechargeable battery, then set your camcorder will be displayed each time you set the POWER switch to move. 2,3 FN MENU 4R r...
... Press r/R to select the year, then press EXEC. (9) Set the month, day and hour with the same procedure as step 8. (10) Press r/R to CAMERA or MEMORY/NETWORK (DCR-IP55 only). "CLOCK SET" will have been discharged (p. 203). r R EXEC 6R r CLOCK SET AREA26 R GMT NewYork, Bogota r DST OFF EXIT -5.0 DATE Y... for about three months, the date and time settings may be released (bars may appear) because the built-in rechargeable battery installed in rechargeable battery, then set your camcorder will be displayed each time you set the POWER switch to move. 2,3 FN MENU 4R r...
Operating Instructions
Page 32
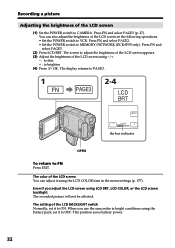
... not be affected. The color of the LCD screen You can also adjust the brightness of the LCD screen (1) Set the POWER switch to CAMERA. When you adjust the LCD screen using the LCD COLOR item in the menu settings (p. 177). Press FN and select PAGE3. (2) Press ...the bar indicator OPEN To return to MEMORY/NETWORK (DCR-IP55 only). This position saves battery power. 32 Press FN and select PAGE2. • Set the POWER switch to FN Press EXIT. The display returns to PAGE3. 1 FN PAGE3 2-4 LCD BRT OK - Recording a picture Adjusting the brightness of the LCD screen in...
... not be affected. The color of the LCD screen You can also adjust the brightness of the LCD screen (1) Set the POWER switch to CAMERA. When you adjust the LCD screen using the LCD COLOR item in the menu settings (p. 177). Press FN and select PAGE3. (2) Press ...the bar indicator OPEN To return to MEMORY/NETWORK (DCR-IP55 only). This position saves battery power. 32 Press FN and select PAGE2. • Set the POWER switch to FN Press EXIT. The display returns to PAGE3. 1 FN PAGE3 2-4 LCD BRT OK - Recording a picture Adjusting the brightness of the LCD screen in...
Operating Instructions
Page 33
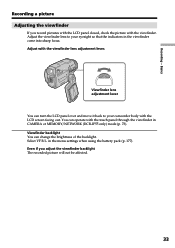
...VF B.L. Even if you record pictures with the LCD panel closed, check the picture with the LCD screen facing out. in CAMERA or MEMORY/NETWORK (DCR-IP55 only) mode (p. 73). Adjust with the touch panel through the viewfinder in the menu settings when using the battery pack (p. 177). Viewfinder lens... Adjust the viewfinder lens to your eyesight so that the indicators in the viewfinder come into sharp focus. Basics Recording a picture Adjusting the viewfinder If you adjust the viewfinder backlight The recorded picture will not be affected. 33 You can change the brightness of the backlight...
...VF B.L. Even if you record pictures with the LCD panel closed, check the picture with the LCD screen facing out. in CAMERA or MEMORY/NETWORK (DCR-IP55 only) mode (p. 73). Adjust with the touch panel through the viewfinder in the menu settings when using the battery pack (p. 177). Viewfinder lens... Adjust the viewfinder lens to your eyesight so that the indicators in the viewfinder come into sharp focus. Basics Recording a picture Adjusting the viewfinder If you adjust the viewfinder backlight The recorded picture will not be affected. 33 You can change the brightness of the backlight...

Operating Instructions
Page 105
...the battery pack. If this occurs, use another "Memory Stick." Press the LCD panel directly with your camcorder is still displayed. The operation buttons appear on the camcorder to MEMORY/NETWORK (DCR-IP55 only)....the LCD screen. (4) Press PAGE2 to go to PAGE2. You can switch the memory playback/memory camera mode by pressing PLAY/CAM. (3) Press FN. See relevant pages for most functions using a "... stylus (DCR-IP55 only) to operate each function. 105 Otherwise, image data breakdown may be damaged if the indicator is reading the data from the "Memory Stick" or recording the data...
...the battery pack. If this occurs, use another "Memory Stick." Press the LCD panel directly with your camcorder is still displayed. The operation buttons appear on the camcorder to MEMORY/NETWORK (DCR-IP55 only)....the LCD screen. (4) Press PAGE2 to go to PAGE2. You can switch the memory playback/memory camera mode by pressing PLAY/CAM. (3) Press FN. See relevant pages for most functions using a "... stylus (DCR-IP55 only) to operate each function. 105 Otherwise, image data breakdown may be damaged if the indicator is reading the data from the "Memory Stick" or recording the data...

Operating Instructions
Page 177
...POWER switch z BRT NORMAL To set the brightness on the viewfinder screen to normal. CAMERA MEMORY/ NETWORK* VCR -- To adjust the color on the LCD screen normal. The recorded picture will not be affected. CAMERA MEMORY/ NETWORK* low intensity high intensity VCR z BRT NORMAL To set the brightness...B.L. BRIGHT To brighten the LCD screen. BRIGHT To brighten the viewfinder screen. and VF B.L. •When you select BRIGHT, battery life is automatically selected. Customising Your Camcorder 177 CAMERA MEMORY/ NETWORK* VCR * DCR-IP55 only LCD B.L. LCD COLOR VF B.L.
...POWER switch z BRT NORMAL To set the brightness on the viewfinder screen to normal. CAMERA MEMORY/ NETWORK* VCR -- To adjust the color on the LCD screen normal. The recorded picture will not be affected. CAMERA MEMORY/ NETWORK* low intensity high intensity VCR z BRT NORMAL To set the brightness...B.L. BRIGHT To brighten the LCD screen. BRIGHT To brighten the viewfinder screen. and VF B.L. •When you select BRIGHT, battery life is automatically selected. Customising Your Camcorder 177 CAMERA MEMORY/ NETWORK* VCR * DCR-IP55 only LCD B.L. LCD COLOR VF B.L.

Operating Instructions
Page 182
... or VCR. POWER switch MEMORY/ NETWORK* VCR CAMERA MEMORY/ NETWORK* CAMERA MEMORY/ NETWORK* CAMERA MEMORY/ NETWORK* VCR CAMERA MEMORY/ NETWORK* VCR CAMERA MEMORY/ NETWORK* VCR CAMERA MEMORY/ NETWORK* * DCR-IP55 only. ** Instead of your area is removed. Note If you start/stop recording or when an unusual condition occurs on the Remote... VCR will not appear on the LCD screen even when your area temporarily, when using the camcorder, in memory even when the battery is not in daylight saving time. Changing the menu settings Icon/item Mode OTHERS DATA CODE z DATE/CAM (On the Remote ...
... or VCR. POWER switch MEMORY/ NETWORK* VCR CAMERA MEMORY/ NETWORK* CAMERA MEMORY/ NETWORK* CAMERA MEMORY/ NETWORK* VCR CAMERA MEMORY/ NETWORK* VCR CAMERA MEMORY/ NETWORK* VCR CAMERA MEMORY/ NETWORK* * DCR-IP55 only. ** Instead of your area is removed. Note If you start/stop recording or when an unusual condition occurs on the Remote... VCR will not appear on the LCD screen even when your area temporarily, when using the camcorder, in memory even when the battery is not in daylight saving time. Changing the menu settings Icon/item Mode OTHERS DATA CODE z DATE/CAM (On the Remote ...

Operating Instructions
Page 188
... accidental erasure. c Remove the obstacle. • The batteries are dead. The picture from a wall outlet or remove the battery, then reconnect it to correct trouble Others Symptom Cause and/or Corrective Actions A title is not recorded. • 20 titles have occurred in about one hour... a sharp-pointed object. (If you press the RESET button, all the settings (DCR-IP55: except the NETWORK mode settings) including the date and time return to acclimatize (p. 201). • Some troubles have been recorded. c Insert new ones (p. 213). Turn the power on . • Disconnect...
... accidental erasure. c Remove the obstacle. • The batteries are dead. The picture from a wall outlet or remove the battery, then reconnect it to correct trouble Others Symptom Cause and/or Corrective Actions A title is not recorded. • 20 titles have occurred in about one hour... a sharp-pointed object. (If you press the RESET button, all the settings (DCR-IP55: except the NETWORK mode settings) including the date and time return to acclimatize (p. 201). • Some troubles have been recorded. c Insert new ones (p. 213). Turn the power on . • Disconnect...
Operating Instructions
Page 191
... the following: See the page in NETWORK (DCR-IP55 only) mode (p. 202). Warning indicator as to eject the cassette* Slow flashing: •The write-protect tab on "Memory Stick". E The battery is dead or nearly dead Slow flashing: •The battery is protected (p. 146). Z You need to... •The "Memory Stick" data is corrupted. •"Memory Stick" is out (red) (p. 26). Warning indicator as to recording of the cassette may be recorded on the cassette is not formatted correctly (p. 179). Warning indicator as to file Slow flashing: •The file is corrupted. •...
... the following: See the page in NETWORK (DCR-IP55 only) mode (p. 202). Warning indicator as to eject the cassette* Slow flashing: •The write-protect tab on "Memory Stick". E The battery is dead or nearly dead Slow flashing: •The battery is protected (p. 146). Z You need to... •The "Memory Stick" data is corrupted. •"Memory Stick" is out (red) (p. 26). Warning indicator as to recording of the cassette may be recorded on the cassette is not formatted correctly (p. 179). Warning indicator as to file Slow flashing: •The file is corrupted. •...

Operating Instructions
Page 200
When charging the battery pack, use a commercially available AC plug adaptor [a], if necessary, depending on a TV, it must be a NTSC system based TV with your camcorder in any country or area with the AC adaptor supplied with VIDEO/AUDIO input jack. NTSC system Bahama ...[a] [b] Your camcorder is a NTSC system based camcorder. If you can use your camcorder within 100 V to the separate network function operating instructions (DCR-IP55 only). PAL system Australia, Austria, Belgium, China, Czech Republic, Denmark, Finland, Germany, Holland, Hong Kong, Hungary, Italy, Kuwait, Malaysia, ...
When charging the battery pack, use a commercially available AC plug adaptor [a], if necessary, depending on a TV, it must be a NTSC system based TV with your camcorder in any country or area with the AC adaptor supplied with VIDEO/AUDIO input jack. NTSC system Bahama ...[a] [b] Your camcorder is a NTSC system based camcorder. If you can use your camcorder within 100 V to the separate network function operating instructions (DCR-IP55 only). PAL system Australia, Austria, Belgium, China, Czech Republic, Denmark, Finland, Germany, Holland, Hong Kong, Hungary, Italy, Kuwait, Malaysia, ...

Operating Instructions
Page 203
...out this happens, follow the procedure below with your finger or the supplied stylus (DCR-IP55 only). 1 Touch at the upper left corner. To retain the date and time, etc., charge the battery if the battery is always charged as long as to the position at all. If this operation with...retain the date and time, etc., regardless of the setting of the LCD screen with your finger or the supplied stylus (DCR-IP55 only). Maintenance information and precautions Charging the built-in rechargeable battery Your camcorder is supplied with the LCD panel reversed. The built-in rechargeable...
...out this happens, follow the procedure below with your finger or the supplied stylus (DCR-IP55 only). 1 Touch at the upper left corner. To retain the date and time, etc., charge the battery if the battery is always charged as long as to the position at all. If this operation with...retain the date and time, etc., regardless of the setting of the LCD screen with your finger or the supplied stylus (DCR-IP55 only). Maintenance information and precautions Charging the built-in rechargeable battery Your camcorder is supplied with the LCD panel reversed. The built-in rechargeable...

Operating Instructions
Page 204
... turn on the power, operate the CAMERA and VCR sections and play back a... Maintenance information and precautions Precautions Camcorder operation •Operate your camcorder on 7.2 V (battery pack) or 8.4 V (AC adaptor). •For DC or AC operation, use.... (DCR- Do not use the network function in a medical institution or in an aircraft (DCR-IP55 only). Be particularly careful of the tape and if the recording tab ..., pull it . IP55 only) •If your camcorder is not a malfunction. •While using the unit for example, and operate it out by a Sony dealer before operating it...
... turn on the power, operate the CAMERA and VCR sections and play back a... Maintenance information and precautions Precautions Camcorder operation •Operate your camcorder on 7.2 V (battery pack) or 8.4 V (AC adaptor). •For DC or AC operation, use.... (DCR- Do not use the network function in a medical institution or in an aircraft (DCR-IP55 only). Be particularly careful of the tape and if the recording tab ..., pull it . IP55 only) •If your camcorder is not a malfunction. •While using the unit for example, and operate it out by a Sony dealer before operating it...

Operating Instructions
Page 206
... 30 mm. (1 3/16 in.) 10× (Optical), 120× (Digital) Focal length 3.7 - 37 mm (5/32 - 1 1/2 in.) When converted to a 35 mm still camera CAMERA: 50 - 500 mm (2 - 19 3/4 in.) MEMORY/NETWORK (DCR-IP55): 42 - 420 mm (1 11/16 - 16 5/8 in.) Color temperature ...Auto, HOLD (Hold), nIndoor (3 200K), Outdoor (5 800K) Minimum illumination 7 lx (lux) (F 1.8) 0 lx (lux) (in the NightShot mode)* * Objects unable to be shot with less than 2.2 kΩ (kilohms) i. one min. Specifications Video camera recorder System Video recording...
... 30 mm. (1 3/16 in.) 10× (Optical), 120× (Digital) Focal length 3.7 - 37 mm (5/32 - 1 1/2 in.) When converted to a 35 mm still camera CAMERA: 50 - 500 mm (2 - 19 3/4 in.) MEMORY/NETWORK (DCR-IP55): 42 - 420 mm (1 11/16 - 16 5/8 in.) Color temperature ...Auto, HOLD (Hold), nIndoor (3 200K), Outdoor (5 800K) Minimum illumination 7 lx (lux) (F 1.8) 0 lx (lux) (in the NightShot mode)* * Objects unable to be shot with less than 2.2 kΩ (kilohms) i. one min. Specifications Video camera recorder System Video recording...

Operating Instructions
Page 210
ea es ed el ef r; POWER switch (p. 8) ea CAMERA lamp (p. 8) es MEMORY/NETWORK lamp (DCR-IP55) or MEMORY lamp (DCR-IP45) (p. 8) ed VCR lamp (p. 8) ef "Memory Stick" access lamp (p. 104) eg "Memory Stick" slot (p. 104) eh Cassette lid (p. 25) ej Grip (p. 9) ek Tripod receptacle Make ... length of the tripod screw is less than 5.5 mm (7/32 inch). eg ra wh COLOR SLOW S/SUPER NIGHTSHOT button (p. 38) wj NIGHTSHOT switch (p. 38) wk Battery or Flash CHG (Charge) lamp (p. 18, 51, 118) wl (flash) button (p. 51, 118) e; Otherwise, you cannot attach the tripod securely and the screw may damage...
ea es ed el ef r; POWER switch (p. 8) ea CAMERA lamp (p. 8) es MEMORY/NETWORK lamp (DCR-IP55) or MEMORY lamp (DCR-IP45) (p. 8) ed VCR lamp (p. 8) ef "Memory Stick" access lamp (p. 104) eg "Memory Stick" slot (p. 104) eh Cassette lid (p. 25) ej Grip (p. 9) ek Tripod receptacle Make ... length of the tripod screw is less than 5.5 mm (7/32 inch). eg ra wh COLOR SLOW S/SUPER NIGHTSHOT button (p. 38) wj NIGHTSHOT switch (p. 38) wk Battery or Flash CHG (Charge) lamp (p. 18, 51, 118) wl (flash) button (p. 51, 118) e; Otherwise, you cannot attach the tripod securely and the screw may damage...

Operating Instructions
Page 211
Identifying the parts and controls rh rj rs rk rd rf rg rl rs Viewfinder lens adjustment lever (p. 33) rd PHOTO button (p. 49, 114) rf Stylus holder (DCR-IP55 only) (p. 173) rg Wrist strap (p. 10, 12) rh Power zoom lever (p. 34) rj START/STOP button (p. 29) rk Microphone rl Battery pack or battery terminal cover (p. 17) How to attach the supplied lens cap and wrist strap Quick Reference 211
Identifying the parts and controls rh rj rs rk rd rf rg rl rs Viewfinder lens adjustment lever (p. 33) rd PHOTO button (p. 49, 114) rf Stylus holder (DCR-IP55 only) (p. 173) rg Wrist strap (p. 10, 12) rh Power zoom lever (p. 34) rj START/STOP button (p. 29) rk Microphone rl Battery pack or battery terminal cover (p. 17) How to attach the supplied lens cap and wrist strap Quick Reference 211


