Operating Instructions
Page 47
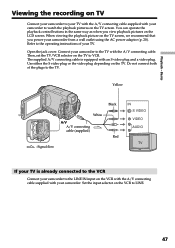
...Playback - Then, set the TV/VCR selector on the TV screen. Yellow Black White A/V A/V connecting cable (supplied) Red : Signal flow IN S VIDEO VIDEO AUDIO If your TV is equipped with your camcorder to the LINE IN input on the TV screen, we recommend that you view playback pictures on the.... Do not connect both of your camcorder. Set the input selector on TV Connect your camcorder to LINE. 47 Open the jack cover. Basics Viewing the recording on the VCR to your TV with the A/V connecting cable supplied with an S video plug and a video plug. You can operate the playback...
...Playback - Then, set the TV/VCR selector on the TV screen. Yellow Black White A/V A/V connecting cable (supplied) Red : Signal flow IN S VIDEO VIDEO AUDIO If your TV is equipped with your camcorder to the LINE IN input on the TV screen, we recommend that you view playback pictures on the.... Do not connect both of your camcorder. Set the input selector on TV Connect your camcorder to LINE. 47 Open the jack cover. Basics Viewing the recording on the VCR to your TV with the A/V connecting cable supplied with an S video plug and a video plug. You can operate the playback...

Operating Instructions
Page 85
... VCR. : Signal flow Yellow Black A/V White A/V connecting cable (supplied) Red IN S VIDEO VIDEO AUDIO When you want to record over) into the VCR, and insert the recorded tape into your camcorder. (2) Prepare the VCR for recording, then set the input selector to your camcorder using the A/V connecting cable supplied with an S video plug and a video plug. Refer to the operating instructions of...
... VCR. : Signal flow Yellow Black A/V White A/V connecting cable (supplied) Red IN S VIDEO VIDEO AUDIO When you want to record over) into the VCR, and insert the recorded tape into your camcorder. (2) Prepare the VCR for recording, then set the input selector to your camcorder using the A/V connecting cable supplied with an S video plug and a video plug. Refer to the operating instructions of...

Operating Instructions
Page 87
...(1) Insert a blank tape (or a tape you want to record over) into the VCR, and insert the recorded tape into your camcorder. (2) Prepare the VCR for more information about i.LINK. Digital effect - With digital-to-digital connection, video and audio signals are not output through the i.LINK (MICROMV Interface). ...Dubbing a tape Using the i.LINK cable Simply connect the i.LINK cable (optional) to the i.LINK (MICROMV Interface) of your camcorder. i.LINK (MICROMV Interface) You can connect one VCR only using the i.LINK cable See page 198 for recording. (3) Set the POWER switch to ...
...(1) Insert a blank tape (or a tape you want to record over) into the VCR, and insert the recorded tape into your camcorder. (2) Prepare the VCR for more information about i.LINK. Digital effect - With digital-to-digital connection, video and audio signals are not output through the i.LINK (MICROMV Interface). ...Dubbing a tape Using the i.LINK cable Simply connect the i.LINK cable (optional) to the i.LINK (MICROMV Interface) of your camcorder. i.LINK (MICROMV Interface) You can connect one VCR only using the i.LINK cable See page 198 for recording. (3) Set the POWER switch to ...

Operating Instructions
Page 88
... VIDEOINPUT in EXEC. (4) Select VIDEO or S VIDEO, then press EXEC. If the setup is VIDEO. Recording video or TV programs When using the A/V connecting cable You can record a tape from another VCR or a TV program from a TV that has video/ audio outputs. The default setting is...recording" on page 89. (1) Set the POWER switch to VCR. (2) Press FN to FN Press EXIT. EXEC RET. VCR SET VIDEOINPUT EXIT VIDEO S VIDEO EXEC RET. 88 in the menu settings. Use your camcorder as a recorder. 1 Switching the video input jack of the jacks in the menu settings, then press 1 CAMERA...
... VIDEOINPUT in EXEC. (4) Select VIDEO or S VIDEO, then press EXEC. If the setup is VIDEO. Recording video or TV programs When using the A/V connecting cable You can record a tape from another VCR or a TV program from a TV that has video/ audio outputs. The default setting is...recording" on page 89. (1) Set the POWER switch to VCR. (2) Press FN to FN Press EXIT. EXEC RET. VCR SET VIDEOINPUT EXIT VIDEO S VIDEO EXEC RET. 88 in the menu settings. Use your camcorder as a recorder. 1 Switching the video input jack of the jacks in the menu settings, then press 1 CAMERA...

Operating Instructions
Page 89
... VIDEO VIDEO AUDIO Red : Signal flow RET. The picture from VCR or TV appears on VCR or TV. 89 WORK VCR (CHG) OFF ON MODE POWER A/V White A/V connecting cable (supplied) When you have finished dubbing a tape Press on the LCD screen or STOP on the Remote Commander to record ...the POWER switch to VCR. (3) Set the camcorder in the menu settings. (The default setting is LCD.) (1) Insert a blank tape (or a tape you record a tape from the VCR, insert a recorded tape into your camcorder and stop recording on VCR if you want to start recording from TV. Next, press REC PAUSE. ...
... VIDEO VIDEO AUDIO Red : Signal flow RET. The picture from VCR or TV appears on VCR or TV. 89 WORK VCR (CHG) OFF ON MODE POWER A/V White A/V connecting cable (supplied) When you have finished dubbing a tape Press on the LCD screen or STOP on the Remote Commander to record ...the POWER switch to VCR. (3) Set the camcorder in the menu settings. (The default setting is LCD.) (1) Insert a blank tape (or a tape you record a tape from the VCR, insert a recorded tape into your camcorder and stop recording on VCR if you want to start recording from TV. Next, press REC PAUSE. ...

Operating Instructions
Page 90
...digital-todigital connection, video and audio signals are transmitted in the recording pause mode. With this connection, you want to record over) into your camcorder, and insert the recorded tape into VCR. (2) Set the POWER switch to connect the yellow (video) plug of your camcorder. (4) Set the camcorder in digital ... S video cable to the i.LINK (MICROMV Interface) of both your TV or VCR has an S video jack Pictures can be reproduced more faithfully by using the i.LINK cable Simply connect the i.LINK cable to the i.LINK (MICROMV Interface) of your camcorder and to the S video jacks ...
...digital-todigital connection, video and audio signals are transmitted in the recording pause mode. With this connection, you want to record over) into your camcorder, and insert the recorded tape into VCR. (2) Set the POWER switch to connect the yellow (video) plug of your camcorder. (4) Set the camcorder in digital ... S video cable to the i.LINK (MICROMV Interface) of both your TV or VCR has an S video jack Pictures can be reproduced more faithfully by using the i.LINK cable Simply connect the i.LINK cable to the i.LINK (MICROMV Interface) of your camcorder and to the S video jacks ...

Operating Instructions
Page 123
... Remote Commander Your camcorder immediately records the image that is displayed on the LCD screen or in the viewfinder. (4) At the point where you want to LCD in to record, follow the steps 3 and 4 on the VCR or the TV. 123 Recording a still image ...of the A/V connecting cable to see the desired program. Various settings are recording a still image with PHOTO. Recording an image from other equipment is on the "Memory Stick". Using the A/V connecting cable "Memory Stick" Operations Black Yellow OUT S VIDEO VIDEO AUDIO : Signal flow A/V A/V connecting cable (supplied) Connect the...
... Remote Commander Your camcorder immediately records the image that is displayed on the LCD screen or in the viewfinder. (4) At the point where you want to LCD in to record, follow the steps 3 and 4 on the VCR or the TV. 123 Recording a still image ...of the A/V connecting cable to see the desired program. Various settings are recording a still image with PHOTO. Recording an image from other equipment is on the "Memory Stick". Using the A/V connecting cable "Memory Stick" Operations Black Yellow OUT S VIDEO VIDEO AUDIO : Signal flow A/V A/V connecting cable (supplied) Connect the...

Operating Instructions
Page 138
...modified on other equipment. when playing back image data shot with other digital still cameras and digital video camera recorders. •Cannot be output from the TV speakers. To play back images with your camcorder to MEMORY/NETWORK (DCR-IP55 only) or VCR. (2) Press PLAY or PB. Viewing a ...moving pictures also with -/+ on a TV screen •Connect your camcorder: - Before operation Insert a "Memory Stick" into your camcorder. (1) Set the POWER switch to the TV with the A/V connecting cable ...
...modified on other equipment. when playing back image data shot with other digital still cameras and digital video camera recorders. •Cannot be output from the TV speakers. To play back images with your camcorder to MEMORY/NETWORK (DCR-IP55 only) or VCR. (2) Press PLAY or PB. Viewing a ...moving pictures also with -/+ on a TV screen •Connect your camcorder: - Before operation Insert a "Memory Stick" into your camcorder. (1) Set the POWER switch to the TV with the A/V connecting cable ...

Operating Instructions
Page 198
...100 megabits of the equipment to be connected by a single i.LINK cable. The maximum baud rate of the camcorder is an i.LINK-compliant MICROMV input/output jack. Mbps stands for ... connected to this unit to i.LINK-compatible equipment having the i.LINK jack, and for handling digital video, digital audio and other equipment. Note Normally, only one piece of each equipment. Possible applications are defined:...two or more familiar term for IEEE 1394 data transport bus proposed by Sony, and is a digital serial interface for controlling other data in one second. IEEE 1394 is ...
...100 megabits of the equipment to be connected by a single i.LINK cable. The maximum baud rate of the camcorder is an i.LINK-compliant MICROMV input/output jack. Mbps stands for ... connected to this unit to i.LINK-compatible equipment having the i.LINK jack, and for handling digital video, digital audio and other equipment. Note Normally, only one piece of each equipment. Possible applications are defined:...two or more familiar term for IEEE 1394 data transport bus proposed by Sony, and is a digital serial interface for controlling other data in one second. IEEE 1394 is ...

