Operating Instructions
Page 7
... information and precautions 201 Specifications 208 Quick Reference Identifying the parts and controls .... 210 Index 219 Using the Network function (DCR-IP220 only) Accessing the network 175 For the details, refer to the Network Function Operating Instructions supplied with your camcorder to correct...143 Playing back images continuously - Table of trouble and how to your computer using the USB cable (For Windows users 154 Viewing images recorded on a tape on your computer - Customizing Your Camcorder Changing the menu settings 177 Troubleshooting Types of contents Getting...
... information and precautions 201 Specifications 208 Quick Reference Identifying the parts and controls .... 210 Index 219 Using the Network function (DCR-IP220 only) Accessing the network 175 For the details, refer to the Network Function Operating Instructions supplied with your camcorder to correct...143 Playing back images continuously - Table of trouble and how to your computer using the USB cable (For Windows users 154 Viewing images recorded on a tape on your computer - Customizing Your Camcorder Changing the menu settings 177 Troubleshooting Types of contents Getting...
Operating Instructions
Page 10
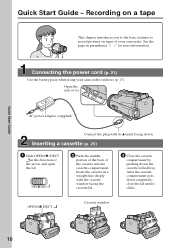
Open the jack cover. AC power adaptor (supplied) Connect the plug with the cassette window facing the cassette lid. 3 Close the cassette compartment by pushing down the cassette lid halfway. Insert the cassette in a straight line deeply with its v mark ... "( )" for more information. See the page in the direction of the arrow and open the lid. After the cassette compartment goes down . OPEN/Z EJECT Cassette window 10 OPEN/ Z EJECT 2 Push the middle portion of the back of your camcorder outdoors (p. 17). Quick Start Guide Quick Start Guide...
Open the jack cover. AC power adaptor (supplied) Connect the plug with the cassette window facing the cassette lid. 3 Close the cassette compartment by pushing down the cassette lid halfway. Insert the cassette in a straight line deeply with its v mark ... "( )" for more information. See the page in the direction of the arrow and open the lid. After the cassette compartment goes down . OPEN/Z EJECT Cassette window 10 OPEN/ Z EJECT 2 Push the middle portion of the back of your camcorder outdoors (p. 17). Quick Start Guide Quick Start Guide...
Operating Instructions
Page 15
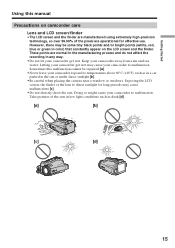
... are manufactured using extremely high-precision technology, so over 99.99% of the pixels are normal in the manufacturing process and do not affect the recording in any way. • Do not let your camcorder away from rain and sea water. Exposing the LCD screen, the finder or the lens to... tiny black points and/or bright points (white, red, blue or green in the sun or under direct sunlight [b]. • Be careful when placing the camera near a window or outdoors.
... are manufactured using extremely high-precision technology, so over 99.99% of the pixels are normal in the manufacturing process and do not affect the recording in any way. • Do not let your camcorder away from rain and sea water. Exposing the LCD screen, the finder or the lens to... tiny black points and/or bright points (white, red, blue or green in the sun or under direct sunlight [b]. • Be careful when placing the camera near a window or outdoors.

Operating Instructions
Page 25
...down the cassette lid halfway. Doing so may cause a malfunction. Insert the cassette in a straight line deeply with the cassette window facing the cassette lid. (4) Close the cassette compartment by pushing down . The cassette compartment automatically lifts up and opens. ...cassette compartment automatically goes down. (5) After the cassette compartment goes down completely, close the lid. 2 OPEN/Z EJECT 3 4,5 Cassette window Cassette lid Cassette compartment To eject a cassette Follow the procedures above, and take out the cassette after the cassette compartment opens completely ...
...down the cassette lid halfway. Doing so may cause a malfunction. Insert the cassette in a straight line deeply with the cassette window facing the cassette lid. (4) Close the cassette compartment by pushing down . The cassette compartment automatically lifts up and opens. ...cassette compartment automatically goes down. (5) After the cassette compartment goes down completely, close the lid. 2 OPEN/Z EJECT 3 4,5 Cassette window Cassette lid Cassette compartment To eject a cassette Follow the procedures above, and take out the cassette after the cassette compartment opens completely ...

Operating Instructions
Page 62
...such as at a beach in tennis or golf. Also it prevents your specific shooting requirements. LANDSCAPE This mode is for when you are recording sunsets, general night views, fireworks displays and neon signs. BEACH&SKI This mode prevents people's faces from appearing dark in strong light or... reflected light, such as in midsummer or on glass or metal mesh in windows when you are record distant subjects such as people or flowers. SUNSETMOON (Sunset & moon) This mode allows you to suit your camcorder from appearing excessively...
...such as at a beach in tennis or golf. Also it prevents your specific shooting requirements. LANDSCAPE This mode is for when you are recording sunsets, general night views, fireworks displays and neon signs. BEACH&SKI This mode prevents people's faces from appearing dark in strong light or... reflected light, such as in midsummer or on glass or metal mesh in windows when you are record distant subjects such as people or flowers. SUNSETMOON (Sunset & moon) This mode allows you to suit your camcorder from appearing excessively...

Operating Instructions
Page 74
... in this function using the Remote Commander. (1) Set the POWER switch to VCR. (2) Press FN to play back, your camcorder starts searching for a scene - The recording date and title of each image or scene are also indicated. You can display thumbnails of all the beginning scenes of each...
... in this function using the Remote Commander. (1) Set the POWER switch to VCR. (2) Press FN to play back, your camcorder starts searching for a scene - The recording date and title of each image or scene are also indicated. You can display thumbnails of all the beginning scenes of each...

Operating Instructions
Page 91
The INPUT TITLE screen appears. (5) Press The TITLE screen appears. (4) Press INPUT TITLE. Editing Superimposing a title Superimposing a title on a recorded tape You can superimpose a title for five seconds from the recording start point. (1) Set the POWER switch to VCR. (2) Press FN to display PAGE1. (3) Press TITLE.
The INPUT TITLE screen appears. (5) Press The TITLE screen appears. (4) Press INPUT TITLE. Editing Superimposing a title Superimposing a title on a recorded tape You can superimpose a title for five seconds from the recording start point. (1) Set the POWER switch to VCR. (2) Press FN to display PAGE1. (3) Press TITLE.

Operating Instructions
Page 101
...Sony Corporation. •All other equipment, format it with the Design Rules for Camera File Systems universal standard established by the JEITA (Japan Electronics and Information Technology Industries Association). Notes on image data compatibility •Image data files recorded on a "Memory Stick" by Windows... OS or Macintosh computers do not have a guaranteed compatibility with your camcorder conform with your camcorder, you cannot use the "Memory Stick" that formatting erases all information on other equipment (DCR-TRV890E/...
...Sony Corporation. •All other equipment, format it with the Design Rules for Camera File Systems universal standard established by the JEITA (Japan Electronics and Information Technology Industries Association). Notes on image data compatibility •Image data files recorded on a "Memory Stick" by Windows... OS or Macintosh computers do not have a guaranteed compatibility with your camcorder conform with your camcorder, you cannot use the "Memory Stick" that formatting erases all information on other equipment (DCR-TRV890E/...

Operating Instructions
Page 151
...driver, the USB driver or the application softwares before connecting your camcorder to view images saved on a "Memory Stick" or recorded on a tape on your computer's connectors and editing software, contact the computer manufacturer. Viewing images on your camcorder to a... image USB jack* Connection cable USB cable (supplied) i.LINK cable (optional) USB cable (supplied) Computer environment requirements Reference pages For Windows users For Macintosh users USB connector, editing software i.LINK (IEEE 1394), connector editing software USB connector, editing software 154 - 156 158 ...
...driver, the USB driver or the application softwares before connecting your camcorder to view images saved on a "Memory Stick" or recorded on a tape on your computer's connectors and editing software, contact the computer manufacturer. Viewing images on your camcorder to a... image USB jack* Connection cable USB cable (supplied) i.LINK cable (optional) USB cable (supplied) Computer environment requirements Reference pages For Windows users For Macintosh users USB connector, editing software i.LINK (IEEE 1394), connector editing software USB connector, editing software 154 - 156 158 ...

Operating Instructions
Page 153
... your computer, be equipped. Note To view images on a tape using the i.LINK cable (For Windows users) You can also record images edited with MovieShaker Ver.3.1 for all the recommended computer environments mentioned above environment is an upgraded OS...your computer using your computer. To view images on the tape. Recommended computer environment Recommended Windows environment OS: Microsoft Windows Me, Windows 2000 Professional, Windows XP Home Edition, Windows XP Professional. Note Operations are included in the supplied application software MovieShaker Ver.3.1 for ...
... your computer, be equipped. Note To view images on a tape using the i.LINK cable (For Windows users) You can also record images edited with MovieShaker Ver.3.1 for all the recommended computer environments mentioned above environment is an upgraded OS...your computer using your computer. To view images on the tape. Recommended computer environment Recommended Windows environment OS: Microsoft Windows Me, Windows 2000 Professional, Windows XP Home Edition, Windows XP Professional. Note Operations are included in the supplied application software MovieShaker Ver.3.1 for ...

Operating Instructions
Page 154
The USB driver can view images recorded on a "Memory Stick" on the CD-ROM supplied, along with the application software required for ... still images. If you connect your camcorder and your computer using the USB cable (For Windows users) Complete installation of the image files edited) Display: 4 MB VRAM video card, Minimum 800 × 600 dot High color (16 bit color, 65 000 colors...pictures live from your camcorder to your computer, you download pictures from your camcorder and pictures recorded on a tape on the size of the USB driver before connecting your camcorder to your computer.
The USB driver can view images recorded on a "Memory Stick" on the CD-ROM supplied, along with the application software required for ... still images. If you connect your camcorder and your computer using the USB cable (For Windows users) Complete installation of the image files edited) Display: 4 MB VRAM video card, Minimum 800 × 600 dot High color (16 bit color, 65 000 colors...pictures live from your camcorder to your computer, you download pictures from your camcorder and pictures recorded on a tape on the size of the USB driver before connecting your camcorder to your computer.

Operating Instructions
Page 155
... operate depending on the type of USB equipment that is used simultaneously. • Operations are not guaranteed for the Windows environment if you connect two or more USB equipment to play back moving pictures). Notes • Operations are registered ...when connecting via USB cable and viewing the "Memory Stick" images on your computer Recommended Windows environment OS: Microsoft Windows 98, Windows 98SE, Windows Me, Windows 2000 Professional, Windows XP Home Edition or Windows XP Professional Standard installation is trademark or registered trademark of Intel Corporation. • All...
... operate depending on the type of USB equipment that is used simultaneously. • Operations are not guaranteed for the Windows environment if you connect two or more USB equipment to play back moving pictures). Notes • Operations are registered ...when connecting via USB cable and viewing the "Memory Stick" images on your computer Recommended Windows environment OS: Microsoft Windows 98, Windows 98SE, Windows Me, Windows 2000 Professional, Windows XP Home Edition or Windows XP Professional Standard installation is trademark or registered trademark of Intel Corporation. • All...

Operating Instructions
Page 156
...messages to install the USB driver. (5) Remove the CD-ROM and then restart the computer, in the CD-ROM drive of your computer and allow Windows to load. (2) Insert the supplied CD-ROM in accordance with the steps on your computer is complete, the USB driver will not be properly ...registered. See page 153 about the recommended computer environment. 156 Notes •If you are using Windows XP, log in with permission of computer administrators. (1) Turn on page 161. •The title screen is not displayed if the screen size of ...
...messages to install the USB driver. (5) Remove the CD-ROM and then restart the computer, in the CD-ROM drive of your computer and allow Windows to load. (2) Insert the supplied CD-ROM in accordance with the steps on your computer is complete, the USB driver will not be properly ...registered. See page 153 about the recommended computer environment. 156 Notes •If you are using Windows XP, log in with permission of computer administrators. (1) Turn on page 161. •The title screen is not displayed if the screen size of ...

Operating Instructions
Page 157
.... 157 Viewing Images Using your Computer Connecting your camcorder to your computer using Windows 2000 Professional, log in with permission of computer administrators. (1) Turn on your computer and allow Windows to load. (2) Insert the supplied CD-ROM in with permission of your computer... transferred (copied) to your computer. If you are using Windows XP, log in the CD-ROM drive of administrators. If you are using the USB cable (For Windows users) Installing Image Transfer This function enables image data recorded on -screen messages to "Image Transfer" and click.
.... 157 Viewing Images Using your Computer Connecting your camcorder to your computer using Windows 2000 Professional, log in with permission of computer administrators. (1) Turn on your computer and allow Windows to load. (2) Insert the supplied CD-ROM in with permission of your computer... transferred (copied) to your computer. If you are using Windows XP, log in the CD-ROM drive of administrators. If you are using the USB cable (For Windows users) Installing Image Transfer This function enables image data recorded on -screen messages to "Image Transfer" and click.

Operating Instructions
Page 158
... software starts up and the "Select Settings Language" screen appears. (4) Select the language for installation. (5) Follow the on your computer and allow Windows to load. (2) Insert the supplied CD-ROM into the CD-ROM drive of your computer, continue installation after a while. (3) Move the cursor.... Connecting your camcorder to your camcorder. Install it from the CD-ROM supplied with your computer using the USB cable (For Windows users) Installing PIXELA ImageMixer Make sure USB driver installation is complete. You need to install PIXELA ImageMixer to view images on -screen...
... software starts up and the "Select Settings Language" screen appears. (4) Select the language for installation. (5) Follow the on your computer and allow Windows to load. (2) Insert the supplied CD-ROM into the CD-ROM drive of your computer, continue installation after a while. (3) Move the cursor.... Connecting your camcorder to your camcorder. Install it from the CD-ROM supplied with your computer using the USB cable (For Windows users) Installing PIXELA ImageMixer Make sure USB driver installation is complete. You need to install PIXELA ImageMixer to view images on -screen...

Operating Instructions
Page 159
...your Computer Connecting your camcorder to your computer using the supplied USB cable. Open "Browse..." Your computer recognizes your camcorder Viewing images recorded on -screen messages so that the Add Hardware Wizard recognizes that the USB drivers have been installed. Set the POWER switch to VCR...connect the (USB) jack on your camcorder to the USB connector on your computer using the USB cable (For Windows users) Making the computer recognize your camcorder, and the Windows Add Hardware Wizard starts. (USB) jack USB connector USB cable (supplied) (4) Follow the on a tape (1) ...
...your Computer Connecting your camcorder to your computer using the supplied USB cable. Open "Browse..." Your computer recognizes your camcorder Viewing images recorded on -screen messages so that the Add Hardware Wizard recognizes that the USB drivers have been installed. Set the POWER switch to VCR...connect the (USB) jack on your camcorder to the USB connector on your computer using the USB cable (For Windows users) Making the computer recognize your camcorder, and the Windows Add Hardware Wizard starts. (USB) jack USB connector USB cable (supplied) (4) Follow the on a tape (1) ...

Operating Instructions
Page 160
... complete without interrupting it. Connecting your camcorder to your computer using the supplied USB cable. Your computer recognizes your computer using the USB cable (For Windows users) Viewing images recorded on a "Memory Stick" (1) Insert a "Memory Stick" into your camcorder.
... complete without interrupting it. Connecting your camcorder to your computer using the supplied USB cable. Your computer recognizes your computer using the USB cable (For Windows users) Viewing images recorded on a "Memory Stick" (1) Insert a "Memory Stick" into your camcorder.

Operating Instructions
Page 161
...Control Panel" t "System", and click "Device Manager". 5 Select and delete the underlined devices below. Viewing images recorded on a tape Step 1: Uninstall the incorrect USB driver 1 Turn on your computer and allow Windows to load. 2 Connect the AC power adaptor, and set the POWER switch to VCR. 3 Connect the USB... to your camcorder before installation of the USB driver was completed. Connecting your camcorder to your computer using the USB cable (For Windows users) If you cannot install the USB driver The USB driver has been registered incorrectly as your computer was connected to the (...
...Control Panel" t "System", and click "Device Manager". 5 Select and delete the underlined devices below. Viewing images recorded on a tape Step 1: Uninstall the incorrect USB driver 1 Turn on your computer and allow Windows to load. 2 Connect the AC power adaptor, and set the POWER switch to VCR. 3 Connect the USB... to your camcorder before installation of the USB driver was completed. Connecting your camcorder to your computer using the USB cable (For Windows users) If you cannot install the USB driver The USB driver has been registered incorrectly as your computer was connected to the (...

Operating Instructions
Page 162
Step 2: Install the USB driver on the supplied CD-ROM Perform the entire procedure described in "Installing the USB driver" on your camcorder, and then disconnect the USB cable. 7 Restart your computer. Connecting your camcorder to your computer using the USB cable (For Windows users) Windows 2000 Professional Windows XP 6 Turn the POWER switch to (CHG) OFF on page 156. 162
Step 2: Install the USB driver on the supplied CD-ROM Perform the entire procedure described in "Installing the USB driver" on your camcorder, and then disconnect the USB cable. 7 Restart your computer. Connecting your camcorder to your computer using the USB cable (For Windows users) Windows 2000 Professional Windows XP 6 Turn the POWER switch to (CHG) OFF on page 156. 162

Operating Instructions
Page 163
...Select the device prefixed with your camcorder. 5 Open your computer's "Device Manager". Ex: (?)Sony Handycam 7 Turn the POWER switch to the (USB) jack on your camcorder using the USB cable supplied with the "?" Windows 2000 Professional: Select "My Computer" t "Control Panel" t "System" t "Hardware", ...your Computer Connecting your camcorder to your computer using the USB cable (For Windows users) Viewing images recorded on a "Memory Stick" Step1: Uninstall the incorrect USB driver 1 Turn on your computer and allow Windows to load. 2 Insert a "Memory Stick" into your camcorder. 3 Connect...
...Select the device prefixed with your camcorder. 5 Open your computer's "Device Manager". Ex: (?)Sony Handycam 7 Turn the POWER switch to the (USB) jack on your camcorder using the USB cable supplied with the "?" Windows 2000 Professional: Select "My Computer" t "Control Panel" t "System" t "Hardware", ...your Computer Connecting your camcorder to your computer using the USB cable (For Windows users) Viewing images recorded on a "Memory Stick" Step1: Uninstall the incorrect USB driver 1 Turn on your computer and allow Windows to load. 2 Insert a "Memory Stick" into your camcorder. 3 Connect...


