
Operating Instructions
Page 4
...) Main Features •Viewing moving pictures recorded on tapes using the i.LINK cable (p. 153) (The i.LINK of .) •Viewing images recorded on a "Memory Stick" using the USB cable (p. 169, 174) •Viewing moving pictures recorded on tapes using the USB cable (p. 164) •Capturing images ...on your computer from your camcorder using the USB cable (p. 166) 4 Capturing images on ...
...) Main Features •Viewing moving pictures recorded on tapes using the i.LINK cable (p. 153) (The i.LINK of .) •Viewing images recorded on a "Memory Stick" using the USB cable (p. 169, 174) •Viewing moving pictures recorded on tapes using the USB cable (p. 164) •Capturing images ...on your computer from your camcorder using the USB cable (p. 166) 4 Capturing images on ...
Operating Instructions
Page 7
...a "Memory Stick" on your computer (For Windows users 169 Connecting your camcorder to your computer using the USB cable (For Windows users 154 Viewing images recorded on a tape on your computer (For Macintosh users 174 Self-diagnosis display 192 Warning indicators and messages ...200 Maintenance information and precautions 201 Specifications 208 Quick Reference Identifying the parts and controls .... 210 Index 219 Using the Network function (DCR-IP220 only) Accessing the network 175 For the details, refer to correct trouble 186 7 PRINT MARK 150 Viewing Images Using your Computer ...
...a "Memory Stick" on your computer (For Windows users 169 Connecting your camcorder to your computer using the USB cable (For Windows users 154 Viewing images recorded on a tape on your computer (For Macintosh users 174 Self-diagnosis display 192 Warning indicators and messages ...200 Maintenance information and precautions 201 Specifications 208 Quick Reference Identifying the parts and controls .... 210 Index 219 Using the Network function (DCR-IP220 only) Accessing the network 175 For the details, refer to correct trouble 186 7 PRINT MARK 150 Viewing Images Using your Computer ...
Operating Instructions
Page 16
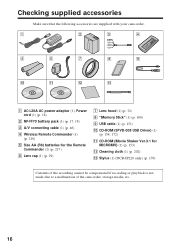
... Shaker Ver.3.1 for the Remote Commander (2) (p. 217) 6 Lens cap (1) (p. 29) 7 Lens hood (1) (p. 32) 8 "Memory Stick" (1) (p. 100) 9 USB cable (1) (p. 151) q; Checking supplied accessories Make sure that the following accessories are supplied with your camcorder. 1 2 3 4 5 6 7 8 9 0 qa qs... (1) (p. 216) 5 Size AA (R6) batteries for MICROMV) (1) (p. 153) qs Cleaning cloth (1) (p. 202) qd Stylus (1) (DCR-IP220 only) (p. 176) Contents of the recording cannot be compensated if recording or playback is not made due to a malfunction of the camcorder, storage media, etc. 16
... Shaker Ver.3.1 for the Remote Commander (2) (p. 217) 6 Lens cap (1) (p. 29) 7 Lens hood (1) (p. 32) 8 "Memory Stick" (1) (p. 100) 9 USB cable (1) (p. 151) q; Checking supplied accessories Make sure that the following accessories are supplied with your camcorder. 1 2 3 4 5 6 7 8 9 0 qa qs... (1) (p. 216) 5 Size AA (R6) batteries for MICROMV) (1) (p. 153) qs Cleaning cloth (1) (p. 202) qd Stylus (1) (DCR-IP220 only) (p. 176) Contents of the recording cannot be compensated if recording or playback is not made due to a malfunction of the camcorder, storage media, etc. 16

Operating Instructions
Page 23
... AREA 1 R GMT Lisbon, London r DST OFF EXIT +0.0 DATE ---Y- --M- -D- -- : -- If you do not set the date and time and "--:--:--" are recorded on a 12-hour cycle. •12:00 AM stands for midnight. •12:00 PM stands for noon. 23 CLOCK SET EXIT AREA26 GMT -5.0 New...York, Bogota r DST OFF EXIT -5.0 DATE RY R M R D R R 2002 JAN 1 12 : 00PM rrr rr r R EXEC 10 SETUP MENU EXIT CLOCK SET NOV 15 2002 USB STREAM 5:30:00 PM LANGUAGE DEMO MODE r R EXEC RET. r R EXEC RET. 6 r R EXEC CLOCK SET AREA26 R GMT New York, Bogota r DST OFF EXIT -5.0 DATE ...
... AREA 1 R GMT Lisbon, London r DST OFF EXIT +0.0 DATE ---Y- --M- -D- -- : -- If you do not set the date and time and "--:--:--" are recorded on a 12-hour cycle. •12:00 AM stands for midnight. •12:00 PM stands for noon. 23 CLOCK SET EXIT AREA26 GMT -5.0 New...York, Bogota r DST OFF EXIT -5.0 DATE RY R M R D R R 2002 JAN 1 12 : 00PM rrr rr r R EXEC 10 SETUP MENU EXIT CLOCK SET NOV 15 2002 USB STREAM 5:30:00 PM LANGUAGE DEMO MODE r R EXEC RET. r R EXEC RET. 6 r R EXEC CLOCK SET AREA26 R GMT New York, Bogota r DST OFF EXIT -5.0 DATE ...

Operating Instructions
Page 73
...Memory Stick" on the PB ZOOM screen disappears. In the PB ZOOM mode If you operate the following functions: - Advanced Playback Operations Enlarging images recorded on your camcorder while you are processing the image using the tape PB ZOOM function. Images in the PB ZOOM Images in the PB ZOOM... mode are not output through the i.LINK (MICROMV Interface) and (USB) jack. When FOCUS is automatically canceled when you press DISPLAY/TOUCH PANEL, the frame on your camcorder. •You cannot record images on a tape on tapes - Tape PB ZOOM Notes •You cannot process ...
...Memory Stick" on the PB ZOOM screen disappears. In the PB ZOOM mode If you operate the following functions: - Advanced Playback Operations Enlarging images recorded on your camcorder while you are processing the image using the tape PB ZOOM function. Images in the PB ZOOM Images in the PB ZOOM... mode are not output through the i.LINK (MICROMV Interface) and (USB) jack. When FOCUS is automatically canceled when you press DISPLAY/TOUCH PANEL, the frame on your camcorder. •You cannot record images on a tape on tapes - Tape PB ZOOM Notes •You cannot process ...

Operating Instructions
Page 100
... .mpg). You can easily play back still images and moving pictures on a "Memory Stick" supplied with your camcorder. You can record and play back, record or delete images. Moving picture (MPEG) Your camcorder compresses picture data in locations that are: - Mov10001.mpg: This file name appears... Stick" get wet. •Do not use a "Memory Stick" near magnets or magnetic fields such as your computer etc., using the USB cable and the "Memory Stick" supplied with your computer. Introduction You can exchange image data with other equipment such as those of speakers and...
... .mpg). You can easily play back still images and moving pictures on a "Memory Stick" supplied with your camcorder. You can record and play back, record or delete images. Moving picture (MPEG) Your camcorder compresses picture data in locations that are: - Mov10001.mpg: This file name appears... Stick" get wet. •Do not use a "Memory Stick" near magnets or magnetic fields such as your computer etc., using the USB cable and the "Memory Stick" supplied with your computer. Introduction You can exchange image data with other equipment such as those of speakers and...

Operating Instructions
Page 151
...For Windows users For Macintosh users USB connector, editing software i.LINK (IEEE 1394), connector editing software USB connector, editing software 154 - 156 158 - 159 164- 168 153 154 - 157 160 169 - 171 172 - 174 * When connecting to view images saved on a "Memory Stick" or recorded on a tape on your computer ... and then insert it into the computer's Memory Stick slot. Introduction There are the following ways of the i.LINK driver, the USB driver or the application softwares before connecting your computer - To view images on your camcorder to install the i.LINK driver or the...
...For Windows users For Macintosh users USB connector, editing software i.LINK (IEEE 1394), connector editing software USB connector, editing software 154 - 156 158 - 159 164- 168 153 154 - 157 160 169 - 171 172 - 174 * When connecting to view images saved on a "Memory Stick" or recorded on a tape on your computer ... and then insert it into the computer's Memory Stick slot. Introduction There are the following ways of the i.LINK driver, the USB driver or the application softwares before connecting your computer - To view images on your camcorder to install the i.LINK driver or the...

Operating Instructions
Page 152
... on your application software, the file size may increase when you open the file. Compressed files cannot be played back on your computer when the USB cable was connected. •Do not compress the data on your camcorder, the image format will differ so a file error indicator may appear and you...
... on your application software, the file size may increase when you open the file. Compressed files cannot be played back on your computer when the USB cable was connected. •Do not compress the data on your camcorder, the image format will differ so a file error indicator may appear and you...

Operating Instructions
Page 154
... the above environment is required. If you connect your camcorder and your computer using the USB cable (For Windows users) Complete installation of the image files edited) Display: 4 MB VRAM video card, Minimum 800 × 600 dot High color (16 bit color, 65 000 ... download pictures from your camcorder and pictures recorded on a tape on your computer (USB Streaming function). Recommended computer usage environment when connecting via the USB jack You must be able to install the USB driver correctly. The USB connector must install a USB driver onto your computer in image processing ...
... the above environment is required. If you connect your camcorder and your computer using the USB cable (For Windows users) Complete installation of the image files edited) Display: 4 MB VRAM video card, Minimum 800 × 600 dot High color (16 bit color, 65 000 ... download pictures from your camcorder and pictures recorded on a tape on your computer (USB Streaming function). Recommended computer usage environment when connecting via the USB jack You must be able to install the USB driver correctly. The USB connector must install a USB driver onto your computer in image processing ...

Operating Instructions
Page 155
...their respective companies. Furthermore, "TM" and "®" are not guaranteed for the Windows environment if you connect two or more USB equipment to play back moving pictures). Notes • Operations are not guaranteed for all the recommended computer environments mentioned above environment... is an upgraded OS. Windows Media Player must be the trademarks or registered trademarks of USB equipment that is used simultaneously. • Operations are not mentioned in each case in the United States and/or other countries...
...their respective companies. Furthermore, "TM" and "®" are not guaranteed for the Windows environment if you connect two or more USB equipment to play back moving pictures). Notes • Operations are not guaranteed for all the recommended computer environments mentioned above environment... is an upgraded OS. Windows Media Player must be the trademarks or registered trademarks of USB equipment that is used simultaneously. • Operations are not mentioned in each case in the United States and/or other countries...

Operating Instructions
Page 156
...accordance with the steps on page 161. •The title screen is not displayed if the screen size of your computer is complete, the USB driver will not be properly registered. Carry out installation again in with the instructions on -screen messages to less than 800 × 600 ...(2) Insert the supplied CD-ROM in accordance with permission of your computer. This starts USB driver installation. (4) Follow the on the screen. If you connect the USB cable before USB driver installation is set to install the USB driver. (5) Remove the CD-ROM and then restart the computer, in the CD-...
...accordance with the steps on page 161. •The title screen is not displayed if the screen size of your computer is complete, the USB driver will not be properly registered. Carry out installation again in with the instructions on -screen messages to less than 800 × 600 ...(2) Insert the supplied CD-ROM in accordance with permission of your computer. This starts USB driver installation. (4) Follow the on the screen. If you connect the USB cable before USB driver installation is set to install the USB driver. (5) Remove the CD-ROM and then restart the computer, in the CD-...

Operating Instructions
Page 157
... cursor to install Image Transfer. 157 Viewing Images Using your Computer Connecting your camcorder to your computer using the USB cable (For Windows users) Installing Image Transfer This function enables image data recorded on a "Memory Stick" to be automatically transferred (copied) to your computer and allow Windows to load. (2) Insert the supplied...
... cursor to install Image Transfer. 157 Viewing Images Using your Computer Connecting your camcorder to your computer using the USB cable (For Windows users) Installing Image Transfer This function enables image data recorded on a "Memory Stick" to be automatically transferred (copied) to your computer and allow Windows to load. (2) Insert the supplied...

Operating Instructions
Page 158
... software in Windows 2000 Professional, you must be authorized as Power Users or administrators. Follow the on your computer using the USB cable (For Windows users) Installing PIXELA ImageMixer Make sure USB driver installation is complete, restart your computer. The installation screen disappears when installation is complete. (6) If DirectX 8.0a or later...
... software in Windows 2000 Professional, you must be authorized as Power Users or administrators. Follow the on your computer using the USB cable (For Windows users) Installing PIXELA ImageMixer Make sure USB driver installation is complete, restart your computer. The installation screen disappears when installation is complete. (6) If DirectX 8.0a or later...

Operating Instructions
Page 159
...in the menu settings (p. 184). (3) With the CD-ROM inserted, connect the (USB) jack on your computer using the USB cable (For Windows users) Making the computer recognize your camcorder Viewing images recorded on a tape (1) Connect the AC power adaptor to your camcorder, and the Windows... Add Hardware Wizard starts. (USB) jack USB connector USB cable (supplied) (4) Follow the on-screen messages so that the Add Hardware Wizard recognizes that the USB drivers have been installed...
...in the menu settings (p. 184). (3) With the CD-ROM inserted, connect the (USB) jack on your computer using the USB cable (For Windows users) Making the computer recognize your camcorder Viewing images recorded on a tape (1) Connect the AC power adaptor to your camcorder, and the Windows... Add Hardware Wizard starts. (USB) jack USB connector USB cable (supplied) (4) Follow the on-screen messages so that the Add Hardware Wizard recognizes that the USB drivers have been installed...

Operating Instructions
Page 160
... installed. The Add Hardware Wizard starts two times because two different USB drivers are installed. Your computer recognizes your computer using the USB cable (For Windows users) Viewing images recorded on the LCD screen of your camcorder before installing the USB driver. 160 USB MODE appears on a "Memory Stick" (1) Insert a "Memory Stick" into your camcorder...
... installed. The Add Hardware Wizard starts two times because two different USB drivers are installed. Your computer recognizes your computer using the USB cable (For Windows users) Viewing images recorded on the LCD screen of your camcorder before installing the USB driver. 160 USB MODE appears on a "Memory Stick" (1) Insert a "Memory Stick" into your camcorder...

Operating Instructions
Page 161
... "Hardware" tab, and click the "Device Manager" button. Viewing Images Using your Computer Windows 98SE Windows Me 161 Viewing images recorded on a tape Step 1: Uninstall the incorrect USB driver 1 Turn on your computer and allow Windows to load. 2 Connect the AC power adaptor, and set the POWER switch ...to VCR. 3 Connect the USB connector on your camcorder using the USB cable (For Windows users) If you cannot install the USB driver The USB driver has been registered incorrectly as your computer was connected to the (USB) jack on your computer to your camcorder before...
... "Hardware" tab, and click the "Device Manager" button. Viewing Images Using your Computer Windows 98SE Windows Me 161 Viewing images recorded on a tape Step 1: Uninstall the incorrect USB driver 1 Turn on your computer and allow Windows to load. 2 Connect the AC power adaptor, and set the POWER switch ...to VCR. 3 Connect the USB connector on your camcorder using the USB cable (For Windows users) If you cannot install the USB driver The USB driver has been registered incorrectly as your computer was connected to the (USB) jack on your computer to your camcorder before...

Operating Instructions
Page 162
Connecting your camcorder to your computer using the USB cable (For Windows users) Windows 2000 Professional Windows XP 6 Turn the POWER switch to (CHG) OFF on page 156. 162 Step 2: Install the USB driver on the supplied CD-ROM Perform the entire procedure described in "Installing the USB driver" on your camcorder, and then disconnect the USB cable. 7 Restart your computer.
Connecting your camcorder to your computer using the USB cable (For Windows users) Windows 2000 Professional Windows XP 6 Turn the POWER switch to (CHG) OFF on page 156. 162 Step 2: Install the USB driver on the supplied CD-ROM Perform the entire procedure described in "Installing the USB driver" on your camcorder, and then disconnect the USB cable. 7 Restart your computer.

Operating Instructions
Page 163
...-ROM Perform the entire procedure described in "Installing the USB driver" on your camcorder, and then disconnect the USB cable. 8 Restart your computer's "Device Manager". Ex: (?)Sony Handycam 7 Turn the POWER switch to the (USB) jack on your camcorder using the USB cable (For Windows users) Viewing images recorded on a "Memory Stick" Step1: Uninstall the incorrect...
...-ROM Perform the entire procedure described in "Installing the USB driver" on your camcorder, and then disconnect the USB cable. 8 Restart your computer's "Device Manager". Ex: (?)Sony Handycam 7 Turn the POWER switch to the (USB) jack on your camcorder using the USB cable (For Windows users) Viewing images recorded on a "Memory Stick" Step1: Uninstall the incorrect...

Operating Instructions
Page 164
The "PIXELA ImageMixer Ver.1.0 for Sony". Viewing images recorded on a tape on your camcorder. Viewing images recorded on a tape (1) Turn on your computer and allow Windows to load. (2) Connect the AC power adaptor, and insert a cassette ...Start" t "Programs" t "PIXELA" t "ImageMixer" t "PIXELA ImageMixer Ver.1.0 for Sony" startup screen appears on the screen. 164 USB Streaming (For Windows users) Capturing images with "PIXELA ImageMixer Ver.1.0 for Sony" You need to install the USB driver and PIXELA ImageMixer to ON in to view images recorded on a tape on your computer -
The "PIXELA ImageMixer Ver.1.0 for Sony". Viewing images recorded on a tape on your camcorder. Viewing images recorded on a tape (1) Turn on your computer and allow Windows to load. (2) Connect the AC power adaptor, and insert a cassette ...Start" t "Programs" t "PIXELA" t "ImageMixer" t "PIXELA ImageMixer Ver.1.0 for Sony" startup screen appears on the screen. 164 USB Streaming (For Windows users) Capturing images with "PIXELA ImageMixer Ver.1.0 for Sony" You need to install the USB driver and PIXELA ImageMixer to ON in to view images recorded on a tape on your computer -

Operating Instructions
Page 165
Viewing Images Using your Computer Viewing images recorded on a tape on page 164. (2) Set the POWER switch to CAMERA. USB Streaming (For Windows users) (6) Click . Viewing pictures live from your camcorder (1) Follow the steps 1, 2 on your camcorder appears on the preview window on pages 164, ...
Viewing Images Using your Computer Viewing images recorded on a tape on page 164. (2) Set the POWER switch to CAMERA. USB Streaming (For Windows users) (6) Click . Viewing pictures live from your camcorder (1) Follow the steps 1, 2 on your camcorder appears on the preview window on pages 164, ...


