
Operating Instructions
Page 9
...you adjust the angle of the arrow. (2) Turn the LCD panel 180 degrees counter-clockwise. (3) Close the LCD panel with the LCD screen facing out. When you use the viewfinder. Getting Started Introduction - Notes • The LCD panel rotates 180 degrees anticlockwise and 90 degrees clockwise. •...; When using the LCD panel except in the direction of the LCD panel Make sure if the LCD panel is opened in the step 2 position. 9 Basic ...
...you adjust the angle of the arrow. (2) Turn the LCD panel 180 degrees counter-clockwise. (3) Close the LCD panel with the LCD screen facing out. When you use the viewfinder. Getting Started Introduction - Notes • The LCD panel rotates 180 degrees anticlockwise and 90 degrees clockwise. •...; When using the LCD panel except in the direction of the LCD panel Make sure if the LCD panel is opened in the step 2 position. 9 Basic ...
Operating Instructions
Page 11
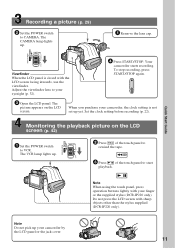
... pick up . 1 Remove the lens cap. The CAMERA lamp lights up your camcorder, the clock setting is closed with sharp objects other than the stylus supplied (DCR-IP220 only). To stop recording, press START/STOP again. 3 Open the LCD panel. When you purchase your camcorder by the LCD panel or the jack cover. 11 The VCR...
... pick up . 1 Remove the lens cap. The CAMERA lamp lights up your camcorder, the clock setting is closed with sharp objects other than the stylus supplied (DCR-IP220 only). To stop recording, press START/STOP again. 3 Open the LCD panel. When you purchase your camcorder by the LCD panel or the jack cover. 11 The VCR...
Operating Instructions
Page 12
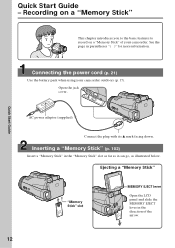
... cord (p. 21) Use the battery pack when using your camcorder. Open the jack cover. Ejecting a "Memory Stick" "Memory Stick" slot MEMORY EJECT lever Open the LCD panel and slide the MEMORY EJECT lever in the "Memory Stick" slot as far as it can go, as illustrated below. Quick Start Guide - See... the page in parentheses "( )" for more information. Quick Start Guide AC power adaptor (supplied) Connect the plug with its v mark facing down. Recording on a "Memory Stick" This chapter introduces you to the basic features to...
... cord (p. 21) Use the battery pack when using your camcorder. Open the jack cover. Ejecting a "Memory Stick" "Memory Stick" slot MEMORY EJECT lever Open the LCD panel and slide the MEMORY EJECT lever in the "Memory Stick" slot as far as it can go, as illustrated below. Quick Start Guide - See... the page in parentheses "( )" for more information. Quick Start Guide AC power adaptor (supplied) Connect the plug with its v mark facing down. Recording on a "Memory Stick" This chapter introduces you to the basic features to...

Operating Instructions
Page 13
.... 13 PB. When the green z mark stops flashing, then lights up, you want to record the date and time for a picture, set up . (CHG)OFF ON MODE 1 Remove the lens cap. 3 Open the LCD panel. CAMERA VCR (CHG)OFF ON MODE MEMORY/NETWORK 2 Press PLAY or displayed. Viewfinder When the...PLAY or PB Note Do not pick up . If you can record a still image. Monitoring the still image on a "Memory Stick" (p. 111) 2 Set the POWER CAMERA switch to POWER VCR MEMORY/NETWORK MEMORY. Quick Start Guide Recording a still image on the LCD screen (p. 136) POWER 1 Set the POWER switch to MEMORY...
.... 13 PB. When the green z mark stops flashing, then lights up, you want to record the date and time for a picture, set up . (CHG)OFF ON MODE 1 Remove the lens cap. 3 Open the LCD panel. CAMERA VCR (CHG)OFF ON MODE MEMORY/NETWORK 2 Press PLAY or displayed. Viewfinder When the...PLAY or PB Note Do not pick up . If you can record a still image. Monitoring the still image on a "Memory Stick" (p. 111) 2 Set the POWER CAMERA switch to POWER VCR MEMORY/NETWORK MEMORY. Quick Start Guide Recording a still image on the LCD screen (p. 136) POWER 1 Set the POWER switch to MEMORY...
Operating Instructions
Page 15
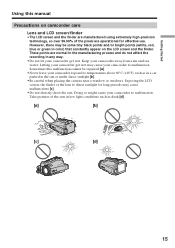
... blue or green in the sun or under direct sunlight [b]. • Be careful when placing the camera near a window or outdoors. However, there may be repaired [a]. • Never leave your camcorder to...water. Take pictures of the pixels are normal in the manufacturing process and do not affect the recording in any way. • Do not let your camcorder get wet. Keep your camcorder to... in a car parked in color) that constantly appear on camcorder care Lens and LCD screen/finder • The LCD screen and the finder are manufactured using extremely high-precision technology, so over 99...
... blue or green in the sun or under direct sunlight [b]. • Be careful when placing the camera near a window or outdoors. However, there may be repaired [a]. • Never leave your camcorder to...water. Take pictures of the pixels are normal in the manufacturing process and do not affect the recording in any way. • Do not let your camcorder get wet. Keep your camcorder to... in a car parked in color) that constantly appear on camcorder care Lens and LCD screen/finder • The LCD screen and the finder are manufactured using extremely high-precision technology, so over 99...

Operating Instructions
Page 19
... at 25°C (77°F) to cut off . This may be shorter. Recording time Battery pack NP-FF70 (supplied) Recording with the viewfinder Continuous Typical* 130 70 Recording with the LCD screen Backlighting on Backlighting off Continuous Typical* Continuous Typical* 115 60 130 70 Approximate ...minutes when you use a fully charged battery * Approximate recording time when you repeat recording start/stop, zooming and turning the power on LCD screen 140 Playing time with the metal parts of the DC plug of the ambient temperature....
... at 25°C (77°F) to cut off . This may be shorter. Recording time Battery pack NP-FF70 (supplied) Recording with the viewfinder Continuous Typical* 130 70 Recording with the LCD screen Backlighting on Backlighting off Continuous Typical* Continuous Typical* 115 60 130 70 Approximate ...minutes when you use a fully charged battery * Approximate recording time when you repeat recording start/stop, zooming and turning the power on LCD screen 140 Playing time with the metal parts of the DC plug of the ambient temperature....
Operating Instructions
Page 27
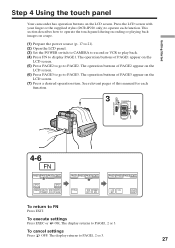
...supplied stylus (DCR-IP220 only) to operate each function. 3 POWER CAMERA (CHG)OFF ON MODE VCR MEMORY/NETWORK 4-6 FN PAGE1 PAGE2 PAGE3 EXIT SPOT FOCUS MENU SELF TIMER SPOT METER END EXPOSCH SURE PAGE1 PAGE2 PAGE3 EXIT TITLE DIG MEM EFFT MIX PAGE1 PAGE2 PAGE3 EXIT LCD VOL BRT ...Using the touch panel Your camcorder has operation buttons on a tape. (1) Prepare the power source (p. 17 to 21). (2) Open the LCD panel. (3) Set the POWER switch to CAMERA to record or VCR to play back. (4) Press FN to PAGE1, 2 or 3. This section describes how to operate the touch panel during...
...supplied stylus (DCR-IP220 only) to operate each function. 3 POWER CAMERA (CHG)OFF ON MODE VCR MEMORY/NETWORK 4-6 FN PAGE1 PAGE2 PAGE3 EXIT SPOT FOCUS MENU SELF TIMER SPOT METER END EXPOSCH SURE PAGE1 PAGE2 PAGE3 EXIT TITLE DIG MEM EFFT MIX PAGE1 PAGE2 PAGE3 EXIT LCD VOL BRT ...Using the touch panel Your camcorder has operation buttons on a tape. (1) Prepare the power source (p. 17 to 21). (2) Open the LCD panel. (3) Set the POWER switch to CAMERA to record or VCR to play back. (4) Press FN to PAGE1, 2 or 3. This section describes how to operate the touch panel during...
Operating Instructions
Page 28
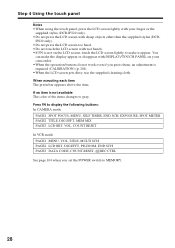
... available The color of the items changes to gray. Press FN to display the following buttons: In CAMERA mode PAGE1 SPOT FOCUS, MENU, SELF TIMER, END SCH, EXPOSURE, SPOT METER PAGE2 TITLE, DIG EFFT, MEM MIX PAGE3 LCD BRT, VOL, COUNT RESET In VCR mode PAGE1 MENU, VOL, TITLE, MULTI SCH PAGE2... each item The green bar appears above the item. If an item is not on your finger or the supplied stylus (DCR-IP220 only). •Do not press the LCD screen with sharp objects other than the supplied stylus (DCR- Step 4 Using the touch panel Notes •When using the touch panel, press the...
... available The color of the items changes to gray. Press FN to display the following buttons: In CAMERA mode PAGE1 SPOT FOCUS, MENU, SELF TIMER, END SCH, EXPOSURE, SPOT METER PAGE2 TITLE, DIG EFFT, MEM MIX PAGE3 LCD BRT, VOL, COUNT RESET In VCR mode PAGE1 MENU, VOL, TITLE, MULTI SCH PAGE2... each item The green bar appears above the item. If an item is not on your finger or the supplied stylus (DCR-IP220 only). •Do not press the LCD screen with sharp objects other than the supplied stylus (DCR- Step 4 Using the touch panel Notes •When using the touch panel, press the...

Operating Instructions
Page 29
... knobs on the LCD screen. (5) Press START/STOP. The CAMERA lamp lights up and your camcorder lights up. The REC indicator appears. The camera recording lamp located on the front of your camcorder is set to CAMERA. To stop recording, press START/STOP again. 3 POWER Microphone CAMERA (CHG)OFF ON MODE VCR MEMORY/NETWORK 1 Camera recording lamp 5 50min REC...
... knobs on the LCD screen. (5) Press START/STOP. The CAMERA lamp lights up and your camcorder lights up. The REC indicator appears. The camera recording lamp located on the front of your camcorder is set to CAMERA. To stop recording, press START/STOP again. 3 POWER Microphone CAMERA (CHG)OFF ON MODE VCR MEMORY/NETWORK 1 Camera recording lamp 5 50min REC...

Operating Instructions
Page 30
... It does not affect transition. You can perform the transition with the LCD screen facing inwards. (3) Eject the cassette. (4) Remove the power source. To enable transition •Transition between the last scene you recorded and the next scene can be sure to set the POWER switch to... POWER switch to (CHG) OFF. (2) Close the LCD panel with the end search function (p. 41) even after ejecting the cassette. •When you record using the LCD screen The battery time is to save battery power and to CAMERA during recording. To display the recording data, press DATA CODE during...
... It does not affect transition. You can perform the transition with the LCD screen facing inwards. (3) Eject the cassette. (4) Remove the power source. To enable transition •Transition between the last scene you recorded and the next scene can be sure to set the POWER switch to... POWER switch to (CHG) OFF. (2) Close the LCD panel with the end search function (p. 41) even after ejecting the cassette. •When you record using the LCD screen The battery time is to save battery power and to CAMERA during recording. To display the recording data, press DATA CODE during...

Operating Instructions
Page 31
... camcorder in the menu settings (p. 180). Basics Recording a picture Adjusting the brightness of the LCD screen using -/+. - : To dim + : To brighten (4) Press OK. The screen to adjust the brightness of the LCD screen appears. (3) Adjust the brightness of the LCD screen (1) Set the POWER switch to CAMERA or MEMORY, then press FN and go to...
... camcorder in the menu settings (p. 180). Basics Recording a picture Adjusting the brightness of the LCD screen using -/+. - : To dim + : To brighten (4) Press OK. The screen to adjust the brightness of the LCD screen appears. (3) Adjust the brightness of the LCD screen (1) Set the POWER switch to CAMERA or MEMORY, then press FN and go to...

Operating Instructions
Page 32
...filter (optional) The shadow of the screen. 32 Even if you adjust the viewfinder backlight The recorded picture will no longer be affected. Recording a picture Adjusting the viewfinder If you record pictures with the LCD panel closed, check the picture with the lens hood on. in the corners of the lens hood... the viewfinder. Adjust the viewfinder lens to remove filters or other objects onto the lens hood. Attaching the supplied lens hood To record fine pictures under strong light, we recommend attaching the lens hood. Adjust with the viewfinder lens adjustment lever.
...filter (optional) The shadow of the screen. 32 Even if you adjust the viewfinder backlight The recorded picture will no longer be affected. Recording a picture Adjusting the viewfinder If you record pictures with the LCD panel closed, check the picture with the lens hood on. in the corners of the lens hood... the viewfinder. Adjust the viewfinder lens to remove filters or other objects onto the lens hood. Attaching the supplied lens hood To record fine pictures under strong light, we recommend attaching the lens hood. Adjust with the viewfinder lens adjustment lever.

Operating Instructions
Page 34
Recording a picture Using the zoom feature - The indicator appears on the LCD screen. Zoom ring You can also use the zoom ring to zoom in and out at the desired speed to fine adjust. Rotating it to zoom in or out. Zoom ring Wide FOCUS AUTO MANUAL ZOOM Telephoto Notes •Do not rotate the zoom ring too quickly. Turn the zoom ring at the desired speed. You can use it too quickly will prevent correct focusing. •Your camcorder changes to the autofocus mode when FOCUS is set to ZOOM. Set FOCUS to ZOOM. 34
Recording a picture Using the zoom feature - The indicator appears on the LCD screen. Zoom ring You can also use the zoom ring to zoom in and out at the desired speed to fine adjust. Rotating it to zoom in or out. Zoom ring Wide FOCUS AUTO MANUAL ZOOM Telephoto Notes •Do not rotate the zoom ring too quickly. Turn the zoom ring at the desired speed. You can use it too quickly will prevent correct focusing. •Your camcorder changes to the autofocus mode when FOCUS is set to ZOOM. Set FOCUS to ZOOM. 34
Operating Instructions
Page 35
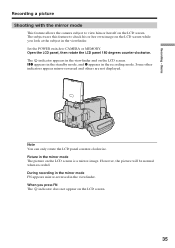
...not appear on the LCD screen. 35 Basics Recording a picture Shooting with the mirror mode This feature allows the camera subject to CAMERA or MEMORY. Note You can only rotate the LCD panel counter-clockwise. However, the picture will be normal when recorded. During recording in the mirror ...mode FN appears mirror-reversed in the recording mode. Picture in the viewfinder...
...not appear on the LCD screen. 35 Basics Recording a picture Shooting with the mirror mode This feature allows the camera subject to CAMERA or MEMORY. Note You can only rotate the LCD panel counter-clockwise. However, the picture will be normal when recorded. During recording in the mirror ...mode FN appears mirror-reversed in the recording mode. Picture in the viewfinder...

Operating Instructions
Page 36
...in minutes to display operation buttons on . Recording data The recording data (date/time or various settings when recorded) are recorded automatically onto the tape. Time The time is displayed about five seconds after the power is turned on the LCD screen. Date The date is turned on ...Remaining tape This appears after you close the LCD panel and open it again, it takes about five seconds after the power is displayed about one minute for a while. Recording a picture Indicators displayed in the recording mode The indicators are not recorded on . FN button Press this operation ...
...in minutes to display operation buttons on . Recording data The recording data (date/time or various settings when recorded) are recorded automatically onto the tape. Time The time is displayed about five seconds after the power is turned on the LCD screen. Date The date is turned on ...Remaining tape This appears after you close the LCD panel and open it again, it takes about five seconds after the power is displayed about one minute for a while. Recording a picture Indicators displayed in the recording mode The indicators are not recorded on . FN button Press this operation ...
Operating Instructions
Page 37
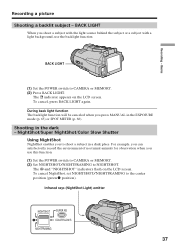
...in a dark place. For example, you can satisfactorily record the environment of nocturnal animals for observation when you to NIGHTSHOT. Recording - indicator appears on the LCD screen. The and "NIGHTSHOT" indicators flash on the LCD screen. To cancel, press BACK LIGHT again. NightShot/...the subject or a subject with a light background, use this function. (1) Set the POWER switch to CAMERA or MEMORY. (2) Set NIGHTSHOT/NIGHTFRAMING to shoot a subject in the dark - Basics Recording a picture Shooting a backlit subject - BACK LIGHT (1) Set the POWER switch to the center position (...
...in a dark place. For example, you can satisfactorily record the environment of nocturnal animals for observation when you to NIGHTSHOT. Recording - indicator appears on the LCD screen. The and "NIGHTSHOT" indicators flash on the LCD screen. To cancel, press BACK LIGHT again. NightShot/...the subject or a subject with a light background, use this function. (1) Set the POWER switch to CAMERA or MEMORY. (2) Set NIGHTSHOT/NIGHTFRAMING to shoot a subject in the dark - Basics Recording a picture Shooting a backlit subject - BACK LIGHT (1) Set the POWER switch to the center position (...
Operating Instructions
Page 38
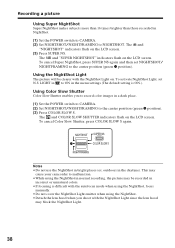
... NIGHTSHOT" indicators flash on the LCD screen. (3) Press SUPER NS. To activate NightShot Light, set NIGHTSHOT/ NIGHTFRAMING to the center position (green z position). LIGHT in to ON in NightShot. (1) Set the POWER switch to CAMERA. (2) Set NIGHTSHOT/NIGHTFRAMING to malfunction. •While using the NightShot in normal recording, the picture may be clearer...
... NIGHTSHOT" indicators flash on the LCD screen. (3) Press SUPER NS. To activate NightShot Light, set NIGHTSHOT/ NIGHTFRAMING to the center position (green z position). LIGHT in to ON in NightShot. (1) Set the POWER switch to CAMERA. (2) Set NIGHTSHOT/NIGHTFRAMING to malfunction. •While using the NightShot in normal recording, the picture may be clearer...

Operating Instructions
Page 40
... appears on the LCD screen. (4) Press EXIT to display PAGE1 (p. 27). (3) Press SELFTIMER. The POWER switch is automatically canceled when: - You can also use the Remote Commander for this operation. (1) Set the POWER switch to CAMERA. (2) Press FN to make PAGE1 disappear. (5) Press START/STOP. Recording a picture Self-timer recording Recording automatically starts in the...
... appears on the LCD screen. (4) Press EXIT to display PAGE1 (p. 27). (3) Press SELFTIMER. The POWER switch is automatically canceled when: - You can also use the Remote Commander for this operation. (1) Set the POWER switch to CAMERA. (2) Press FN to make PAGE1 disappear. (5) Press START/STOP. Recording a picture Self-timer recording Recording automatically starts in the...

Operating Instructions
Page 42
... is not a malfunction. 42 You can monitor the recorded tape on the LCD screen. VOL + Bar indicator To return to PAGE1. 2 CAMERA POWER 4 5 (CHG)OFF ON MODE VCR MEMORY/NETWORK 6,7 FN VOL OK - To stop playback Press on the LCD screen or STOP on for the volume adjustment appears.... You can also control playback using the Remote Commander. (1) Prepare the power source and insert the recorded tape. (2) Set the POWER switch to VCR. The VCR lamp lights up. (3) Open the LCD panel. (4) Press to rewind the tape. (5) Press to start playback. (6) Adjust the volume following...
... is not a malfunction. 42 You can monitor the recorded tape on the LCD screen. VOL + Bar indicator To return to PAGE1. 2 CAMERA POWER 4 5 (CHG)OFF ON MODE VCR MEMORY/NETWORK 6,7 FN VOL OK - To stop playback Press on the LCD screen or STOP on for the volume adjustment appears.... You can also control playback using the Remote Commander. (1) Prepare the power source and insert the recorded tape. (2) Set the POWER switch to VCR. The VCR lamp lights up. (3) Open the LCD panel. (4) Press to rewind the tape. (5) Press to start playback. (6) Adjust the volume following...

Operating Instructions
Page 43
... Remote Commander. To make the indicators appear, press DISPLAY/TOUCH PANEL or DISPLAY again. Using the Remote Commander Press DATA CODE on the LCD screen. Playback - Follow the steps below to PAGE3. (2) Press DATA CODE. The indicators disappear on the Remote Commander in the menu ...back a tape To display the screen indicators - Using the data code function Your camcorder automatically records not only images on the tape but also the recording data (date/time or various settings when recorded) (data code). DATA CODE OFF OK CAM DATE DATA DATA (3) Select CAM DATA or...
... Remote Commander. To make the indicators appear, press DISPLAY/TOUCH PANEL or DISPLAY again. Using the Remote Commander Press DATA CODE on the LCD screen. Playback - Follow the steps below to PAGE3. (2) Press DATA CODE. The indicators disappear on the Remote Commander in the menu ...back a tape To display the screen indicators - Using the data code function Your camcorder automatically records not only images on the tape but also the recording data (date/time or various settings when recorded) (data code). DATA CODE OFF OK CAM DATE DATA DATA (3) Select CAM DATA or...


