
Computer Applications Guide
Page 2
... recorded on a "Memory Stick" on DirectX technology. You cannot hear sound if your camcorder to a Macintosh computer using ImageMixer VCD2 • OS: Mac OS X (v10.1.5 or later) Standard installation is required. • Application: QuickTime 4.0 or later (this must be installed to play back movies.) • ...USB port (this must be provided as standard), disc drive 2 Read this first • For camera operations, read the separate Camera Operations Guide supplied with an i.LINK cable and use the standard software in the OS. It is required. You can only transfer and view still ...
... recorded on a "Memory Stick" on DirectX technology. You cannot hear sound if your camcorder to a Macintosh computer using ImageMixer VCD2 • OS: Mac OS X (v10.1.5 or later) Standard installation is required. • Application: QuickTime 4.0 or later (this must be installed to play back movies.) • ...USB port (this must be provided as standard), disc drive 2 Read this first • For camera operations, read the separate Camera Operations Guide supplied with an i.LINK cable and use the standard software in the OS. It is required. You can only transfer and view still ...
Computer Applications Guide
Page 3
...a trademark or registered trademark of the power switch on the camcorder varies depending on the OS. License of Picture Package by Sony Corporation would not be the trademarks or registered trademarks of Roxio,... respective owners thereof. Except to the extent expressly permitted by applicable laws, you by copyright laws and other applicable laws of each case in this manual are from CDs, ..., licensing, selling and publishing) any license or right to the separate Camera Operations Guide supplied with your camcorder for details. • The screens shown in the United States and / or...
...a trademark or registered trademark of the power switch on the camcorder varies depending on the OS. License of Picture Package by Sony Corporation would not be the trademarks or registered trademarks of Roxio,... respective owners thereof. Except to the extent expressly permitted by applicable laws, you by copyright laws and other applicable laws of each case in this manual are from CDs, ..., licensing, selling and publishing) any license or right to the separate Camera Operations Guide supplied with your camcorder for details. • The screens shown in the United States and / or...
Computer Applications Guide
Page 11
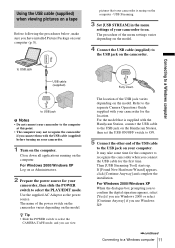
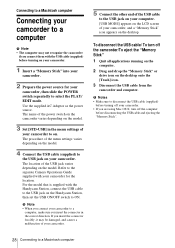
...digital signature appears, select [Yes] if you use Windows 2000 or select [Continue Anyway] if you use Windows XP. ,continued Connecting to the separate Camera Operations Guide supplied with your camcorder for your camcorder.... 1 Turn on the computer - For the model that your camcorder is supplied with the USB cable (supplied) before turning on your camcorder... the camcorder varies ...camcorder if you connect them with the Handycam Station, connect the USB cable to the USB jack on the Handycam...camcorder when you connect the USB cable...
...digital signature appears, select [Yes] if you use Windows 2000 or select [Continue Anyway] if you use Windows XP. ,continued Connecting to the separate Camera Operations Guide supplied with your camcorder for your camcorder.... 1 Turn on the computer - For the model that your camcorder is supplied with the USB cable (supplied) before turning on your camcorder... the camcorder varies ...camcorder if you connect them with the Handycam Station, connect the USB cable to the USB jack on the Handycam...camcorder when you connect the USB cable...
Computer Applications Guide
Page 13
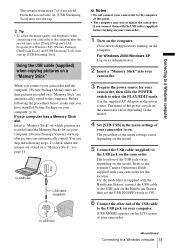
... Close down all applications running on a "Memory Stick," see page 14. z Tip • To adjust the image quality and brightness when connecting your camcorder to the computer after pictures are stored on the computer. The name of the power switch on the camcorder varies depending on the...Notes • Do not connect your camcorder to the separate Camera Operations Guide supplied with the USB cable (supplied) before turning on your camcorder and the computer, [Picture Package Menu] starts up . For the model that is supplied with the Handycam Station, connect the USB cable to...
... Close down all applications running on a "Memory Stick," see page 14. z Tip • To adjust the image quality and brightness when connecting your camcorder to the computer after pictures are stored on the computer. The name of the power switch on the camcorder varies depending on the...Notes • Do not connect your camcorder to the separate Camera Operations Guide supplied with the USB cable (supplied) before turning on your camcorder and the computer, [Picture Package Menu] starts up . For the model that is supplied with the Handycam Station, connect the USB cable to...
Computer Applications Guide
Page 17
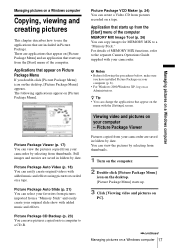
...the pictures by date. Picture Package CD Backup (p. 23) You can change the applications that appear on the menu with your computer (p. 8). • For Windows 2000/Windows XP, log on your camcorder. Applications that starts up from thumbnails. 1 Turn on the computer. 2 Double-click ...save pictures copied onto a computer to the separate Camera Operations Guide supplied with the [Settings] screen. Viewing video and pictures on your camcorder are applications that appear on [Picture Package Menu] and an application that appear on Picture Package Menu If you have installed Picture...
...the pictures by date. Picture Package CD Backup (p. 23) You can change the applications that appear on the menu with your computer (p. 8). • For Windows 2000/Windows XP, log on your camcorder. Applications that starts up from thumbnails. 1 Turn on the computer. 2 Double-click ...save pictures copied onto a computer to the separate Camera Operations Guide supplied with the [Settings] screen. Viewing video and pictures on your camcorder are applications that appear on [Picture Package Menu] and an application that appear on Picture Package Menu If you have installed Picture...
Computer Applications Guide
Page 28
...in the correct direction. Refer to the separate Camera Operations Guide supplied with the Handycam Station, connect the USB cable to the USB jack on your camcorder. If you insert the connector forcibly, it may not recognize the camcorder if you connect them with the USB cable (supplied)... sure you are using Mac OS X, turn off the camcorder/To eject the "Memory Stick" 1 Quit all applications running on the computer. 2 Drag and drop the "Memory Stick" or drive icon on your camcorder. 1 Insert a "Memory Stick" into your camcorder. 2 Prepare the power source for the location. Connecting ...
...in the correct direction. Refer to the separate Camera Operations Guide supplied with the Handycam Station, connect the USB cable to the USB jack on your camcorder. If you insert the connector forcibly, it may not recognize the camcorder if you connect them with the USB cable (supplied)... sure you are using Mac OS X, turn off the camcorder/To eject the "Memory Stick" 1 Quit all applications running on the computer. 2 Drag and drop the "Memory Stick" or drive icon on your camcorder. 1 Insert a "Memory Stick" into your camcorder. 2 Prepare the power source for the location. Connecting ...
Computer Applications Guide
Page 29
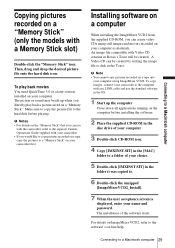
...models with a Memory Stick slot) Double-click the "Memory Stick" icon. The picture or sound may break up the computer Close down all applications running on the computer before playing. b Notes • For details on the "Memory Stick" that you can create video CDs using ImageMixer...click the unzipped [ImageMixerVCD2_Install]. 7 When the user acceptance screen is displayed, enter your camcorder to the computer with an i.LINK cable and use with the camcorder, refer to the separate Camera Operations Guide supplied with Video CD creation in Roxio's Toast will be created by writing the image...
...models with a Memory Stick slot) Double-click the "Memory Stick" icon. The picture or sound may break up the computer Close down all applications running on the computer before playing. b Notes • For details on the "Memory Stick" that you can create video CDs using ImageMixer...click the unzipped [ImageMixerVCD2_Install]. 7 When the user acceptance screen is displayed, enter your camcorder to the computer with an i.LINK cable and use with the camcorder, refer to the separate Camera Operations Guide supplied with Video CD creation in Roxio's Toast will be created by writing the image...

Computer Applications Guide
Page 30
...The picture is a listing for the Burn DVD feature in the index of the Camera Operations Guide. • You can only use a USB cable. For system and operation requirements, visit...sony.com/support/ dvimag/ - Europe http://www.vaio-link.com/ - z Tips • After you turn on your computer. • [Click to DVD Automatic Mode Launcher] is connected to DVD" via an i.LINK cable (optional). Quit all applications... DVDs when you connect your camcorder, then slide the POWER switch repeatedly to select the PLAY/ EDIT mode. Taiwan http://vaio-online.sony.com/tw/vaio/ - Regarding...
...The picture is a listing for the Burn DVD feature in the index of the Camera Operations Guide. • You can only use a USB cable. For system and operation requirements, visit...sony.com/support/ dvimag/ - Europe http://www.vaio-link.com/ - z Tips • After you turn on your computer. • [Click to DVD Automatic Mode Launcher] is connected to DVD" via an i.LINK cable (optional). Quit all applications... DVDs when you connect your camcorder, then slide the POWER switch repeatedly to select the PLAY/ EDIT mode. Taiwan http://vaio-online.sony.com/tw/vaio/ - Regarding...

Camera Operations Guide
Page 7
...also to a tape 97 Dubbing selected scenes from a "Memory Stick Duo" to other operating instructions supplied with your computer cComputer Applications Guide 7 CLOCK SET/WORLD TIME, etc 89 Customizing Personal Menu 90 Dubbing/Editing Connecting to a VCR or TV 93 Dubbing to ...a tape to a "Memory Stick Duo 96 Dubbing still images from a tape - Digital program editing 98 Dubbing sound to a recorded tape 105 Deleting recorded pictures ........107 Marking recorded images with your camcorder: • Editing images with specific information - REC MODE/MULTI-SOUND/ AUDIO MIX/...
...also to a tape 97 Dubbing selected scenes from a "Memory Stick Duo" to other operating instructions supplied with your computer cComputer Applications Guide 7 CLOCK SET/WORLD TIME, etc 89 Customizing Personal Menu 90 Dubbing/Editing Connecting to a VCR or TV 93 Dubbing to ...a tape to a "Memory Stick Duo 96 Dubbing still images from a tape - Digital program editing 98 Dubbing sound to a recorded tape 105 Deleting recorded pictures ........107 Marking recorded images with your camcorder: • Editing images with specific information - REC MODE/MULTI-SOUND/ AUDIO MIX/...
Camera Operations Guide
Page 13
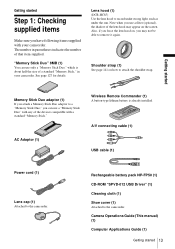
... indicates the number of the lens hood may appear on , you may not be able to remove it again. The number in your camcorder. Also, if you force the lens hood on the screen. Memory Stick Duo adaptor (1) If you attach a Memory Stick Duo adaptor ...CD-ROM "SPVD-012 USB Driver" (1) Cleaning cloth (1) Shoe cover (1) Attached to the camcorder. Lens hood (1) (DCR-HC85) Use the lens hood to attach the shoulder strap. Camera Operations Guide (This manual) (1) Computer Applications Guide (1) Getting started Step 1: Checking supplied items Make sure you have following items supplied with a ...
... indicates the number of the lens hood may appear on , you may not be able to remove it again. The number in your camcorder. Also, if you force the lens hood on the screen. Memory Stick Duo adaptor (1) If you attach a Memory Stick Duo adaptor ...CD-ROM "SPVD-012 USB Driver" (1) Cleaning cloth (1) Shoe cover (1) Attached to the camcorder. Lens hood (1) (DCR-HC85) Use the lens hood to attach the shoulder strap. Camera Operations Guide (This manual) (1) Computer Applications Guide (1) Getting started Step 1: Checking supplied items Make sure you have following items supplied with a ...
Camera Operations Guide
Page 46
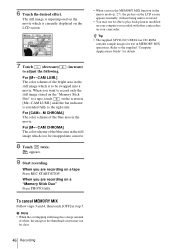
...modified on your computer or recorded with other camcorders on a tape Press REC START/STOP. For [CAMTM CHROMA] The color scheme of the blue area in the thumbnail screen may not be clear. 46 Recording Refer to the supplied "Computer Applications Guide" for use the MEMORY MIX function in... the movie. When you are recording on your camcorder. When you are recording on the screen in the still image which is currently displayed on...
...modified on your computer or recorded with other camcorders on a tape Press REC START/STOP. For [CAMTM CHROMA] The color scheme of the blue area in the thumbnail screen may not be clear. 46 Recording Refer to the supplied "Computer Applications Guide" for use the MEMORY MIX function in... the movie. When you are recording on your camcorder. When you are recording on the screen in the still image which is currently displayed on...

Camera Operations Guide
Page 80
... items" (p. 62). The default settings are marked with G. The settings you can adjust vary depending on the power mode of your camcorder is connected to a Sony VAIO series personal computer, you can currently operate. REC CTRL For recording on a "Memory Stick Duo." PROG.EDIT OTHER DEVICE Select to... DUB CTRL See page 106 for details. REC CTRL For recording on a tape. Using the (EDIT/ PLAY) menu - See the supplied "Computer Applications Guide" for details. 80 Using the Menu TITLE/ TAPE TITLE, etc. MEMORY STICK Select to make programs and dubbing the selected scenes to DVD") using ...
... items" (p. 62). The default settings are marked with G. The settings you can adjust vary depending on the power mode of your camcorder is connected to a Sony VAIO series personal computer, you can currently operate. REC CTRL For recording on a "Memory Stick Duo." PROG.EDIT OTHER DEVICE Select to... DUB CTRL See page 106 for details. REC CTRL For recording on a tape. Using the (EDIT/ PLAY) menu - See the supplied "Computer Applications Guide" for details. 80 Using the Menu TITLE/ TAPE TITLE, etc. MEMORY STICK Select to make programs and dubbing the selected scenes to DVD") using ...
Camera Operations Guide
Page 81
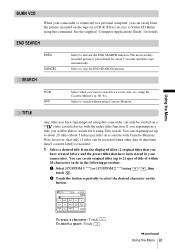
BURN VCD When your camcorder). Using the Menu TITLE GON OFF Select when you want to search for details. See the supplied "Computer Applications Guide" for a scene, title, etc. END SEARCH EXEC CANCEL SEARCH Select to stop the END SEARCH function. You can...,continued Using the Menu 81 If you superimpose a title, you have been stored in your camcorder is recorded. 1 Select a desired title from the displayed titles (2 original titles that have superimposed using this camcorder can superimpose up to search for about 5 letters per title) on a cassette with the ...
BURN VCD When your camcorder). Using the Menu TITLE GON OFF Select when you want to search for details. See the supplied "Computer Applications Guide" for a scene, title, etc. END SEARCH EXEC CANCEL SEARCH Select to stop the END SEARCH function. You can...,continued Using the Menu 81 If you superimpose a title, you have been stored in your camcorder is recorded. 1 Select a desired title from the displayed titles (2 original titles that have superimposed using this camcorder can superimpose up to search for about 5 letters per title) on a cassette with the ...
Camera Operations Guide
Page 86
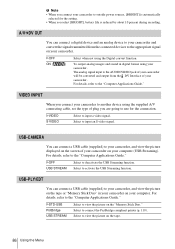
... S video signal. Select to the "Computer Applications Guide." USB-CAMERA You can connect a digital device and an analog device to your camcorder and convert the signal transmitted from the DV Interface of your camcorder will be converted and output from the connected devices to the appropriate signal on your camcorder. For details, refer to connect the...
... S video signal. Select to the "Computer Applications Guide." USB-CAMERA You can connect a digital device and an analog device to your camcorder and convert the signal transmitted from the DV Interface of your camcorder will be converted and output from the connected devices to the appropriate signal on your camcorder. For details, refer to connect the...


