Operating Guide
Page 2
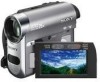
...magnitude to constitute a risk of electrical power supplied to the presence of the polarized plug by the manufacturer, as they may be operated only from battery power, or other ). This plug will fit into the power outlet only one blade wider than the other sources, refer to operate from the ... To reduce fire or shock hazard, do not expose the unit to excessive heat such as sunshine, fire or the like. Do not expose the batteries to rain or moisture. Do not defeat the safety purpose of important operating and maintenance (servicing) instructions in . If you are not sure of...
...magnitude to constitute a risk of electrical power supplied to the presence of the polarized plug by the manufacturer, as they may be operated only from battery power, or other ). This plug will fit into the power outlet only one blade wider than the other sources, refer to operate from the ... To reduce fire or shock hazard, do not expose the unit to excessive heat such as sunshine, fire or the like. Do not expose the batteries to rain or moisture. Do not defeat the safety purpose of important operating and maintenance (servicing) instructions in . If you are not sure of...
Operating Guide
Page 4
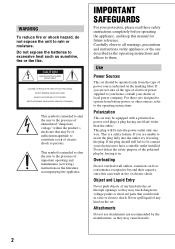
.../L200B. This equipment generates, uses, and can help preserve our environment by returning your authority to Part 15 of Conformity Trade Name: SONY Model No.: DCR-HC62 Responsible Party: Sony Electronics Inc. CAUTION Replace the battery with the limits for a Class B digital device, pursuant to operate this product, you . Otherwise, fire or injury may call...
.../L200B. This equipment generates, uses, and can help preserve our environment by returning your authority to Part 15 of Conformity Trade Name: SONY Model No.: DCR-HC62 Responsible Party: Sony Electronics Inc. CAUTION Replace the battery with the limits for a Class B digital device, pursuant to operate this product, you . Otherwise, fire or injury may call...

Operating Guide
Page 5
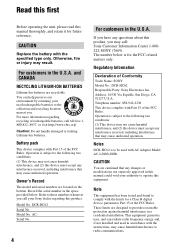
...Duo") - "Operating Guide" (This manual) - special handling may apply, See www.dtsc.ca.gov/hazardouswaste/perchlorate Perchlorate Material: Lithium battery contains perchlorate. Types of "Memory Stick" you can use in order to comply with the limits for a digital device pursuant to Subpart...is supplied with two kinds of California, USA only Perchlorate Material - Increase the separation between the equipment and receiver. - Your camcorder is no guarantee that to radio or television reception, which the receiver is connected. - Reorient or relocate the receiving antenna. ...
...Duo") - "Operating Guide" (This manual) - special handling may apply, See www.dtsc.ca.gov/hazardouswaste/perchlorate Perchlorate Material: Lithium battery contains perchlorate. Types of "Memory Stick" you can use in order to comply with the limits for a digital device pursuant to Subpart...is supplied with two kinds of California, USA only Perchlorate Material - Increase the separation between the equipment and receiver. - Your camcorder is no guarantee that to radio or television reception, which the receiver is connected. - Reorient or relocate the receiving antenna. ...
Operating Guide
Page 6
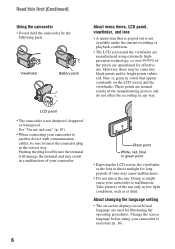
See "On use . Doing so might cause your camcorder if necessary (p. 16). 6 Viewfinder Battery pack About menu items, LCD panel, viewfinder, and lens • A menu item that appear constantly on -screen displays in any way. Change the screen ...These points are used for illustrating the operating procedures. However, there may be sure to malfunction. Read this first (Continued) Using the camcorder • Do not hold the camcorder by the following parts. Pushing the plug forcibly into the terminal will damage the terminal and may cause malfunctions. • Do not ...
See "On use . Doing so might cause your camcorder if necessary (p. 16). 6 Viewfinder Battery pack About menu items, LCD panel, viewfinder, and lens • A menu item that appear constantly on -screen displays in any way. Change the screen ...These points are used for illustrating the operating procedures. However, there may be sure to malfunction. Read this first (Continued) Using the camcorder • Do not hold the camcorder by the following parts. Pushing the plug forcibly into the terminal will damage the terminal and may cause malfunctions. • Do not ...
Operating Guide
Page 9
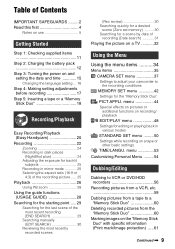
... first 4 Notes on use 5 Getting Started Step 1: Checking supplied items 11 Step 2: Charging the battery pack 12 Step 3: Turning the power on and setting the date and time 15 Changing the language...5: Inserting a tape or a "Memory Stick Duo 18 Recording/Playback Easy Recording/Playback (Easy Handycam 20 Recording 22 Zooming 24 Recording in dark places (NightShot plus 24 Adjusting the exposure for ...Using the menu items .......... 34 Menu items 35 CAMERA SET menu 37 Settings to adjust your camcorder to a "Memory Stick Duo 60 Deleting recorded pictures from the "Memory Stick Duo 60 ...
... first 4 Notes on use 5 Getting Started Step 1: Checking supplied items 11 Step 2: Charging the battery pack 12 Step 3: Turning the power on and setting the date and time 15 Changing the language...5: Inserting a tape or a "Memory Stick Duo 18 Recording/Playback Easy Recording/Playback (Easy Handycam 20 Recording 22 Zooming 24 Recording in dark places (NightShot plus 24 Adjusting the exposure for ...Using the menu items .......... 34 Menu items 35 CAMERA SET menu 37 Settings to adjust your camcorder to a "Memory Stick Duo 60 Deleting recorded pictures from the "Memory Stick Duo 60 ...
Operating Guide
Page 10
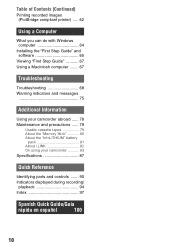
... ...... 78 Maintenance and precautions ...... 79 Usable cassette tapes 79 About the "Memory Stick 80 About the "InfoLITHIUM" battery pack 81 About i.LINK 82 On using your camcorder 83 Specifications 87 Quick Reference Identifying parts and controls ....... 90 Indicators displayed during recording/ playback 94 Index 97 Spanish Quick Guide/Guía rápida...
... ...... 78 Maintenance and precautions ...... 79 Usable cassette tapes 79 About the "Memory Stick 80 About the "InfoLITHIUM" battery pack 81 About i.LINK 82 On using your camcorder 83 Specifications 87 Quick Reference Identifying parts and controls ....... 90 Indicators displayed during recording/ playback 94 Index 97 Spanish Quick Guide/Guía rápida...
Operating Guide
Page 11
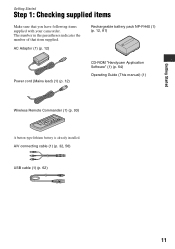
AC Adaptor (1) (p. 12) Rechargeable battery pack NP-FH40 (1) (p. 12, 81) Power cord (Mains lead) (1) (p. 12) CD-ROM "Handycam Application Software" (1) (p. 64) Operating Guide (This manual) (1) Wireless Remote Commander (1) (p. 93) A button-type lithium battery is already installed. A/V connecting cable (1) (p. 32, 56) USB cable (1) (p. 62) 11 The number in the parentheses indicates the number of that you have following items supplied with your camcorder. Getting Started Getting Started Step 1: Checking supplied items Make sure that item supplied.
AC Adaptor (1) (p. 12) Rechargeable battery pack NP-FH40 (1) (p. 12, 81) Power cord (Mains lead) (1) (p. 12) CD-ROM "Handycam Application Software" (1) (p. 64) Operating Guide (This manual) (1) Wireless Remote Commander (1) (p. 93) A button-type lithium battery is already installed. A/V connecting cable (1) (p. 32, 56) USB cable (1) (p. 62) 11 The number in the parentheses indicates the number of that you have following items supplied with your camcorder. Getting Started Getting Started Step 1: Checking supplied items Make sure that item supplied.

Operating Guide
Page 12
...Power cord (Mains lead) POWER switch You can charge the "InfoLITHIUM" battery pack (H series) (p. 81) after attaching it into place 2. 2 Slide the POWER switch in the direction of the battery pack and your camcorder 1, then attach the battery pack and click it to the DC IN jack on the DC plug ... (charge) lamp The CHG (charge) lamp lights up and charging starts. b Notes • You cannot attach any "InfoLITHIUM" battery pack other than the H series to your camcorder. 4 Connect the power cord (mains lead) to the AC Adaptor and the wall outlet (wall socket). 1 Align the terminals of the ...
...Power cord (Mains lead) POWER switch You can charge the "InfoLITHIUM" battery pack (H series) (p. 81) after attaching it into place 2. 2 Slide the POWER switch in the direction of the battery pack and your camcorder 1, then attach the battery pack and click it to the DC IN jack on the DC plug ... (charge) lamp The CHG (charge) lamp lights up and charging starts. b Notes • You cannot attach any "InfoLITHIUM" battery pack other than the H series to your camcorder. 4 Connect the power cord (mains lead) to the AC Adaptor and the wall outlet (wall socket). 1 Align the terminals of the ...
Operating Guide
Page 13
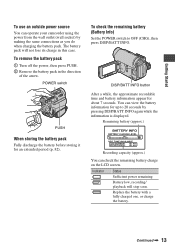
...POWER switch to 20 seconds by making the same connections as you do when charging the battery pack. Continued , 13 Getting Started To use an outside power source You can operate your camcorder using the power from the wall outlet (wall socket) by pressing DISP/BATT INFO again ...while the information is displayed. Remaining battery (approx.) 60 65 Recording capacity (approx.) You can check the remaining battery charge on the LCD screen. To ...
...POWER switch to 20 seconds by making the same connections as you do when charging the battery pack. Continued , 13 Getting Started To use an outside power source You can operate your camcorder using the power from the wall outlet (wall socket) by pressing DISP/BATT INFO again ...while the information is displayed. Remaining battery (approx.) 60 65 Recording capacity (approx.) You can check the remaining battery charge on the LCD screen. To ...
Operating Guide
Page 14
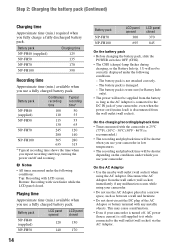
...Adaptor is connected to the DC IN jack of the AC Adaptor or battery terminal with any malfunction occurs while using the AC Adaptor. This may cause a malfunction. • Even if your camcorder. • Do not use your camcorder in a narrow space, such as between a wall and furniture. &#.... On the AC Adaptor • Use the nearby wall outlet (wall socket) when using your camcorder is disconnected from the wall outlet (wall socket) immediately if any metallic objects. Battery pack Charging time NP-FH40 (supplied) 125 NP-FH50 135 NP-FH70 170 NP-FH100 390 Recording...
...Adaptor is connected to the DC IN jack of the AC Adaptor or battery terminal with any malfunction occurs while using the AC Adaptor. This may cause a malfunction. • Even if your camcorder. • Do not use your camcorder in a narrow space, such as between a wall and furniture. &#.... On the AC Adaptor • Use the nearby wall outlet (wall socket) when using your camcorder is disconnected from the wall outlet (wall socket) immediately if any metallic objects. Battery pack Charging time NP-FH40 (supplied) 125 NP-FH50 135 NP-FH70 170 NP-FH100 390 Recording...
Operating Guide
Page 15
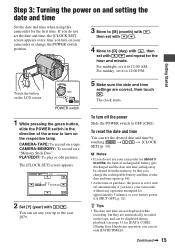
... then touch . POWER switch 1 While pressing the green button, slide the POWER switch in rechargeable battery gets discharged and the date and time settings may be displayed during playback (see page 51 for ...for [DATA CODE] (During Easy Handycam operation, you do not set the date and time, the [CLOCK SET] screen appears every time you leave your camcorder without any year up to the year... Set the date and time when using this camcorder for the hour and minute. The [CLOCK SET] screen appears. In that case, charge the rechargeable battery and then set the date and time again...
... then touch . POWER switch 1 While pressing the green button, slide the POWER switch in rechargeable battery gets discharged and the date and time settings may be displayed during playback (see page 51 for ...for [DATA CODE] (During Easy Handycam operation, you do not set the date and time, the [CLOCK SET] screen appears every time you leave your camcorder without any year up to the year... Set the date and time when using this camcorder for the hour and minute. The [CLOCK SET] screen appears. In that case, charge the rechargeable battery and then set the date and time again...

Operating Guide
Page 17
... angle to record or play (2). 180 degrees (max.) 2 DISP/BATT INFO 2 90 degrees (max.) 1 90 degrees to toggle the screen indicators (such as Battery Info) on the LCD screen is poor. This is clear. Step 4: Making setting adjustments before recording Opening the lens cover Slide the LENS COVER switch... can close the lens cover. z Tips • You can adjust the brightness of the LCD screen. • Press DISP/BATT INFO to the camcorder b Notes • Do not press the buttons below the LCD frame accidentally when you can view pictures using the viewfinder to adjust the brightness of...
... angle to record or play (2). 180 degrees (max.) 2 DISP/BATT INFO 2 90 degrees (max.) 1 90 degrees to toggle the screen indicators (such as Battery Info) on the LCD screen is poor. This is clear. Step 4: Making setting adjustments before recording Opening the lens cover Slide the LENS COVER switch... can close the lens cover. z Tips • You can adjust the brightness of the LCD screen. • Press DISP/BATT INFO to the camcorder b Notes • Do not press the buttons below the LCD frame accidentally when you can view pictures using the viewfinder to adjust the brightness of...

Operating Guide
Page 19
... that the "Memory Stick Duo" does not pop out and drop. Do not shake or knock your camcorder is lit or flashing, your camcorder, turn the power off, eject the "Memory Stick Duo," or remove the battery pack. Getting Started 2 Insert the "Memory Stick Duo" into the slot in once and slide out...
... that the "Memory Stick Duo" does not pop out and drop. Do not shake or knock your camcorder is lit or flashing, your camcorder, turn the power off, eject the "Memory Stick Duo," or remove the battery pack. Getting Started 2 Insert the "Memory Stick Duo" into the slot in once and slide out...
Operating Guide
Page 39
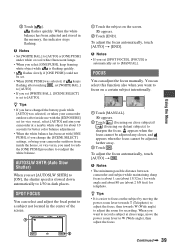
...wide angle and about 80 cm (about 13/32 in dark places. When you set . • When [ONE PUSH] was selected, or taken your camcorder at close subjects)/ (focusing on the subject by moving the power zoom lever towards T (Telephoto) to adjust the focus, then towards W (Wide angle) ..., touch [AUTO] t [END]. z Tips • If you have changed the battery pack while [AUTO] was selected, if keeps flashing after inside the house, or vice versa, you change the [SCENE SELECT] settings, or bring your camcorder outdoors from inside use with the [EXPOSURE] set (or vice versa), select [AUTO...
...wide angle and about 80 cm (about 13/32 in dark places. When you set . • When [ONE PUSH] was selected, or taken your camcorder at close subjects)/ (focusing on the subject by moving the power zoom lever towards T (Telephoto) to adjust the focus, then towards W (Wide angle) ..., touch [AUTO] t [END]. z Tips • If you have changed the battery pack while [AUTO] was selected, if keeps flashing after inside the house, or vice versa, you change the [SCENE SELECT] settings, or bring your camcorder outdoors from inside use with the [EXPOSURE] set (or vice versa), select [AUTO...
Operating Guide
Page 47
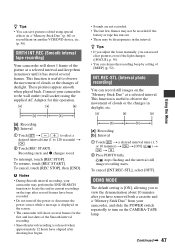
... Adaptor for this operation. • Sounds are not recorded. • The last few frames may not be recorded if the battery or tape has run out. • There may be discrepancies in current recordings on the tape after several frames have removed both... the Menu [a]: Recording [b]: Interval 1 Touch t / to select a desired interval time (1 to red. b Notes • During Smooth interval recording, your camcorder, and slide the POWER switch repeatedly to view the demonstration about 10 minutes after shooting has begun. [a]: Recording [b]: Interval 1 Touch t a desired interval time ...
... Adaptor for this operation. • Sounds are not recorded. • The last few frames may not be recorded if the battery or tape has run out. • There may be discrepancies in current recordings on the tape after several frames have removed both... the Menu [a]: Recording [b]: Interval 1 Touch t / to select a desired interval time (1 to red. b Notes • During Smooth interval recording, your camcorder, and slide the POWER switch repeatedly to view the demonstration about 10 minutes after shooting has begun. [a]: Recording [b]: Interval 1 Touch t a desired interval time ...
Operating Guide
Page 51
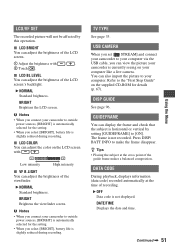
...supplied CD-ROM for the setting. • When you select [BRIGHT], battery life is horizontal or vertical by this operation. B NORMAL Standard brightness. GUIDEFRAME You can also import the picture to your camcorder to outside power sources, [BRIGHT] is automatically selected for the setting.... the LCD screen. Low intensity High intensity x VF B.LIGHT You can view the picture your camcorder is currently seeing on your computer via the USB cable, you select [BRIGHT], battery life is automatically selected for details (p. 67). DISP GUIDE See page 96. Refer to make the...
...supplied CD-ROM for the setting. • When you select [BRIGHT], battery life is horizontal or vertical by this operation. B NORMAL Standard brightness. GUIDEFRAME You can also import the picture to your camcorder to outside power sources, [BRIGHT] is automatically selected for the setting.... the LCD screen. Low intensity High intensity x VF B.LIGHT You can view the picture your camcorder is currently seeing on your computer via the USB cable, you select [BRIGHT], battery life is automatically selected for details (p. 67). DISP GUIDE See page 96. Refer to make the...
Operating Guide
Page 68
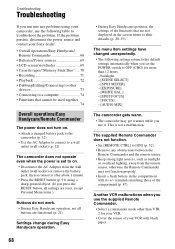
... [SPOT FOCUS] - [FOCUS] - [AUDIO MIX] The camcorder gets warm. • The camcorder may not function properly. • Insert a fresh battery in the compartment with black paper. 68 Settings change during Easy Handycam operation. • During Easy Handycam operation, the settings of the compartment (p. 87). The menu ... it after about 1 minute. • Press the RESET button (p. 91) using your Sony dealer. • Overall operations/Easy Handycam/ Remote Commander 68 • Batteries/Power sources 69 • LCD screen/viewfinder 69 • Cassette tapes/"Memory Stick Duo"........
... [SPOT FOCUS] - [FOCUS] - [AUDIO MIX] The camcorder gets warm. • The camcorder may not function properly. • Insert a fresh battery in the compartment with black paper. 68 Settings change during Easy Handycam operation. • During Easy Handycam operation, the settings of the compartment (p. 87). The menu ... it after about 1 minute. • Press the RESET button (p. 91) using your Sony dealer. • Overall operations/Easy Handycam/ Remote Commander 68 • Batteries/Power sources 69 • LCD screen/viewfinder 69 • Cassette tapes/"Memory Stick Duo"........
Operating Guide
Page 69
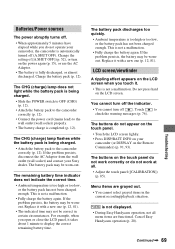
...switch to OFF (CHG) (p. 12). • Attach the battery pack to the camcorder correctly (p. 12). • Connect the power cord (mains lead) to the camcorder correctly (p. 12). The CHG (charge) lamp flashes while the battery pack is not displayed. • During Easy Handycam operation, not all . • Adjust the touch panel ([CALIBRATION.... If the problem persists, disconnect the AC Adaptor from the wall outlet (wall socket) and contact your Sony dealer. The battery pack may not be worn-out. Replace it takes about 1 minute to check the warning messages (p. 76). You cannot turn off ...
...switch to OFF (CHG) (p. 12). • Attach the battery pack to the camcorder correctly (p. 12). • Connect the power cord (mains lead) to the camcorder correctly (p. 12). The CHG (charge) lamp flashes while the battery pack is not displayed. • During Easy Handycam operation, not all . • Adjust the touch panel ([CALIBRATION.... If the problem persists, disconnect the AC Adaptor from the wall outlet (wall socket) and contact your Sony dealer. The battery pack may not be worn-out. Replace it takes about 1 minute to check the warning messages (p. 76). You cannot turn off ...
Operating Guide
Page 70
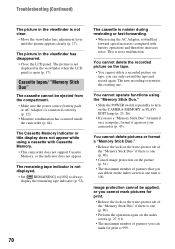
...delete on the index screen at one . Image protection cannot be ejected from the compartment. • Make sure the power source (battery pack or AC Adaptor) is not displayed in the viewfinder has disappeared. • Close the LCD panel. The Cassette Memory indicator or... title display does not appear while using a cassette with battery operation) and therefore increases noise. The picture is connected correctly (p. 12). • Moisture condensation has occurred inside the camcorder (p. 84). You cannot delete the recorded picture on the tape. • ...
...delete on the index screen at one . Image protection cannot be ejected from the compartment. • Make sure the power source (battery pack or AC Adaptor) is not displayed in the viewfinder has disappeared. • Close the LCD panel. The Cassette Memory indicator or... title display does not appear while using a cassette with battery operation) and therefore increases noise. The picture is connected correctly (p. 12). • Moisture condensation has occurred inside the camcorder (p. 84). You cannot delete the recorded picture on the tape. • ...
Operating Guide
Page 75
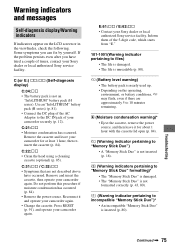
... described above have tried a couple of times, contact your camcorder securely (p. 12). Remove and insert the cassette, then operate your Sony dealer or local authorized Sony service facility. Remove the cassette and leave your camcorder again. C:(or E:) ss:ss (Self-diagnosis display) C:04:ss • The battery pack is unreadable (p. 80). Reconnect it for at...
... described above have tried a couple of times, contact your camcorder securely (p. 12). Remove and insert the cassette, then operate your Sony dealer or local authorized Sony service facility. Remove the cassette and leave your camcorder again. C:(or E:) ss:ss (Self-diagnosis display) C:04:ss • The battery pack is unreadable (p. 80). Reconnect it for at...


