
Camera Operations Guide
Page 1
Camera Operations Guide [US] 2-055-844-12(1) Camera Operations Guide Read this first Digital Video Camera Recorder DCR-HC1000 © 2004 Sony Corporation
Camera Operations Guide [US] 2-055-844-12(1) Camera Operations Guide Read this first Digital Video Camera Recorder DCR-HC1000 © 2004 Sony Corporation

Camera Operations Guide
Page 3
... determined by one or more of the following measures: - Be careful when placing the camera near a window or outdoors. • Do not aim at dusk. ,continued 3 ... on the type of "Memory Stick" you call upon your Sony dealer regarding this equipment does cause harmful interference to radio or .... - Take pictures of the sun only in a particular installation. DCR-HC Serial No. These limits are marked with the limits for help...viewfinder. Doing so might cause your camcorder. Owner's Record The model and serial numbers are operational for a digital device pursuant to Subpart B of...
... determined by one or more of the following measures: - Be careful when placing the camera near a window or outdoors. • Do not aim at dusk. ,continued 3 ... on the type of "Memory Stick" you call upon your Sony dealer regarding this equipment does cause harmful interference to radio or .... - Take pictures of the sun only in a particular installation. DCR-HC Serial No. These limits are marked with the limits for help...viewfinder. Doing so might cause your camcorder. Owner's Record The model and serial numbers are operational for a digital device pursuant to Subpart B of...

Camera Operations Guide
Page 4
...the buttons displayed on -screen displays in each local language are used on this manual are using this may cause a malfunction of your camcorder. Battery compartment lid • Do not rotate the Multi-Angle Grip forcefully or subject it . Notes on using the touch panel, place...used in illustrating the operating procedures. Note on connecting other device Before connecting your camcorder to other device such as shown in the following parts. Change the screen language before using a digital still camera, and thus may appear different from what you insert the connector plug forcibly ...
...the buttons displayed on -screen displays in each local language are used on this manual are using this may cause a malfunction of your camcorder. Battery compartment lid • Do not rotate the Multi-Angle Grip forcefully or subject it . Notes on using the touch panel, place...used in illustrating the operating procedures. Note on connecting other device Before connecting your camcorder to other device such as shown in the following parts. Change the screen language before using a digital still camera, and thus may appear different from what you insert the connector plug forcibly ...

Camera Operations Guide
Page 6
...in various modes from a "Memory Stick Duo 48 Various playback functions 49 Magnifying pictures - Title search 52 Searching for a desired scene - Digital effect 38 Overlaying still images on movies on a tape for playback 52 Searching quickly for a scene by date of the most recently recorded...in and out of a scene - Tape playback zoom/Memory playback zoom 49 Displaying the screen indicators 50 Displaying the date/time and camera settings data - SPOT FOCUS 35 Adjusting the focus manually 36 Recording a picture using Cassette Memory - Date search 53 6 Adjusting the...
...in various modes from a "Memory Stick Duo 48 Various playback functions 49 Magnifying pictures - Title search 52 Searching for a desired scene - Digital effect 38 Overlaying still images on movies on a tape for playback 52 Searching quickly for a scene by date of the most recently recorded...in and out of a scene - Tape playback zoom/Memory playback zoom 49 Displaying the screen indicators 50 Displaying the date/time and camera settings data - SPOT FOCUS 35 Adjusting the focus manually 36 Recording a picture using Cassette Memory - Date search 53 6 Adjusting the...

Camera Operations Guide
Page 7
... Using the (STANDARD SET) menu - APPLI.) menu - REC-STL, etc 67 Using the (EDIT/PLAY) menu - Digital program editing 91 Dubbing sound to other operating instructions supplied with your camcorder: • Editing images with your camcorder abroad ..........119 Usable cassette tapes 120 About the "Memory Stick 121 About the "InfoLITHIUM" battery pack 123..." to a tape 90 Dubbing selected scenes from a tape - Advanced operations Using the Menu Selecting menu items 54 Using the AUTO LOCK switch ...........55 Using the (CAMERA SET) menu -
... Using the (STANDARD SET) menu - APPLI.) menu - REC-STL, etc 67 Using the (EDIT/PLAY) menu - Digital program editing 91 Dubbing sound to other operating instructions supplied with your camcorder: • Editing images with your camcorder abroad ..........119 Usable cassette tapes 120 About the "Memory Stick 121 About the "InfoLITHIUM" battery pack 123..." to a tape 90 Dubbing selected scenes from a tape - Advanced operations Using the Menu Selecting menu items 54 Using the AUTO LOCK switch ...........55 Using the (CAMERA SET) menu -

Camera Operations Guide
Page 9
... pressing the green button, slide the POWER switch down to (CHG) OFF. a Slide the POWER switch repeatedly until the PLAY/EDIT lamp lights up the CAMERA-TAPE lamp. b Touch (rewind). c Touch (play) to standby mode, press REC START/STOP again. To stop, press . a Remove the lens cap. To change to start...
... pressing the green button, slide the POWER switch down to (CHG) OFF. a Slide the POWER switch repeatedly until the PLAY/EDIT lamp lights up the CAMERA-TAPE lamp. b Touch (rewind). c Touch (play) to standby mode, press REC START/STOP again. To stop, press . a Remove the lens cap. To change to start...

Camera Operations Guide
Page 11
... up . The power turns on the LCD screen. A shutter sound is heard and the still image is adjusted. a Slide the POWER switch repeatedly until the CAMERA-MEMORY lamp lights up to view images in the default setting. A short beep sound is heard when the focus is recorded. 4 View the recorded picture...
... up . The power turns on the LCD screen. A shutter sound is heard and the still image is adjusted. a Slide the POWER switch repeatedly until the CAMERA-MEMORY lamp lights up to view images in the default setting. A short beep sound is heard when the focus is recorded. 4 View the recorded picture...
Camera Operations Guide
Page 12
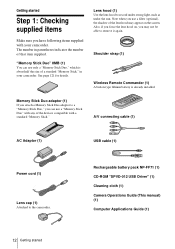
... (optional), the shadow of a standard "Memory Stick," in parentheses indicates the number of the devices compatible with your camcorder. The number in your camcorder. Shoulder strap (1) Wireless Remote Commander (1) A button-type lithium battery is about half the size of the lens hood...Memory Stick Duo adaptor to remove it again. Rechargeable battery pack NP-FF71 (1) CD-ROM "SPVD-012 USB Driver" (1) Cleaning cloth (1) Camera Operations Guide (This manual) (1) Computer Applications Guide (1) 12 Getting started Step 1: Checking supplied items Make sure you can use a "Memory...
... (optional), the shadow of a standard "Memory Stick," in parentheses indicates the number of the devices compatible with your camcorder. The number in your camcorder. Shoulder strap (1) Wireless Remote Commander (1) A button-type lithium battery is about half the size of the lens hood...Memory Stick Duo adaptor to remove it again. Rechargeable battery pack NP-FF71 (1) CD-ROM "SPVD-012 USB Driver" (1) Cleaning cloth (1) Camera Operations Guide (This manual) (1) Computer Applications Guide (1) 12 Getting started Step 1: Checking supplied items Make sure you can use a "Memory...

Camera Operations Guide
Page 16
... and the subject, you cannot find it to the camcorder, then rotate it , touch 16 Getting started When using this camcorder for the desired power mode lights up to meet various recording situations. Maximum 180 degrees • CAMERA-TAPE mode: To record on a tape. • CAMERA-MEMORY mode: To record on a "Memory Stick Duo...
... and the subject, you cannot find it to the camcorder, then rotate it , touch 16 Getting started When using this camcorder for the desired power mode lights up to meet various recording situations. Maximum 180 degrees • CAMERA-TAPE mode: To record on a tape. • CAMERA-MEMORY mode: To record on a "Memory Stick Duo...

Camera Operations Guide
Page 17
...You can view images using the viewfinder when you can adjust the brightness by setting [BEEP] in the viewfinder. [EXPOSURE], etc. To use your camcorder in the CAMERA- To hide the buttons on the screen. 4 Touch [YES]. are using the battery pack, p. 78). TAPE mode). • : The LCD...started 17 z Tip • If you want to set. • [EXPOSURE]: Adjust with / and touch . • [FADER]: Touch it repeatedly to CAMERA-TAPE or CAMERA-MEMORY (p. 16). 2 Close the LCD panel with / , then touch . Use the viewfinder when the battery is running out, or when the screen is...
...You can view images using the viewfinder when you can adjust the brightness by setting [BEEP] in the viewfinder. [EXPOSURE], etc. To use your camcorder in the CAMERA- To hide the buttons on the screen. 4 Touch [YES]. are using the battery pack, p. 78). TAPE mode). • : The LCD...started 17 z Tip • If you want to set. • [EXPOSURE]: Adjust with / and touch . • [FADER]: Touch it repeatedly to CAMERA-TAPE or CAMERA-MEMORY (p. 16). 2 Close the LCD panel with / , then touch . Use the viewfinder when the battery is running out, or when the screen is...

Camera Operations Guide
Page 18
CAMERA SET PROGRAM AE SPOT METER EXPOSURE OK 5 Select (TIME/LANGU.) with / , then touch . DISPLAY MENU ROTATE A. CLOCK SET -:--:-- The ...time, the [CLOCK SET] screen appears every time you do not use your camcorder (p. 16). 2 Press OPEN and open the LCD panel. OPEN POWER switch 1 Turn on your camcorder. If you turn on your camcorder for the first time. SHUT OFF CLOCK SET WORLD --:--:-- DATE 2004Y JAN M ...any year up to 12:00AM. Step 5: Setting the date and time Set the date and time when using this camcorder for about 3 months, the built-in step 7, then touch .
CAMERA SET PROGRAM AE SPOT METER EXPOSURE OK 5 Select (TIME/LANGU.) with / , then touch . DISPLAY MENU ROTATE A. CLOCK SET -:--:-- The ...time, the [CLOCK SET] screen appears every time you do not use your camcorder (p. 16). 2 Press OPEN and open the LCD panel. OPEN POWER switch 1 Turn on your camcorder. If you turn on your camcorder for the first time. SHUT OFF CLOCK SET WORLD --:--:-- DATE 2004Y JAN M ...any year up to 12:00AM. Step 5: Setting the date and time Set the date and time when using this camcorder for about 3 months, the built-in step 7, then touch .

Camera Operations Guide
Page 22
... lamp lights up, and the currently selected recording folder appears on a tape Slide the POWER switch until the CAMERA-TAPE lamp lights up, and your camcorder is finished, then [YES]. To delete the movie, touch after playback is set to the (CHG) OFF position. 22 Recording To turn ..."Memory Stick Duo," the movie will be recorded with stereo sound. Playback starts automatically. When you are recording on the LCD screen and the Camera recording lamp lights up to the standby mode. To check the most recently recorded MPEG movie - Recording Recording movies You can record movies on a...
... lamp lights up, and the currently selected recording folder appears on a tape Slide the POWER switch until the CAMERA-TAPE lamp lights up, and your camcorder is finished, then [YES]. To delete the movie, touch after playback is set to the (CHG) OFF position. 22 Recording To turn ..."Memory Stick Duo," the movie will be recorded with stereo sound. Playback starts automatically. When you are recording on the LCD screen and the Camera recording lamp lights up to the standby mode. To check the most recently recorded MPEG movie - Recording Recording movies You can record movies on a...

Camera Operations Guide
Page 23
... correct depending on the environment of use . Indicators displayed during recording on a tape The indicators will not be displayed during recording. Date/time and the camera settings data (p. 50) will not be displayed during recording. 60min REC 101 0:00:00 320 2min 60min REC 0:00:00 60min P-MENU Recording P-MENU A ...will be correct depending on the environment of use . Date/time (p. 50) will not be recorded on the tape. When you do not operate the camcorder for Cassette Memory cassettes B Remaining battery The indicated time may not be recorded on the "Memory Stick Duo."
... correct depending on the environment of use . Indicators displayed during recording on a tape The indicators will not be displayed during recording. Date/time and the camera settings data (p. 50) will not be displayed during recording. 60min REC 101 0:00:00 320 2min 60min REC 0:00:00 60min P-MENU Recording P-MENU A ...will be correct depending on the environment of use . Date/time (p. 50) will not be recorded on the tape. When you do not operate the camcorder for Cassette Memory cassettes B Remaining battery The indicated time may not be recorded on the "Memory Stick Duo."

Camera Operations Guide
Page 24
... a sharp focus in SP mode and LP mode on the image size and the recording environment. Do not record pictures in that point activate the digital zoom ([DIGITAL ZOOM], p. 61). The length of time you can record on a "Memory Stick Duo" varies depending on the same tape. - Occasional use of the zoom...:20 00:10:40 00:21:20 00:42:40 01:25:20 02:50:40 05:41:20 When the CAMERA-TAPE mode is useful when you can view this camcorder. A tape recorded in the LP mode. • See "To record for a longer time on a "Memory Stick Duo"" (p. 24) for the...
... a sharp focus in SP mode and LP mode on the image size and the recording environment. Do not record pictures in that point activate the digital zoom ([DIGITAL ZOOM], p. 61). The length of time you can record on a "Memory Stick Duo" varies depending on the same tape. - Occasional use of the zoom...:20 00:10:40 00:21:20 00:42:40 01:25:20 02:50:40 05:41:20 When the CAMERA-TAPE mode is useful when you can view this camcorder. A tape recorded in the LP mode. • See "To record for a longer time on a "Memory Stick Duo"" (p. 24) for the...

Camera Operations Guide
Page 26
... the count down for about 10 seconds. If you can start recording after a delay of about 10 seconds (The count down indication begins from the (CAMERA SET) menu (p. 56). 60min STBY SELF-TIMER: OFF 0:00:00 OFF ON 3 Touch [ON], then . appears. 60min STBY 0:00:00 P-MENU 26 Recording To stop...
... the count down for about 10 seconds. If you can start recording after a delay of about 10 seconds (The count down indication begins from the (CAMERA SET) menu (p. 56). 60min STBY SELF-TIMER: OFF 0:00:00 OFF ON 3 Touch [ON], then . appears. 60min STBY 0:00:00 P-MENU 26 Recording To stop...

Camera Operations Guide
Page 27
... a DVD, refer to the supplied "Computer applications Guide." appears on your camcorder. If the [AUDIO MODE] has been set to [16BIT], it automatically switches to your home theater system with Sony VAIO series personal computers is recorded in 5.1ch surround sound format. •...computer using an optional microphone and a Sony VAIO series personal computer. Recording 27 Recording Enhanced sound recording - 4CH MIC REC You can enjoy 5.1ch surround sound playback by following the procedure below using "Click to select the CAMERA-TAPE mode. Recording Attach the optional...
... a DVD, refer to the supplied "Computer applications Guide." appears on your camcorder. If the [AUDIO MODE] has been set to [16BIT], it automatically switches to your home theater system with Sony VAIO series personal computers is recorded in 5.1ch surround sound format. •...computer using an optional microphone and a Sony VAIO series personal computer. Recording 27 Recording Enhanced sound recording - 4CH MIC REC You can enjoy 5.1ch surround sound playback by following the procedure below using "Click to select the CAMERA-TAPE mode. Recording Attach the optional...

Camera Operations Guide
Page 29
... hear a light beeping sound when the focus and brightness settings are adjusted. A shutter sound is displayed. OPEN PHOTO 3 Slide the POWER switch repeatedly until the CAMERA-MEMORY lamp lights up. To delete the image, touch , then [YES]. Slide the POWER switch while pressing the green button. The number of images that...
... hear a light beeping sound when the focus and brightness settings are adjusted. A shutter sound is displayed. OPEN PHOTO 3 Slide the POWER switch repeatedly until the CAMERA-MEMORY lamp lights up. To delete the image, touch , then [YES]. Slide the POWER switch while pressing the green button. The number of images that...

Camera Operations Guide
Page 30
... the screen (p. 50). • The recording angle is recorded. • The recording time, date, and the camera settings data are recorded automatically on the recording media without being displayed on your camcorder. The number of pictures you press PHOTO on the screen. Refer to the following list for the approximate..."Memory Stick Duo" formatted on your Remote Commander, the image displayed on the quality/size of 640 × 480 is 500kB, that of the CAMERA-TAPE mode. Selecting image quality or size Select the (MEMORY SET) menu, [STILL SET], then [ QUALITY] or [ IMAGE SIZE] (p. 64).
... the screen (p. 50). • The recording angle is recorded. • The recording time, date, and the camera settings data are recorded automatically on the recording media without being displayed on your camcorder. The number of pictures you press PHOTO on the screen. Refer to the following list for the approximate..."Memory Stick Duo" formatted on your Remote Commander, the image displayed on the quality/size of 640 × 480 is 500kB, that of the CAMERA-TAPE mode. Selecting image quality or size Select the (MEMORY SET) menu, [STILL SET], then [ QUALITY] or [ IMAGE SIZE] (p. 64).

Camera Operations Guide
Page 31
... the flash lamp open.) • The flash will not work during the following order. Your camcorder is set to auto flashing by default, so according to the lighting conditions, the flash may ...flash charge indicator flickers while charging, and remains lit when the battery charge is complete. (In the CAMERA-TAPE mode, it takes a while to fully charge the flash lamp since it . The available settings... vary according to what you do not want to use the flash at all. Digital effect - Follow the steps below when you always want to use the flash, or when you selected...
... the flash lamp open.) • The flash will not work during the following order. Your camcorder is set to auto flashing by default, so according to the lighting conditions, the flash may ...flash charge indicator flickers while charging, and remains lit when the battery charge is complete. (In the CAMERA-TAPE mode, it takes a while to fully charge the flash lamp since it . The available settings... vary according to what you do not want to use the flash at all. Digital effect - Follow the steps below when you always want to use the flash, or when you selected...

Camera Operations Guide
Page 32
To adjust it manually, select [FLASH LEVEL] of [FLASH SET] in the (CAMERA SET) menu (p. 60). • When the focus is not displayed on the "Memory Stick Duo." You will not work during the following operations: - [SPOTLIGHT], [SUNSET&... distance information. PHOTO PHOTO [MENU] and select it , touch 32 Recording When bars of [PROGRAM AE] - To cancel the count down indication begins from the (CAMERA SET) menu. 60min 1152 FINE 30 SELF-TIMER: OFF OFF ON 3 Touch [ON], then . The image is recorded on the screen, touch / . Flexible spot meter...
To adjust it manually, select [FLASH LEVEL] of [FLASH SET] in the (CAMERA SET) menu (p. 60). • When the focus is not displayed on the "Memory Stick Duo." You will not work during the following operations: - [SPOTLIGHT], [SUNSET&... distance information. PHOTO PHOTO [MENU] and select it , touch 32 Recording When bars of [PROGRAM AE] - To cancel the count down indication begins from the (CAMERA SET) menu. 60min 1152 FINE 30 SELF-TIMER: OFF OFF ON 3 Touch [ON], then . The image is recorded on the screen, touch / . Flexible spot meter...


