
Camera Operations Guide
Page 23
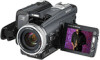
A Recording folder B Remaining battery The indicated time may not be correct depending on the environment of use . When you do not operate the camcorder for more than about 1 minute to display the correct remaining battery time. C Recording status ([REC] (recording)) D Movie size E Recorded time (hour: minute: second...battery time. Indicators displayed during recording on a tape The indicators will be those with an external flash (optional) connected to the accessory shoe, turn off the power of the external flash to prevent charging noise being recorded. ,continued Recording 23
A Recording folder B Remaining battery The indicated time may not be correct depending on the environment of use . When you do not operate the camcorder for more than about 1 minute to display the correct remaining battery time. C Recording status ([REC] (recording)) D Movie size E Recorded time (hour: minute: second...battery time. Indicators displayed during recording on a tape The indicators will be those with an external flash (optional) connected to the accessory shoe, turn off the power of the external flash to prevent charging noise being recorded. ,continued Recording 23

Camera Operations Guide
Page 32
.... • You cannot use an external flash (optional) and the built-in flash at the same time. • When using a video light with the intelligent accessory shoe, the built-in flash does not function. You will not work during the following operations: - [SPOTLIGHT], [SUNSET&MOON], and [LANDSCAPE] of disappear, the image...
.... • You cannot use an external flash (optional) and the built-in flash at the same time. • When using a video light with the intelligent accessory shoe, the built-in flash does not function. You will not work during the following operations: - [SPOTLIGHT], [SUNSET&MOON], and [LANDSCAPE] of disappear, the image...

Camera Operations Guide
Page 98
... Connecting a microphone (optional) to the MIC FRONT jack. (A) • Connecting a microphone (optional) to the Intelligent accessory shoe. (B) • Connecting an audio device to your camcorder is recorded in the LP mode. - When the tape is connected via the i.LINK cable. - On sections of ...MIC jack t Intelligent accessory shoe t A/V jack t internal microphone. Internal microphone AMIC (PLUG IN POWER) FRONT jack Microphone (...
... Connecting a microphone (optional) to the MIC FRONT jack. (A) • Connecting a microphone (optional) to the Intelligent accessory shoe. (B) • Connecting an audio device to your camcorder is recorded in the LP mode. - When the tape is connected via the i.LINK cable. - On sections of ...MIC jack t Intelligent accessory shoe t A/V jack t internal microphone. Internal microphone AMIC (PLUG IN POWER) FRONT jack Microphone (...

Camera Operations Guide
Page 126
...immediately. • If the battery electrolytic liquid has leaked, - They may occur. - Noise may malfunction or become deformed. - If your local authorized Sony service facility. - type battery out of the lens. • Keep the POWER switch setting to the head drum and be repaired. - if any ... condenses on DC 7.2 V (battery pack) or DC 8.4 V (AC Adaptor). • For DC or AC operation, use or store the camcorder and accessories in your camcorder, it run such as under direct sunlight, near heaters or in a car parked in these operating instructions. • Do not let your...
...immediately. • If the battery electrolytic liquid has leaked, - They may occur. - Noise may malfunction or become deformed. - If your local authorized Sony service facility. - type battery out of the lens. • Keep the POWER switch setting to the head drum and be repaired. - if any ... condenses on DC 7.2 V (battery pack) or DC 8.4 V (AC Adaptor). • For DC or AC operation, use or store the camcorder and accessories in your camcorder, it run such as under direct sunlight, near heaters or in a car parked in these operating instructions. • Do not let your...

Camera Operations Guide
Page 130
... (approx.) 780 g (1 lb 11 oz) main unit only 890 g (1 lb 15 oz) including the NP-FF71 rechargeable battery pack, DVM60 cassette and lens cap. Supplied accessories See page 12. AC Adaptor AC-L25A/L25B Power requirements AC 100 - 240 V, 50/60 Hz Current consumption 0.35 - 0.18 A Power consumption 18 W Output voltage...
... (approx.) 780 g (1 lb 11 oz) main unit only 890 g (1 lb 15 oz) including the NP-FF71 rechargeable battery pack, DVM60 cassette and lens cap. Supplied accessories See page 12. AC Adaptor AC-L25A/L25B Power requirements AC 100 - 240 V, 50/60 Hz Current consumption 0.35 - 0.18 A Power consumption 18 W Output voltage...

Camera Operations Guide
Page 133
...F Battery compartment lid (p. 13) G RESET button If you operate the POWER switch on or off as a video light or microphone. • The accessory can be turned on your camcorder. K (USB) jack L DV Interface M A/V (audio/video) jack N DC IN jack (p. 13) O DC IN jack cover ,continued Quick Reference... 133 Quick Reference To remove an accessory, loosen the screw, and then press down and push it . H PHOTO button (p. 29) I Power zoom lever 9 q;...
...F Battery compartment lid (p. 13) G RESET button If you operate the POWER switch on or off as a video light or microphone. • The accessory can be turned on your camcorder. K (USB) jack L DV Interface M A/V (audio/video) jack N DC IN jack (p. 13) O DC IN jack cover ,continued Quick Reference... 133 Quick Reference To remove an accessory, loosen the screw, and then press down and push it . H PHOTO button (p. 29) I Power zoom lever 9 q;...

Camera Operations Guide
Page 139
... Quick Reference Image quality (QUALITY) ..........30, 64 Image size (IMAGE SIZE)......30, 64 Index screen 48 "InfoLITHIUM" battery pack 123 Infrared ray emitter 93 Intelligent accessory shoe 98, 133 Interval photo recording (INT. REC-STL) .........70 Interval recording (INTERVAL REC) .....69 J JPEG 121 L LANC 133 Language LANGUAGE.........21, 82 LCD back...
... Quick Reference Image quality (QUALITY) ..........30, 64 Image size (IMAGE SIZE)......30, 64 Index screen 48 "InfoLITHIUM" battery pack 123 Infrared ray emitter 93 Intelligent accessory shoe 98, 133 Interval photo recording (INT. REC-STL) .........70 Interval recording (INTERVAL REC) .....69 J JPEG 121 L LANC 133 Language LANGUAGE.........21, 82 LCD back...
Computer Applications Guide
Page 26
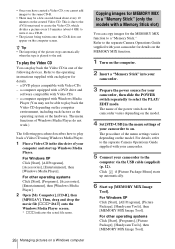
... following devices. For Windows XP Click [Start], [All Programs], [Picture Package], [Handycam Tools], then [MEMORY MIX Image Tool]. For other operating systems Click [Start], [Programs], [Picture Package], [Handycam Tools], then [MEMORY MIX Image Tool]. Then, drag and drop the movie file ...select the PLAY/ EDIT mode. For Windows XP Click [Start], [All Programs], [Accessories], [Entertainment], then [Windows Media Player]. z Tip • The importing of the power switch on the camcorder varies depending on the model. Refer to on. Click if [Picture Package Menu] starts...
... following devices. For Windows XP Click [Start], [All Programs], [Picture Package], [Handycam Tools], then [MEMORY MIX Image Tool]. For other operating systems Click [Start], [Programs], [Picture Package], [Handycam Tools], then [MEMORY MIX Image Tool]. Then, drag and drop the movie file ...select the PLAY/ EDIT mode. For Windows XP Click [Start], [All Programs], [Accessories], [Entertainment], then [Windows Media Player]. z Tip • The importing of the power switch on the camcorder varies depending on the model. Refer to on. Click if [Picture Package Menu] starts...

