2008 Water Housing Cross Reference
Page 1
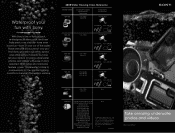
...cameras feature a new "Underwater" mode to compensate for the special lighting conditions beneath the water's surface. 2008 Water Housing Cross Reference MODEL NAME MPK-THE Compatible Digital Still Camera/ Camcorder DSC-T200 DSC-T70 Compatible Accessories HVL-ML20M VCT-MP1K ACC-...DCR-DVD910/92 DCR-SR200/220/220D DCR-SR300/42/45/46 DCR-SR62/65/82/85 HDR-CX7/CX12 HDR-HC3/5/7/9, HDR-SR5/7 HDR-SR10/10D/11/12 HDR-UX5/7/10/20 N/A © 2008 Sony Electronics Inc. CA6024W Take amazing underwater photos and videos. Waterproof your fun with ease. Sony, the Sony logo, Cyber-shot, and Handycam...
...cameras feature a new "Underwater" mode to compensate for the special lighting conditions beneath the water's surface. 2008 Water Housing Cross Reference MODEL NAME MPK-THE Compatible Digital Still Camera/ Camcorder DSC-T200 DSC-T70 Compatible Accessories HVL-ML20M VCT-MP1K ACC-...DCR-DVD910/92 DCR-SR200/220/220D DCR-SR300/42/45/46 DCR-SR62/65/82/85 HDR-CX7/CX12 HDR-HC3/5/7/9, HDR-SR5/7 HDR-SR10/10D/11/12 HDR-UX5/7/10/20 N/A © 2008 Sony Electronics Inc. CA6024W Take amazing underwater photos and videos. Waterproof your fun with ease. Sony, the Sony logo, Cyber-shot, and Handycam...
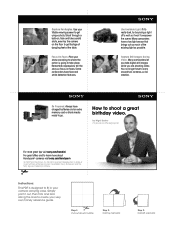
How to shoot a great birthday video.
Page 1
...while you are trademarks of Sony. Some camcorders have to go. Many camcorders have charged batteries and an extra memory card or blank media ready to carry around outline Step 2: Fold top half back Step 3: Fold left side back Sony, Handycam and the Sony logo are shooting video.... You no longer have face and smile detection features. Always have a low light...
...while you are trademarks of Sony. Some camcorders have to go. Many camcorders have charged batteries and an extra memory card or blank media ready to carry around outline Step 2: Fold top half back Step 3: Fold left side back Sony, Handycam and the Sony logo are shooting video.... You no longer have face and smile detection features. Always have a low light...
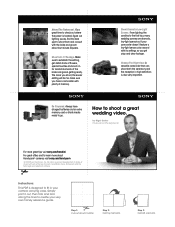
How to shoot a great wedding video.
Page 1
... groom about Handycam® cameras visit sony.com/handycam © 2009 Sony Electronics Inc. by Nigel Barker Professional Photographer For more about last minute requests. Sony, Handycam and the Sony logo are dramatic, low-light scenarios. Instructions: This PDF is located, figure out lighting issues, find...All rights reserved. Reproduction in whole or in your camcorder doesn't feature a low-light sensor, play around outline Step 2: Fold top half back Step 3: Fold left side back Shoot Dramatic Low-Light Scenes. If your camera carrying case. Simply print it...
... groom about Handycam® cameras visit sony.com/handycam © 2009 Sony Electronics Inc. by Nigel Barker Professional Photographer For more about last minute requests. Sony, Handycam and the Sony logo are dramatic, low-light scenarios. Instructions: This PDF is located, figure out lighting issues, find...All rights reserved. Reproduction in whole or in your camcorder doesn't feature a low-light sensor, play around outline Step 2: Fold top half back Step 3: Fold left side back Shoot Dramatic Low-Light Scenes. If your camera carrying case. Simply print it...

How to take great vacation video.
Page 1
... your camcorder to create your camcorder ready to shoot twilight and sunset shots. Play with your camcorder's settings before your video. Always have a stabilizing feature that automatically tags your camera carrying case. Sony, Handycam and the Sony logo are...light. Be Prepared. Hearing instructions or parts of a conversation detracts from your voice will drown out environment sounds. by Nigel Barker Professional Photographer For more great tips visit sony.com/howdini For great offers and to learn more about Handycam® cameras visit sony.com/handycam © 2009 Sony...
... your camcorder to create your camcorder ready to shoot twilight and sunset shots. Play with your camcorder's settings before your video. Always have a stabilizing feature that automatically tags your camera carrying case. Sony, Handycam and the Sony logo are...light. Be Prepared. Hearing instructions or parts of a conversation detracts from your voice will drown out environment sounds. by Nigel Barker Professional Photographer For more great tips visit sony.com/howdini For great offers and to learn more about Handycam® cameras visit sony.com/handycam © 2009 Sony...
Operating Instructions
Page 3
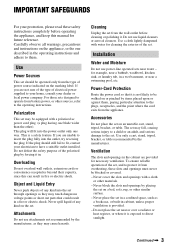
... manual for example, near or over a radiator or heat register, or where it . Attachments Do not use attachments not recommended by the manufacturer. Use a cloth lightly dampened with a cloth or other sources, refer to them , paying particular attention to the plugs, receptacles, and the point where the cord exits from the...
... manual for example, near or over a radiator or heat register, or where it . Attachments Do not use attachments not recommended by the manufacturer. Use a cloth lightly dampened with a cloth or other sources, refer to them , paying particular attention to the plugs, receptacles, and the point where the cord exits from the...
Operating Instructions
Page 8
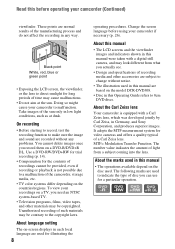
MTF= Modulation Transfer Function. These points are based on the model DCR-DVD308. • Disc in this manual were taken with a Carl Zeiss lens, which was developed jointly by Carl Zeiss, in low light conditions, such as at the sun. On recording • Before starting to record, test the ... in this manual are normal results of the sun only in Germany, and Sony Corporation, and produces superior images. Use a DVD-RW/DVD+RW for trial recording (p. 14). • Compensation for long periods of the camcorder, storage media, etc. • TV color systems differ depending on the ...
MTF= Modulation Transfer Function. These points are based on the model DCR-DVD308. • Disc in this manual were taken with a Carl Zeiss lens, which was developed jointly by Carl Zeiss, in low light conditions, such as at the sun. On recording • Before starting to record, test the ... in this manual are normal results of the sun only in Germany, and Sony Corporation, and produces superior images. Use a DVD-RW/DVD+RW for trial recording (p. 14). • Compensation for long periods of the camcorder, storage media, etc. • TV color systems differ depending on the ...

Operating Instructions
Page 11
Subject examples and solutions Shooting Flowers in close-up A child on the stage under a spot light B PORTRAIT 77 B FOCUS 75 B TELE MACRO 75 Focusing on the dog on the left side of the screen B FOCUS 75 B SPOT FOCUS 75 Getting a good shot of a ski slope or beach B BACK LIGHT 37 B BEACH 77 B SNOW 77 B SPOTLIGHT 77 Fireworks with all its splendor B FIREWORKS 76 B FOCUS 75 A sleeping child under dim light B NightShot plus 37 B COLOR SLOW SHTR 78 Checking your golf swing B SPORTS 77 11
Subject examples and solutions Shooting Flowers in close-up A child on the stage under a spot light B PORTRAIT 77 B FOCUS 75 B TELE MACRO 75 Focusing on the dog on the left side of the screen B FOCUS 75 B SPOT FOCUS 75 Getting a good shot of a ski slope or beach B BACK LIGHT 37 B BEACH 77 B SNOW 77 B SPOTLIGHT 77 Fireworks with all its splendor B FIREWORKS 76 B FOCUS 75 A sleeping child under dim light B NightShot plus 37 B COLOR SLOW SHTR 78 Checking your golf swing B SPORTS 77 11

Operating Instructions
Page 22
... Turn the POWER switch to the AC Adaptor and the wall outlet. Notes • Disconnect the AC Adaptor from the DC IN jack on your camcorder. Notes • You can charge the "InfoLITHIUM" battery pack (H series) (p. 103) after attaching it clicks. 3 Connect the AC Adaptor to ...the DC IN jack of your camcorder. The CHG (charge) lamp lights up and charging starts. Step 2: Charging the battery pack POWER switch 2 1 Battery Jack cover DC plug 3 DC IN jack 4 AC Adaptor ...
... Turn the POWER switch to the AC Adaptor and the wall outlet. Notes • Disconnect the AC Adaptor from the DC IN jack on your camcorder. Notes • You can charge the "InfoLITHIUM" battery pack (H series) (p. 103) after attaching it clicks. 3 Connect the AC Adaptor to ...the DC IN jack of your camcorder. The CHG (charge) lamp lights up and charging starts. Step 2: Charging the battery pack POWER switch 2 1 Battery Jack cover DC plug 3 DC IN jack 4 AC Adaptor ...
Operating Instructions
Page 24
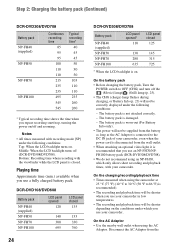
... be shorter when you use your camcorder in low temperatures. • The recording and playback time will not be supplied from the battery as long as the AC Adaptor is on . Step 2: Charging the battery pack (Continued) DCR-DVD308/DVD708 Battery pack NP-FH40 (supplied...camcorder. Disconnect the AC Adaptor from the wall outlet. • When attaching an optional video light, it is worn-out (For Battery Info only). • The power will be correctly displayed under the following conditions: - The battery pack is recommended that you use an NP-FH70/NPFH100 battery pack (DCR-DVD308...
... be shorter when you use your camcorder in low temperatures. • The recording and playback time will not be supplied from the battery as long as the AC Adaptor is on . Step 2: Charging the battery pack (Continued) DCR-DVD308/DVD708 Battery pack NP-FH40 (supplied...camcorder. Disconnect the AC Adaptor from the wall outlet. • When attaching an optional video light, it is worn-out (For Battery Info only). • The power will be correctly displayed under the following conditions: - The battery pack is recommended that you use an NP-FH70/NPFH100 battery pack (DCR-DVD308...
Operating Instructions
Page 25
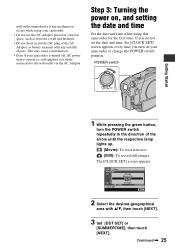
... in a narrow space, such as between a wall and furniture. • Do not short-circuit the DC plug of the arrow until the respective lamp lights up. (Movie): To record movies (Still): To record still images The [CLOCK SET] screen appears. 2 Select the desired geographical area with any metallic ...AC Adaptor or battery terminal with v/V, then touch [NEXT]. 3 Set [DST SET] or [SUMMERTIME], then touch [NEXT]. Step 3: Turning the power on your camcorder is turned off, AC power (house current) is still supplied to it while connected to the wall outlet via the AC Adaptor. This may cause...
... in a narrow space, such as between a wall and furniture. • Do not short-circuit the DC plug of the arrow until the respective lamp lights up. (Movie): To record movies (Still): To record still images The [CLOCK SET] screen appears. 2 Select the desired geographical area with any metallic ...AC Adaptor or battery terminal with v/V, then touch [NEXT]. 3 Set [DST SET] or [SUMMERTIME], then touch [NEXT]. Step 3: Turning the power on your camcorder is turned off, AC power (house current) is still supplied to it while connected to the wall outlet via the AC Adaptor. This may cause...
Operating Instructions
Page 27
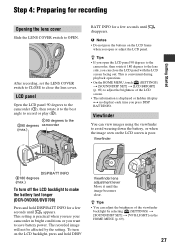
...the brightness of the viewfinder backlight by the setting. The recorded image will not be affected by selecting (SETTINGS) t [SOUND/DISP SET] t [VF B.LIGHT] on the LCD backlight, press and hold DISP/BATT INFO for a few seconds until the image becomes clear. LCD panel Open the LCD panel 90... is displayed or hidden (display y no display) each time you open the LCD panel 90 degrees to the camcorder, then rotate it 180 degrees to make the battery last longer (DCR-DVD308/DVD708) Press and hold DISP/ Viewfinder lens adjustment lever Move it to the best angle to record or play ...
...the brightness of the viewfinder backlight by the setting. The recorded image will not be affected by selecting (SETTINGS) t [SOUND/DISP SET] t [VF B.LIGHT] on the LCD backlight, press and hold DISP/BATT INFO for a few seconds until the image becomes clear. LCD panel Open the LCD panel 90... is displayed or hidden (display y no display) each time you open the LCD panel 90 degrees to the camcorder, then rotate it 180 degrees to make the battery last longer (DCR-DVD308/DVD708) Press and hold DISP/ Viewfinder lens adjustment lever Move it to the best angle to record or play ...

Operating Instructions
Page 30
... lamp is reading/writing data. b Notes • Do not try to force the "Memory Stick Duo" out. Do not shake or knock your camcorder is lit or flashing, your camcorder, turn the power off, eject the "Memory Stick Duo," or remove the battery pack. Step 5: Inserting a disc or a "Memory Stick Duo" (Continued... Stick Duo" into the "Memory Stick Duo" slot in once and then slide it clicks. Access lamp ("Memory Stick Duo") To eject a "Memory Stick Duo" Lightly push the "Memory Stick Duo" in the right direction until it out of the slot.
... lamp is reading/writing data. b Notes • Do not try to force the "Memory Stick Duo" out. Do not shake or knock your camcorder is lit or flashing, your camcorder, turn the power off, eject the "Memory Stick Duo," or remove the battery pack. Step 5: Inserting a disc or a "Memory Stick Duo" (Continued... Stick Duo" into the "Memory Stick Duo" slot in once and then slide it clicks. Access lamp ("Memory Stick Duo") To eject a "Memory Stick Duo" Lightly push the "Memory Stick Duo" in the right direction until it out of the slot.
Operating Instructions
Page 31
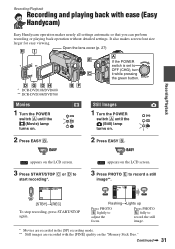
...E lightly to record a still image**. 6 [STBY]t[REC] To stop recording, press START/STOP again. Press PHOTO E fully to OFF (CHG), turn it while pressing the green button. It also makes screen font size larger for easy viewing. Open the lens cover (p. 27) * DCR-DVD108/DVD608 ** DCR-DVD308/DVD708... the still image. * Movies are recorded in the [SP] recording mode. ** Still images are recorded with ease (Easy Handycam) Easy Handycam operation makes nearly all settings automatic so that you can perform recording or playing back operation without detailed settings. Recording/Playback Recording...
...E lightly to record a still image**. 6 [STBY]t[REC] To stop recording, press START/STOP again. Press PHOTO E fully to OFF (CHG), turn it while pressing the green button. It also makes screen font size larger for easy viewing. Open the lens cover (p. 27) * DCR-DVD108/DVD608 ** DCR-DVD308/DVD708... the still image. * Movies are recorded in the [SP] recording mode. ** Still images are recorded with ease (Easy Handycam) Easy Handycam operation makes nearly all settings automatic so that you can perform recording or playing back operation without detailed settings. Recording/Playback Recording...

Operating Instructions
Page 37
... aspect ratio (16:9 or 4:3) (DCR-DVD308/DVD708) POWER switch WIDE SELECT To select the aspect ratio of the subject appears on . 2 Press WIDE SELECT repeatedly to select the desired screen aspect ratio. Adjusting the exposure for backlit subjects To adjust the exposure for backlit subjects, press BACK LIGHT to the lens side (2). z Tips...). • Adjust the focus manually ([FOCUS], p. 75) when it 180 degrees to display .. This may cause a malfunction. Open the LCD panel 90 degrees to the camcorder (1), then rotate it is not displayed in the viewfinder.
... aspect ratio (16:9 or 4:3) (DCR-DVD308/DVD708) POWER switch WIDE SELECT To select the aspect ratio of the subject appears on . 2 Press WIDE SELECT repeatedly to select the desired screen aspect ratio. Adjusting the exposure for backlit subjects To adjust the exposure for backlit subjects, press BACK LIGHT to the lens side (2). z Tips...). • Adjust the focus manually ([FOCUS], p. 75) when it 180 degrees to display .. This may cause a malfunction. Open the LCD panel 90 degrees to the camcorder (1), then rotate it is not displayed in the viewfinder.
Operating Instructions
Page 63
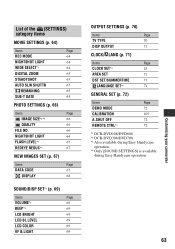
... SLW SHUTTR 65 REMAINING 65 SUB-T DATE 65 PHOTO SETTINGS (p. 66) Items Page IMAGE SIZE*2*3 66 QUALITY 66 FILE NO. 66 NIGHTSHOT LIGHT 64 FLASH LEVEL*2 67 REDEYE REDUC*2 67 VIEW IMAGES SET (p. 67) Items Page DATA CODE 67 DISPLAY 68 SOUND/DISP SET*4 (p. 69... LANGUAGE SET*3 71 GENERAL SET (p. 72) Items Page DEMO MODE 72 CALIBRATION 105 A.SHUT OFF 72 REMOTE CTRL*2 72 *1 DCR-DVD108/DVD608 *2 DCR-DVD308/DVD708 *3 Also available during Easy Handycam operation. *4 Only [SOUND SETTINGS] is available during Easy Handycam operation. 63 Customizing your camcorder
... SLW SHUTTR 65 REMAINING 65 SUB-T DATE 65 PHOTO SETTINGS (p. 66) Items Page IMAGE SIZE*2*3 66 QUALITY 66 FILE NO. 66 NIGHTSHOT LIGHT 64 FLASH LEVEL*2 67 REDEYE REDUC*2 67 VIEW IMAGES SET (p. 67) Items Page DATA CODE 67 DISPLAY 68 SOUND/DISP SET*4 (p. 69... LANGUAGE SET*3 71 GENERAL SET (p. 72) Items Page DEMO MODE 72 CALIBRATION 105 A.SHUT OFF 72 REMOTE CTRL*2 72 *1 DCR-DVD108/DVD608 *2 DCR-DVD308/DVD708 *3 Also available during Easy Handycam operation. *4 Only [SOUND SETTINGS] is available during Easy Handycam operation. 63 Customizing your camcorder
Operating Instructions
Page 64
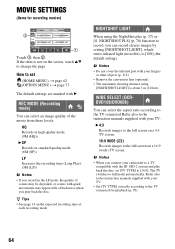
...the disc, set (HOME MENU) t page 62 (OPTION MENU) t page 73 The default settings are marked with a block noise when you connect your camcorder to the instruction manuals supplied with your TV. • Set [TV TYPE] correctly according to full mode automatically. z Tips • See page 14 on...objects (p. 112). • Remove the conversion lens (optional). • The maximum shooting distance using the NightShot plus (p. 37) or [S. NIGHTSHOT LIGHT When using [NIGHTSHOT LIGHT] is not on the screen, touch v/V to the full screen on a 16:9 (wide) TV screen. The TV switches to the TV ...
...the disc, set (HOME MENU) t page 62 (OPTION MENU) t page 73 The default settings are marked with a block noise when you connect your camcorder to the instruction manuals supplied with your TV. • Set [TV TYPE] correctly according to full mode automatically. z Tips • See page 14 on...objects (p. 112). • Remove the conversion lens (optional). • The maximum shooting distance using the NightShot plus (p. 37) or [S. NIGHTSHOT LIGHT When using [NIGHTSHOT LIGHT] is not on the screen, touch v/V to the full screen on a 16:9 (wide) TV screen. The TV switches to the TV ...
Operating Instructions
Page 66
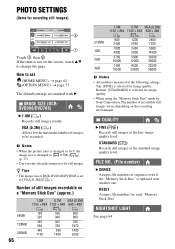
... ( ) (p. 37). • You can only select the image size for image quality. • When using the "Memory Stick Duo" made by Sony Corporation. QUALITY B FINE ( ) Records still images at the standard image quality level. FILE NO. (File number) B SERIES Assigns file numbers in sequence... 2. z Tips • The image size of recordable still images varies depending on the screen, touch v/V to [VGA (0.3M)]( ). The number of DCR-DVD108/DVD608 is selected for still images. STANDARD ( ) Records still images at the fine image quality level. IMAGE SIZE (DCRDVD308/DVD708) B 1.0M (...
... ( ) (p. 37). • You can only select the image size for image quality. • When using the "Memory Stick Duo" made by Sony Corporation. QUALITY B FINE ( ) Records still images at the standard image quality level. FILE NO. (File number) B SERIES Assigns file numbers in sequence... 2. z Tips • The image size of recordable still images varies depending on the screen, touch v/V to [VGA (0.3M)]( ). The number of DCR-DVD108/DVD608 is selected for still images. STANDARD ( ) Records still images at the fine image quality level. IMAGE SIZE (DCRDVD308/DVD708) B 1.0M (...
Operating Instructions
Page 69
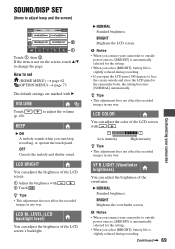
...z Tips • This adjustment does not affect the recorded images in any way. VF B.LIGHT (Viewfinder brightness) You can adjust the brightness of the viewfinder. b Notes • When you connect your camcorder to set (HOME MENU) t page 62 (OPTION MENU) t page 73 The default settings... screen outside power sources, [BRIGHT] is slightly reduced during recording. • If you open the LCD panel 180 degrees to the camcorder body, the setting becomes [NORMAL] automatically. B NORMAL Standard brightness. BRIGHT Brightens the viewfinder screen. to adjust the volume BEEP B ...
...z Tips • This adjustment does not affect the recorded images in any way. VF B.LIGHT (Viewfinder brightness) You can adjust the brightness of the viewfinder. b Notes • When you connect your camcorder to set (HOME MENU) t page 62 (OPTION MENU) t page 73 The default settings... screen outside power sources, [BRIGHT] is slightly reduced during recording. • If you open the LCD panel 180 degrees to the camcorder body, the setting becomes [NORMAL] automatically. B NORMAL Standard brightness. BRIGHT Brightens the viewfinder screen. to adjust the volume BEEP B ...

Operating Instructions
Page 77
...ocean or a lake. Sunrise or sunset - This setting also prevents your camcorder b Notes • The [WHITE BAL. ] setting is adjusted to be adjusted according to fill the screen under the same lighting conditions as people or flowers while creating a soft background. WHITE BAL. (...At party scenes or studios where the lighting conditions change quickly - Continued , 77 Customizing your camcorder from appearing excessively white when subjects are lit by strong light. When the white balance has been adjusted and stored in between the camcorder and the subject. PORTRAIT ( ) ...
...ocean or a lake. Sunrise or sunset - This setting also prevents your camcorder b Notes • The [WHITE BAL. ] setting is adjusted to be adjusted according to fill the screen under the same lighting conditions as people or flowers while creating a soft background. WHITE BAL. (...At party scenes or studios where the lighting conditions change quickly - Continued , 77 Customizing your camcorder from appearing excessively white when subjects are lit by strong light. When the white balance has been adjusted and stored in between the camcorder and the subject. PORTRAIT ( ) ...
Operating Instructions
Page 85
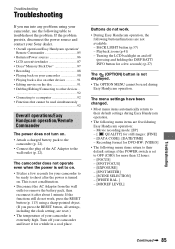
... the clock setting, are not available. - If the problem persists, disconnect the power source and contact your Sony dealer. • Overall operations/Easy Handycam operation/ Remote Commander 85 • Batteries/Power sources 86 • LCD screen/viewfinder 87 • Discs/"...) button is extremely high. BACK LIGHT button (p.37) - Movie recording mode: [SP] - [ QUALITY] for more than 12 hours: - [FOCUS] - [SPOT FOCUS] - [EXPOSURE] - [SPOT METER] - [SCENE SELECTION] - [WHITE BAL. ] - [MICREF LEVEL] Troubleshooting Continued , 85 The camcorder does not operate even when the ...
... the clock setting, are not available. - If the problem persists, disconnect the power source and contact your Sony dealer. • Overall operations/Easy Handycam operation/ Remote Commander 85 • Batteries/Power sources 86 • LCD screen/viewfinder 87 • Discs/"...) button is extremely high. BACK LIGHT button (p.37) - Movie recording mode: [SP] - [ QUALITY] for more than 12 hours: - [FOCUS] - [SPOT FOCUS] - [EXPOSURE] - [SPOT METER] - [SCENE SELECTION] - [WHITE BAL. ] - [MICREF LEVEL] Troubleshooting Continued , 85 The camcorder does not operate even when the ...


