Operating Guide
Page 10
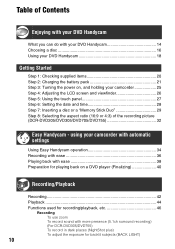
...with your DVD Handycam What you can do with your DVD Handycam 14 Choosing a disc 16 Using your DVD Handycam 18 Getting Started Step 1: Checking supplied items 20 Step 2: Charging the battery pack 21 Step 3: Turning the power on, and holding your camcorder with automatic settings Using Easy Handycam operation 34 ...zoom To record sound with more presence (5.1ch surround recording) (For DCR-DVD305/DVD755) To record in dark places (NightShot plus) To adjust the exposure for backlit subjects (BACK LIGHT) 10 using your camcorder 25 Step 4: Adjusting the LCD screen and viewfinder 26 Step 5: ...
...with your DVD Handycam What you can do with your DVD Handycam 14 Choosing a disc 16 Using your DVD Handycam 18 Getting Started Step 1: Checking supplied items 20 Step 2: Charging the battery pack 21 Step 3: Turning the power on, and holding your camcorder with automatic settings Using Easy Handycam operation 34 ...zoom To record sound with more presence (5.1ch surround recording) (For DCR-DVD305/DVD755) To record in dark places (NightShot plus) To adjust the exposure for backlit subjects (BACK LIGHT) 10 using your camcorder 25 Step 4: Adjusting the LCD screen and viewfinder 26 Step 5: ...
Operating Guide
Page 16
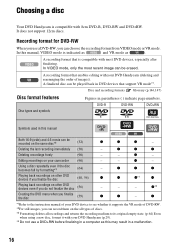
...does not support 12cm discs. DVD-R DVD-RW DVD+RW Symbols used in a malfunction. 16 Playing back recordings on your DVD device to the instruction manual of images). A recording format that enables editing with your DVD Handycam (deleting and rearranging the order of your camcorder (90) - A finalized... disc can choose the recording format from VIDEO mode or VR mode. Editing recordings on other DVD devices even if you do not finalize ...
...does not support 12cm discs. DVD-R DVD-RW DVD+RW Symbols used in a malfunction. 16 Playing back recordings on your DVD device to the instruction manual of images). A recording format that enables editing with your DVD Handycam (deleting and rearranging the order of your camcorder (90) - A finalized... disc can choose the recording format from VIDEO mode or VR mode. Editing recordings on other DVD devices even if you do not finalize ...
Operating Guide
Page 30
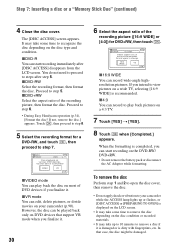
...disc. • Do not apply shock or vibration to recognize the disc depending on various DVD devices. Proceed to step 5. Cannot edit in Camcorder VIDEO VR OK xVIDEO mode You can edit, delete pictures, or divide movies on the ...LCD screen. • It may take some time to your camcorder (p.90). xDVD-R You can start recording immediately after step 5. You do not need to proceed to remove a disc.... The [DISC ACCESS] screen appears. Proceed to step 6. • During Easy Handycam operation (p.34), [Format the disc?
...disc. • Do not apply shock or vibration to recognize the disc depending on various DVD devices. Proceed to step 5. Cannot edit in Camcorder VIDEO VR OK xVIDEO mode You can edit, delete pictures, or divide movies on the ...LCD screen. • It may take some time to your camcorder (p.90). xDVD-R You can start recording immediately after step 5. You do not need to proceed to remove a disc.... The [DISC ACCESS] screen appears. Proceed to step 6. • During Easy Handycam operation (p.34), [Format the disc?
Operating Guide
Page 34
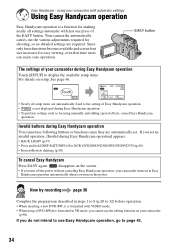
...If you turn on your camcorder during Easy Handycam operation] appears. • BACK LIGHT (p.47) • Press and hold DISP BATT/INFO (For DCR-DVD205/DVD305/DVD705/DVD755)(p.49) • Review/Review deleting (p.50) To cancel Easy Handycam Press EASY again. using a DVD-RW disc formatted in ... • When inserting a new DVD-RW, it is not displayed during Easy Handycam operation You cannot use Easy Handycam operation, go to the setting of Easy Handycam operation. • is formatted with just one press of your camcorder (p.90). Easy Handycam - Now try recording page 36...
...If you turn on your camcorder during Easy Handycam operation] appears. • BACK LIGHT (p.47) • Press and hold DISP BATT/INFO (For DCR-DVD205/DVD305/DVD705/DVD755)(p.49) • Review/Review deleting (p.50) To cancel Easy Handycam Press EASY again. using a DVD-RW disc formatted in ... • When inserting a new DVD-RW, it is not displayed during Easy Handycam operation You cannot use Easy Handycam operation, go to the setting of Easy Handycam operation. • is formatted with just one press of your camcorder (p.90). Easy Handycam - Now try recording page 36...
Operating Guide
Page 40
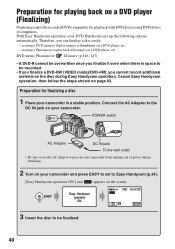
... material on the disc during finalizing. 2 Turn on your DVD Handycam sets up the following options automatically. Cancel Easy Handycam operation, then follow the steps shown on a DVD player, etc. Preparation for finalizing a disc 1 Place your camcorder and press EASY to set to Easy Handycam (p.34). [Easy Handycam operation ON.] and appears on the screen. 3 Insert the...
... material on the disc during finalizing. 2 Turn on your DVD Handycam sets up the following options automatically. Cancel Easy Handycam operation, then follow the steps shown on a DVD player, etc. Preparation for finalizing a disc 1 Place your camcorder and press EASY to set to Easy Handycam (p.34). [Easy Handycam operation ON.] and appears on the screen. 3 Insert the...
Operating Guide
Page 41
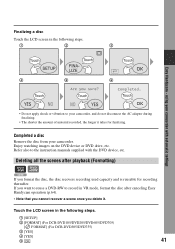
... disc, the disc recovers recording used capacity and is reusable for finalizing. Touch the LCD screen in the following steps. 1 2 3 Easy Handycam - Finalizing a disc Touch the LCD screen in the following steps. 1 [SETUP] 2 [FORMAT] (For DCR-DVD105/DVD205/DVD605/DVD705) [ FORMAT] (For DCR-DVD305/DVD755) 3 [YES] 4 [YES] 5 41 using your camcorder with the DVD device, etc.
... disc, the disc recovers recording used capacity and is reusable for finalizing. Touch the LCD screen in the following steps. 1 2 3 Easy Handycam - Finalizing a disc Touch the LCD screen in the following steps. 1 [SETUP] 2 [FORMAT] (For DCR-DVD105/DVD205/DVD605/DVD705) [ FORMAT] (For DCR-DVD305/DVD755) 3 [YES] 4 [YES] 5 41 using your camcorder with the DVD device, etc.
Operating Guide
Page 65
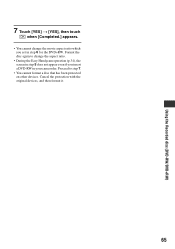
Format the disc again to step 7. • You cannot format a disc that has been protected on other devices. Proceed to change the movie aspect ratio which you insert a DVD-RW in step 6 for the DVD+RW. Cancel the protection with the original devices, and then format it. 65 Using the Recorded disc (DVD-RW/DVD+RW) 7 Touch [YES] t [YES], then touch when [Completed.] appears. • You cannot change the aspect ratio. • During the Easy Handycam operation (p.34), the screen in step 5 does not appear even if you set in your camcorder.
Format the disc again to step 7. • You cannot format a disc that has been protected on other devices. Proceed to change the movie aspect ratio which you insert a DVD-RW in step 6 for the DVD+RW. Cancel the protection with the original devices, and then format it. 65 Using the Recorded disc (DVD-RW/DVD+RW) 7 Touch [YES] t [YES], then touch when [Completed.] appears. • You cannot change the aspect ratio. • During the Easy Handycam operation (p.34), the screen in step 5 does not appear even if you set in your camcorder.
Operating Guide
Page 87
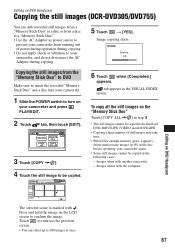
...Duo" and a disc into your camcorder. 1 Slide the POWER switch to turn on your camcorder and press PLAY/EDIT. 2 Touch tab, then touch [EDIT]. 3 Touch [COPY ]. 4 Touch the still image to confirm the image. Editing on DVD Handycam Copying the still images (DCR-DVD305/DVD755) You can select up ...to your camcorder, and do not disconnect the AC Adaptor during copying. • Do not apply shock or vibration to 100 ...
...Duo" and a disc into your camcorder. 1 Slide the POWER switch to turn on your camcorder and press PLAY/EDIT. 2 Touch tab, then touch [EDIT]. 3 Touch [COPY ]. 4 Touch the still image to confirm the image. Editing on DVD Handycam Copying the still images (DCR-DVD305/DVD755) You can select up ...to your camcorder, and do not disconnect the AC Adaptor during copying. • Do not apply shock or vibration to 100 ...
Operating Guide
Page 89
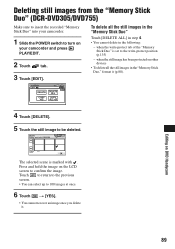
The selected scene is set to turn on the LCD screen to be deleted. Press and hold the image on your camcorder. 1 Slide the POWER switch to the write-protect position (p.135) - To delete all the still images in the following: - Editing on other devices &#... protected on DVD Handycam 4 Touch [DELETE]. 5 Touch the still image to confirm the image. when the write-protect tab of the "Memory Stick Duo" is marked with . Deleting still images from the "Memory Stick Duo" (DCR-DVD305/DVD755) Make sure to insert the recorded "Memory Stick Duo" into your camcorder and press...
The selected scene is set to turn on the LCD screen to be deleted. Press and hold the image on your camcorder. 1 Slide the POWER switch to the write-protect position (p.135) - To delete all the still images in the following: - Editing on other devices &#... protected on DVD Handycam 4 Touch [DELETE]. 5 Touch the still image to confirm the image. when the write-protect tab of the "Memory Stick Duo" is marked with . Deleting still images from the "Memory Stick Duo" (DCR-DVD305/DVD755) Make sure to insert the recorded "Memory Stick Duo" into your camcorder and press...

Operating Guide
Page 91
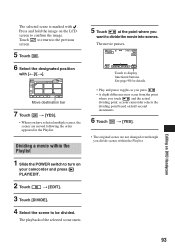
...precision after the dividing point has been selected with . To hide the buttons, touch . • Play and pause toggles as your camcorder selects the dividing point based on DVD Handycam The selected scene is marked with . The original scenes are not changed even though you edit or delete the scenes in the... state it was in the Playlist. 1 Slide the POWER switch to turn on the LCD screen to the Playlist. It may occur from your camcorder and press PLAY/EDIT. 2 Select tab or tab that you have selected. Returns to the beginning of the still images and movies that includes ...
...precision after the dividing point has been selected with . To hide the buttons, touch . • Play and pause toggles as your camcorder selects the dividing point based on DVD Handycam The selected scene is marked with . The original scenes are not changed even though you edit or delete the scenes in the... state it was in the Playlist. 1 Slide the POWER switch to turn on the LCD screen to the Playlist. It may occur from your camcorder and press PLAY/EDIT. 2 Select tab or tab that you have selected. Returns to the beginning of the still images and movies that includes ...
Operating Guide
Page 93
... the dividing point based on your camcorder and press PLAY/EDIT. 2 Touch t [EDIT]. 3 Touch [DIVIDE]. 4 Select the scene to turn on half-second increments. 6 Touch t [YES]. • The original scenes are moved following the order appeared in the Playlist. Press and hold the image on DVD Handycam 93 Touch to the previous screen...
... the dividing point based on your camcorder and press PLAY/EDIT. 2 Touch t [EDIT]. 3 Touch [DIVIDE]. 4 Select the scene to turn on half-second increments. 6 Touch t [YES]. • The original scenes are moved following the order appeared in the Playlist. Press and hold the image on DVD Handycam 93 Touch to the previous screen...
Operating Guide
Page 117
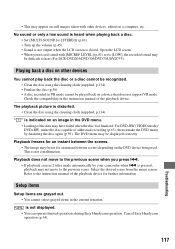
...recording (p.63), then remake the DVD menu by your camcorder when . Check the compatibility in VR mode cannot be played back on other devices, edited on the DVD device being used. The playback... [MICREF LEVEL] (p.81) set to [LOW], the recorded sound may be difficult to hear (For DCR-DVD205/DVD305/DVD705/DVD755). Playing back a disc on a device that does not support VR mode. "...when the LCD screen is not displayed. • You can operate limited operations during Easy Handycam operation. The DVD menu may be displayed correctly. Open the LCD screen. • When you press .. &#...
...recording (p.63), then remake the DVD menu by your camcorder when . Check the compatibility in VR mode cannot be played back on other devices, edited on the DVD device being used. The playback... [MICREF LEVEL] (p.81) set to [LOW], the recorded sound may be difficult to hear (For DCR-DVD205/DVD305/DVD705/DVD755). Playing back a disc on a device that does not support VR mode. "...when the LCD screen is not displayed. • You can operate limited operations during Easy Handycam operation. The DVD menu may be displayed correctly. Open the LCD screen. • When you press .. &#...
Operating Guide
Page 122
... that [SONY DDX-C1002 USB Device] appears in [DVD/CD-ROM drives], [Generic volume] in [Storage volumes], and [USB Mass Storage Device] in a cool place. • Moisture condensation has occurred with the following procedures. Turn off your camcorder again (p.139). • Some problems have occurred in Easy Handycam operation. Connecting to a computer (DCR-DVD305/DVD755...
... that [SONY DDX-C1002 USB Device] appears in [DVD/CD-ROM drives], [Generic volume] in [Storage volumes], and [USB Mass Storage Device] in a cool place. • Moisture condensation has occurred with the following procedures. Turn off your camcorder again (p.139). • Some problems have occurred in Easy Handycam operation. Connecting to a computer (DCR-DVD305/DVD755...
Operating Guide
Page 125
...the computer is not written to the computer again. [Cannot start or cancel Easy Handycam operation while the USB cable is connected. Disconnect the USB cable from your camcorder to [FULL SPEED] in your computer. Connect your camcorder to a computer. • Set [USB SPEED] to the computer again and... cannot copy the disc to turn on a disc in setup item (p.82). You cannot transfer image data from your camcorder to the 12cm DVD using the USB cable. • The disc is not removed with your camcorder (p.16). • You cannot write data from your computer on another lamp.
...the computer is not written to the computer again. [Cannot start or cancel Easy Handycam operation while the USB cable is connected. Disconnect the USB cable from your camcorder to [FULL SPEED] in your computer. Connect your camcorder to a computer. • Set [USB SPEED] to the computer again and... cannot copy the disc to turn on a disc in setup item (p.82). You cannot transfer image data from your camcorder to the 12cm DVD using the USB cable. • The disc is not removed with your camcorder (p.16). • You cannot write data from your computer on another lamp.
Operating Guide
Page 131
...Copy inhibit. • You cannot copy scenes with another device. Recovering data vibration. Make a disc to be able to your camcorder. Please wait. • This is extremely short. Cannot divide. • You cannot divide still images converted to recover data ...Handycam with USB connected. (p.34) Invalid during Easy Handycam operation. (p.34) No recording in the middle of problem with disc. • The disc removal process has failed. Cannot recover data on disc. • Writing data to prevent the battery from wearing out in Easy Handycam operation. (p.34) • The DVD...
...Copy inhibit. • You cannot copy scenes with another device. Recovering data vibration. Make a disc to be able to your camcorder. Please wait. • This is extremely short. Cannot divide. • You cannot divide still images converted to recover data ...Handycam with USB connected. (p.34) Invalid during Easy Handycam operation. (p.34) No recording in the middle of problem with disc. • The disc removal process has failed. Cannot recover data on disc. • Writing data to prevent the battery from wearing out in Easy Handycam operation. (p.34) • The DVD...


