Operating Guide
Page 4
... will prevent damage to the set due to excessive shock by the manufacturer that the set from the wall outlet and disconnect the antenna or cable system. Replacement parts When replacement parts are specified in safe operating condition. 4 Service Damage Requiring Service Unplug the set is damaged or frayed. - If the...
... will prevent damage to the set due to excessive shock by the manufacturer that the set from the wall outlet and disconnect the antenna or cable system. Replacement parts When replacement parts are specified in safe operating condition. 4 Service Damage Requiring Service Unplug the set is damaged or frayed. - If the...
Operating Guide
Page 6
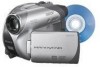
... the equipment and receiver. - Consult the dealer or an experienced radio/ TV technician for details. On the discs you can use in your camcorder You can use 8cm DVD-Rs, 8cm DVD-RWs and 8cm DVD+RWs only. On the types of "Memory Stick" you can be used...- The supplied interface cable must be used with the equipment in CANADA "Battery pack" THIS CLASS B DIGITAL APPARATUS COMPLIES WITH CANADIAN ICES-003. Notes on a circuit different from that to which the receiver is supplied with the computer connected (stored on the supplied CD-ROM)* * The DCR-DVD105/DVD205/DVD605/ DVD705 ...
... the equipment and receiver. - Consult the dealer or an experienced radio/ TV technician for details. On the discs you can use in your camcorder You can use 8cm DVD-Rs, 8cm DVD-RWs and 8cm DVD+RWs only. On the types of "Memory Stick" you can be used...- The supplied interface cable must be used with the equipment in CANADA "Battery pack" THIS CLASS B DIGITAL APPARATUS COMPLIES WITH CANADIAN ICES-003. Notes on a circuit different from that to which the receiver is supplied with the computer connected (stored on the supplied CD-ROM)* * The DCR-DVD105/DVD205/DVD605/ DVD705 ...
Operating Guide
Page 7
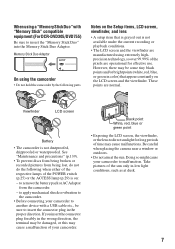
When using a "Memory Stick Duo" with a USB cable etc., be some tiny black points and/or bright points (white, red,... are normal. to insert the "Memory Stick Duo" into the Memory Stick Duo Adaptor. Doing so might cause your camcorder. Take pictures of the POWER switch (p.25) or the ACCESS lamp (p.29) is on the LCD screen and the... for effective use. to apply mechanical shock or vibration to the camcorder. • Before connecting your camcorder to another device with "Memory Stick" compatible equipment (For DCR-DVD305/DVD755) Be sure to remove the battery pack or AC Adaptor...
When using a "Memory Stick Duo" with a USB cable etc., be some tiny black points and/or bright points (white, red,... are normal. to insert the "Memory Stick Duo" into the Memory Stick Duo Adaptor. Doing so might cause your camcorder. Take pictures of the POWER switch (p.25) or the ACCESS lamp (p.29) is on the LCD screen and the... for effective use. to apply mechanical shock or vibration to the camcorder. • Before connecting your camcorder to another device with "Memory Stick" compatible equipment (For DCR-DVD305/DVD755) Be sure to remove the battery pack or AC Adaptor...
Operating Guide
Page 20
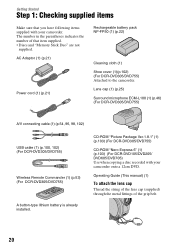
...-ROM "Nero Express 6" (1) (p.103) (For DCR-DVD105/DVD205/ DVD605/DVD705) Use when copying a disc recorded with your camcorder onto a 12cm DVD. Lens cap (1) (p.25) Surround microphone ECM-L100 (1) (p.46) (For DCR-DVD305/DVD755) A/V connecting cable (1) (p.54, 96, 98, 102) USB cable (1) (p.100, 102) (For DCR-DVD305/DVD755) Wireless Remote Commander (1) (p.53) (For DCR-DVD305/DVD755) A button-type lithium...
...-ROM "Nero Express 6" (1) (p.103) (For DCR-DVD105/DVD205/ DVD605/DVD705) Use when copying a disc recorded with your camcorder onto a 12cm DVD. Lens cap (1) (p.25) Surround microphone ECM-L100 (1) (p.46) (For DCR-DVD305/DVD755) A/V connecting cable (1) (p.54, 96, 98, 102) USB cable (1) (p.100, 102) (For DCR-DVD305/DVD755) Wireless Remote Commander (1) (p.53) (For DCR-DVD305/DVD755) A button-type lithium...
Operating Guide
Page 54
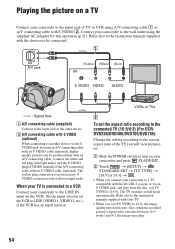
...or via the S VIDEO jack, by using an A/V connecting cable with an A/V connecting cable. Also, when the recorded picture's aspect ratio switches between 16:9 (wide) and 4:3, the image may deteriorate. When your TV is not necessary. Connect your camcorder to LINE (VIDEO 1, VIDEO 2, etc.), if the VCR...8226; When you set [TV TYPE] to [16:9]. Playing the picture on a TV Connect your camcorder to the input jack of TV or VCR using A/V connecting cable 1 or A/V connecting cable with an S VIDEO cable (optional). Connect the white and red plug (left/right audio) and the S VIDEO plug (S VIDEO...
...or via the S VIDEO jack, by using an A/V connecting cable with an A/V connecting cable. Also, when the recorded picture's aspect ratio switches between 16:9 (wide) and 4:3, the image may deteriorate. When your TV is not necessary. Connect your camcorder to LINE (VIDEO 1, VIDEO 2, etc.), if the VCR...8226; When you set [TV TYPE] to [16:9]. Playing the picture on a TV Connect your camcorder to the input jack of TV or VCR using A/V connecting cable 1 or A/V connecting cable with an S VIDEO cable (optional). Connect the white and red plug (left/right audio) and the S VIDEO plug (S VIDEO...
Operating Guide
Page 55
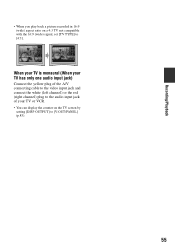
When your TV is monaural (When your TV has only one audio input jack) Connect the yellow plug of the A/V connecting cable to the video input jack and connect the white (left channel) or the red (right channel) plug to the audio input jack of your TV or VCR. • You can display the counter on a 4:3 TV not compatible with the 16:9 (wide) signal, set [TV TYPE] to [V-OUT/PANEL] (p.83). 55 Recording/Playback • When you play back a picture recorded in 16:9 (wide) aspect ratio on the TV screen by setting [DISP OUTPUT] to [4:3].
When your TV is monaural (When your TV has only one audio input jack) Connect the yellow plug of the A/V connecting cable to the video input jack and connect the white (left channel) or the red (right channel) plug to the audio input jack of your TV or VCR. • You can display the counter on a 4:3 TV not compatible with the 16:9 (wide) signal, set [TV TYPE] to [V-OUT/PANEL] (p.83). 55 Recording/Playback • When you play back a picture recorded in 16:9 (wide) aspect ratio on the TV screen by setting [DISP OUTPUT] to [4:3].
Operating Guide
Page 69
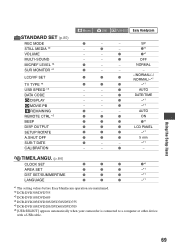
... z z z z*1 AREA SET z z z -*1 DST SET/SUMMERTIME z z z -*1 LANGUAGE z z z -*1 *1 The setting values before Easy Handycam operation are maintained. *2 DCR-DVD305/DVD755 *3 DCR-DVD105/DVD605 *4 DCR-DVD205/DVD305/DVD705/DVD755 *5 DCR-DVD105/DVD205/DVD605/DVD705 *6 [USB SELECT] appears automatically when your camcorder is connected to a computer or other device with a USB cable. 69 z*1 - - z -*1 - - z - Using the Setup items STANDARD SET (p.80) REC MODE STILL...
... z z z z*1 AREA SET z z z -*1 DST SET/SUMMERTIME z z z -*1 LANGUAGE z z z -*1 *1 The setting values before Easy Handycam operation are maintained. *2 DCR-DVD305/DVD755 *3 DCR-DVD105/DVD605 *4 DCR-DVD205/DVD305/DVD705/DVD755 *5 DCR-DVD105/DVD205/DVD605/DVD705 *6 [USB SELECT] appears automatically when your camcorder is connected to a computer or other device with a USB cable. 69 z*1 - - z -*1 - - z - Using the Setup items STANDARD SET (p.80) REC MODE STILL...
Operating Guide
Page 78
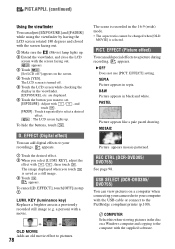
...EXPOSURE] : Adjust with the screen facing out. PICT. MOSAIC Picture appears mosaic-patterned. USB SELECT (DCR-DVD305/ DVD755) You can view pictures on a computer when connecting your camcorder to the PictBridge compliant printer (p.100). D. EFFECT (Digital effect) You can add digital effects to ...your computer with the USB cable or connect to your recordings. The image displayed when you touch is...
...EXPOSURE] : Adjust with the screen facing out. PICT. MOSAIC Picture appears mosaic-patterned. USB SELECT (DCR-DVD305/ DVD755) You can view pictures on a computer when connecting your camcorder to the PictBridge compliant printer (p.100). D. EFFECT (Digital effect) You can add digital effects to ...your computer with the USB cable or connect to your recordings. The image displayed when you touch is...
Operating Guide
Page 79
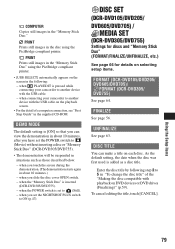
..." using the PictBridge compliant printer. Using the Setup items 79 PRINT Prints still images in about 10 minutes.) - when connecting your camcorder to another device with the USB cable on the playback screen. • For the detail of the "Making the disc compatible with the USB...the disc was first used is pressed while connecting your camcorder to ON (p.47). when the "Memory Stick Duo" is set the NIGHTSHOT PLUS switch to another device with playback on selecting setup items. FORMAT (DCR-DVD105/DVD205/ DVD605/DVD705)/ FORMAT (DCR-DVD305/ DVD755) See page 64. when you slide ...
..." using the PictBridge compliant printer. Using the Setup items 79 PRINT Prints still images in about 10 minutes.) - when connecting your camcorder to another device with the USB cable on the playback screen. • For the detail of the "Making the disc compatible with the USB...the disc was first used is pressed while connecting your camcorder to ON (p.47). when the "Memory Stick Duo" is set the NIGHTSHOT PLUS switch to another device with playback on selecting setup items. FORMAT (DCR-DVD105/DVD205/ DVD605/DVD705)/ FORMAT (DCR-DVD305/ DVD755) See page 64. when you slide ...
Operating Guide
Page 96
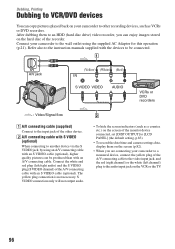
...and camera settings data, display them to an HDD (hard disc drive) video recorder, you are connecting your camcorder to the wall outlet using an A/V connecting cable with an S VIDEO cable (optional). Refer also to the instruction manuals supplied with the devices to be produced than with S VIDEO ... the screen indicators (such as VCRs or DVD recorders. The yellow plug connection is not necessary. Connect your camcorder to a monaural device, connect the yellow plug of the A/V connecting cable to the video input jack, and the red (right channel) or the white (left /right audio) and...
...and camera settings data, display them to an HDD (hard disc drive) video recorder, you are connecting your camcorder to the wall outlet using an A/V connecting cable with an S VIDEO cable (optional). Refer also to the instruction manuals supplied with the devices to be produced than with S VIDEO ... the screen indicators (such as VCRs or DVD recorders. The yellow plug connection is not necessary. Connect your camcorder to a monaural device, connect the yellow plug of the A/V connecting cable to the video input jack, and the red (right channel) or the white (left /right audio) and...
Operating Guide
Page 97
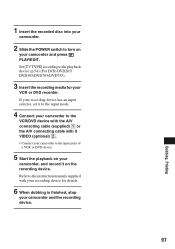
...POWER switch to turn on your camcorder and the recording device. 97 Dubbing, Printing If your recording device has an input selector, set it on your VCR or DVD recorder. Set [TV TYPE] according to the playback device (p.54) (For DCR-DVD205/ DVD305/DVD705/DVD755). 3... Insert the recording media for your camcorder, and record it to the input mode. 4 Connect your camcorder to the VCR/DVD device with the A/V connecting cable (supplied) 1 or the A/V connecting cable with your recording device for details. 6 ...
...POWER switch to turn on your camcorder and the recording device. 97 Dubbing, Printing If your recording device has an input selector, set it on your VCR or DVD recorder. Set [TV TYPE] according to the playback device (p.54) (For DCR-DVD205/ DVD305/DVD705/DVD755). 3... Insert the recording media for your camcorder, and record it to the input mode. 4 Connect your camcorder to the VCR/DVD device with the A/V connecting cable (supplied) 1 or the A/V connecting cable with your recording device for details. 6 ...

Operating Guide
Page 98
... can record pictures or TV programs from a TV or VCR/DVD device (DCR-DVD305/DVD755) You can be connected. Recording images from a VCR, TV or DVD device onto a disc using your camcorder. Connect your camcorder to be produced than with an A/V connecting cable. A/V jack (Yellow) (White) (Red) OUT S VIDEO VIDEO AUDIO : Video/Signal flow...
... can record pictures or TV programs from a TV or VCR/DVD device (DCR-DVD305/DVD755) You can be connected. Recording images from a VCR, TV or DVD device onto a disc using your camcorder. Connect your camcorder to be produced than with an A/V connecting cable. A/V jack (Yellow) (White) (Red) OUT S VIDEO VIDEO AUDIO : Video/Signal flow...

Operating Guide
Page 99
...of a TV or VCR/DVD device. 2 If you are recording from a VCR/ DVD device, insert the cassette or disc into your camcorder. Format the disc if you connected your camcorder to the device which has the S VIDEO jack, touch [SET] t [VIDEO INPUT] t [S VIDEO] t . • Touch [... press PHOTO during recording. 99 Dubbing, Printing 1 Connect your camcorder to the TV or VCR/DVD device with the A/V connecting cable (supplied) 1 or the A/V connecting cable with S VIDEO (optional) 2. • Connect your camcorder to the output jacks of your camcorder. 7 Touch [REC] at the point you want to start...
...of a TV or VCR/DVD device. 2 If you are recording from a VCR/ DVD device, insert the cassette or disc into your camcorder. Format the disc if you connected your camcorder to the device which has the S VIDEO jack, touch [SET] t [VIDEO INPUT] t [S VIDEO] t . • Touch [... press PHOTO during recording. 99 Dubbing, Printing 1 Connect your camcorder to the TV or VCR/DVD device with the A/V connecting cable (supplied) 1 or the A/V connecting cable with S VIDEO (optional) 2. • Connect your camcorder to the output jacks of your camcorder. 7 Touch [REC] at the point you want to start...
Operating Guide
Page 100
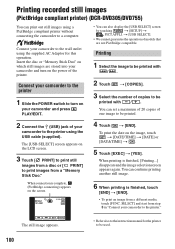
... of one image to the printer." Printing recorded still images (PictBridge compliant printer) (DCR-DVD305/DVD755) You can also display the [USB SELECT] screen by touching t [SETUP] t PICT.APPLI. Connect your camcorder to the printer 1 Slide the POWER switch to turn on the screen. You can... press PLAY/EDIT. • You can print out still images using the supplied AC Adaptor for the printer to the printer using the USB cable (supplied). When printing is finished, [Printing...] disappears and the image selection screen appears again. VGA PRINT 101-0001 1 / 10 END 4 Touch...
... of one image to the printer." Printing recorded still images (PictBridge compliant printer) (DCR-DVD305/DVD755) You can also display the [USB SELECT] screen by touching t [SETUP] t PICT.APPLI. Connect your camcorder to the printer 1 Slide the POWER switch to turn on the screen. You can... press PLAY/EDIT. • You can print out still images using the supplied AC Adaptor for the printer to the printer using the USB cable (supplied). When printing is finished, [Printing...] disappears and the image selection screen appears again. VGA PRINT 101-0001 1 / 10 END 4 Touch...
Operating Guide
Page 101
... a device other devices that have a file size of model or manufacturer. 101 Dubbing, Printing Remove the "Memory Stick Duo" from your camcorder. • If the printer stops working, disconnect the USB cable (supplied), turn the printer off . • Some printer models may be performed properly. - • Do not attempt the following operations...
... a device other devices that have a file size of model or manufacturer. 101 Dubbing, Printing Remove the "Memory Stick Duo" from your camcorder. • If the printer stops working, disconnect the USB cable (supplied), turn the printer off . • Some printer models may be performed properly. - • Do not attempt the following operations...
Operating Guide
Page 103
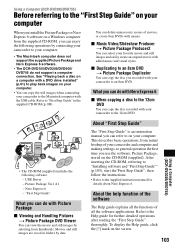
...This describes basic operations, from the supplied CD-ROM, you can select your computer. Refer to the Macintosh computer with the USB cable. Picture Package Ver.1.8.1 - About the help function of the software The Help guide explains all the functions of movies, or create...8226; The CD-ROM (supplied) includes the following operations by connecting your camcorder to your computer. • The Macintosh computer does not support the supplied Picture Package and Nero Express 6 software. • The DCR-DVD105/DVD205/DVD605/ DVD705 do not support a computer connection. USB Driver - ...
...This describes basic operations, from the supplied CD-ROM, you can select your computer. Refer to the Macintosh computer with the USB cable. Picture Package Ver.1.8.1 - About the help function of the software The Help guide explains all the functions of movies, or create...8226; The CD-ROM (supplied) includes the following operations by connecting your camcorder to your computer. • The Macintosh computer does not support the supplied Picture Package and Nero Express 6 software. • The DCR-DVD105/DVD205/DVD605/ DVD705 do not support a computer connection. USB Driver - ...
Operating Guide
Page 104
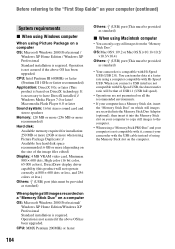
... is required. Before referring to the computer. • When using a "Memory Stick PRO Duo" and your computer is not compatible with it, connect your camcorder with the USB cable instead of USB1.1 (USB full speed). • Operations are not guaranteed on all the recommended environments. • If your computer has a Memory Stick... 2.0). Operation is compatible with Hi-Speed USB. CPU: MMX Pentium 200MHz or faster 104 Others: (USB) port (This must be provided as standard) • Your camcorder is not assured if the above OS has been upgraded.
... is required. Before referring to the computer. • When using a "Memory Stick PRO Duo" and your computer is not compatible with it, connect your camcorder with the USB cable instead of USB1.1 (USB full speed). • Operations are not guaranteed on all the recommended environments. • If your computer has a Memory Stick... 2.0). Operation is compatible with Hi-Speed USB. CPU: MMX Pentium 200MHz or faster 104 Others: (USB) port (This must be provided as standard) • Your camcorder is not assured if the above OS has been upgraded.
Operating Guide
Page 109
... condition of your camcorder is extremely high. A motor sound is heard in the camcorder when the disc cover is not a malfunction. You cannot turn Easy Handycam operation on or off. • You cannot turn Easy Handycam operation on or off your Sony dealer. Set the... USB cable (For DCR-DVD305/DVD755 ). Settings change during operation. • This is not a malfunction. 109 Troubleshooting Buttons do not work . • During Easy Handycam operation, the available buttons are limited. If the problem persists, remove the power source and contact your camcorder and ...
... condition of your camcorder is extremely high. A motor sound is heard in the camcorder when the disc cover is not a malfunction. You cannot turn Easy Handycam operation on or off. • You cannot turn Easy Handycam operation on or off your Sony dealer. Set the... USB cable (For DCR-DVD305/DVD755 ). Settings change during operation. • This is not a malfunction. 109 Troubleshooting Buttons do not work . • During Easy Handycam operation, the available buttons are limited. If the problem persists, remove the power source and contact your camcorder and ...

Operating Guide
Page 120
... dub correctly using the A/V connecting cable. • The A/V connecting cable is full, or the added scenes exceed 999. to edit. • There are not displayed on the LCD screen or the viewfinder (For DCR-DVD305/DVD755). • Touch t [REC CTRL] (p.98). Dubbing/Connecting to other device on your camcorder (p.96, 98). 120 Scenes cannot...
... dub correctly using the A/V connecting cable. • The A/V connecting cable is full, or the added scenes exceed 999. to edit. • There are not displayed on the LCD screen or the viewfinder (For DCR-DVD305/DVD755). • Touch t [REC CTRL] (p.98). Dubbing/Connecting to other device on your camcorder (p.96, 98). 120 Scenes cannot...
Operating Guide
Page 122
... USB device other than the keyboard, the mouse, and the camcorder from the computer. • Disconnect the cable from the computer and camcorder, restart the computer, then connect them again correctly. Unable to unfinalize a disc (p.63). The [Device Manager] window appears. 5 Make sure that [SONY DDX-C1002 USB Device] appears in [DVD/CD-ROM...
... USB device other than the keyboard, the mouse, and the camcorder from the computer. • Disconnect the cable from the computer and camcorder, restart the computer, then connect them again correctly. Unable to unfinalize a disc (p.63). The [Device Manager] window appears. 5 Make sure that [SONY DDX-C1002 USB Device] appears in [DVD/CD-ROM...


