
Limited Warranty (US Only)
Page 1
... protection, to you enter into a service contract with the Sony Partnership within the Warranty period must pay for one (1) year. For your authorized dealer, call: 1-800-488-SONY (7669) Printed in exchange for defective parts for a period of one (1) year. 4-557-172-02 General Stereo/Hifi Components/Tape Decks ® CD Players/Mini Disc Players/Audio Systems Hifi Audio LIMITED WARRANTY Sony Electronics Inc. ("Sony...
... protection, to you enter into a service contract with the Sony Partnership within the Warranty period must pay for one (1) year. For your authorized dealer, call: 1-800-488-SONY (7669) Printed in exchange for defective parts for a period of one (1) year. 4-557-172-02 General Stereo/Hifi Components/Tape Decks ® CD Players/Mini Disc Players/Audio Systems Hifi Audio LIMITED WARRANTY Sony Electronics Inc. ("Sony...
Operating Instructions
Page 2
... like. Owner's Record The model and serial numbers are provided for help. Model No. This equipment generates, uses, and can be determined by one wider than the other apparatus (including amplifiers) that to radio communications. Connect the equipment into your Sony dealer regarding this product. Record the serial number in the U.S.A This symbol is no guarantee that any heat sources such as...
... like. Owner's Record The model and serial numbers are provided for help. Model No. This equipment generates, uses, and can be determined by one wider than the other apparatus (including amplifiers) that to radio communications. Connect the equipment into your Sony dealer regarding this product. Record the serial number in the U.S.A This symbol is no guarantee that any heat sources such as...
Operating Instructions
Page 4
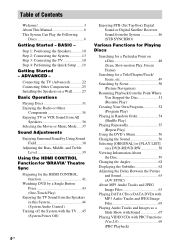
... All Speakers 36 Selecting the Movie or Music Mode..... 37 Sound Adjustments Enjoying Surround Sound by Using Sound Field 38 Adjusting the Bass, Middle, and Treble Level 39 Using the HDMI CONTROL Function for 'BRAVIA' Theatre Sync Preparing for the HDMI CONTROL function 41 Watching DVD by a Single Button Press 43 (One-Touch Play) Enjoying the TV Sound from the Speakers in this System 44 (System Audio Control) Turning off the System with the TV ..... 45 (System Power Off) Enjoying STB (Set Top Box) Digital Sound or Digital Satellite Receiver Sound from the System...
... All Speakers 36 Selecting the Movie or Music Mode..... 37 Sound Adjustments Enjoying Surround Sound by Using Sound Field 38 Adjusting the Bass, Middle, and Treble Level 39 Using the HDMI CONTROL Function for 'BRAVIA' Theatre Sync Preparing for the HDMI CONTROL function 41 Watching DVD by a Single Button Press 43 (One-Touch Play) Enjoying the TV Sound from the Speakers in this System 44 (System Audio Control) Turning off the System with the TV ..... 45 (System Power Off) Enjoying STB (Set Top Box) Digital Sound or Digital Satellite Receiver Sound from the System...
Operating Instructions
Page 5
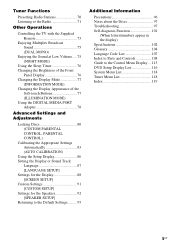
Tuner Functions Presetting Radio Stations 70 Listening to the Radio 71 Other Operations Controlling the TV with the Supplied Remote 73 Enjoying Multiplex Broadcast Sound 75 (DUAL MONO) Enjoying the Sound at Low Volume..... 75 (NIGHT MODE) Using the Sleep Timer 76 Changing the Brightness of the Front Panel Display 76 Changing the Display Mode 77 (INFORMATION MODE) Changing the Display Appearance of the Soft-touch Buttons 77 (ILLUMINATION MODE) Using the DIGITAL MEDIA PORT Adapter 78 Advanced Settings and Adjustments Locking Discs 80 (CUSTOM...
Tuner Functions Presetting Radio Stations 70 Listening to the Radio 71 Other Operations Controlling the TV with the Supplied Remote 73 Enjoying Multiplex Broadcast Sound 75 (DUAL MONO) Enjoying the Sound at Low Volume..... 75 (NIGHT MODE) Using the Sleep Timer 76 Changing the Brightness of the Front Panel Display 76 Changing the Display Mode 77 (INFORMATION MODE) Changing the Display Appearance of the Soft-touch Buttons 77 (ILLUMINATION MODE) Using the DIGITAL MEDIA PORT Adapter 78 Advanced Settings and Adjustments Locking Discs 80 (CUSTOM...

Operating Instructions
Page 20
... 0.0dB CENTER : 16ft 4.87m + 1.0dB SUBWOOFER : 16ft 4.87m + 4.0dB SURROUND L : 10ft 3.04m - 2.0dB SURROUND R : 10ft 3.04m - 2.0dB If OK, unplug calibration mic and select "YES". To quit the Quick Setup Press DISPLAY in any of the settings, see "Calibrating the Appropriate Settings Automatically" (page 83). 20US Do not connect other microphones. Note • The ECM-AC2 jack is used for the Speakers" (page 92). • If you cancel [AUTO CALIBRATION...
... 0.0dB CENTER : 16ft 4.87m + 1.0dB SUBWOOFER : 16ft 4.87m + 4.0dB SURROUND L : 10ft 3.04m - 2.0dB SURROUND R : 10ft 3.04m - 2.0dB If OK, unplug calibration mic and select "YES". To quit the Quick Setup Press DISPLAY in any of the settings, see "Calibrating the Appropriate Settings Automatically" (page 83). 20US Do not connect other microphones. Note • The ECM-AC2 jack is used for the Speakers" (page 92). • If you cancel [AUTO CALIBRATION...

Operating Instructions
Page 34
...; When you press FUNCTION, the mode of the control unit. DVD t FM t AM t TV t SAT/CABLE t DMPORT t DVD t ... FUNCTION Press FUNCTION repeatedly until the desired function name appears in the following sequence. Each time you use a TV, VCR, or other components connected to the operating instructions supplied with the function "TV" and "SAT/CABLE." Basic Operations Enjoying the Radio or Other Components Selecting the connected component You can assign a digital sound input corresponding with the...
...; When you press FUNCTION, the mode of the control unit. DVD t FM t AM t TV t SAT/CABLE t DMPORT t DVD t ... FUNCTION Press FUNCTION repeatedly until the desired function name appears in the following sequence. Each time you use a TV, VCR, or other components connected to the operating instructions supplied with the function "TV" and "SAT/CABLE." Basic Operations Enjoying the Radio or Other Components Selecting the connected component You can assign a digital sound input corresponding with the...
Operating Instructions
Page 40
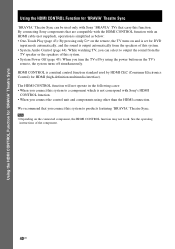
... select to products featuring 'BRAVIA' Theatre Sync. HDMI CONTROL is a mutual control function standard used only with Sony's HDMI CONTROL function. • When you turn the TV off by HDMI CEC (Consumer Electronics Control) for DVD input mode automatically, and the sound is output automatically from the TV speaker or the speakers of the component. 40US See the operating instructions of this system. • System Power Off (page 45): When you connect the control unit and components using the power button on the TV's remote...
... select to products featuring 'BRAVIA' Theatre Sync. HDMI CONTROL is a mutual control function standard used only with Sony's HDMI CONTROL function. • When you turn the TV off by HDMI CEC (Consumer Electronics Control) for DVD input mode automatically, and the sound is output automatically from the TV speaker or the speakers of the component. 40US See the operating instructions of this system. • System Power Off (page 45): When you connect the control unit and components using the power button on the TV's remote...
Operating Instructions
Page 41
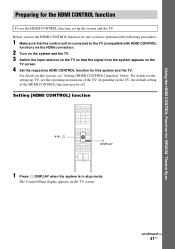
.... Setting [HDMI CONTROL] function X/x, DISPLAY 1 Press DISPLAY when the system is connected to the TV (compatible with HDMI CONTROL function) via the HDMI connection. 2 Turn on the system and the TV. 3 Switch the input selector on the TV so that the signal from the system appears on the setting up the system and the TV. The Control Menu display appears on this system and the TV. Using the HDMI CONTROL Function for 'BRAVIA' Theatre Sync Preparing for this system, see the operating instructions of the HDMI CONTROL function...
.... Setting [HDMI CONTROL] function X/x, DISPLAY 1 Press DISPLAY when the system is connected to the TV (compatible with HDMI CONTROL function) via the HDMI connection. 2 Turn on the system and the TV. 3 Switch the input selector on the TV so that the signal from the system appears on the setting up the system and the TV. The Control Menu display appears on this system and the TV. Using the HDMI CONTROL Function for 'BRAVIA' Theatre Sync Preparing for this system, see the operating instructions of the HDMI CONTROL function...

Operating Instructions
Page 44
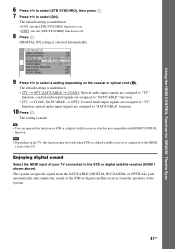
... can adjust the system volume using the TV volume. • If you turn on this system by PAP (picture and picture) mode, the DVD playback will be output from the TV speakers. To use System Audio Control as follows: • When you are watching the TV. You can also operate System Audio Control from the TV menu. You can use System Audio Control, connect the control unit and the TV with an audio cord (not supplied) (A) and an HDMI cable (not supplied) (B). : Audio signal...
... can adjust the system volume using the TV volume. • If you turn on this system by PAP (picture and picture) mode, the DVD playback will be output from the TV speakers. To use System Audio Control as follows: • When you are watching the TV. You can also operate System Audio Control from the TV menu. You can use System Audio Control, connect the control unit and the TV with an audio cord (not supplied) (A) and an HDMI cable (not supplied) (B). : Audio signal...

Operating Instructions
Page 46
... 2 HDMI input jacks. • The names of HDMI inputs in the following illustration, you can enjoy digital sound and images of STB or a digital satellite receiver are examples. : Video signal flow : Audio signal flow To HDMI 2 (HDMI cable) TV To HDMI 1 (HDMI cable) Using the HDMI CONTROL Function for 'BRAVIA' Theatre Sync Rear of the control unit DMPORT STB C Digital coaxial cord or digital optical cord Setting [STB SYNCHRO] 1 Press "/1. 2 Press DISPLAY when the system is output from the TV by the HDMI connection (HDMI 1 shown below). Sound is in stop mode...
... 2 HDMI input jacks. • The names of HDMI inputs in the following illustration, you can enjoy digital sound and images of STB or a digital satellite receiver are examples. : Video signal flow : Audio signal flow To HDMI 2 (HDMI cable) TV To HDMI 1 (HDMI cable) Using the HDMI CONTROL Function for 'BRAVIA' Theatre Sync Rear of the control unit DMPORT STB C Digital coaxial cord or digital optical cord Setting [STB SYNCHRO] 1 Press "/1. 2 Press DISPLAY when the system is output from the TV by the HDMI connection (HDMI 1 shown below). Sound is in stop mode...
Operating Instructions
Page 47
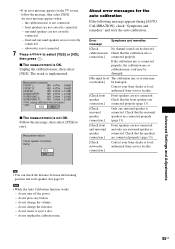
..." function, optical audio input signals are assigned to "SAT/CABLE" function. 10 Press . Enjoying digital sound Select the HDMI input of the system. 47US The default setting is made. Note • Depending on the TV, this function on STB or a digital satellite receiver which is not compatible with HDMI CONTROL function. The system accepts the signal from the SAT/CABLE (DIGITAL IN COAXIAL or OPTICAL) jack automatically and outputs the sound of the STB or digital satellite receiver from the speakers of your TV connected to...
..." function, optical audio input signals are assigned to "SAT/CABLE" function. 10 Press . Enjoying digital sound Select the HDMI input of the system. 47US The default setting is made. Note • Depending on the TV, this function on STB or a digital satellite receiver which is not compatible with HDMI CONTROL function. The system accepts the signal from the SAT/CABLE (DIGITAL IN COAXIAL or OPTICAL) jack automatically and outputs the sound of the STB or digital satellite receiver from the speakers of your TV connected to...

Operating Instructions
Page 52
X/x/c, H DISPLAY 1 Press DISPLAY. The Control Menu display appears on the disc to 99 tracks. Note • If [MULTI-DISC RESUME] in [CUSTOM SETUP] is set [MULTI-DISC RESUME] in VR mode, VIDEO CDs, CDs, DATA CDs, and DATA DVDs, the system remembers the resume playback point for the current disc. • Resume Play does not work during Program Play and Shuffle Play. • This function may be cleared when: - the system enters standby mode (DATA CD/ DATA...
X/x/c, H DISPLAY 1 Press DISPLAY. The Control Menu display appears on the disc to 99 tracks. Note • If [MULTI-DISC RESUME] in [CUSTOM SETUP] is set [MULTI-DISC RESUME] in VR mode, VIDEO CDs, CDs, DATA CDs, and DATA DVDs, the system remembers the resume playback point for the current disc. • Resume Play does not work during Program Play and Shuffle Play. • This function may be cleared when: - the system enters standby mode (DATA CD/ DATA...

Operating Instructions
Page 53
... turn off the Control Menu display Press DISPLAY repeatedly until the Control Menu display is displayed when you want to program. To change or cancel using X/x. TRACK - - 7. TRACK - - 7. Press X/x to normal play the same program again, select [ON] in the programmed order 1 Follow steps 1 to 5. TRACK - - 6. TRACK - - 5. If you want to change or cancel a program 1 Follow steps 1 to 3 of "Creating Your Own Program." 2 Select the program number of programmed tracks 4 Press c. To cancel a program, select...
... turn off the Control Menu display Press DISPLAY repeatedly until the Control Menu display is displayed when you want to program. To change or cancel using X/x. TRACK - - 7. TRACK - - 7. Press X/x to normal play the same program again, select [ON] in the programmed order 1 Follow steps 1 to 5. TRACK - - 6. TRACK - - 5. If you want to change or cancel a program 1 Follow steps 1 to 3 of "Creating Your Own Program." 2 Select the program number of programmed tracks 4 Press c. To cancel a program, select...

Operating Instructions
Page 81
... level. 1 Press DISPLAY while the system is already set . The system is set . The [PARENTAL CONTROL] function allows you to a predetermined level such as the age of the users. The Control Menu display appears on the TV screen. Enter a 4-digit password using the number buttons, then press . Advanced Settings and Adjustments continued 81US PARENTAL CONTROL Enter a new 4-digit password, then press ENTER . The display for children [PARENTAL CONTROL] (DVD VIDEO only) Playback of specific discs [CUSTOM PARENTAL CONTROL]." 2 Press X/x to select [PARENTAL CONTROL...
... level. 1 Press DISPLAY while the system is already set . The system is set . The [PARENTAL CONTROL] function allows you to a predetermined level such as the age of the users. The Control Menu display appears on the TV screen. Enter a 4-digit password using the number buttons, then press . Advanced Settings and Adjustments continued 81US PARENTAL CONTROL Enter a new 4-digit password, then press ENTER . The display for children [PARENTAL CONTROL] (DVD VIDEO only) Playback of specific discs [CUSTOM PARENTAL CONTROL]." 2 Press X/x to select [PARENTAL CONTROL...

Operating Instructions
Page 83
... parental control level while playing the disc. Calibrating the Appropriate Settings Automatically (AUTO CALIBRATION) D. You cannot turn the volume down. Advanced Settings and Adjustments continued 83US If you press and input the correct number. FUNCTION C/X/x/c, DISPLAY Note • Loud test sound is canceled, the level returns to the previous level. If the Resume Play mode is output when [AUTO CALIBRATION] starts. Changing the password 1 Press DISPLAY while the system is in stop mode. C. C. (Digital Cinema Auto Calibration) can set the appropriate surround sound...
... parental control level while playing the disc. Calibrating the Appropriate Settings Automatically (AUTO CALIBRATION) D. You cannot turn the volume down. Advanced Settings and Adjustments continued 83US If you press and input the correct number. FUNCTION C/X/x/c, DISPLAY Note • Loud test sound is canceled, the level returns to the previous level. If the Resume Play mode is output when [AUTO CALIBRATION] starts. Changing the password 1 Press DISPLAY while the system is in stop mode. C. C. (Digital Cinema Auto Calibration) can set the appropriate surround sound...
Operating Instructions
Page 85
... not change the volume. - • If an error message appears on the TV screen, follow the message, then select [YES]. An error message appears when: - x The measurement is implemented. Contact your Sony dealer or local authorized Sony service facility. do not insert or eject a disc. - do not unplug the calibration mic. do not press any button. - Advanced Settings and Adjustments 85US Check speaker connection. If the calibration mic is connected...
... not change the volume. - • If an error message appears on the TV screen, follow the message, then select [YES]. An error message appears when: - x The measurement is implemented. Contact your Sony dealer or local authorized Sony service facility. do not insert or eject a disc. - do not unplug the calibration mic. do not press any button. - Advanced Settings and Adjustments 85US Check speaker connection. If the calibration mic is connected...
Operating Instructions
Page 91
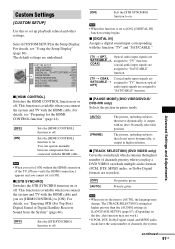
... other settings. Select [CUSTOM SETUP] in high resolution. Sets the [HDMI CONTROL] function to set [HDMI CONTROL] to [AUTO], the language may not work.) • If PCM, DTS, Dolby Digital sound, and MPEG audio tracks have the same number of channels priority when you connect the system and TV with the HDMI cable. Custom Settings [CUSTOM SETUP] Use this to on. x [STB SYNCHRO] Switches the STB SYNCHRO function on which contains the highest number of channels, the system continued 91US x [TRACK SELECTION] (DVD VIDEO...
... other settings. Select [CUSTOM SETUP] in high resolution. Sets the [HDMI CONTROL] function to set [HDMI CONTROL] to [AUTO], the language may not work.) • If PCM, DTS, Dolby Digital sound, and MPEG audio tracks have the same number of channels priority when you connect the system and TV with the HDMI cable. Custom Settings [CUSTOM SETUP] Use this to on. x [STB SYNCHRO] Switches the STB SYNCHRO function on which contains the highest number of channels, the system continued 91US x [TRACK SELECTION] (DVD VIDEO...
Operating Instructions
Page 98
... the speakers and components are connected correctly and securely. • Perform [AUTO CALIBRATION] (page 83). Color irregularity occurs on the remote if "MUTING ON" is displayed in the front panel display. • The system is in pause mode or in Slow-motion Play mode. No sound is output from the HDMI OUT jack. • Set [AUDIO (HDMI)] in [TV TYPE] of video signal output from your TV set . • Make sure that no sound. • The speaker cord...
... the speakers and components are connected correctly and securely. • Perform [AUTO CALIBRATION] (page 83). Color irregularity occurs on the remote if "MUTING ON" is displayed in the front panel display. • The system is in pause mode or in Slow-motion Play mode. No sound is output from the HDMI OUT jack. • Set [AUDIO (HDMI)] in [TV TYPE] of video signal output from your TV set . • Make sure that no sound. • The speaker cord...

Operating Instructions
Page 99
... the disc with automatic tuning). Operation Radio stations cannot be monaural or stereo even if the sound track is connected securely. Preset the stations (page 70). • Press DISPLAY so that the antenna (aerial) is recorded in with the playback side facing down . The remote does not function. • There are playing a Dolby Digital, DTS, or MPEG audio sound track. • Make sure the sound field function is dirty or flawed. Remove the disc...
... the disc with automatic tuning). Operation Radio stations cannot be monaural or stereo even if the sound track is connected securely. Preset the stations (page 70). • Press DISPLAY so that the antenna (aerial) is recorded in with the playback side facing down . The remote does not function. • There are playing a Dolby Digital, DTS, or MPEG audio sound track. • Make sure the sound field function is dirty or flawed. Remove the disc...

Operating Instructions
Page 119
... Q Quick Setup 19 R Radio 71 Radio Stations 70 Region Code 8, 105 119US Index Numerics 16:9 88 4:3 LETTER BOX 88 4:3 OUTPUT 89 4:3 PAN SCAN 88 5.1 Channel Surround 57 A A/V SYNC 63 ALBUM 49 Album 104 AM Step 70 ANGLE 62 ATTENUATE 35 AUDIO 87 AUDIO (HDMI) 92 AUDIO DRC 92 Auto Calibration 83, 104 B BACKGROUND 88 BASS 39 Batteries 9 BLACK LEVEL 89 BLACK LEVEL (COMPONENT OUT) 89 C CHAPTER 49 Chapter 104 Continuous play 31 Control Menu Display 113 Control...
... Q Quick Setup 19 R Radio 71 Radio Stations 70 Region Code 8, 105 119US Index Numerics 16:9 88 4:3 LETTER BOX 88 4:3 OUTPUT 89 4:3 PAN SCAN 88 5.1 Channel Surround 57 A A/V SYNC 63 ALBUM 49 Album 104 AM Step 70 ANGLE 62 ATTENUATE 35 AUDIO 87 AUDIO (HDMI) 92 AUDIO DRC 92 Auto Calibration 83, 104 B BACKGROUND 88 BASS 39 Batteries 9 BLACK LEVEL 89 BLACK LEVEL (COMPONENT OUT) 89 C CHAPTER 49 Chapter 104 Continuous play 31 Control Menu Display 113 Control...


