
Child Safety: It Makes A Difference Where Your TV Stands
Page 1
The home theater entertainment experience is large enough to support the weight of your television (...understand the manufacturer's instructions and product safety notices. 4 Don't allow children to climb on or play with your home. The Industry Cares! The industry is a Sector of the Electronic Industries Alliance Sometimes televisions are improperly secured or ... potentially push or pull a TV over. 7 Share our safety message on this hidden hazard of the home with furniture and television sets. 5 Avoid placing any items on top of TVs such as VCRs and remotes that is a growing ...
The home theater entertainment experience is large enough to support the weight of your television (...understand the manufacturer's instructions and product safety notices. 4 Don't allow children to climb on or play with your home. The Industry Cares! The industry is a Sector of the Electronic Industries Alliance Sometimes televisions are improperly secured or ... potentially push or pull a TV over. 7 Share our safety message on this hidden hazard of the home with furniture and television sets. 5 Avoid placing any items on top of TVs such as VCRs and remotes that is a growing ...

Limited Warranty (US Only)
Page 1
... or visit the Sony Web Site: www.sony.com For an accessory or part not available from the Product. Some states do not allow the exclusion or limitation of , or to service the Product. This warranty does not cover customer instruction, installation, set up adjustments or ...Tape Decks ® CD Players/Mini Disc Players/Audio Systems Hifi Audio LIMITED WARRANTY Sony Electronics Inc. ("Sony") warrants this Product is invalid if the factory applied serial number has been altered or removed from your convenience, Sony Electronics Inc. This warranty does not cover Products sold...
... or visit the Sony Web Site: www.sony.com For an accessory or part not available from the Product. Some states do not allow the exclusion or limitation of , or to service the Product. This warranty does not cover customer instruction, installation, set up adjustments or ...Tape Decks ® CD Players/Mini Disc Players/Audio Systems Hifi Audio LIMITED WARRANTY Sony Electronics Inc. ("Sony") warrants this Product is invalid if the factory applied serial number has been altered or removed from your convenience, Sony Electronics Inc. This warranty does not cover Products sold...
Operating Instructions
Page 4
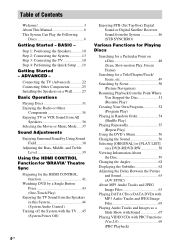
...Step 4: Performing the Quick Setup ..... 19 Getting Started - ADVANCED - BASIC - Table of Contents Welcome 3 About This Manual 6 This System Can Play the Following Discs 6 Getting Started - Connecting the TV (Advanced 22 Connecting Other Components 25 Installing the Speakers on a Wall.......... ... Enjoying the TV Sound from the Speakers in this System 44 (System Audio Control) Turning off the System with the TV ..... 45 (System Power Off) Enjoying STB (Set Top Box) Digital Sound or Digital Satellite Receiver Sound from the System 46 (STB SYNCHRO) Various Functions for Playing Discs ...
...Step 4: Performing the Quick Setup ..... 19 Getting Started - ADVANCED - BASIC - Table of Contents Welcome 3 About This Manual 6 This System Can Play the Following Discs 6 Getting Started - Connecting the TV (Advanced 22 Connecting Other Components 25 Installing the Speakers on a Wall.......... ... Enjoying the TV Sound from the Speakers in this System 44 (System Audio Control) Turning off the System with the TV ..... 45 (System Power Off) Enjoying STB (Set Top Box) Digital Sound or Digital Satellite Receiver Sound from the System 46 (STB SYNCHRO) Various Functions for Playing Discs ...
Operating Instructions
Page 5
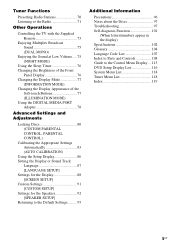
...the Appropriate Settings Automatically 83 (AUTO CALIBRATION) Using the Setup Display 86 Setting the Display or Sound Track Language 87 [LANGUAGE SETUP] Settings for the Display 88 [SCREEN SETUP] Custom Settings 91 [CUSTOM SETUP] Settings for the ...Settings.......... 95 Additional Information Precautions 96 Notes about the Discs 97 Troubleshooting 97 Self-diagnosis Function 101 (When letters/numbers appear in the display) Specifications 102 Glossary 104 Language Code List 107 Index to Parts and Controls 108 Guide to the Control Menu Display ... 113 DVD Setup Display List 116 System...
...the Appropriate Settings Automatically 83 (AUTO CALIBRATION) Using the Setup Display 86 Setting the Display or Sound Track Language 87 [LANGUAGE SETUP] Settings for the Display 88 [SCREEN SETUP] Custom Settings 91 [CUSTOM SETUP] Settings for the ...Settings.......... 95 Additional Information Precautions 96 Notes about the Discs 97 Troubleshooting 97 Self-diagnosis Function 101 (When letters/numbers appear in the display) Specifications 102 Glossary 104 Language Code List 107 Index to Parts and Controls 108 Guide to the Control Menu Display ... 113 DVD Setup Display List 116 System...
Operating Instructions
Page 8
... operating instructions supplied with Dolby* Digital and Dolby Pro Logic (II) adaptive matrix surround decoder and the DTS** Digital Surround System. * Manufactured under license from Dolby Laboratories. Reverse engineering or disassembly is a two sided disc product which mates DVD recorded...not guaranteed. Depending on the DVD VIDEO, no region code indication may be intentionally set by U.S. Copyrights This product incorporates copyright protection technology that is intended for home and other intellectual property rights. Be sure to play any other side. DVD ...
... operating instructions supplied with Dolby* Digital and Dolby Pro Logic (II) adaptive matrix surround decoder and the DTS** Digital Surround System. * Manufactured under license from Dolby Laboratories. Reverse engineering or disassembly is a two sided disc product which mates DVD recorded...not guaranteed. Depending on the DVD VIDEO, no region code indication may be intentionally set by U.S. Copyrights This product incorporates copyright protection technology that is intended for home and other intellectual property rights. Be sure to play any other side. DVD ...

Operating Instructions
Page 10
... subwoofer is placed outside (3). Close to a wall Note • If the subwoofer is recommended that the subwoofer should be unstable. It is to adjust the setting of the front speaker, the distance should be placed ahead of the distance from the listening position (1). Front speaker (L) Center speaker Subwoofer 2 Front speaker (R) 111...
... subwoofer is placed outside (3). Close to a wall Note • If the subwoofer is recommended that the subwoofer should be unstable. It is to adjust the setting of the front speaker, the distance should be placed ahead of the distance from the listening position (1). Front speaker (L) Center speaker Subwoofer 2 Front speaker (R) 111...

Operating Instructions
Page 11
... in an inclined position. • Do not place the speakers in a cabinet, etc. Very humid - For details, see "Calibrating the Appropriate Settings Automatically" (page 83). Subject to vibrations - Tip • When you change the positions of the speakers, it is installed. • Do not...Image distortion on the TV screen may occur depending on the location of the subwoofer where the speaker unit is recommended that you change the settings. Subject to direct sunlight • Use caution when placing the speakers and/or speaker stands (not supplied) that are attached with the...
... in an inclined position. • Do not place the speakers in a cabinet, etc. Very humid - For details, see "Calibrating the Appropriate Settings Automatically" (page 83). Subject to vibrations - Tip • When you change the positions of the speakers, it is installed. • Do not...Image distortion on the TV screen may occur depending on the location of the subwoofer where the speaker unit is recommended that you change the settings. Subject to direct sunlight • Use caution when placing the speakers and/or speaker stands (not supplied) that are attached with the...
Operating Instructions
Page 15
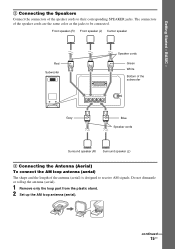
...connectors of the antenna (aerial) is designed to receive AM signals. Front speaker (R) Front speaker (L) Center speaker Red Subwoofer SYSTEM CONTROL ONLY FOR HCD-IS10 SPEAKER ONLY FOR SS-IS10 FRONT R FRONT L SUR R SUR L CENTER Speaker cords Green White Bottom of the subwoofer Gray Blue Speaker cords Surround ... SPEAKER jacks. Do not dismantle or roll up the antenna (aerial). 1 Remove only the loop part from the plastic stand. 2 Set up the AM loop antenna (aerial). continued 15US Getting Started - BASIC - 2 Connecting the Speakers Connect the connectors of the speaker cords ...
...connectors of the antenna (aerial) is designed to receive AM signals. Front speaker (R) Front speaker (L) Center speaker Red Subwoofer SYSTEM CONTROL ONLY FOR HCD-IS10 SPEAKER ONLY FOR SS-IS10 FRONT R FRONT L SUR R SUR L CENTER Speaker cords Green White Bottom of the subwoofer Gray Blue Speaker cords Surround ... SPEAKER jacks. Do not dismantle or roll up the antenna (aerial). 1 Remove only the loop part from the plastic stand. 2 Set up the AM loop antenna (aerial). continued 15US Getting Started - BASIC - 2 Connecting the Speakers Connect the connectors of the speaker cords ...
Operating Instructions
Page 19
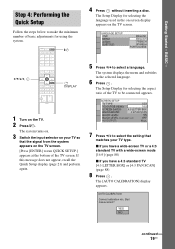
...[16:9] (page 88) x If you have a 4:3 standard TV [4:3 LETTER BOX] or [4:3 PAN SCAN] (page 88) 8 Press . The Setup Display for using the system. The system turns on. 3 Switch the input selector on your TV so that matches your TV type. YES NO continued 19US The... 4:3 LETTER BOX BACKGROUND: 4:3 PAN SCAN BLACK LEVEL: ON BLACK LEVEL (COMPONENT OUT): OFF 4:3 OUTPUT: FULL 7 Press X/x to select the setting that the signal from the system appears on the TV screen. [Press [ENTER] to make the minimum number of the TV screen. Start measurement? The [AUTO CALIBRATION] display appears...
...[16:9] (page 88) x If you have a 4:3 standard TV [4:3 LETTER BOX] or [4:3 PAN SCAN] (page 88) 8 Press . The Setup Display for using the system. The system turns on. 3 Switch the input selector on your TV so that matches your TV type. YES NO continued 19US The... 4:3 LETTER BOX BACKGROUND: 4:3 PAN SCAN BLACK LEVEL: ON BLACK LEVEL (COMPONENT OUT): OFF 4:3 OUTPUT: FULL 7 Press X/x to select the setting that the signal from the system appears on the TV screen. [Press [ENTER] to make the minimum number of the TV screen. Start measurement? The [AUTO CALIBRATION] display appears...

Operating Instructions
Page 20
...- 2.0dB If OK, unplug calibration mic and select "YES". To quit the Quick Setup Press DISPLAY in any of the settings, see "Calibrating the Appropriate Settings Automatically" (page 83). 20US Rear of each speaker should face the calibration mic, and there should be no obstruction between the ...AC2 jack Calibration mic 10 Press X/x to select [YES]. Be quiet during the measurement (which the system is finished. YES NO Note • The environment of the control unit, and set it may affect measurements. • If measurement fails, follow the message then retry [AUTO CALIBRATION]....
...- 2.0dB If OK, unplug calibration mic and select "YES". To quit the Quick Setup Press DISPLAY in any of the settings, see "Calibrating the Appropriate Settings Automatically" (page 83). 20US Rear of each speaker should face the calibration mic, and there should be no obstruction between the ...AC2 jack Calibration mic 10 Press X/x to select [YES]. Be quiet during the measurement (which the system is finished. YES NO Note • The environment of the control unit, and set it may affect measurements. • If measurement fails, follow the message then retry [AUTO CALIBRATION]....
Operating Instructions
Page 23
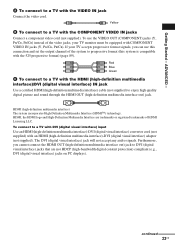
... supplied) to a TV with the COMPONENT VIDEO IN jacks Connect a component video cord (not supplied). HDMI (high-definition multimedia interface) The system incorporates High-Definition Multimedia Interface (HDMITM) technology. To use the VIDEO OUT (COMPONENT) jacks (Y, PB/CB, PR/CR) instead of HDMI ..., you cannot connect the HDMI OUT (high-definition multimedia interface out) jack to progressive format (this connection and set the output channel of the system to DVI (digital visual interface) jacks that are trademarks or registered trademarks of the video jacks, your TV accepts...
... supplied) to a TV with the COMPONENT VIDEO IN jacks Connect a component video cord (not supplied). HDMI (high-definition multimedia interface) The system incorporates High-Definition Multimedia Interface (HDMITM) technology. To use the VIDEO OUT (COMPONENT) jacks (Y, PB/CB, PR/CR) instead of HDMI ..., you cannot connect the HDMI OUT (high-definition multimedia interface out) jack to progressive format (this connection and set the output channel of the system to DVI (digital visual interface) jacks that are trademarks or registered trademarks of the video jacks, your TV accepts...

Operating Instructions
Page 32
...1 Turn on your TV. 2 Switch the input selector on the control unit. • When you connect the system and TV with the HDMI cable, you set to on the remote. - The system starts playback (continuous play). Touch briefly VOLUME +/- (soft-touch button) on the TV to select "DVD." The... system turns on the control unit, when "VOLUME XX" (X is a number) appears, touch and hold the VOLUME +/- "No ...
...1 Turn on your TV. 2 Switch the input selector on the control unit. • When you connect the system and TV with the HDMI cable, you set to on the remote. - The system starts playback (continuous play). Touch briefly VOLUME +/- (soft-touch button) on the TV to select "DVD." The... system turns on the control unit, when "VOLUME XX" (X is a number) appears, touch and hold the VOLUME +/- "No ...
Operating Instructions
Page 35
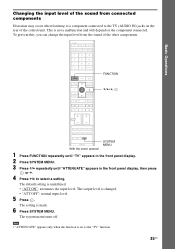
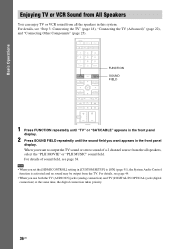
The default setting is made. 6 Press SYSTEM MENU. Note • "ATTENUATE" appears only when the function is set to select a setting. The setting is underlined. • "ATT ON": attenuates the input level. To prevent this, you can change the input level from connected components ... malfunction and will depend on the rear of the other components. This is changed. • "ATT OFF": normal input level. 5 Press . The system menu turns off. FUNCTION X/x/c, SYSTEM MENU With the cover opened. 1 Press FUNCTION repeatedly until "TV" appears in the front panel display. 2 Press...
The default setting is made. 6 Press SYSTEM MENU. Note • "ATTENUATE" appears only when the function is set to select a setting. The setting is underlined. • "ATT ON": attenuates the input level. To prevent this, you can change the input level from connected components ... malfunction and will depend on the rear of the other components. This is changed. • "ATT OFF": normal input level. 5 Press . The system menu turns off. FUNCTION X/x/c, SYSTEM MENU With the cover opened. 1 Press FUNCTION repeatedly until "TV" appears in the front panel display. 2 Press...
Operating Instructions
Page 36
... see page 38. When you want appears in the front panel display. 2 Press SOUND FIELD repeatedly until the sound field you set the [HDMI CONTROL] setting in this system. FUNCTION SOUND FIELD 1 Press FUNCTION repeatedly until "TV" or "SAT/CABLE" appears in the front panel display. Note •... When you want to [ON] (page 91), the System Audio Control function is activated and no sound may be output from the TV...
... see page 38. When you want appears in the front panel display. 2 Press SOUND FIELD repeatedly until the sound field you set the [HDMI CONTROL] setting in this system. FUNCTION SOUND FIELD 1 Press FUNCTION repeatedly until "TV" or "SAT/CABLE" appears in the front panel display. Note •... When you want to [ON] (page 91), the System Audio Control function is activated and no sound may be output from the TV...

Operating Instructions
Page 37
The default setting is selected. When neither "MOVIE" or "MUSIC" lights up in the front panel display, "AUTO" is underlined. • "AUTO": selects the mode automatically to produce ...
The default setting is selected. When neither "MOVIE" or "MUSIC" lights up in the front panel display, "AUTO" is underlined. • "AUTO": selects the mode automatically to produce ...
Operating Instructions
Page 40
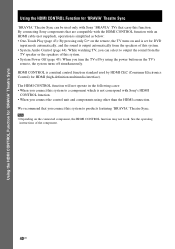
...interface). By connecting Sony components that you connect this system to output the sound from the speakers of this system. • System Audio Control (page 44): While watching TV, you connect this system to a component which is not correspond with Sony 'BRAVIA' TVs that carry this system. • System Power Off (page...page 43): By pressing only H on the remote, the TV turns on and is set for DVD input mode automatically, and the sound is a mutual control function standard used only with Sony's HDMI CONTROL function. • When you turn the TV off simultaneously. See the ...
...interface). By connecting Sony components that you connect this system to output the sound from the speakers of this system. • System Audio Control (page 44): While watching TV, you connect this system to a component which is not correspond with Sony 'BRAVIA' TVs that carry this system. • System Power Off (page...page 43): By pressing only H on the remote, the TV turns on and is set for DVD input mode automatically, and the sound is a mutual control function standard used only with Sony's HDMI CONTROL function. • When you turn the TV off simultaneously. See the ...
Operating Instructions
Page 41
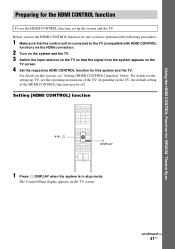
... To use the HDMI CONTROL function, be off. continued 41US For details on this system and the TV. For details on the TV, the default setting of the TV. Depending on the setting up the system and the TV. Before you have performed the following procedures. 1 Make sure that... the signal from the system appears on the TV screen. Setting [HDMI CONTROL] function X/x, DISPLAY 1 Press DISPLAY when the system is connected to the...
... To use the HDMI CONTROL function, be off. continued 41US For details on this system and the TV. For details on the TV, the default setting of the TV. Depending on the setting up the system and the TV. Before you have performed the following procedures. 1 Make sure that... the signal from the system appears on the TV screen. Setting [HDMI CONTROL] function X/x, DISPLAY 1 Press DISPLAY when the system is connected to the...
Operating Instructions
Page 42
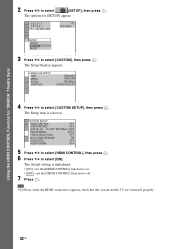
...to select [HDMI CONTROL], then press . 6 Press X/x to select [CUSTOM SETUP], then press . Note • If [Please verify the HDMI connection.] appears, check that this system and the TV are connected properly. 42US Using the HDMI CONTROL Function for [SETUP] appear. 1 2 ( 2 7 ) 1 8 ( 3 4 ) T 0:00:02 ... CUSTOM RESET BNR 3 Press X/x to select [SETUP], then press . The Setup item is underlined. • [ON]: sets the [HDMI CONTROL] function to on. • [OFF]: sets the [HDMI CONTROL] function to off. 7 Press . The Setup Display appears. The options for 'BRAVIA' Theatre Sync 2...
...to select [HDMI CONTROL], then press . 6 Press X/x to select [CUSTOM SETUP], then press . Note • If [Please verify the HDMI connection.] appears, check that this system and the TV are connected properly. 42US Using the HDMI CONTROL Function for [SETUP] appear. 1 2 ( 2 7 ) 1 8 ( 3 4 ) T 0:00:02 ... CUSTOM RESET BNR 3 Press X/x to select [SETUP], then press . The Setup item is underlined. • [ON]: sets the [HDMI CONTROL] function to on. • [OFF]: sets the [HDMI CONTROL] function to off. 7 Press . The Setup Display appears. The options for 'BRAVIA' Theatre Sync 2...

Operating Instructions
Page 43
.... • Depending on . r Switches to [ON] (page 41). Note • When the "DMPORT" function is set to HDMI input. Press H on . r Plays back a DVD and outputs the sound. r Switches to "DVD" function. r Minimizes sound level. The system and the components with the HDMI connections turn on simultaneously, and DVD playback starts automatically...
.... • Depending on . r Switches to [ON] (page 41). Note • When the "DMPORT" function is set to HDMI input. Press H on . r Plays back a DVD and outputs the sound. r Switches to "DVD" function. r Minimizes sound level. The system and the components with the HDMI connections turn on simultaneously, and DVD playback starts automatically...

Operating Instructions
Page 44
... output for 'BRAVIA' Theatre Sync Enjoying the TV Sound from the Speakers in this system while watching the TV, TV sound is output from the TV, set [AUDIO (HDMI)] to "TV" function automatically while you are watching the TV. ... TV menu. Note • When the TV is turned on before turning on this System (System Audio Control) You can also operate System Audio Control from the speakers of the TV speakers is highlighted) or return to the ...TV. For details, see the operating instructions of the control unit Depending on the TV setting, the system turns on and switches to [ON] on the...
... output for 'BRAVIA' Theatre Sync Enjoying the TV Sound from the Speakers in this system while watching the TV, TV sound is output from the TV, set [AUDIO (HDMI)] to "TV" function automatically while you are watching the TV. ... TV menu. Note • When the TV is turned on before turning on this System (System Audio Control) You can also operate System Audio Control from the speakers of the TV speakers is highlighted) or return to the ...TV. For details, see the operating instructions of the control unit Depending on the TV setting, the system turns on and switches to [ON] on the...


