
Child Safety: It Makes A Difference Where Your TV Stands
Page 1
...remotes that may pique the children's curiosity. 6 Remember that is a growing trend, and larger televisions are popular purchases and are like most Americans, you have more than one television. As a result, TV sets may cause unnecessary injury. The Industry Cares! The home theater... entertainment experience is large enough to support the weight of television and consumer electronics furniture manufacturers to climb on or play with your home. Child Safety: It Makes A Difference Where Your TV ...
...remotes that may pique the children's curiosity. 6 Remember that is a growing trend, and larger televisions are popular purchases and are like most Americans, you have more than one television. As a result, TV sets may cause unnecessary injury. The Industry Cares! The home theater... entertainment experience is large enough to support the weight of television and consumer electronics furniture manufacturers to climb on or play with your home. Child Safety: It Makes A Difference Where Your TV ...
Operating Instructions
Page 5
Tuner Functions Presetting Radio Stations 70 Listening to the Radio 71 Other Operations Controlling the TV with the Supplied Remote 73 Enjoying Multiplex Broadcast Sound 75 (DUAL MONO) Enjoying the Sound at Low Volume..... 75 (NIGHT MODE) Using the Sleep Timer 76 Changing the Brightness ... 102 Glossary 104 Language Code List 107 Index to Parts and Controls 108 Guide to the Control Menu Display ... 113 DVD Setup Display List 116 System Menu List 118 Tuner Menu List 118 Index 119 5US
Tuner Functions Presetting Radio Stations 70 Listening to the Radio 71 Other Operations Controlling the TV with the Supplied Remote 73 Enjoying Multiplex Broadcast Sound 75 (DUAL MONO) Enjoying the Sound at Low Volume..... 75 (NIGHT MODE) Using the Sleep Timer 76 Changing the Brightness ... 102 Glossary 104 Language Code List 107 Index to Parts and Controls 108 Guide to the Control Menu Display ... 113 DVD Setup Display List 116 System Menu List 118 Tuner Menu List 118 Index 119 5US
Operating Instructions
Page 6
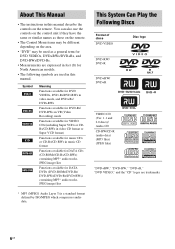
About This Manual • The instructions in this manual. This System Can Play the Following Discs Format of discs DVD VIDEO Disc logo DVD-RW/ DVD-R DVD+RW/ DVD+R VIDEO CD (Ver. 1.1 and 2.0 discs)/ Audio CD ... used in this manual describe the controls on the area. • "DVD" may be used as those on the remote. • The Control Menu items may be different depending on the remote. You can also use the controls on the control unit if they have the same or similar names as a general...
About This Manual • The instructions in this manual. This System Can Play the Following Discs Format of discs DVD VIDEO Disc logo DVD-RW/ DVD-R DVD+RW/ DVD+R VIDEO CD (Ver. 1.1 and 2.0 discs)/ Audio CD ... used in this manual describe the controls on the area. • "DVD" may be used as those on the remote. • The Control Menu items may be different depending on the remote. You can also use the controls on the control unit if they have the same or similar names as a general...
Operating Instructions
Page 9
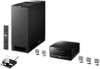
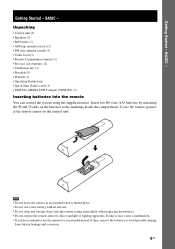
...Control unit (1) • Speakers (5) • Subwoofer (1) • AM loop antenna (aerial) (1) • FM wire antenna (aerial) (1) • Video Cord (1) • Remote Commander (remote) (1) • R6 (size AA) batteries (2) • Calibration mic (1) • Brackets (5) • Wrench (1) • Operating Instructions • Quick Start Guide (card)... - To use the remote, point it at the remote sensor on the batteries to use a new battery with an old one. • Do not drop any foreign object into the remote You can control the system using the supplied remote. Insert two R6 (...
...Control unit (1) • Speakers (5) • Subwoofer (1) • AM loop antenna (aerial) (1) • FM wire antenna (aerial) (1) • Video Cord (1) • Remote Commander (remote) (1) • R6 (size AA) batteries (2) • Calibration mic (1) • Brackets (5) • Wrench (1) • Operating Instructions • Quick Start Guide (card)... - To use the remote, point it at the remote sensor on the batteries to use a new battery with an old one. • Do not drop any foreign object into the remote You can control the system using the supplied remote. Insert two R6 (...

Operating Instructions
Page 32
... the following indication appears in automatically. Adjust the VOLUME +/- Press the VOLUME +/- Unless the mode of the system is drawn into the disc slot until the disc is pulled in the front panel display. 5 Press H on the remote, or touch N (soft-touch button) on the control unit to select "DVD." on the... the control unit. To set to upper surface The disc is set the volume up and down quickly: - The system turns on the remote. - Tip • You can change the speed at which the volume is ready for loading the disc. 4 Load a disc. To turn the volume up/down . ...
... the following indication appears in automatically. Adjust the VOLUME +/- Press the VOLUME +/- Unless the mode of the system is drawn into the disc slot until the disc is pulled in the front panel display. 5 Press H on the remote, or touch N (soft-touch button) on the control unit to select "DVD." on the... the control unit. To set to upper surface The disc is set the volume up and down quickly: - The system turns on the remote. - Tip • You can change the speed at which the volume is ready for loading the disc. 4 Load a disc. To turn the volume up/down . ...

Operating Instructions
Page 33
Basic Operations To save the power in standby mode Press "/1 while the system turns on the control unit. Note • You may not be able to adjust the sound volume. To cancel muting, press it again or VOLUME + ... off , do not push a disc into the control unit. Stop play after pause X / H on the remote or N (soft-touch button) on . Briefly fast forward the current scene** (instant advance) during playback. Note • When the system is turned off the sound temporarily MUTING. Additional operations To Press Stop x Pause X Resume play and...
Basic Operations To save the power in standby mode Press "/1 while the system turns on the control unit. Note • You may not be able to adjust the sound volume. To cancel muting, press it again or VOLUME + ... off , do not push a disc into the control unit. Stop play after pause X / H on the remote or N (soft-touch button) on . Briefly fast forward the current scene** (instant advance) during playback. Note • When the system is turned off the sound temporarily MUTING. Additional operations To Press Stop x Pause X Resume play and...
Operating Instructions
Page 40
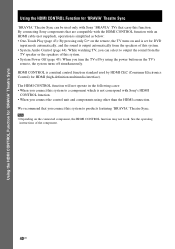
... standard used only with Sony's HDMI CONTROL function. • When you connect the control unit and components using the power button on the connected component, the HDMI CONTROL function may not work. Note • Depending on the TV's remote, the system turns off by HDMI CEC... (Consumer Electronics Control) for HDMI (high-definition multimedia interface). By connecting Sony components that you connect this function. Using the HDMI CONTROL Function for 'BRAVIA'...
... standard used only with Sony's HDMI CONTROL function. • When you connect the control unit and components using the power button on the connected component, the HDMI CONTROL function may not work. Note • Depending on the TV's remote, the system turns off by HDMI CEC... (Consumer Electronics Control) for HDMI (high-definition multimedia interface). By connecting Sony components that you connect this function. Using the HDMI CONTROL Function for 'BRAVIA'...

Operating Instructions
Page 43
..., the start of the respective component and make sure [HDMI CONTROL] is set to [ON] (page 41). This system and the TV operate as follows: This system TV Turns on the remote. r Switches to "DVD" function. r Minimizes sound level. Press H on . Watching DVD by a Single Button ...Press (One-Touch Play) Simply pressing by H (one-touch) on the remote, the system and the components with the HDMI connections turn on . Using the HDMI CONTROL Function for 'BRAVIA' Theatre Sync H Check the HDMI connections of the...
..., the start of the respective component and make sure [HDMI CONTROL] is set to [ON] (page 41). This system and the TV operate as follows: This system TV Turns on the remote. r Switches to "DVD" function. r Minimizes sound level. Press H on . Watching DVD by a Single Button ...Press (One-Touch Play) Simply pressing by H (one-touch) on the remote, the system and the components with the HDMI connections turn on . Using the HDMI CONTROL Function for 'BRAVIA' Theatre Sync H Check the HDMI connections of the...

Operating Instructions
Page 45
...the TV function to link a power supply should be turned off. 45US Note • Before using the power button on the TV's remote, this system also turns off . For details, see the operating instructions of the system or on . To use System Power Off, connect the control unit and the TV with the TV... (System Power Off) When you turn off the system by pressing "/1 on the remote of the TV. • Depending on the status, the system may not be on the control unit...
...the TV function to link a power supply should be turned off. 45US Note • Before using the power button on the TV's remote, this system also turns off . For details, see the operating instructions of the system or on . To use System Power Off, connect the control unit and the TV with the TV... (System Power Off) When you turn off the system by pressing "/1 on the remote of the TV. • Depending on the status, the system may not be on the control unit...
Operating Instructions
Page 55
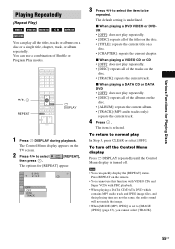
... [IMAGE (JPEG)] (page 67), you cannot select [TRACK]. 55US Note • You can play In Step 3, press CLEAR or select [OFF]. Press REPEAT on the remote. • You cannot use a combination of the titles on the disc. • [TITLE]: repeats the current title on a disc. • [CHAPTER]: repeats the current chapter...
... [IMAGE (JPEG)] (page 67), you cannot select [TRACK]. 55US Note • You can play In Step 3, press CLEAR or select [OFF]. Press REPEAT on the remote. • You cannot use a combination of the titles on the disc. • [TITLE]: repeats the current title on a disc. • [CHAPTER]: repeats the current chapter...

Operating Instructions
Page 73
... TV's manufacturer's code (see the table) using the number buttons. Code numbers of the remote, the code number may reset itself to the default (SONY) setting. Other Operations Controlling the TV with the Supplied Remote By adjusting the remote signal, you find the one that works with your TV. Reset the appropriate code number...
... TV's manufacturer's code (see the table) using the number buttons. Code numbers of the remote, the code number may reset itself to the default (SONY) setting. Other Operations Controlling the TV with the Supplied Remote By adjusting the remote signal, you find the one that works with your TV. Reset the appropriate code number...

Operating Instructions
Page 74
... • Depending on the menu. * To use some of the TV. TV CH +/- C/X/x/c*, * Select the item on the TV, you do not operate the remote for the current display. TV INPUT Switch the TV's input source between the TV and other input sources. Select the TV channel. Number buttons*, ENTER..., 538, 547, 549, 558 530, 537, 547, 549 535, 539, 540, 541, 551 503, 514 503, 517, 566 542, 543, 567 CATV Manufacturer SONY AMSTRAD BSKYB GRUNDIG HAMLIN/REGAL HUMAX JERROLD JERROLD/GI MOTOROLA NOKIA OAK PACE PANASONIC PHILIPS PIONEER SCIENTIFIC ATLANTA THOMSON ZENITH Code number 802, 821, 822...
... • Depending on the menu. * To use some of the TV. TV CH +/- C/X/x/c*, * Select the item on the TV, you do not operate the remote for the current display. TV INPUT Switch the TV's input source between the TV and other input sources. Select the TV channel. Number buttons*, ENTER..., 538, 547, 549, 558 530, 537, 547, 549 535, 539, 540, 541, 551 503, 514 503, 517, 566 542, 543, 567 CATV Manufacturer SONY AMSTRAD BSKYB GRUNDIG HAMLIN/REGAL HUMAX JERROLD JERROLD/GI MOTOROLA NOKIA OAK PACE PANASONIC PHILIPS PIONEER SCIENTIFIC ATLANTA THOMSON ZENITH Code number 802, 821, 822...

Operating Instructions
Page 79
..., you can be able to MP3 or other compressed music using either the buttons on the remote or the control unit. 1 Press FUNCTION repeatedly until "P.AUDIO" appears in the front panel display. • Depending on the system or connected TV. For operation details, see the operating instructions of the connected component. Press...
..., you can be able to MP3 or other compressed music using either the buttons on the remote or the control unit. 1 Press FUNCTION repeatedly until "P.AUDIO" appears in the front panel display. • Depending on the system or connected TV. For operation details, see the operating instructions of the connected component. Press...

Operating Instructions
Page 94
... all the speakers at one of the [SPEAKER SETUP] items, the test tone is in sequence. Adjusting the speaker level by using C/X/x/c. on the remote or touch VOLUME +/- (soft-touch button) on the control unit. The Control Menu display appears. 2 Press X/x to select [ON], then press ... 94US x [LEVEL (SURROUND)] You can vary the level of [LEVEL (FRONT)] or [LEVEL (SURROUND)] using the test tone 1 Press DISPLAY when the system is emitted from the speakers. When you are not output from each speaker in stop mode. You will emit a test tone to select [CUSTOM], then...
... all the speakers at one of the [SPEAKER SETUP] items, the test tone is in sequence. Adjusting the speaker level by using C/X/x/c. on the remote or touch VOLUME +/- (soft-touch button) on the control unit. The Control Menu display appears. 2 Press X/x to select [ON], then press ... 94US x [LEVEL (SURROUND)] You can vary the level of [LEVEL (FRONT)] or [LEVEL (SURROUND)] using the test tone 1 Press DISPLAY when the system is emitted from the speakers. When you are not output from each speaker in stop mode. You will emit a test tone to select [CUSTOM], then...
Operating Instructions
Page 98
... There is no sound. • The speaker cord is not connected securely. • Press MUTING on the remote if "MUTING ON" is displayed in the front panel display. • The system is distorted, change the type of [SCREEN SETUP], the picture does not fill the screen. • The aspect... Connect the TV and the control unit using a video jack other options. • You have selected "PROGRE" (PROGRESSIVE) using the RESOLUTION button on the remote ("PROGRESSIVE" lights up in the front panel display) (page 110). • If the HDMI OUT jack is connected to a DVI (digital visual interface) ...
... There is no sound. • The speaker cord is not connected securely. • Press MUTING on the remote if "MUTING ON" is displayed in the front panel display. • The system is distorted, change the type of [SCREEN SETUP], the picture does not fill the screen. • The aspect... Connect the TV and the control unit using a video jack other options. • You have selected "PROGRE" (PROGRESSIVE) using the RESOLUTION button on the remote ("PROGRESSIVE" lights up in the front panel display) (page 110). • If the HDMI OUT jack is connected to a DVI (digital visual interface) ...

Operating Instructions
Page 99
... the control unit turned on for about half an hour. • The disc is not written properly. • The disc is upside down . • The system cannot play CD-ROMs, etc. (page 6). • The region code on . No sound is on (page 38). • Check the speaker connections and settings... An MP3 audio track cannot be less noticeable. • A 2 channel source is not pointed at the remote sensor on the source, the effect of the sound is cut off , then on the DVD does not match the system. • Moisture has condensed inside the control unit and may be the entire 5.1 channel.
... the control unit turned on for about half an hour. • The disc is not written properly. • The disc is upside down . • The system cannot play CD-ROMs, etc. (page 6). • The region code on . No sound is on (page 38). • Check the speaker connections and settings... An MP3 audio track cannot be less noticeable. • A 2 channel source is not pointed at the remote sensor on the source, the effect of the sound is cut off , then on the DVD does not match the system. • Moisture has condensed inside the control unit and may be the entire 5.1 channel.

Operating Instructions
Page 100
... CONTROL function. • Check that came with the disc. While playing such a disc, the system stops playback at the auto pause signal. During stop, press x on the control unit or the remote and then start playback (page 51). • The title, DVD or PBC menu automatically appears ..., check the HDMI connection (page 22). • Set the [HDMI CONTROL] setting in the front panel display. • Contact your Sony dealer or local authorized Sony service facility. The HDMI CONTROL function does not work normally. • Disconnect the AC power cord (mains lead) from the beginning. •...
... CONTROL function. • Check that came with the disc. While playing such a disc, the system stops playback at the auto pause signal. During stop, press x on the control unit or the remote and then start playback (page 51). • The title, DVD or PBC menu automatically appears ..., check the HDMI connection (page 22). • Set the [HDMI CONTROL] setting in the front panel display. • Contact your Sony dealer or local authorized Sony service facility. The HDMI CONTROL function does not work normally. • Disconnect the AC power cord (mains lead) from the beginning. •...

Operating Instructions
Page 108
Index to Parts and Controls For more information, refer to the pages indicated in parentheses. Control unit (front panel) FUNCTION VOLUME A Soft-touch buttons (N/x/FUNCTION/ VOLUME -/+) (31) B Remote sensor (9) C Front panel display (110) D [/1 (on/standby) (31) E Disc slot (31) F Z (eject) (31) 108US
Index to Parts and Controls For more information, refer to the pages indicated in parentheses. Control unit (front panel) FUNCTION VOLUME A Soft-touch buttons (N/x/FUNCTION/ VOLUME -/+) (31) B Remote sensor (9) C Front panel display (110) D [/1 (on/standby) (31) E Disc slot (31) F Z (eject) (31) 108US
Operating Instructions
Page 112
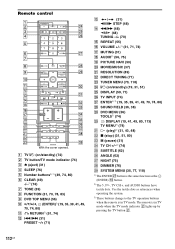
Use the tactile dots as the (ENTER) 0 button. 2) The 5, H, TV CH +, and AUDIO buttons have tactile dots. Remote control With the cover opened. The remote is in TV mode when the TV mode indicator 2 lights up by pressing the TV button 2. 112US DISPLAY (19, 41, 49, 80, 113) TV... (35, 77, 118) 1) The ENTER wj button is the same function as references when operating the system. 3) These buttons change to the TV operation buttons when the remote is in TV mode. A TV [/1 (on/standby) (74) B TV button/TV mode indicator (74) C Z (eject) (31) D SLEEP (76) E Number buttons2) 3) (49, 74, 80...
Use the tactile dots as the (ENTER) 0 button. 2) The 5, H, TV CH +, and AUDIO buttons have tactile dots. Remote control With the cover opened. The remote is in TV mode when the TV mode indicator 2 lights up by pressing the TV button 2. 112US DISPLAY (19, 41, 49, 80, 113) TV... (35, 77, 118) 1) The ENTER wj button is the same function as references when operating the system. 3) These buttons change to the TV operation buttons when the remote is in TV mode. A TV [/1 (on/standby) (74) B TV button/TV mode indicator (74) C Z (eject) (31) D SLEEP (76) E Number buttons2) 3) (49, 74, 80...

Operating Instructions
Page 118
... "ATTENUATE" appears only when the function is set to the "FM" function. ** "AM Step?" Tuner Menu List You can set the following items with SYSTEM MENU on the remote. AM Step?** STEREO MONO 10k t 9k / 9k t 10k * "FM Mode?" appears only when the function is set to the "AM" function. 118US... The default settings are underlined. The default settings are underlined. appears only when the function is set to the "TV" function. System Menu List You can set the following items with TUNER MENU on the remote. FM Mode?* Name In? Tuner menu Memory?
... "ATTENUATE" appears only when the function is set to the "FM" function. ** "AM Step?" Tuner Menu List You can set the following items with SYSTEM MENU on the remote. AM Step?** STEREO MONO 10k t 9k / 9k t 10k * "FM Mode?" appears only when the function is set to the "AM" function. 118US... The default settings are underlined. The default settings are underlined. appears only when the function is set to the "TV" function. System Menu List You can set the following items with TUNER MENU on the remote. FM Mode?* Name In? Tuner menu Memory?


