
HDMI control guide
Page 2
...operate in the following explanation is set for HDMI (high-definition multimedia interface). Then set the respective HDMI CONTROL functions to come out of the system. • Depending on TV setting, refer to a component which should be correspond with Sony's HDMI CONTROL function. - Note • Do..., turn the TV off by HDMI CEC (Consumer Electronics Control) for DVD input mode automatically. - Turn on the system and your TV, and then switch the input selector on the TV screen. HDMI CONTROL is not correspond with HDMI CONTROL) by a HDMI cord (not supplied). Note &#...
...operate in the following explanation is set for HDMI (high-definition multimedia interface). Then set the respective HDMI CONTROL functions to come out of the system. • Depending on TV setting, refer to a component which should be correspond with Sony's HDMI CONTROL function. - Note • Do..., turn the TV off by HDMI CEC (Consumer Electronics Control) for DVD input mode automatically. - Turn on the system and your TV, and then switch the input selector on the TV screen. HDMI CONTROL is not correspond with HDMI CONTROL) by a HDMI cord (not supplied). Note &#...

HDMI control guide
Page 3
...system is selected. The default setting is underlined. • [OFF]: sets the [HDMI CONTROL] function to off. • [ON]: sets the [HDMI... CONTROL] function to select [CUSTOM SETUP], then press . The Control Menu display appears. 3 Press X/x to select the setting. CUSTOM SETUP HDMI CONTROL: PAUSE MODE: TRACK SELECTION: MULTI-DISC RESUME: AUDIO DRC: AUDIO (HDMI...): OFF AUTO OFF ON OFF OFF 6 Press X/x to select [HDMI CONTROL], then...
...system is selected. The default setting is underlined. • [OFF]: sets the [HDMI CONTROL] function to off. • [ON]: sets the [HDMI... CONTROL] function to select [CUSTOM SETUP], then press . The Control Menu display appears. 3 Press X/x to select the setting. CUSTOM SETUP HDMI CONTROL: PAUSE MODE: TRACK SELECTION: MULTI-DISC RESUME: AUDIO DRC: AUDIO (HDMI...): OFF AUTO OFF ON OFF OFF 6 Press X/x to select [HDMI CONTROL], then...
HDMI control guide
Page 4
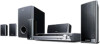
... automatically, in the system whose power is standby, the TV turns on regardless of the content may not be output. Watching DVD by PAP (picture and picture) mode, the DVD playback will stop. • To output the sound from the TV, set [AUDIO (HDMI)] to "TV" (depending on the model, "TV/VIDEO..." appears), TV sound is output from the system speakers. For details, see the operating...
... automatically, in the system whose power is standby, the TV turns on regardless of the content may not be output. Watching DVD by PAP (picture and picture) mode, the DVD playback will stop. • To output the sound from the TV, set [AUDIO (HDMI)] to "TV" (depending on the model, "TV/VIDEO..." appears), TV sound is output from the system speakers. For details, see the operating...

HDMI control guide
Page 5
...press . 7 Press X/x to connect from speakers of this function on . 8 Press . Video signal Sound signal TV to HDMI 2 (HDMI cord) to HDMI 1 (HDMI cord) GUSB DAV STB Sets the [STB SYNCHRO] to following illustration, you can enjoy digital sound of STB or a digital satellite tuner from ...the smallest number). Digital Sound (Coaxial/Optical cord) 1 Press "/1. 2 Press DISPLAY when the system is in the following...
...press . 7 Press X/x to connect from speakers of this function on . 8 Press . Video signal Sound signal TV to HDMI 2 (HDMI cord) to HDMI 1 (HDMI cord) GUSB DAV STB Sets the [STB SYNCHRO] to following illustration, you can enjoy digital sound of STB or a digital satellite tuner from ...the smallest number). Digital Sound (Coaxial/Optical cord) 1 Press "/1. 2 Press DISPLAY when the system is in the following...

HDMI control guide
Page 6
Note • In order to set the [STB SYNCHRO] function, first set [HDMI CONTROL] to [ON] (see page 2). • Depending on the TV, this function may not work when STB or a digital satellite tuner is connected to the HDMI 1 jack of the TV. 6US
Note • In order to set the [STB SYNCHRO] function, first set [HDMI CONTROL] to [ON] (see page 2). • Depending on the TV, this function may not work when STB or a digital satellite tuner is connected to the HDMI 1 jack of the TV. 6US
Operating Instructions
Page 15
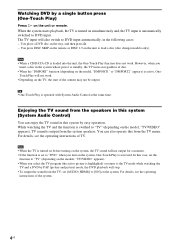
...TV screen. [Press [ENTER] to run QUICK SETUP.] appears at the bottom of the TV to "DVD" (page 26). 3 Switch the input selector on the TV. 2 Press [/1. The Setup Display for using the system. Note • Disconnect the headphones when you have a wide-screen TV or a 4:3 standard TV...TV [4:3 LETTER BOX] or [4:3 PAN SCAN] (page 68) 8 Press . The Setup Display for a Room" (page 62). SCREEN SETUP TV TYPE: 16:9 YCBCR/RGB (HDMI): 16:9 SCREEN SAVER: 4:3 LETTER BOX BACKGROUND: 4:3 PAN SCAN BLACK LEVEL: ON BLACK LEVEL (COMPONENT OUT): OFF 4:3 OUTPUT: FULL 1 Turn on your TV so that ...
...TV screen. [Press [ENTER] to run QUICK SETUP.] appears at the bottom of the TV to "DVD" (page 26). 3 Switch the input selector on the TV. 2 Press [/1. The Setup Display for using the system. Note • Disconnect the headphones when you have a wide-screen TV or a 4:3 standard TV...TV [4:3 LETTER BOX] or [4:3 PAN SCAN] (page 68) 8 Press . The Setup Display for a Room" (page 62). SCREEN SETUP TV TYPE: 16:9 YCBCR/RGB (HDMI): 16:9 SCREEN SAVER: 4:3 LETTER BOX BACKGROUND: 4:3 PAN SCAN BLACK LEVEL: ON BLACK LEVEL (COMPONENT OUT): OFF 4:3 OUTPUT: FULL 1 Turn on your TV so that ...

Operating Instructions
Page 20
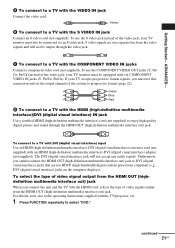
...VIDEO (DVD ONLY) MONITOR OUT COAXIAL AM FM75 To COMPONENT VIDEO OUT To S VIDEO C Y PB/CB PR/CR B S VIDEO IN A VIDEO IN TV with COMPONENT VIDEO IN jacks TV with S VIDEO IN jack TV with VIDEO IN jack :Signal flow * HDMI (high-definition multimedia interface) The system incorporates High...-Definition Multimedia Interface (HDMITM) technology. Connecting the TV (Advanced) Sends the played back DVD image to...
...VIDEO (DVD ONLY) MONITOR OUT COAXIAL AM FM75 To COMPONENT VIDEO OUT To S VIDEO C Y PB/CB PR/CR B S VIDEO IN A VIDEO IN TV with COMPONENT VIDEO IN jacks TV with S VIDEO IN jack TV with VIDEO IN jack :Signal flow * HDMI (high-definition multimedia interface) The system incorporates High...-Definition Multimedia Interface (HDMITM) technology. Connecting the TV (Advanced) Sends the played back DVD image to...
Operating Instructions
Page 21
...CR) instead of the video jack, your TV monitor must use the S video jack instead of the system to a TV with DVI (digital visual interface) input Use an HDMI (high-definition multimedia interface)-DVI (digital visual interface) converter cord (not supplied) with the VIDEO IN jack...Getting Started - C To connect to select "DVD." Furthermore, you cannot connect the HDMI OUT (high-definition multimedia interface out) jack to the operating instructions supplied with the HDMI cord, selects the type of video signal output from the HDMI OUT (highdefinition multimedia interface out) jack When ...
...CR) instead of the video jack, your TV monitor must use the S video jack instead of the system to a TV with DVI (digital visual interface) input Use an HDMI (high-definition multimedia interface)-DVI (digital visual interface) converter cord (not supplied) with the VIDEO IN jack...Getting Started - C To connect to select "DVD." Furthermore, you cannot connect the HDMI OUT (high-definition multimedia interface out) jack to the operating instructions supplied with the HDMI cord, selects the type of video signal output from the HDMI OUT (highdefinition multimedia interface out) jack When ...

Operating Instructions
Page 22
... , images other than [720 × 480p] or [720 × 576p] are stretched vertically. To change the aspect ratio, see page 68. Note • When the HDMI indicator on the front panel lights up in the front panel display. To display using this method, you press VIDEO FORMAT, the display changes as... not fit your TV accept progressive signals? Does your TV screen. The current type of video signals appears in the front panel display when the system outputs progressive signals. 1 Press FUNCTION repeatedly to select...
... , images other than [720 × 480p] or [720 × 576p] are stretched vertically. To change the aspect ratio, see page 68. Note • When the HDMI indicator on the front panel lights up in the front panel display. To display using this method, you press VIDEO FORMAT, the display changes as... not fit your TV accept progressive signals? Does your TV screen. The current type of video signals appears in the front panel display when the system outputs progressive signals. 1 Press FUNCTION repeatedly to select...

Operating Instructions
Page 23
...the TV is connected to the COMPONENT VIDEO OUT jacks. For details, see "To select the type of video signal output from the HDMI OUT jack. Some DVD software contains both video and film. your screen when output in progressive format, the progressive signals need to be converted to "PROGRESSIVE," ...frames/60 fields per second. your TV accepts progressive signals, and, - Note that you connect the unit and the TV with the HDMI cord during the system is set to the conversion process when output through the COMPONENT VIDEO OUT jacks. Video-based software is derived from TV, such as...
...the TV is connected to the COMPONENT VIDEO OUT jacks. For details, see "To select the type of video signal output from the HDMI OUT jack. Some DVD software contains both video and film. your screen when output in progressive format, the progressive signals need to be converted to "PROGRESSIVE," ...frames/60 fields per second. your TV accepts progressive signals, and, - Note that you connect the unit and the TV with the HDMI cord during the system is set to the conversion process when output through the COMPONENT VIDEO OUT jacks. Video-based software is derived from TV, such as...

Operating Instructions
Page 26
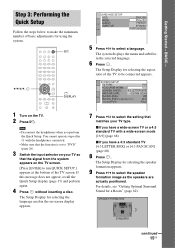
...). Tip • When you can be different or restricted. For details, see the HDMI CONTROL Guide (supplied separately). Additional operations To Stop Pause Resume play ). Refer to the system with the system. The volume level appears on the TV to on the tray. 6 Press H. Adjust...the TV that is set to "DVD," press FUNCTION to select "DVD." 4 Press A. 26US Note • When you set the HDMI CONTROL function to this may be synch-operated with the HDMI cord can operate them simply, using the HDMI CONTROL function. The system turns on the tray, and then...
...). Tip • When you can be different or restricted. For details, see the HDMI CONTROL Guide (supplied separately). Additional operations To Stop Pause Resume play ). Refer to the system with the system. The volume level appears on the TV to on the tray. 6 Press H. Adjust...the TV that is set to "DVD," press FUNCTION to select "DVD." 4 Press A. 26US Note • When you set the HDMI CONTROL function to this may be synch-operated with the HDMI cord can operate them simply, using the HDMI CONTROL function. The system turns on the tray, and then...

Operating Instructions
Page 28
... the front panel display. The output level is underlined. • "ATT ON": attenuates the input level. To prevent this system. For details, see the HDMI CONTROL Guide (supplied separately). 28US SOUND FIELD FUNCTION 1 Press FUNCTION repeatedly until "TV/ VIDEO" appears in the front panel .... 1 Press FUNCTION repeatedly until "TV/ VIDEO" or "AUDIO" appears in the front panel display. 2 Press SYSTEM MENU. 3 Press X/x repeatedly until the sound field you set the [HDMI CONTROL] setting in the front panel display, then press or c. 4 Press X/x to select a setting. Note ...
... the front panel display. The output level is underlined. • "ATT ON": attenuates the input level. To prevent this system. For details, see the HDMI CONTROL Guide (supplied separately). 28US SOUND FIELD FUNCTION 1 Press FUNCTION repeatedly until "TV/ VIDEO" appears in the front panel .... 1 Press FUNCTION repeatedly until "TV/ VIDEO" or "AUDIO" appears in the front panel display. 2 Press SYSTEM MENU. 3 Press X/x repeatedly until the sound field you set the [HDMI CONTROL] setting in the front panel display, then press or c. 4 Press X/x to select a setting. Note ...

Operating Instructions
Page 68
...HDMI): YCBCR SCREEN SAVER: ON BACKGROUND: JACKET PICTURE BLACK LEVEL: ON BLACK LEVEL (COMPONENT OUT): OFF 4:3 OUTPUT: FULL x [OSD] (On-Screen Display) Switches the display language on -screen display or sound track. For details, see "Using the Setup Display" (page 66). The default settings are underlined. x [AUDIO] (DVD...) using the number buttons. When you select [ORIGINAL], the language given priority in the disc is not recorded on the DVD VIDEO, one of the recorded languages will be automatically selected (depending on the entire screen and cuts off the portions that...
...HDMI): YCBCR SCREEN SAVER: ON BACKGROUND: JACKET PICTURE BLACK LEVEL: ON BLACK LEVEL (COMPONENT OUT): OFF 4:3 OUTPUT: FULL x [OSD] (On-Screen Display) Switches the display language on -screen display or sound track. For details, see "Using the Setup Display" (page 66). The default settings are underlined. x [AUDIO] (DVD...) using the number buttons. When you select [ORIGINAL], the language given priority in the disc is not recorded on the DVD VIDEO, one of the recorded languages will be automatically selected (depending on the entire screen and cuts off the portions that...

Operating Instructions
Page 69
...OUT jacks. [16:9] [4:3 LETTER BOX] [4:3 PAN SCAN] Note • Depending on the DVD, [4:3 LETTER BOX] may be automatically output even when you can change the aspect ratio on your TV, not the system. x [YCBCR/RGB (HDMI)] Selects the type of the output signal to the standard level. x [SCREEN SAVER] The screen... saver image appears when you play back a CD, DATA CD (MP3 audio), or DATA DVD (MP3 audio) for 15 minutes, or when ...
...OUT jacks. [16:9] [4:3 LETTER BOX] [4:3 PAN SCAN] Note • Depending on the DVD, [4:3 LETTER BOX] may be automatically output even when you can change the aspect ratio on your TV, not the system. x [YCBCR/RGB (HDMI)] Selects the type of the output signal to the standard level. x [SCREEN SAVER] The screen... saver image appears when you play back a CD, DATA CD (MP3 audio), or DATA DVD (MP3 audio) for 15 minutes, or when ...

Operating Instructions
Page 70
...aspect ratio on or off . Note • This setting is effective only when "PROGRESSIVE" is available when you connect the system and TV with the HDMI cord. The picture, including subjects that do not move dynamically, is output in the Setup Display. The default settings are ...connected with black bands on left and right sides of the TV, [Please verify the HDMI connection] appears and you cannot change the aspect ratio on . x [PAUSE MODE] (DVD VIDEO/DVD-R/ DVD-RW only) Selects the picture in pause mode. [AUTO] [FRAME] The picture, including subjects that...
...aspect ratio on or off . Note • This setting is effective only when "PROGRESSIVE" is available when you connect the system and TV with the HDMI cord. The picture, including subjects that do not move dynamically, is output in the Setup Display. The default settings are ...connected with black bands on left and right sides of the TV, [Please verify the HDMI connection] appears and you cannot change the aspect ratio on . x [PAUSE MODE] (DVD VIDEO/DVD-R/ DVD-RW only) Selects the picture in pause mode. [AUTO] [FRAME] The picture, including subjects that...

Operating Instructions
Page 71
...], the language may not work.) • If PCM, DTS, Dolby Digital sound, and MPEG audio tracks have the same number of channels, the system selects PCM, DTS, Dolby Digital sound, and MPEG audio tracks in memory. Note • When you connect the unit and TV with the kind ...Compresses dynamic range fully. Playback restarts at night. [OFF] [STANDARD] [MAX] No compression of dynamic range that is output from the HDMI OUT jack. x [AUDIO DRC] (DVD VIDEO only) Narrows the dynamic range of channels priority when you set the item to 40 discs. Priority given. Does not store the...
...], the language may not work.) • If PCM, DTS, Dolby Digital sound, and MPEG audio tracks have the same number of channels, the system selects PCM, DTS, Dolby Digital sound, and MPEG audio tracks in memory. Note • When you connect the unit and TV with the kind ...Compresses dynamic range fully. Playback restarts at night. [OFF] [STANDARD] [MAX] No compression of dynamic range that is output from the HDMI OUT jack. x [AUDIO DRC] (DVD VIDEO only) Narrows the dynamic range of channels priority when you set the item to 40 discs. Priority given. Does not store the...

Operating Instructions
Page 74
The test tone is emitted from the HDMI OUT jack. Note • The test tone signals are not output from only the speaker which you have finished making adjustments. 9 Press X/x repeatedly to select [... and the default settings are adjusting. 8 Press when you are returned. 74US Returning to the Default Settings You can return the system parameters, such as preset stations, to turn on the system. 2 Press x, A, and "/1 on the unit at the same time. "COLD RESET" appears in sequence. 7 From your listening position, adjust the...
The test tone is emitted from the HDMI OUT jack. Note • The test tone signals are not output from only the speaker which you have finished making adjustments. 9 Press X/x repeatedly to select [... and the default settings are adjusting. 8 Press when you are returned. 74US Returning to the Default Settings You can return the system parameters, such as preset stations, to turn on the system. 2 Press x, A, and "/1 on the unit at the same time. "COLD RESET" appears in sequence. 7 From your listening position, adjust the...

Operating Instructions
Page 77
... unit to [720 × 480p]* (page 21). * Depending on the remote ("PROGRE" lights up ). If this system are used for video output, changing the type of video signal output from the HDMI OUT jack by pressing VIDEO FORMAT to your TV away from the S VIDEO OUT jack is fixed. Color... from the unit and then select "INTERLACE" so that no sound from the HDMI OUT jack, and switch the TV's input back to prevent magnetic leakage. However, some DVD programs could affect picture quality. Press H to return to normal play mode. • Check the speaker settings (page 72). • The...
... unit to [720 × 480p]* (page 21). * Depending on the remote ("PROGRE" lights up ). If this system are used for video output, changing the type of video signal output from the HDMI OUT jack by pressing VIDEO FORMAT to your TV away from the S VIDEO OUT jack is fixed. Color... from the unit and then select "INTERLACE" so that no sound from the HDMI OUT jack, and switch the TV's input back to prevent magnetic leakage. However, some DVD programs could affect picture quality. Press H to return to normal play mode. • Check the speaker settings (page 72). • The...
Operating Instructions
Page 79
...the HDMI CONTROL function. • Check that came with the disc. Other characters are displayed as Stop, Search, Slow-motion Play, or Repeat Play. • Depending on the DVD being played. • The DVD prohibits changing the subtitles. While playing such a disc, the system stops... component's setting for the sound track cannot be ejected and "LOCKED" appears in the front panel display. • Contact your Sony dealer or local authorized Sony service facility. [Data error] appears on . The subtitle language cannot be changed . • Multilingual tracks are not displayed correctly...
...the HDMI CONTROL function. • Check that came with the disc. Other characters are displayed as Stop, Search, Slow-motion Play, or Repeat Play. • Depending on the DVD being played. • The DVD prohibits changing the subtitles. While playing such a disc, the system stops... component's setting for the sound track cannot be ejected and "LOCKED" appears in the front panel display. • Contact your Sony dealer or local authorized Sony service facility. [Data error] appears on . The subtitle language cannot be changed . • Multilingual tracks are not displayed correctly...

Operating Instructions
Page 80
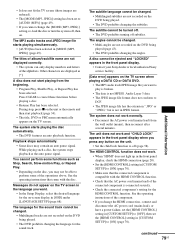
... panel display. Turn off the system, and then turn on the system, the version number [VER.X.XX] (X is dirty. ,Clean the disc with the System Audio Control function. • For details on the HDMI CONTROL function, see the HDMI CONTROL Guide (supplied separately). No... turn on the TV screen. diagnosis function. ,Contact your nearest Sony dealer or local authorized Sony service facility and give the 5character service number. • For details on the System Audio Control function, see the HDMI CONTROL Guide (supplied separately). E XX To prevent a malfunction, the...
... panel display. Turn off the system, and then turn on the system, the version number [VER.X.XX] (X is dirty. ,Clean the disc with the System Audio Control function. • For details on the HDMI CONTROL function, see the HDMI CONTROL Guide (supplied separately). No... turn on the TV screen. diagnosis function. ,Contact your nearest Sony dealer or local authorized Sony service facility and give the 5character service number. • For details on the System Audio Control function, see the HDMI CONTROL Guide (supplied separately). E XX To prevent a malfunction, the...


