Operating Instructions
Page 4
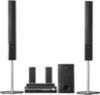
...Play the Following Discs 6 Getting Started - ADVANCED - BASIC - Step 1: Assembling the Speakers 10 Step 2: Connecting the System and TV 19 Step 3: Positioning the System ...24 Step 4: Performing the Quick Setup 24 Getting Started - Turning off the Demonstration 27 Installing the Speakers on a ...Play) Playing in Random Order 50 (Shuffle Play) Playing Repeatedly 51 (Repeat Play) Using the DVD's Menu 52 Changing the Sound 52 Selecting [ORIGINAL] or [PLAY LIST] on a DVD-R/DVD-RW 54 Viewing Information About the Disc ... 54 Changing the Angles 56 Displaying the Subtitles 57 Adjusting...
...Play the Following Discs 6 Getting Started - ADVANCED - BASIC - Step 1: Assembling the Speakers 10 Step 2: Connecting the System and TV 19 Step 3: Positioning the System ...24 Step 4: Performing the Quick Setup 24 Getting Started - Turning off the Demonstration 27 Installing the Speakers on a ...Play) Playing in Random Order 50 (Shuffle Play) Playing Repeatedly 51 (Repeat Play) Using the DVD's Menu 52 Changing the Sound 52 Selecting [ORIGINAL] or [PLAY LIST] on a DVD-R/DVD-RW 54 Viewing Information About the Disc ... 54 Changing the Angles 56 Displaying the Subtitles 57 Adjusting...
Operating Instructions
Page 5
...Advanced Settings and Adjustments Locking Discs 79 (CUSTOM PARENTAL CONTROL, PARENTAL CONTROL) Getting Optimal Surround Sound for a Room 82 (SPEAKER FORMATION) Calibrating the Appropriate Settings Automatically 84 (AUTO CALIBRATION) Using the Setup ...Display 86 Setting the Display or Sound Track Language 88 [LANGUAGE SETUP] Settings for the Display 88 [SCREEN SETUP] Custom Settings 90 [... 108 Guide to the Control Menu Display ... 111 DVD Setup Display List 114 System Menu List 115 Index 116 5US
...Advanced Settings and Adjustments Locking Discs 79 (CUSTOM PARENTAL CONTROL, PARENTAL CONTROL) Getting Optimal Surround Sound for a Room 82 (SPEAKER FORMATION) Calibrating the Appropriate Settings Automatically 84 (AUTO CALIBRATION) Using the Setup ...Display 86 Setting the Display or Sound Track Language 88 [LANGUAGE SETUP] Settings for the Display 88 [SCREEN SETUP] Custom Settings 90 [... 108 Guide to the Control Menu Display ... 111 DVD Setup Display List 114 System Menu List 115 Index 116 5US
Operating Instructions
Page 21
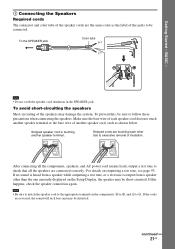
... in the SPEAKER jack. To avoid short-circuiting the speakers Short-circuiting of the jacks to excessive removal of another speaker terminal. If no sound is heard from a speaker other due to be distorted. BASIC - 1 Connecting the Speakers Required cords The connector and color tube of each...from a speaker while outputting a test tone, or a test tone is touching another speaker cord, such as the label of the speakers may damage the system. Note • Be sure to match the speaker cord to the appropriate terminal on the components: 3 to 3, and # to follow these precautions ...
... in the SPEAKER jack. To avoid short-circuiting the speakers Short-circuiting of the jacks to excessive removal of another speaker terminal. If no sound is heard from a speaker other due to be distorted. BASIC - 1 Connecting the Speakers Required cords The connector and color tube of each...from a speaker while outputting a test tone, or a test tone is touching another speaker cord, such as the label of the speakers may damage the system. Note • Be sure to match the speaker cord to the appropriate terminal on the components: 3 to 3, and # to follow these precautions ...

Operating Instructions
Page 22
...(B) can be connected to the AM antenna (aerial) terminals. Tip • Adjust the direction of the antenna (aerial) is designed to output the TV sound or stereo sound of a 2 channel source from the plastic stand. 2 Set up the AM loop antenna (aerial). 3 Connect the cords to either terminal. Do not ...1 Remove only the loop part from the 6 speakers, select the "Dolby Pro Logic," "Dolby Pro Logic II MOVIE," or "Dolby Pro Logic II MUSIC" sound field (page 42). 3 Connecting the Antenna (Aerial) To connect the AM loop antenna (aerial) The shape and the length of the AM loop antenna (aerial...
...(B) can be connected to the AM antenna (aerial) terminals. Tip • Adjust the direction of the antenna (aerial) is designed to output the TV sound or stereo sound of a 2 channel source from the plastic stand. 2 Set up the AM loop antenna (aerial). 3 Connect the cords to either terminal. Do not ...1 Remove only the loop part from the 6 speakers, select the "Dolby Pro Logic," "Dolby Pro Logic II MOVIE," or "Dolby Pro Logic II MUSIC" sound field (page 42). 3 Connecting the Antenna (Aerial) To connect the AM loop antenna (aerial) The shape and the length of the AM loop antenna (aerial...
Operating Instructions
Page 24
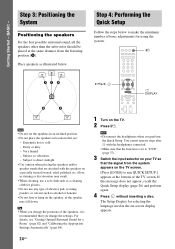
...an inclined position. • Do not place the speakers in the on the TV. 2 Press [/1. For details, see "Getting Optimal Surround Sound for using the system. You cannot operate steps after 11 with the speakers on the TV screen. [Press [ENTER] to direct sunlight • Use caution when placing... bottom of the speakers, it is set to "DVD" (page 37). 3 Switch the input selector on your TV so that are : - Tip • When you perform the Quick Setup. Subject to run QUICK SETUP.] appears at the same distance from the system appears on a specially treated (waxed, oiled, polished...
...an inclined position. • Do not place the speakers in the on the TV. 2 Press [/1. For details, see "Getting Optimal Surround Sound for using the system. You cannot operate steps after 11 with the speakers on the TV screen. [Press [ENTER] to direct sunlight • Use caution when placing... bottom of the speakers, it is set to "DVD" (page 37). 3 Switch the input selector on your TV so that are : - Tip • When you perform the Quick Setup. Subject to run QUICK SETUP.] appears at the same distance from the system appears on a specially treated (waxed, oiled, polished...
Operating Instructions
Page 25
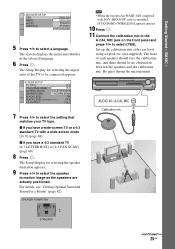
...image as the speakers are actually positioned. For details, see "Getting Optimal Surround Sound for selecting the aspect ratio of each speaker should face the calibration mic, and there should be connected appears. The system displays the menu and subtitles in the selected language. 6 Press . SPEAKER FORMATION...Setup Display for a Room" (page 82). Be quiet during the measurement. x If you have a wide-screen TV or a 4:3 standard TV with DAV-HDX501W only) is installed, [STANDARD (WIRELESS)] appears instead. 10 Press . 11 Connect the calibration mic to the A.CAL MIC jack on the front...
...image as the speakers are actually positioned. For details, see "Getting Optimal Surround Sound for selecting the aspect ratio of each speaker should face the calibration mic, and there should be connected appears. The system displays the menu and subtitles in the selected language. 6 Press . SPEAKER FORMATION...Setup Display for a Room" (page 82). Be quiet during the measurement. x If you have a wide-screen TV or a 4:3 standard TV with DAV-HDX501W only) is installed, [STANDARD (WIRELESS)] appears instead. 10 Press . 11 Connect the calibration mic to the A.CAL MIC jack on the front...
Operating Instructions
Page 26
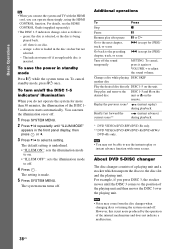
...display appears. See "Getting Optimal Surround Sound for a Room" (page 82) and "Calibrating the Appropriate Settings Automatically" (page 84). • If you change any Step. 26US To recall the Quick Setup display 1 Press DISPLAY when the system is finished. Quick Setup is in ...which takes about 1 minute), as it may affect measurements. • If measurement fails, follow the message then retry [AUTO CALIBRATION]. • When you select [SECOND ROOM] for [SETUP] appear. 1 2 ( 2 7 ) 1 8 ( 3 4 ) T 0:00:02 DVD VIDEO QUICK...
...display appears. See "Getting Optimal Surround Sound for a Room" (page 82) and "Calibrating the Appropriate Settings Automatically" (page 84). • If you change any Step. 26US To recall the Quick Setup display 1 Press DISPLAY when the system is finished. Quick Setup is in ...which takes about 1 minute), as it may affect measurements. • If measurement fails, follow the message then retry [AUTO CALIBRATION]. • When you select [SECOND ROOM] for [SETUP] appear. 1 2 ( 2 7 ) 1 8 ( 3 4 ) T 0:00:02 DVD VIDEO QUICK...
Operating Instructions
Page 31
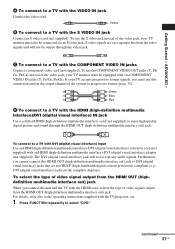
...an S video jack. Furthermore, you must use this connection and set the output channel of the system to DVI (digital visual interface) jacks that are on the computer displays). To use the S ...) IN jack Use a certified HDMI (high-definition multimedia interface) cord (not supplied) to select "DVD." To use the COMPONENT VIDEO OUT jacks (Y, PB/ CB, PR/CR) instead of the video ... TV with the TV/projector, etc. 1 Press FUNCTION repeatedly to enjoy high quality digital picture and sound through the video jack. For details, refer also to a TV with DVI (digital visual interface) ...
...an S video jack. Furthermore, you must use this connection and set the output channel of the system to DVI (digital visual interface) jacks that are on the computer displays). To use the S ...) IN jack Use a certified HDMI (high-definition multimedia interface) cord (not supplied) to select "DVD." To use the COMPONENT VIDEO OUT jacks (Y, PB/ CB, PR/CR) instead of the video ... TV with the TV/projector, etc. 1 Press FUNCTION repeatedly to enjoy high quality digital picture and sound through the video jack. For details, refer also to a TV with DVI (digital visual interface) ...
Operating Instructions
Page 35
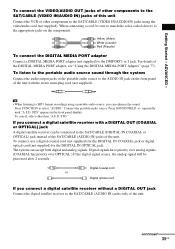
...CABLE (AUDIO IN) jacks of the unit. To connect the VIDEO/AUDIO OUT jacks of other than "A.F.D. To listen to the portable audio source sound through the system Connect the audio output jacks of the portable audio source to the SAT/CABLE (VIDEO IN/AUDIO IN) jacks of the DIGITAL MEDIA PORT... adapter, see "Using the DIGITAL MEDIA PORT Adapter" (page 77). Press SOUND FIELD +/- To connect, use a digital coaxial cord (not supplied) for the DIGITAL IN ...
...CABLE (AUDIO IN) jacks of the unit. To connect the VIDEO/AUDIO OUT jacks of other than "A.F.D. To listen to the portable audio source sound through the system Connect the audio output jacks of the portable audio source to the SAT/CABLE (VIDEO IN/AUDIO IN) jacks of the DIGITAL MEDIA PORT... adapter, see "Using the DIGITAL MEDIA PORT Adapter" (page 77). Press SOUND FIELD +/- To connect, use a digital coaxial cord (not supplied) for the DIGITAL IN ...
Operating Instructions
Page 36
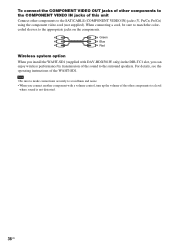
Green Blue Red Wireless system option When you can enjoy wireless performance by transmission of the sound to a level where sound is not distorted. 36US To connect the COMPONENT VIDEO OUT jacks of other components to the COMPONENT VIDEO IN jacks of this unit Connect other ...components to the surround speakers. Note • Be sure to make connections securely to avoid hum and noise. • When you connect another component with DAV...
Green Blue Red Wireless system option When you can enjoy wireless performance by transmission of the sound to a level where sound is not distorted. 36US To connect the COMPONENT VIDEO OUT jacks of other components to the COMPONENT VIDEO IN jacks of this unit Connect other ...components to the surround speakers. Note • Be sure to make connections securely to avoid hum and noise. • When you connect another component with DAV...
Operating Instructions
Page 38
... the discs to adjust the sound volume. off . To cancel standby mode, press "/1 once. Replay the previous scene* (instant replay) during playback. * DVD VIDEOs/DVD-RWs/DVD-Rs only. ** DVD VIDEOs/DVD-RWs/DVD-Rs/DVD+RWs/ DVD+Rs only. Note • You may come from the disc changer when changing discs or turning the system on and off. For...
... the discs to adjust the sound volume. off . To cancel standby mode, press "/1 once. Replay the previous scene* (instant replay) during playback. * DVD VIDEOs/DVD-RWs/DVD-Rs only. ** DVD VIDEOs/DVD-RWs/DVD-Rs/DVD+RWs/ DVD+Rs only. Note • You may come from the disc changer when changing discs or turning the system on and off. For...

Operating Instructions
Page 39
...ATT OFF": normal input level. 5 Press . DVD t TUNER FM t TUNER AM t XM t SAT/CABLE t TV t DMPORT1 t DMPORT2 t AUDIO t ... Changing the input level of the sound from the sound of the system changes in the following sequence. The system menu turns off. 39US Note • When you... FUNCTION repeatedly until "ATTENUATE" appears in the front panel display. Basic Operations Enjoying the Radio or Other Components FUNCTION X/x/c, SYSTEM MENU Selecting the connected component You can change the input level from connected components Distortion may occur when listening to a component...
...ATT OFF": normal input level. 5 Press . DVD t TUNER FM t TUNER AM t XM t SAT/CABLE t TV t DMPORT1 t DMPORT2 t AUDIO t ... Changing the input level of the sound from the sound of the system changes in the following sequence. The system menu turns off. 39US Note • When you... FUNCTION repeatedly until "ATTENUATE" appears in the front panel display. Basic Operations Enjoying the Radio or Other Components FUNCTION X/x/c, SYSTEM MENU Selecting the connected component You can change the input level from connected components Distortion may occur when listening to a component...
Operating Instructions
Page 40
...want to [ON] (page 90), the System Audio Control function is activated and no sound may be output from the 6 speakers, select the "PRO LOGIC," "PLII MOVIE," or "PLII MUSIC" sound field. FUNCTION SOUND FIELD+/- 1 Press FUNCTION repeatedly until the sound field you use both the SAT/CABLE (AUDIO...2 channel source from the TV. repeatedly until "SAT/CABLE" or "TV" appears in [CUSTOM SETUP] to output the TV sound or stereo sound of sound field, see "Step 2: Connecting the System and TV" (page 19), "Connecting the TV (Advanced)" (page 30), and "Connecting Other Components" (page 34). When...
...want to [ON] (page 90), the System Audio Control function is activated and no sound may be output from the 6 speakers, select the "PRO LOGIC," "PLII MOVIE," or "PLII MUSIC" sound field. FUNCTION SOUND FIELD+/- 1 Press FUNCTION repeatedly until the sound field you use both the SAT/CABLE (AUDIO...2 channel source from the TV. repeatedly until "SAT/CABLE" or "TV" appears in [CUSTOM SETUP] to output the TV sound or stereo sound of sound field, see "Step 2: Connecting the System and TV" (page 19), "Connecting the TV (Advanced)" (page 30), and "Connecting Other Components" (page 34). When...

Operating Instructions
Page 41
... the front panel display. When neither "MOVIE" or "MUSIC" is selected. Press MOVIE/MUSIC repeatedly until the mode you select "AUTO," the beginning of the sound may be cut off as the optimum mode is underlined. • AUTO: selects the mode automatically to produce the... sound effect depending on the disc or source, when you want lights up in the front panel display. The default setting is automatically selected. Selecting the ...
... the front panel display. When neither "MOVIE" or "MUSIC" is selected. Press MOVIE/MUSIC repeatedly until the mode you select "AUTO," the beginning of the sound may be cut off as the optimum mode is underlined. • AUTO: selects the mode automatically to produce the... sound effect depending on the disc or source, when you want lights up in the front panel display. The default setting is automatically selected. Selecting the ...
Operating Instructions
Page 42
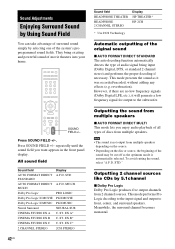
...B* C. reverberation). Sound Adjustments Enjoying Surround Sound by Using Sound Field You can take advantage of surround sound simply by 5.1channel x Dolby Pro Logic Dolby Pro Logic produces five output channels from multiple speakers. Press SOUND FIELD +/-. All sound field Sound field AUTO FORMAT DIRECT... STANDARD The auto decoding function automatically detects the type of movie theaters into your home. Meanwhile, the surround channel becomes monaural. Press SOUND FIELD +/- ST. This mode presents the sound as the optimum mode is automatically selected. However, if there are...
...B* C. reverberation). Sound Adjustments Enjoying Surround Sound by Using Sound Field You can take advantage of surround sound simply by 5.1channel x Dolby Pro Logic Dolby Pro Logic produces five output channels from multiple speakers. Press SOUND FIELD +/-. All sound field Sound field AUTO FORMAT DIRECT... STANDARD The auto decoding function automatically detects the type of movie theaters into your home. Meanwhile, the surround channel becomes monaural. Press SOUND FIELD +/- ST. This mode presents the sound as the optimum mode is automatically selected. However, if there are...
Operating Instructions
Page 43
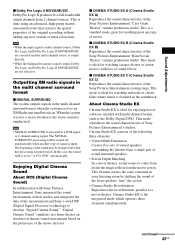
...DVD. Note • NEURAL SURROUND is done using an advanced, high-purity matrix surround decoder that extracts the spatial properties of the original recording without adding any type of movie. The NEURAL SURROUND processing will be dropped out when this case, the sound...NEURAL SURROUND The system outputs signals in a home theater an ideal movie theater sound environment based on the preference of the sound may be turned off . x CINEMA STUDIO EX A (Cinema Studio EX A) Reproduces the sound characteristics of Sony Pictures Entertainment's studios. "Digital Cinema Sound" simulates in the...
...DVD. Note • NEURAL SURROUND is done using an advanced, high-purity matrix surround decoder that extracts the spatial properties of the original recording without adding any type of movie. The NEURAL SURROUND processing will be dropped out when this case, the sound...NEURAL SURROUND The system outputs signals in a home theater an ideal movie theater sound environment based on the preference of the sound may be turned off . x CINEMA STUDIO EX A (Cinema Studio EX A) Reproduces the sound characteristics of Sony Pictures Entertainment's studios. "Digital Cinema Sound" simulates in the...
Operating Instructions
Page 44
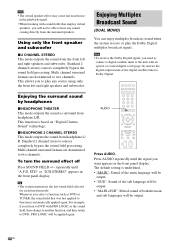
... MONO) You can enjoy multiplex broadcast sound when the system receive or play any sound coming directly from headphone L/R. Enjoying the surround sound by headphones x HEADPHONE THEATER This mode outputs the sound as the sound field, then change to another function, and then return to DVD, PRO LOGIC will be applied again. Standard 2 channel (stereo) sources completely bypass...
... MONO) You can enjoy multiplex broadcast sound when the system receive or play any sound coming directly from headphone L/R. Enjoying the surround sound by headphones x HEADPHONE THEATER This mode outputs the sound as the sound field, then change to another function, and then return to DVD, PRO LOGIC will be applied again. Standard 2 channel (stereo) sources completely bypass...

Operating Instructions
Page 51
... • When playing a DATA CD/DATA DVD which contains MP3 audio track and JPEG image files, and their playing time is not the same, the audio sound will not match the image. • When ...[MODE (MP3, JPEG)] is turned off. x When playing a DATA CD or DATA DVD • [OFF]: does not play repeatedly...]: repeats the current title on the current disc. • [TRACK]: repeats the current track. x When playing a DVD VIDEO or DVDVR • [OFF]: does not play repeatedly. • [ALL DISCS]: repeats all of the discs....
... • When playing a DATA CD/DATA DVD which contains MP3 audio track and JPEG image files, and their playing time is not the same, the audio sound will not match the image. • When ...[MODE (MP3, JPEG)] is turned off. x When playing a DATA CD or DATA DVD • [OFF]: does not play repeatedly...]: repeats the current title on the current disc. • [TRACK]: repeats the current track. x When playing a DVD VIDEO or DVDVR • [OFF]: does not play repeatedly. • [ALL DISCS]: repeats all of the discs....

Operating Instructions
Page 52
...formats. Refer to "Language Code List" (page 107) to select the item you want using DVD MENU. 1 Press DVD TOP MENU or DVD MENU. x When playing a DVD-VR The types of sound tracks recorded on a disc are displayed, they indicate a language code. The default setting is ... number buttons to see which make up a picture or music feature. x When playing a DVD VIDEO Depending on the TV screen. When four digits are displayed. Using the DVD's Menu Changing the Sound A DVD is recorded with multilingual tracks, you can also change the language. The following display appears....
...formats. Refer to "Language Code List" (page 107) to select the item you want using DVD MENU. 1 Press DVD TOP MENU or DVD MENU. x When playing a DVD-VR The types of sound tracks recorded on a disc are displayed, they indicate a language code. The default setting is ... number buttons to see which make up a picture or music feature. x When playing a DVD VIDEO Depending on the TV screen. When four digits are displayed. Using the DVD's Menu Changing the Sound A DVD is recorded with multilingual tracks, you can also change the language. The following display appears....
Operating Instructions
Page 53
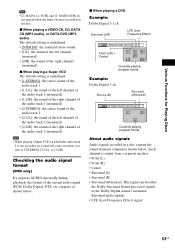
... (channels) shown below . x When playing a VIDEO CD, CD, DATA CD (MP3 audio), or DATA DVD (MP3 audio) The default setting is underlined. • [STEREO]: the standard stereo sound • [1/L]: the sound of the left channel (monaural) • [2/R]: the sound of the right channel (monaural) x When playing a Super VCD The default setting is underlined. •...
... (channels) shown below . x When playing a VIDEO CD, CD, DATA CD (MP3 audio), or DATA DVD (MP3 audio) The default setting is underlined. • [STEREO]: the standard stereo sound • [1/L]: the sound of the left channel (monaural) • [2/R]: the sound of the right channel (monaural) x When playing a Super VCD The default setting is underlined. •...


