
Child Safety: It Makes A Difference Where Your TV Stands
Page 1
... Cares! Thank you have more than one television. The home theater entertainment experience is committed to climb on or play with furniture and television sets. 5 Avoid placing any items on top of TVs such as VCRs and remotes that may pique the children's curiosity. 6 Remember that ... directly into the TV). 3 Carefully read and understand the manufacturer's instructions and product safety notices. 4 Don't allow children to making home entertainment enjoyable and safe. Use the appropriate furniture that children can become excited while watching a program and can potentially push or pull ...
... Cares! Thank you have more than one television. The home theater entertainment experience is committed to climb on or play with furniture and television sets. 5 Avoid placing any items on top of TVs such as VCRs and remotes that may pique the children's curiosity. 6 Remember that ... directly into the TV). 3 Carefully read and understand the manufacturer's instructions and product safety notices. 4 Don't allow children to making home entertainment enjoyable and safe. Use the appropriate furniture that children can become excited while watching a program and can potentially push or pull ...
Operating Instructions
Page 4
... (PBC Playback) Tuner Functions Presetting Radio Stations 57 Listening to the Radio 58 Other Operations Controlling the TV with the Supplied Remote 60 Using the THEATRE SYNC Function 60 Using the Sound Effect 61 Using the Sleep Timer 62 Changing the Brightness of Contents ...Welcome 3 About This Manual 6 This System Can Play the Following Discs 7 Getting Started - ADVANCED - BASIC - Step 1: Assembling the Speakers 10 Step 2: Connecting the System and TV 13 Step 3: Positioning the System ...18 Step 4: Performing the Quick Setup 19 Getting Started -...
... (PBC Playback) Tuner Functions Presetting Radio Stations 57 Listening to the Radio 58 Other Operations Controlling the TV with the Supplied Remote 60 Using the THEATRE SYNC Function 60 Using the Sound Effect 61 Using the Sleep Timer 62 Changing the Brightness of Contents ...Welcome 3 About This Manual 6 This System Can Play the Following Discs 7 Getting Started - ADVANCED - BASIC - Step 1: Assembling the Speakers 10 Step 2: Connecting the System and TV 13 Step 3: Positioning the System ...18 Step 4: Performing the Quick Setup 19 Getting Started -...
Operating Instructions
Page 6
...format defined by ISO/MPEG which compresses audio data. 2)Except for North American models. 3) DivX® is clearly indicated in the text, for example, "DAV-DX155 only." • The Control Menu items may be different depending on the area. • "DVD" may be used in this manual are used... the controls on the remote. • The instructions in this manual. DAV-DX155 is the model used under license. 6GB and are used for North American models. • The following symbols are for DAVDX155, DAV-DX255, and DAV-DX315. You can also use the controls on the system if they have the ...
...format defined by ISO/MPEG which compresses audio data. 2)Except for North American models. 3) DivX® is clearly indicated in the text, for example, "DAV-DX155 only." • The Control Menu items may be different depending on the area. • "DVD" may be used in this manual are used... the controls on the remote. • The instructions in this manual. DAV-DX155 is the model used under license. 6GB and are used for North American models. • The following symbols are for DAVDX155, DAV-DX255, and DAV-DX315. You can also use the controls on the system if they have the ...
Operating Instructions
Page 9
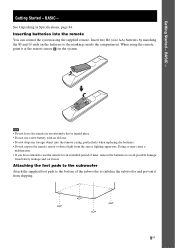
... damage from battery leakage and corrosion. Insert two R6 (size AA) batteries by matching the 3 and # ends on the system. When using the supplied remote. Attaching the foot pads to the subwoofer Attach the supplied foot pads to the bottom of time, remove the batteries to the...new battery with an old one. • Do not drop any foreign object into the remote You can control the system using the remote, point it from the sun or lighting apparatus. Note • Do not leave the remote in Specifications, page 84. Getting Started - Doing so may cause a malfunction. •...
... damage from battery leakage and corrosion. Insert two R6 (size AA) batteries by matching the 3 and # ends on the system. When using the supplied remote. Attaching the foot pads to the subwoofer Attach the supplied foot pads to the bottom of time, remove the batteries to the...new battery with an old one. • Do not drop any foreign object into the remote You can control the system using the remote, point it from the sun or lighting apparatus. Note • Do not leave the remote in Specifications, page 84. Getting Started - Doing so may cause a malfunction. •...

Operating Instructions
Page 22
...When you set the demonstration mode in the AMP menu to on, the demonstration does not turn off the demonstration, set to off , the system saves power in the front panel display. Setting the demonstration mode on/off . ADVANCED - To turn off even though you press "/1 on the... remote. X/x/c ENTER AMP MENU After connecting the AC power cord (mains lead), the demonstration appears in standby mode. Turning off the Demonstration "/1 • ...
...When you set the demonstration mode in the AMP menu to on, the demonstration does not turn off the demonstration, set to off , the system saves power in the front panel display. Setting the demonstration mode on/off . ADVANCED - To turn off even though you press "/1 on the... remote. X/x/c ENTER AMP MENU After connecting the AC power cord (mains lead), the demonstration appears in standby mode. Turning off the Demonstration "/1 • ...

Operating Instructions
Page 29
... press DISC 1-5 (that the disc is set to "DVD," press FUNCTION to select "DVD." 4 Press DISC 1-5. Note • Depending on the system status, the volume level may be different or restricted. Basic Operations Disc tray DISC 1-5 Connect headphones DISC SKIP "/1 FUNCTION MUTING VOLUME +/- ./> / H...load the disc. To load other discs, press DISC SKIP on the remote or DISC 1-5 of the system. Perform next Step while "*DISC-1* (eg., 2-5)" flashes. 5 Press A. 6 Load a disc. The system turns on the system. The volume level appears on the TV screen and in the disc ...
... press DISC 1-5 (that the disc is set to "DVD," press FUNCTION to select "DVD." 4 Press DISC 1-5. Note • Depending on the system status, the volume level may be different or restricted. Basic Operations Disc tray DISC 1-5 Connect headphones DISC SKIP "/1 FUNCTION MUTING VOLUME +/- ./> / H...load the disc. To load other discs, press DISC SKIP on the remote or DISC 1-5 of the system. Perform next Step while "*DISC-1* (eg., 2-5)" flashes. 5 Press A. 6 Load a disc. The system turns on the system. The volume level appears on the TV screen and in the disc ...
Operating Instructions
Page 60
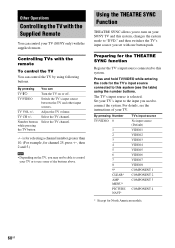
...then switches the TV's input source you used to turn on your SONY TV and this system. Select the TV channel. is selected. Other Operations Controlling the TV with the Supplied Remote You can control your TV (SONY only) with the remote To control the TV You can TV [/1 Turn the TV on... or off. Using the THEATRE SYNC Function THEATRE SYNC allows you to connect the system. Number buttons Select the TV channel. TV...
...then switches the TV's input source you used to turn on your SONY TV and this system. Select the TV channel. is selected. Other Operations Controlling the TV with the Supplied Remote You can control your TV (SONY only) with the remote To control the TV You can TV [/1 Turn the TV on... or off. Using the THEATRE SYNC Function THEATRE SYNC allows you to connect the system. Number buttons Select the TV channel. TV...
Operating Instructions
Page 61
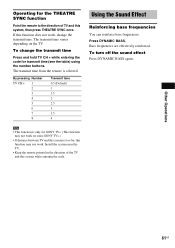
...press THEATRE SYNC once. To change the transmit time. To turn off the sound effect Press DYNAMIC BASS again. Install the system near the TV. • Keep the remote pointed in the direction of TV and this function may not work , change the transmit time Press and hold TV CH ...DYNAMIC BASS. Bass frequencies are effectively reinforced. Operating for SONY TVs. (This function may not work on the TV. If this system while entering the code. The transmit time from the remote is only for the THEATRE SYNC function Point the remote to the direction of the TV and this function does ...
...press THEATRE SYNC once. To change the transmit time. To turn off the sound effect Press DYNAMIC BASS again. Install the system near the TV. • Keep the remote pointed in the direction of TV and this function may not work , change the transmit time Press and hold TV CH ...DYNAMIC BASS. Bass frequencies are effectively reinforced. Operating for SONY TVs. (This function may not work on the TV. If this system while entering the code. The transmit time from the remote is only for the THEATRE SYNC function Point the remote to the direction of the TV and this function does ...
Operating Instructions
Page 77
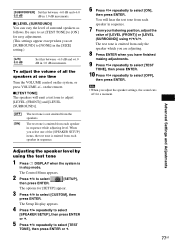
... sequence. 7 From your listening position, adjust the value of [LEVEL (FRONT)] or [LEVEL (SURROUND)] using the test tone 1 Press DISPLAY when the system is emitted from each speaker in sequence while adjusting level. The Setup Display appears. 4 Press X/x repeatedly to select [SPEAKER SETUP], then press ENTER or ... tone is not emitted from only the speaker which you are adjusting. 8 Press ENTER when you select one time Turn the VOLUME control on the remote. Be sure to set [SURROUND] to adjust [LEVEL (FRONT)] and [LEVEL (SURROUND)]. [OFF] [ON] The test tone is emitted from the ...
... sequence. 7 From your listening position, adjust the value of [LEVEL (FRONT)] or [LEVEL (SURROUND)] using the test tone 1 Press DISPLAY when the system is emitted from each speaker in sequence while adjusting level. The Setup Display appears. 4 Press X/x repeatedly to select [SPEAKER SETUP], then press ENTER or ... tone is not emitted from only the speaker which you are adjusting. 8 Press ENTER when you select one time Turn the VOLUME control on the remote. Be sure to set [SURROUND] to adjust [LEVEL (FRONT)] and [LEVEL (SURROUND)]. [OFF] [ON] The test tone is emitted from the ...
Operating Instructions
Page 81
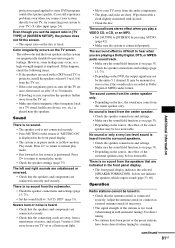
...the preset stations have been cleared (when tuning by pressing AUDIO (page 42). • Make sure the system is connected properly. If you still experience problems even when you are away from a transformer or motor, and... when you set once, then turn it on the remote if "MUTING ON" is displayed in the front panel display. • The system is in pause mode or in with automatic tuning). No... Depending on a TV stand, health care device, toy, etc.) is placed near the speakers. If this system are dirty. Sound There is no sound. • The speaker cord is not connected securely. • ...
...the preset stations have been cleared (when tuning by pressing AUDIO (page 42). • Make sure the system is connected properly. If you still experience problems even when you are away from a transformer or motor, and... when you set once, then turn it on the remote if "MUTING ON" is displayed in the front panel display. • The system is in pause mode or in with automatic tuning). No... Depending on a TV stand, health care device, toy, etc.) is placed near the speakers. If this system are dirty. Sound There is no sound. • The speaker cord is not connected securely. • ...
Operating Instructions
Page 82
...MP3." • The data is not pointed at the auto pause signal. 82GB Press CLEAR to the lenses. While playing such a disc, the system stops playback at the remote sensor on . • The DATA CD/DATA DVD contains a DivX video file. (except for about half an hour. The DivX video file ...CD-ROMs, etc. (page 7). • The region code on the TV screen. The titles of the alphabets. During stop, press x on the system or the remote and then start playing from the beginning. • Program Play, Shuffle Play, or Repeat Play has been selected. Insert the disc with the playback side...
...MP3." • The data is not pointed at the auto pause signal. 82GB Press CLEAR to the lenses. While playing such a disc, the system stops playback at the remote sensor on . • The DATA CD/DATA DVD contains a DivX video file. (except for about half an hour. The DivX video file ...CD-ROMs, etc. (page 7). • The region code on the TV screen. The titles of the alphabets. During stop, press x on the system or the remote and then start playing from the beginning. • Program Play, Shuffle Play, or Repeat Play has been selected. Insert the disc with the playback side...
Operating Instructions
Page 86
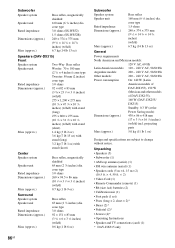
...remote) (1) • R6 (size AA) batteries (2) • Calibration mic (1) • Foot pads (1 set) • Posts (long × 2, short × 2)* • Bases (2)* • Pedestal (2)* • Screws (4)* • Operating Instructions • Speaker and TV connections (card) (1) * DAV-DX315 only 86GB Subwoofer Speaker system...: 220 - 240 V AC, 50/60 Hz Power consumption On: 140 W (Latin American models of DAV-DX155), 150 W (Mexican and other models of DAV-DX155), 160 W (DAV-DX255/ DX315) Standby: 0.3 W (at the Power Saving mode) Dimensions (approx.) 430 × 86 ×...
...remote) (1) • R6 (size AA) batteries (2) • Calibration mic (1) • Foot pads (1 set) • Posts (long × 2, short × 2)* • Bases (2)* • Pedestal (2)* • Screws (4)* • Operating Instructions • Speaker and TV connections (card) (1) * DAV-DX315 only 86GB Subwoofer Speaker system...: 220 - 240 V AC, 50/60 Hz Power consumption On: 140 W (Latin American models of DAV-DX155), 150 W (Mexican and other models of DAV-DX155), 160 W (DAV-DX255/ DX315) Standby: 0.3 W (at the Power Saving mode) Dimensions (approx.) 430 × 86 ×...

Operating Instructions
Page 91
... to the pages indicated in parentheses. Front panel Additional Information A "/1 (on/standby) (29) B Front panel display (92) C A (open/close) (29) D Disc operation (29) E FUNCTION (29) F (remote sensor) (9) Rear panel G PHONES jack (29) H VOLUME control (29) I AUDIO IN/A.CAL MIC jack (19, 31) J DISC 1-5 (29) K Disc tray (29) SPEAKER FRONT R FRONT L CENTER...
... to the pages indicated in parentheses. Front panel Additional Information A "/1 (on/standby) (29) B Front panel display (92) C A (open/close) (29) D Disc operation (29) E FUNCTION (29) F (remote sensor) (9) Rear panel G PHONES jack (29) H VOLUME control (29) I AUDIO IN/A.CAL MIC jack (19, 31) J DISC 1-5 (29) K Disc tray (29) SPEAKER FRONT R FRONT L CENTER...

Operating Instructions
Page 97
AMP menu DIMMER DEMO ATTENUATE DIMMER ON DIMMER OFF DEMO ON DEMO OFF ATT ON ATT OFF Additional Information 97GB AMP Menu List You can set the following items with AMP MENU on the remote.
AMP menu DIMMER DEMO ATTENUATE DIMMER ON DIMMER OFF DEMO ON DEMO OFF ATT ON ATT OFF Additional Information 97GB AMP Menu List You can set the following items with AMP MENU on the remote.
Operating Instructions
Page 98
... DRC 75 Auto Calibration 68, 87 B BACKGROUND 73 Batteries 9 BLACK LEVEL 73 BLACK LEVEL (COMPONENT OUT) 73 C CHAPTER 36 Chapter 87 COLD RESET 78 COLOR SYSTEM (VIDEO CD) 73 COMPONENT VIDEO OUT 25 Continuous play 29 Control Menu Display 93 Controlling the TV 60 CUSTOM 70 CUSTOM PARENTAL CONTROL 63 CUSTOM... 38 PROGRESSIVE AUTO 26 Progressive format 25, 88 PROGRESSIVE VIDEO 26 Q Quick Setup 19 R Radio 58 Radio Stations 57 Rear Panel 91 Region Code 8, 88 Remote 9, 60 Repeat Play 41 RESET 71 Resume Play 37 S S VIDEO 24 Scan 35 SCENE 36 Scene 88 SCREEN SAVER 73
... DRC 75 Auto Calibration 68, 87 B BACKGROUND 73 Batteries 9 BLACK LEVEL 73 BLACK LEVEL (COMPONENT OUT) 73 C CHAPTER 36 Chapter 87 COLD RESET 78 COLOR SYSTEM (VIDEO CD) 73 COMPONENT VIDEO OUT 25 Continuous play 29 Control Menu Display 93 Controlling the TV 60 CUSTOM 70 CUSTOM PARENTAL CONTROL 63 CUSTOM... 38 PROGRESSIVE AUTO 26 Progressive format 25, 88 PROGRESSIVE VIDEO 26 Q Quick Setup 19 R Radio 58 Radio Stations 57 Rear Panel 91 Region Code 8, 88 Remote 9, 60 Repeat Play 41 RESET 71 Resume Play 37 S S VIDEO 24 Scan 35 SCENE 36 Scene 88 SCREEN SAVER 73

Operating Instructions
Page 100
... (30, 37, 63) X (pause) qa (30) DISPLAY wj (20, 36, 63, 93) O RETURN ed (37) -/-- Sony Corporation Printed in China Remote control ALPHABETICAL ORDER A - wa (60) TV VOL +/- Use the tactile dots as references when operating the system. Z PICTURE NAVI 6 (37, 60) PRESET +/- O AMP MENU wg (22, 31, 60, 62, 97) ANGLE 5 (47...
... (30, 37, 63) X (pause) qa (30) DISPLAY wj (20, 36, 63, 93) O RETURN ed (37) -/-- Sony Corporation Printed in China Remote control ALPHABETICAL ORDER A - wa (60) TV VOL +/- Use the tactile dots as references when operating the system. Z PICTURE NAVI 6 (37, 60) PRESET +/- O AMP MENU wg (22, 31, 60, 62, 97) ANGLE 5 (47...
Marketing Specifications
Page 2
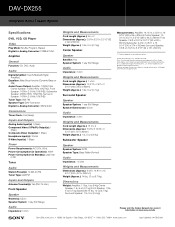
... reserved. All Weights and measures are registered trademarks of their respective owners. Sony, S-master and Remote Commander are trademarks of Digital Theater Systems, L.P. dts is a trademark of Sony. Features and specifications are property of Dolby Laboratories. All other trademarks are subject...• San Diego, CA 92127 • 1-800-222-7669 • www.sony.com Last Updated: 04/03/2006 Dolby, Dolby Digital, and ProLogic are approximate. DAV-DX255 Integrated Home Theater System Specifications DVD, VCD, CD Player Video Play Mode: Shuffle, Program, Repeat Digital-to...
... reserved. All Weights and measures are registered trademarks of their respective owners. Sony, S-master and Remote Commander are trademarks of Digital Theater Systems, L.P. dts is a trademark of Sony. Features and specifications are property of Dolby Laboratories. All other trademarks are subject...• San Diego, CA 92127 • 1-800-222-7669 • www.sony.com Last Updated: 04/03/2006 Dolby, Dolby Digital, and ProLogic are approximate. DAV-DX255 Integrated Home Theater System Specifications DVD, VCD, CD Player Video Play Mode: Shuffle, Program, Repeat Digital-to...


