Operating Instructions
Page 1
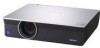
3-211-166-13 (1) Data Projector Operating Instructions VPL-CX100 VPL-CX120/CX125 VPL-CX150/CX155 VPL-CW125 © 2007 Sony Corporation
3-211-166-13 (1) Data Projector Operating Instructions VPL-CX100 VPL-CX120/CX125 VPL-CX150/CX155 VPL-CW125 © 2007 Sony Corporation

Operating Instructions
Page 4
...Main Unit 13 Top/Front/Side 13 Rear/Side/Bottom 13 Control Panel 15 Connector Panel 16 Remote Commander 17 VPL-CX125/CX155/CW125 ..... 17 VPL-CX100/CX120/CX150 ...... 19 Effective Tools for Your Presentation 32 Controlling the Computer Using a Presentation Tool, RM-PJPK1...CX155/CW125 only 33 Adjustments and Settings Using a Menu Using a MENU 34 The Picture Menu 36 The Signal Menu 37 About the Preset Memory No. ....38 The Function Menu 39 The Installation Menu 41 The Setup Menu 43 The Information Menu 44 Projecting the Picture Installing the Projector 21 Connecting the Projector...
...Main Unit 13 Top/Front/Side 13 Rear/Side/Bottom 13 Control Panel 15 Connector Panel 16 Remote Commander 17 VPL-CX125/CX155/CW125 ..... 17 VPL-CX100/CX120/CX150 ...... 19 Effective Tools for Your Presentation 32 Controlling the Computer Using a Presentation Tool, RM-PJPK1...CX155/CW125 only 33 Adjustments and Settings Using a Menu Using a MENU 34 The Picture Menu 36 The Signal Menu 37 About the Preset Memory No. ....38 The Function Menu 39 The Installation Menu 41 The Setup Menu 43 The Information Menu 44 Projecting the Picture Installing the Projector 21 Connecting the Projector...
Operating Instructions
Page 10
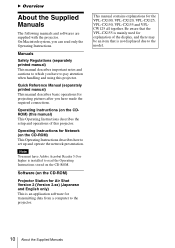
... are supplied with the projector. Software (on the CDROM) (this manual) This Operating Instructions describes the setup and operations of the display, and there may be an item that is mainly used for the VPL-CX100, VPL-CX120, VPL-CX125, VPL-CX150, VPL-CX155 and VPLCW125 all together.... On Macintosh system, you have made the required connections. This manual contains explanations for explanation of this projector. Be aware that the VPL-CX155 is not displayed due to set...
... are supplied with the projector. Software (on the CDROM) (this manual) This Operating Instructions describes the setup and operations of the display, and there may be an item that is mainly used for the VPL-CX100, VPL-CX120, VPL-CX125, VPL-CX150, VPL-CX155 and VPLCW125 all together.... On Macintosh system, you have made the required connections. This manual contains explanations for explanation of this projector. Be aware that the VPL-CX155 is not displayed due to set...
Operating Instructions
Page 11
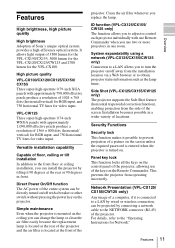
...or 90 degrees in a wider variety of the screen. Network Presentation (VPL-CX125/ CX155/CW125 only) Any image of the projector. Features 11 Overview Side Shot (VPL-CX125/CX155/CW125 only) The projector supports the Side Shot feature (horizontal trapezoidal correction function), enabling projection ...VPL-CX150/CX155, 3000 lumen for the VPL-CX120/CX125/CW125 and 2700 lumen for the VPL-CX100. It allows light output of Sony's unique optical system provides a high-efficiency optical system. High picture quality VPL-CX100/CX120/CX125/CX150/ CX155 Three super-high-aperture 0.79-inch XGA...
...or 90 degrees in a wider variety of the screen. Network Presentation (VPL-CX125/ CX155/CW125 only) Any image of the projector. Features 11 Overview Side Shot (VPL-CX125/CX155/CW125 only) The projector supports the Side Shot feature (horizontal trapezoidal correction function), enabling projection ...VPL-CX150/CX155, 3000 lumen for the VPL-CX120/CX125/CW125 and 2700 lumen for the VPL-CX100. It allows light output of Sony's unique optical system provides a high-efficiency optical system. High picture quality VPL-CX100/CX120/CX125/CX150/ CX155 Three super-high-aperture 0.79-inch XGA...
Operating Instructions
Page 15
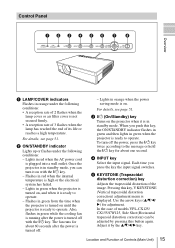
... it on until the projector is ready to the message or hold the ?/1 key for about one second. Each time you can be adjusted by the v/V/b/B key. In the case of models VPL-CX125/ CX155/CW125, Side Shot (Horizontal trapezoid distortion correction) can turn off with the ?/1 key. -... the power saving mode is on , and when it by pressing this button again. Location and Function of the image. Flashes in green when the projector is ready to operate. - Use the arrow keys (v/V/b/ B) for adjustment. Control Panel 123456 7 8 LAMP/ COVER ON/ STANDBY INPUT KEYSTONE MENU...
... it on until the projector is ready to the message or hold the ?/1 key for about one second. Each time you can be adjusted by the v/V/b/B key. In the case of models VPL-CX125/ CX155/CW125, Side Shot (Horizontal trapezoid distortion correction) can turn off with the ?/1 key. -... the power saving mode is on , and when it by pressing this button again. Location and Function of the image. Flashes in green when the projector is ready to operate. - Use the arrow keys (v/V/b/ B) for adjustment. Control Panel 123456 7 8 LAMP/ COVER ON/ STANDBY INPUT KEYSTONE MENU...
Operating Instructions
Page 17
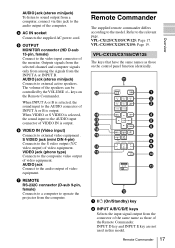
.... VIDEO jack (phono type) Connects to the composite video output of video equipment. Remote Commander The supplied remote commander differs according to the relevant page. VPL-CX125/CX155/CW125 The keys that have the same names as those on the Remote Commander. FREEZE ID MODE 1 2 3 1 2 3 4 5 6 7 8 9 0 qa ...Video input) Connects to external active speakers. g REMOTE RS-232C connector (D-sub 9-pin, female) Connects to a computer to operate the projector from a computer, connect via this model. AUDIO jack (stereo minijack) To listen to sound output from the computer. ql qk qj qh...
.... VIDEO jack (phono type) Connects to the composite video output of video equipment. Remote Commander The supplied remote commander differs according to the relevant page. VPL-CX125/CX155/CW125 The keys that have the same names as those on the Remote Commander. FREEZE ID MODE 1 2 3 1 2 3 4 5 6 7 8 9 0 qa ...Video input) Connects to external active speakers. g REMOTE RS-232C connector (D-sub 9-pin, female) Connects to a computer to operate the projector from a computer, connect via this model. AUDIO jack (stereo minijack) To listen to sound output from the computer. ql qk qj qh...
Operating Instructions
Page 19
... detector. • The operation range is input. For details, see "Smart APA" in this projector. f RESET key Resets the value of an item to its factory preset value or returns the ...key d LENS key This function is , the wider the angle within which the commander can control the projector becomes. Overview To install batteries 1 Push and slide the lid to open it . While pressing the lid... with D ZOOM key to its clearest while a signal is displayed on the projector. Be sure to its original size. The shorter the distance between the Remote Commander and the remote ...
... detector. • The operation range is input. For details, see "Smart APA" in this projector. f RESET key Resets the value of an item to its factory preset value or returns the ...key d LENS key This function is , the wider the angle within which the commander can control the projector becomes. Overview To install batteries 1 Push and slide the lid to open it . While pressing the lid... with D ZOOM key to its clearest while a signal is displayed on the projector. Be sure to its original size. The shorter the distance between the Remote Commander and the remote ...
Operating Instructions
Page 21
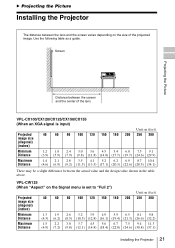
...VPL-CX100/CX120/CX125/CX150/CX155 (When an XGA signal is set to "Full 2") Unit: m (feet) Projected image size (diagonal) (inches) 40 60 80 100 120 150 180 200 250 300 Minimum Distance 1.3 1.9 2.6 3.2 3.9 4.9 5.9 6.5 8.1 9.8 (4.3) (6.2) (8.5) (10.5) (12.8) (16.1) (19.4) (21.3) (26.6) (32.2) Maximum Distance 1.5 2.2 3.0 3.7 4.5 5.6 6.7 7.5 9.4 11.3 (4.9) (7.2) (9.8) (12.1) (14.8) (18.4) (22.0) (24.6) (30.8) (37.1) Installing the Projector...value shown in the table above. B Projecting the Picture Installing the Projector The distance between the lens and the screen varies depending on the...
...VPL-CX100/CX120/CX125/CX150/CX155 (When an XGA signal is set to "Full 2") Unit: m (feet) Projected image size (diagonal) (inches) 40 60 80 100 120 150 180 200 250 300 Minimum Distance 1.3 1.9 2.6 3.2 3.9 4.9 5.9 6.5 8.1 9.8 (4.3) (6.2) (8.5) (10.5) (12.8) (16.1) (19.4) (21.3) (26.6) (32.2) Maximum Distance 1.5 2.2 3.0 3.7 4.5 5.6 6.7 7.5 9.4 11.3 (4.9) (7.2) (9.8) (12.1) (14.8) (18.4) (22.0) (24.6) (30.8) (37.1) Installing the Projector...value shown in the table above. B Projecting the Picture Installing the Projector The distance between the lens and the screen varies depending on the...
Operating Instructions
Page 22
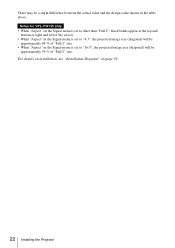
..., see "Installation Diagram" on the Signal menu is set to "16:9", the projected image size (diagonal) will be approximately 84 % of "Full 2" size. Notes for VPL-CW125 only • When "Aspect" on page 59. 22 Installing the...
..., see "Installation Diagram" on the Signal menu is set to "16:9", the projected image size (diagonal) will be approximately 84 % of "Full 2" size. Notes for VPL-CW125 only • When "Aspect" on page 59. 22 Installing the...
Operating Instructions
Page 23
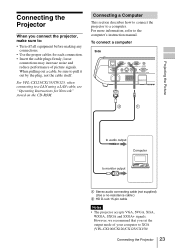
For VPL-CX125/CX155/CW125, when connecting to a computer. Connecting a Computer This section describes how to connect the projector to a LAN using a LAN cable, see "Operating Instructions for each connection. • Insert the cable plugs firmly; When pulling out a cable, be sure ...the CD-ROM. loose connections may increase noise and reduce performance of your computer to the computer's instruction manual. For more information, refer to XGA (VPL-CX100/CX120/CX125/CX150/ Connecting the Projector 23 Connecting the Projector When you set the output mode of picture signals.
For VPL-CX125/CX155/CW125, when connecting to a computer. Connecting a Computer This section describes how to connect the projector to a LAN using a LAN cable, see "Operating Instructions for each connection. • Insert the cable plugs firmly; When pulling out a cable, be sure ...the CD-ROM. loose connections may increase noise and reduce performance of your computer to the computer's instruction manual. For more information, refer to XGA (VPL-CX100/CX120/CX125/CX150/ Connecting the Projector 23 Connecting the Projector When you set the output mode of picture signals.
Operating Instructions
Page 24
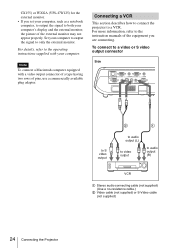
Connecting a VCR This section describes how to connect the projector to both your computer's display and the external monitor, the picture of the external monitor may not appear properly. CX155) or WXGA (VPL-CW125) for the external monitor. • If you are connecting. Set your ... audio connecting cable (not supplied) (Use a no-resistance cable.) B Video cable (not supplied) or S-Video cable (not supplied) 24 Connecting the Projector To connect to a video or S video output connector Side NETWORK INPUT C RGB AUDIO INPUT A RGB AUDIO INPUT B MONITOR AUDIO OUTPUT S VIDEO VIDEO...
Connecting a VCR This section describes how to connect the projector to both your computer's display and the external monitor, the picture of the external monitor may not appear properly. CX155) or WXGA (VPL-CW125) for the external monitor. • If you are connecting. Set your ... audio connecting cable (not supplied) (Use a no-resistance cable.) B Video cable (not supplied) or S-Video cable (not supplied) 24 Connecting the Projector To connect to a video or S video output connector Side NETWORK INPUT C RGB AUDIO INPUT A RGB AUDIO INPUT B MONITOR AUDIO OUTPUT S VIDEO VIDEO...

Operating Instructions
Page 26
The ON/STANDBY indicator flashes in green, and then lights in red and the projector goes into a wall outlet, then connect all equipment. Projecting 24 LAMP/ COVER ON/ STANDBY INPUT KEYSTONE MENU PUSH ENTER PIC MUTING ON/STANDBY indicator MPUITICNG .... 2 Press the ?/1 key. The ON/STANDBY indicator lights in green. 3 Turn on the Remote Commander. 26 Projecting To operate with the Remote Commander of VPL-CX125/ CX155/CW125 You can select directly the input signal you want to project by pressing one key from among INPUT A, B, C, AIR SHOT, VIDEO or S VIDEO on...
The ON/STANDBY indicator flashes in green, and then lights in red and the projector goes into a wall outlet, then connect all equipment. Projecting 24 LAMP/ COVER ON/ STANDBY INPUT KEYSTONE MENU PUSH ENTER PIC MUTING ON/STANDBY indicator MPUITICNG .... 2 Press the ?/1 key. The ON/STANDBY indicator lights in green. 3 Turn on the Remote Commander. 26 Projecting To operate with the Remote Commander of VPL-CX125/ CX155/CW125 You can select directly the input signal you want to project by pressing one key from among INPUT A, B, C, AIR SHOT, VIDEO or S VIDEO on...
Operating Instructions
Page 27
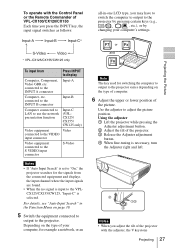
...computer. 6 Adjust the upper or lower position of the picture. For details, see "Auto Input Search" in -one LCD type, you may have to switch the computer to output to the projector by pressing certain keys (e.g., , etc.), or by changing your computer, for example a notebook, or an Note The... only) Video equipment Video connected to the VIDEO input connector Video equipment connected to the VPLCX125/CX155/CW125, "Input-C" is selected. Depending on the type of VPL-CX100/CX120/CX150 Each time you press the INPUT key, the input signal switches as follows: all-in the Function Menu on ...
...computer. 6 Adjust the upper or lower position of the picture. For details, see "Auto Input Search" in -one LCD type, you may have to switch the computer to output to the projector by pressing certain keys (e.g., , etc.), or by changing your computer, for example a notebook, or an Note The... only) Video equipment Video connected to the VIDEO input connector Video equipment connected to the VPLCX125/CX155/CW125, "Input-C" is selected. Depending on the type of VPL-CX100/CX120/CX150 Each time you press the INPUT key, the input signal switches as follows: all-in the Function Menu on ...
Operating Instructions
Page 29
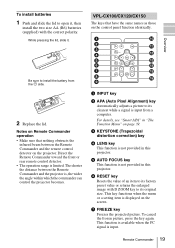
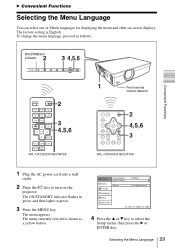
... INPUT B INPUT E INPUT C AIR SHOT VIDEO S VIDEO MENU APA ENTER 2 3 4,5,6 RESET FOCUS ZOOM SHIFT ASPECT KEY STONE VPL-CX125/CX155/CW125 MPUITICNG PEUNSTHER MENU KEYSTONE INPUT SOTNA/NDBY LACMOPV/ER NEINTPWUOTRCK RGB MONITOR INPUT A AUDIO OUTPUT AUDIO S VIDEO RGB VVIIDDEEOOIN INPUT B ...VPL-CX100/CX120/CX150 1 Plug the AC power cord into a wall outlet. 2 Press the ?/1 key to select the Setup menu, then press the B or ENTER key. B Convenient Functions Selecting the Menu Language You can select one of fifteen languages for displaying the menu and other on the projector...
... INPUT B INPUT E INPUT C AIR SHOT VIDEO S VIDEO MENU APA ENTER 2 3 4,5,6 RESET FOCUS ZOOM SHIFT ASPECT KEY STONE VPL-CX125/CX155/CW125 MPUITICNG PEUNSTHER MENU KEYSTONE INPUT SOTNA/NDBY LACMOPV/ER NEINTPWUOTRCK RGB MONITOR INPUT A AUDIO OUTPUT AUDIO S VIDEO RGB VVIIDDEEOOIN INPUT B ...VPL-CX100/CX120/CX150 1 Plug the AC power cord into a wall outlet. 2 Press the ?/1 key to select the Setup menu, then press the B or ENTER key. B Convenient Functions Selecting the Menu Language You can select one of fifteen languages for displaying the menu and other on the projector...
Operating Instructions
Page 34
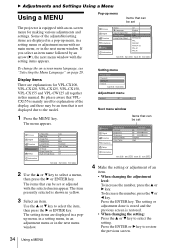
... select an item name followed by an arrow (B), the next menu window with the selected menu appear. The setting items are explanations for VPL-CX100, VPL-CX120, VPL-CX125, VPL-CX150, VPL-CX155 and VPL-CW125 all together in a pop-up menu Items that VPLCX155 is mainly used for making various adjustments and settings. To decrease the... next menu window. Use the v or V key to select the item, then press the B or ENTER key. B Adjustments and Settings Using a Menu Using a MENU The projector is restored. • When changing the setting: Press the v or V key to select the setting.
... select an item name followed by an arrow (B), the next menu window with the selected menu appear. The setting items are explanations for VPL-CX100, VPL-CX120, VPL-CX125, VPL-CX150, VPL-CX155 and VPL-CW125 all together in a pop-up menu Items that VPLCX155 is mainly used for making various adjustments and settings. To decrease the... next menu window. Use the v or V key to select the item, then press the B or ENTER key. B Adjustments and Settings Using a Menu Using a MENU The projector is restored. • When changing the setting: Press the v or V key to select the setting.
Operating Instructions
Page 35
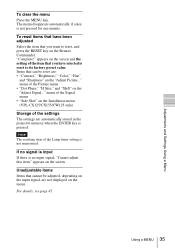
... in the projector memory when the ENTER key is pressed. Using a MENU 35 Adjustments and Settings Using a Menu To clear the menu Press the MENU key. "Complete!" appears on the screen and the setting of the Picture menu • "Dot Phase," "H Size," and "Shift" on the Installation menu (VPL-CX125/CX155/CW125 only...
... in the projector memory when the ENTER key is pressed. Using a MENU 35 Adjustments and Settings Using a Menu To clear the menu Press the MENU key. "Complete!" appears on the screen and the setting of the Picture menu • "Dot Phase," "H Size," and "Shift" on the Installation menu (VPL-CX125/CX155/CW125 only...
Operating Instructions
Page 38
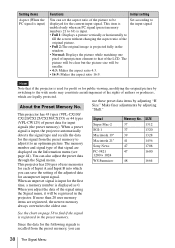
... the oldest one pixel of input picture element to that of the LCD. Since the data for public viewing, modifying the original picture by switching... first time, a memory number is displayed as 0. This projector has 43 types (VPL-CX100/ CX120/CX125/CX150/CX155) or 44 types (VPL-CW125) of the original picture. • Full 2:The...projector has 20 types of user memories for each of Input A and Input B into which are displayed on page 58 to fill the screen without changing the aspect ratio of preset data for an unpreset input signal. Signal Super Mac-2 SGI-1 Macintosh 19" Macintosh 21" Sony...
... the oldest one pixel of input picture element to that of the LCD. Since the data for public viewing, modifying the original picture by switching... first time, a memory number is displayed as 0. This projector has 43 types (VPL-CX100/ CX120/CX125/CX150/CX155) or 44 types (VPL-CW125) of the original picture. • Full 2:The...projector has 20 types of user memories for each of Input A and Input B into which are displayed on page 58 to fill the screen without changing the aspect ratio of preset data for an unpreset input signal. Signal Super Mac-2 SGI-1 Macintosh 19" Macintosh 21" Sony...
Operating Instructions
Page 39
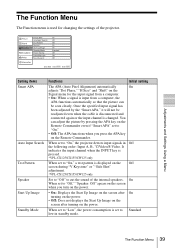
...on the Signal menu for changing the settings of the internal speakers. The Function Menu 39 When set to cut the sound of the projector. Adjustments and Settings Using a Menu Setting items Smart APA Auto Input Search Test Pattern Speaker Start Up Image Standby Mode Functions Initial ..."Off" to "Low", the power consumption is changed. It indicates the input channel when the INPUT key is pressed. *VPL-CX125/CX155/CW125 only When set to "On," the projector detects input signals in standby mode. When set to "Off," "Speaker: Off" apears on the screen when you press the...
...on the Signal menu for changing the settings of the internal speakers. The Function Menu 39 When set to cut the sound of the projector. Adjustments and Settings Using a Menu Setting items Smart APA Auto Input Search Test Pattern Speaker Start Up Image Standby Mode Functions Initial ..."Off" to "Low", the power consumption is changed. It indicates the input channel when the INPUT key is pressed. *VPL-CX125/CX155/CW125 only When set to "On," the projector detects input signals in standby mode. When set to "Off," "Speaker: Off" apears on the screen when you press the...

Operating Instructions
Page 41
...Blue Standard Front & Rear All Off Off Set: Exit: Adjustments and Settings Using a Menu Setting items V Keystone Side Shot (VPL-CX125/ CX155/CW125 only) Image Flip Background Lamp Mode IR Receiver Functions Initial setting Corrects the trapezoidal distortion caused by the projection angle. When ...or "Manual" for changing the settings of the projected image will be lower compared with the "High" setting. The brightness of the projector. Normally, set to a higher value (+ direction). Sets the lamp brightness used for manual correction using the v/V/b/B keys. direction). The...
...Blue Standard Front & Rear All Off Off Set: Exit: Adjustments and Settings Using a Menu Setting items V Keystone Side Shot (VPL-CX125/ CX155/CW125 only) Image Flip Background Lamp Mode IR Receiver Functions Initial setting Corrects the trapezoidal distortion caused by the projection angle. When ...or "Manual" for changing the settings of the projected image will be lower compared with the "High" setting. The brightness of the projector. Normally, set to a higher value (+ direction). Sets the lamp brightness used for manual correction using the v/V/b/B keys. direction). The...

Operating Instructions
Page 42
... first switch the V Keystone setting to "Manual", then return it is used at an altitude of the Remote Commander. You can control the projector with the Remote Commander with the supplied Remote Commander. The setting mode will be diminished. 42 The Installation Menu High Altitude Set to "On"... is set to "Auto", press the KEYSTONE key on the projector. Setting items Functions Initial setting ID Mode (VPL-CX125/ CX155/CW125 only) Assigns an ID number (1 to 3) to the projector when you All want control two or more projectors individually with the ID MODE key set to "1." When this ...
... first switch the V Keystone setting to "Manual", then return it is used at an altitude of the Remote Commander. You can control the projector with the Remote Commander with the supplied Remote Commander. The setting mode will be diminished. 42 The Installation Menu High Altitude Set to "On"... is set to "Auto", press the KEYSTONE key on the projector. Setting items Functions Initial setting ID Mode (VPL-CX125/ CX155/CW125 only) Assigns an ID number (1 to 3) to the projector when you All want control two or more projectors individually with the ID MODE key set to "1." When this ...


