Operating Instructions
Page 2
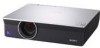
... accessible. WARNING When installing the unit, incorporate a readily accessible disconnect device in a residential installation. DO NOT USE ANY OTHER POWER CORD. If you have questions on a circuit different from that to which the receiver is no guarantee that conforms to the safety ... occur in .) Rating Minimum 10 A, 125 V Using this apparatus to comply with the instructions, may require the use of the above Power Cord / Appliance Connector / Plug, please consult a qualified service personnel. If this equipment does cause harmful interference to radio communications. These limits...
... accessible. WARNING When installing the unit, incorporate a readily accessible disconnect device in a residential installation. DO NOT USE ANY OTHER POWER CORD. If you have questions on a circuit different from that to which the receiver is no guarantee that conforms to the safety ... occur in .) Rating Minimum 10 A, 125 V Using this apparatus to comply with the instructions, may require the use of the above Power Cord / Appliance Connector / Plug, please consult a qualified service personnel. If this equipment does cause harmful interference to radio communications. These limits...
Operating Instructions
Page 6
... internal heat build-up may impair the performance of the projector, take care with respect to the "Cleaning the Air Filter" on page 48 for several days. • To disconnect the cord, pull it out by qualified Sony personnel before operating it further. • Unplug the unit... maintenance may occur, causing picture degradation or damage to disconnect the AC power cord from the AC power source (mains) as long as they will damage the lens surface. If voltage adaptation is required, consult with qualified Sony personnel. • Should any windows that face the screen with opaque ...
... internal heat build-up may impair the performance of the projector, take care with respect to the "Cleaning the Air Filter" on page 48 for several days. • To disconnect the cord, pull it out by qualified Sony personnel before operating it further. • Unplug the unit... maintenance may occur, causing picture degradation or damage to disconnect the AC power cord from the AC power source (mains) as long as they will damage the lens surface. If voltage adaptation is required, consult with qualified Sony personnel. • Should any windows that face the screen with opaque ...
Operating Instructions
Page 15
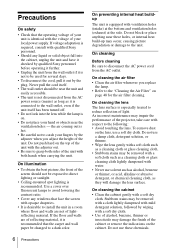
...when the lamp has reached the end of models VPL-CX125/ CX155/CW125, Side Shot (Horizontal trapezoid distortion correction) can turn off the power, press the ?/1 key twice according to operate. - Lights in red when the AC power cord is ready to operate. When you push this ...key, V KEYSTONE (Vertical trapezoidal distortion correction) adjustment menu is ready to operate. Pressing this key, the ON/STANDBY indicator flashes in green and then lights in green when the projector is displayed. Control ...
...when the lamp has reached the end of models VPL-CX125/ CX155/CW125, Side Shot (Horizontal trapezoid distortion correction) can turn off the power, press the ?/1 key twice according to operate. - Lights in red when the AC power cord is ready to operate. When you push this ...key, V KEYSTONE (Vertical trapezoidal distortion correction) adjustment menu is ready to operate. Pressing this key, the ON/STANDBY indicator flashes in green and then lights in green when the projector is displayed. Control ...
Operating Instructions
Page 17
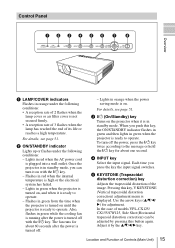
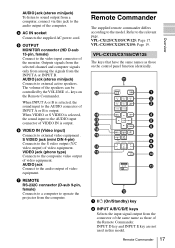
...Connects to the relevant page. g REMOTE RS-232C connector (D-sub 9-pin, female) Connects to a computer to operate the projector from the INPUT A or INPUT B. VPL-CX125/CX155/CW125: Page 17. The volume of video equipment. Remote Commander The supplied remote commander differs according to external active... type) Connects to the composite video output of the speakers can be controlled by the VOLUME +/- VPL-CX100/CX120/CX150: Page 19. AUDIO - d AC IN socket Connects the supplied AC power cord. e OUTPUT MONITOR connector (HD D-sub 15-pin, female) Connect to the video input connector of...
...Connects to the relevant page. g REMOTE RS-232C connector (D-sub 9-pin, female) Connects to a computer to operate the projector from the INPUT A or INPUT B. VPL-CX125/CX155/CW125: Page 17. The volume of video equipment. Remote Commander The supplied remote commander differs according to external active... type) Connects to the composite video output of the speakers can be controlled by the VOLUME +/- VPL-CX100/CX120/CX150: Page 19. AUDIO - d AC IN socket Connects the supplied AC power cord. e OUTPUT MONITOR connector (HD D-sub 15-pin, female) Connect to the video input connector of...

Operating Instructions
Page 26
...INPUT A, B, C, AIR SHOT, VIDEO or S VIDEO on the equipment connected to the projector. 4 Select the input source. The ON/STANDBY indicator flashes in green, and then lights in red and the projector goes into a wall outlet, then connect all equipment. Projecting 24 LAMP/ COVER ON/... 4 MENU APA ENTER RESET FOCUS ZOOM SHIFT ASPECT KEY STONE VPL-CX125/CX155/CW125 APA INPUT KEY STONE /TILT LENS ENTER AUTO FOCUS RESET MENU FREEZE PIC MUTING D ZOOM AUDIO MUTING VOLUME 2 4 VPL-CX100/CX120/CX150 1 Plug the AC power cord into standby mode. 2 Press the ?/1 key. The ON/...
...INPUT A, B, C, AIR SHOT, VIDEO or S VIDEO on the equipment connected to the projector. 4 Select the input source. The ON/STANDBY indicator flashes in green, and then lights in red and the projector goes into a wall outlet, then connect all equipment. Projecting 24 LAMP/ COVER ON/... 4 MENU APA ENTER RESET FOCUS ZOOM SHIFT ASPECT KEY STONE VPL-CX125/CX155/CW125 APA INPUT KEY STONE /TILT LENS ENTER AUTO FOCUS RESET MENU FREEZE PIC MUTING D ZOOM AUDIO MUTING VOLUME 2 4 VPL-CX100/CX120/CX150 1 Plug the AC power cord into standby mode. 2 Press the ?/1 key. The ON/...
Operating Instructions
Page 28
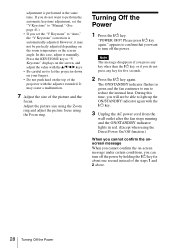
.... Press the KEYSTONE key to "V Keystone" displays on the screen, and adjust the value with the v/V/b/B keys. • Be careful not to let the projector down on your fingers. • Do not push hard on the room temperature or the screen angle. Note The message disappears if you press any...cannot confirm the on-screen message under certain conditions, you do not press any key for about one second instead of the projector with the ?/1 key. 3 Unplug the AC power cord from the wall outlet after the fan stops running and the ON/STANDBY indicator lights in green and the fan continues to...
.... Press the KEYSTONE key to "V Keystone" displays on the screen, and adjust the value with the v/V/b/B keys. • Be careful not to let the projector down on your fingers. • Do not push hard on the room temperature or the screen angle. Note The message disappears if you press any...cannot confirm the on-screen message under certain conditions, you do not press any key for about one second instead of the projector with the ?/1 key. 3 Unplug the AC power cord from the wall outlet after the fan stops running and the ON/STANDBY indicator lights in green and the fan continues to...
Operating Instructions
Page 29
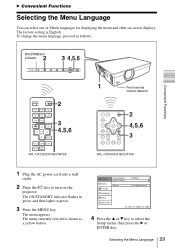
The menu appears. B Convenient Functions Selecting the Menu Language You can select one of fifteen languages for displaying the menu and other on the projector. To change the menu language, proceed as a yellow button. 4 Press the v or V key to turn on -screen displays. The menu...remote control detector APA INPUT KEY STONE /TILT LENS ENTER AUTO FOCUS RESET MENU FREEZE PIC MUTING D ZOOM AUDIO MUTING VOLUME 2 4,5,6 3 VPL-CX100/CX120/CX150 1 Plug the AC power cord into a wall outlet. 2 Press the ?/1 key to select the Setup menu, then press the B or ENTER key. The ON/...
The menu appears. B Convenient Functions Selecting the Menu Language You can select one of fifteen languages for displaying the menu and other on the projector. To change the menu language, proceed as a yellow button. 4 Press the v or V key to turn on -screen displays. The menu...remote control detector APA INPUT KEY STONE /TILT LENS ENTER AUTO FOCUS RESET MENU FREEZE PIC MUTING D ZOOM AUDIO MUTING VOLUME 2 4,5,6 3 VPL-CX100/CX120/CX150 1 Plug the AC power cord into a wall outlet. 2 Press the ?/1 key to select the Setup menu, then press the B or ENTER key. The ON/...

Operating Instructions
Page 31
...service center because you have forgotten the password, you will provide you fail to enter the correct password after three tries, the projector cannot be able to verify the projector's serial number and your identity has been confirmed, we will need to confirm. Convenient Functions When "Security Lock enabled!" Enter ... the ?/1 key to on, then it becomes effective. is displayed on the menu screen, the setting for entering the password is displayed when the power is set to turn off and disconnect the AC power cord. If "Invalid Password!" The screen used . Security Lock 31
...service center because you have forgotten the password, you will provide you fail to enter the correct password after three tries, the projector cannot be able to verify the projector's serial number and your identity has been confirmed, we will need to confirm. Convenient Functions When "Security Lock enabled!" Enter ... the ?/1 key to on, then it becomes effective. is displayed on the menu screen, the setting for entering the password is displayed when the power is set to turn off and disconnect the AC power cord. If "Invalid Password!" The screen used . Security Lock 31
Operating Instructions
Page 46
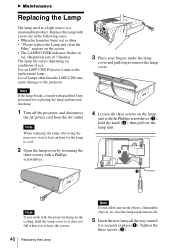
... rate of lamps other than the LMP-C200 may cause damage to cool. 2 Open the lamp cover by loosening the three screws with the projector hung on the ceiling, hold the knob (b), then pull out the lamp unit. B Maintenance Replacing the Lamp The lamp used as the replacement... screws (b). Replace this lamp with qualified Sony personnel for the lamp to the projector. Note When replacing the lamp after using the projector, wait at least an hour for replacing the lamp and internal checking. 1 Turn off the projector, and disconnect the AC power cord from the AC outlet. Note If you...
... rate of lamps other than the LMP-C200 may cause damage to cool. 2 Open the lamp cover by loosening the three screws with the projector hung on the ceiling, hold the knob (b), then pull out the lamp unit. B Maintenance Replacing the Lamp The lamp used as the replacement... screws (b). Replace this lamp with qualified Sony personnel for the lamp to the projector. Note When replacing the lamp after using the projector, wait at least an hour for replacing the lamp and internal checking. 1 Turn off the projector, and disconnect the AC power cord from the AC outlet. Note If you...

Operating Instructions
Page 47
...on if the lamp is initialized to attach the lamp cover securely as it was. Refer to turn on . (Page 51) 7 Connect the power cord. is displayed in the menu screen. The ON/STANDBY indicator lights in this product contains mercury. Yes: No: 12Select "Yes" with the V ... Timer is not secured properly. 6 Restore the lamp cover to environmental considerations. Change the Lamp and clean the Filter? If not, the projector cannot be regulated due to the original position and tighten the three screws with the Phillips screwdriver. 11Select "Execute" with the v key. Note...
...on if the lamp is initialized to attach the lamp cover securely as it was. Refer to turn on . (Page 51) 7 Connect the power cord. is displayed in the menu screen. The ON/STANDBY indicator lights in this product contains mercury. Yes: No: 12Select "Yes" with the V ... Timer is not secured properly. 6 Restore the lamp cover to environmental considerations. Change the Lamp and clean the Filter? If not, the projector cannot be regulated due to the original position and tighten the three screws with the Phillips screwdriver. 11Select "Execute" with the v key. Note...

Operating Instructions
Page 48
.... 6 Replace the air filter cover. Remove the air filter, and then remove the dust with qualified Sony personnnel. • Be sure to clean the air filter will vary depending on the environment or how the projector is not inserted securely. (Page 51) • To erase a message, press any key on the air... cleaned whenever you replace the lamp. Claws 4 Clean the air filter with a vacuum cleaner. 5 Attach the air filter so that it is used. 1 Turn the power off and unplug the power cord. 2 Remove the air filter cover.
.... 6 Replace the air filter cover. Remove the air filter, and then remove the dust with qualified Sony personnnel. • Be sure to clean the air filter will vary depending on the environment or how the projector is not inserted securely. (Page 51) • To erase a message, press any key on the air... cleaned whenever you replace the lamp. Claws 4 Clean the air filter with a vacuum cleaner. 5 Attach the air filter so that it is used. 1 Turn the power off and unplug the power cord. 2 Remove the air filter cover.
Operating Instructions
Page 52
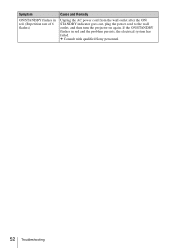
If the ON/STANDBY flashes in red. (Repetition rate of 6 flashes) Cause and Remedy Unplug the AC power cord from the wall outlet after the ON/ STANDBY indicator goes out, plug the power cord to the wall outlet, and then turn the projector on again. c Consult with qualified Sony personnel. 52 Troubleshooting Symptom ON/STANDBY flashes in red and the problem persists, the electrical system has failed.
If the ON/STANDBY flashes in red. (Repetition rate of 6 flashes) Cause and Remedy Unplug the AC power cord from the wall outlet after the ON/ STANDBY indicator goes out, plug the power cord to the wall outlet, and then turn the projector on again. c Consult with qualified Sony personnel. 52 Troubleshooting Symptom ON/STANDBY flashes in red and the problem persists, the electrical system has failed.
Operating Instructions
Page 56
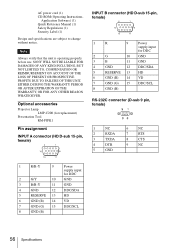
AC power cord (1) CD-ROM (Operating Instructions, Application Software) (1) Quick Reference Manual (1) Safety Regulations (1) Security Label (1) Design and specifications are subject to change without notice. SONY WILL NOT BE LIABLE FOR DAMAGES OF ANY KIND INCLUDING, BUT NOT LIMITED TO, COMPENSATION OR ...EXPIRATION OF THE WARRANTY, OR FOR ANY OTHER REASON WHATSOEVER. Note Always verify that the unit is operating properly before use. Optional accessories Projector Lamp LMP-C200 (for replacement) Presentation Tool RM-PJPK1 Pin assignment INPUT A connector (HD D-sub 15-pin, female) INPUT B ...
AC power cord (1) CD-ROM (Operating Instructions, Application Software) (1) Quick Reference Manual (1) Safety Regulations (1) Security Label (1) Design and specifications are subject to change without notice. SONY WILL NOT BE LIABLE FOR DAMAGES OF ANY KIND INCLUDING, BUT NOT LIMITED TO, COMPENSATION OR ...EXPIRATION OF THE WARRANTY, OR FOR ANY OTHER REASON WHATSOEVER. Note Always verify that the unit is operating properly before use. Optional accessories Projector Lamp LMP-C200 (for replacement) Presentation Tool RM-PJPK1 Pin assignment INPUT A connector (HD D-sub 15-pin, female) INPUT B ...


