Operating Instructions
Page 3
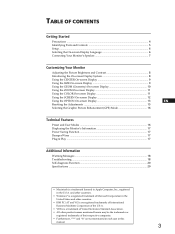
... Started Precautions ...4 Identifying Parts and Controls 5 Setup ...6 Selecting the On-screen Display Language 6 Connecting Your Monitor's Speaker 7 Customizing Your Monitor Adjusting the Picture Brightness and Contrast 8 Introducing the On-screen Display System 8 Using the CENTER On-screen Display... Selecting the Graphic Picture Enhancement (GPE) Mode 16 F ES Technical Features Preset and User Modes ...16 C Displaying the Monitor's Information 17 Power Saving Function ...17 Damper Wires ...17 Plug & Play ...17 Additional Information Warning Messages ...18 Troubleshooting ...
... Started Precautions ...4 Identifying Parts and Controls 5 Setup ...6 Selecting the On-screen Display Language 6 Connecting Your Monitor's Speaker 7 Customizing Your Monitor Adjusting the Picture Brightness and Contrast 8 Introducing the On-screen Display System 8 Using the CENTER On-screen Display... Selecting the Graphic Picture Enhancement (GPE) Mode 16 F ES Technical Features Preset and User Modes ...16 C Displaying the Monitor's Information 17 Power Saving Function ...17 Damper Wires ...17 Plug & Play ...17 Additional Information Warning Messages ...18 Troubleshooting ...

Operating Instructions
Page 4
... with sharp or abrasive items such as a transformer or high voltage power lines. Do not use the appropriate cord, this monitor. Do not place the monitor on , the CRT is demagnetized (degaussed) for repair or shipment, use any type of abrasive pad, scouring powder or solvent... supply. This type of plug types: for 100 to direct sunlight, excessive dust, mechanical vibration or shock. • Do not place the monitor near materials (curtains, draperies) that may scratch the screen's coating. For the customers in the U.S.A. Use of the screen with a mild detergent...
... with sharp or abrasive items such as a transformer or high voltage power lines. Do not use the appropriate cord, this monitor. Do not place the monitor on , the CRT is demagnetized (degaussed) for repair or shipment, use any type of abrasive pad, scouring powder or solvent... supply. This type of plug types: for 100 to direct sunlight, excessive dust, mechanical vibration or shock. • Do not place the monitor near materials (curtains, draperies) that may scratch the screen's coating. For the customers in the U.S.A. Use of the screen with a mild detergent...

Operating Instructions
Page 5
... buttons when adjusting other items. 7 u (power) switch and indicator (pages 17, 20) Turns the monitor on , and either flashes in green and orange or lights up in orange when the monitor is in parentheses for further details. Identifying Parts and Controls See the pages in power saving mode. 8 AC...) Adjust the contrast. Front Getting StarGtedtting Started Rear 1 MUTING button (page 7) Mutes the sound. 2 RESET button (page 15) Resets the adjustments to the monitor. 9 Video input connector (HD15) EN Inputs RGB video signals and SYNC signals. The indicator lights up in green when the...
... buttons when adjusting other items. 7 u (power) switch and indicator (pages 17, 20) Turns the monitor on , and either flashes in green and orange or lights up in orange when the monitor is in parentheses for further details. Identifying Parts and Controls See the pages in power saving mode. 8 AC...) Adjust the contrast. Front Getting StarGtedtting Started Rear 1 MUTING button (page 7) Mutes the sound. 2 RESET button (page 15) Resets the adjustments to the monitor. 9 Video input connector (HD15) EN Inputs RGB video signals and SYNC signals. The indicator lights up in green when the...
Operating Instructions
Page 6
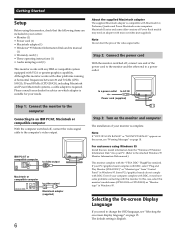
..."Selecting the on-screen display language" on the monitor and computer The installation of Power Book models may have some problems connecting with this monitor's model name (CPD-100GS or CPD-200GS) as "Monitor type" from the "Windows 95 Monitor Information Disk" into your PC/graphics board complies... with DDC, select "Plug and Play Monitor (VESA DDC)" as "Monitor type" in Windows 95. to a ...
..."Selecting the on-screen display language" on the monitor and computer The installation of Power Book models may have some problems connecting with this monitor's model name (CPD-100GS or CPD-200GS) as "Monitor type" from the "Windows 95 Monitor Information Disk" into your PC/graphics board complies... with DDC, select "Plug and Play Monitor (VESA DDC)" as "Monitor type" in Windows 95. to a ...

Operating Instructions
Page 7
...and activate the speaker. 7 The mark appears at the bottom of the computer. 26 Note While muting the sound, the mark appears in your monitor. Note If the volume from the speaker. To reset, press the RESET button while the OSD is too low, increase the output level (average... of 500 mv) of the screen. The SOUND OSD appears. Connecting Your Monitor's Speaker You can listen to the audio signals from your computer's sound card using headphones (not supplied). Getting StarGtedtting Started 3 Press the >?// buttons...
...and activate the speaker. 7 The mark appears at the bottom of the computer. 26 Note While muting the sound, the mark appears in your monitor. Note If the volume from the speaker. To reset, press the RESET button while the OSD is too low, increase the output level (average... of 500 mv) of the screen. The SOUND OSD appears. Connecting Your Monitor's Speaker You can listen to the audio signals from your computer's sound card using headphones (not supplied). Getting StarGtedtting Started 3 Press the >?// buttons...

Operating Instructions
Page 8
... brightness For contrast adjustment Press the >?// buttons. / . . . for more contrast ? . . . The brightness and contrast are made using the MENU OSD. Customizing Your Monitor Before adjusting • Connect the monitor and the computer, and turn them on . The BRIGHTNESS/CONTRAST OSD appears. This MENU OSD contains links to display the MENU OSD. BRIGHTNESS...
... brightness For contrast adjustment Press the >?// buttons. / . . . for more contrast ? . . . The brightness and contrast are made using the MENU OSD. Customizing Your Monitor Before adjusting • Connect the monitor and the computer, and turn them on . The BRIGHTNESS/CONTRAST OSD appears. This MENU OSD contains links to display the MENU OSD. BRIGHTNESS...
Operating Instructions
Page 9
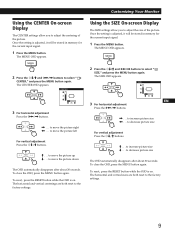
... ¨./> and >?// buttons to select " SIZE," and press the MENU button again. The horizontal and vertical centerings are both reset to the factory settings. GCeuttsitnogmSiztianrgteYdour Monitor Using the CENTER On-screen Display The CENTER settings allow you to adjust the centering of the picture. Once the setting is on . to move...
... ¨./> and >?// buttons to select " SIZE," and press the MENU button again. The horizontal and vertical centerings are both reset to the factory settings. GCeuttsitnogmSiztianrgteYdour Monitor Using the CENTER On-screen Display The CENTER settings allow you to adjust the centering of the picture. Once the setting is on . to move...
Operating Instructions
Page 10
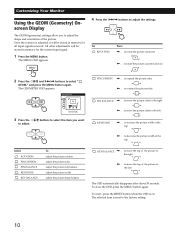
... picture clockwise ? . . . to adjust the shape and orientation of the picture to adjust. to move the picture sides to the factory setting. 10 Customizing Your Monitor Using the GEOM (Geometry) Onscreen Display The GEOM (geometry) settings allow you want to the left KEYSTONE / . . . to rotate the picture counterclockwise 2 Press the ¨...
... picture clockwise ? . . . to adjust the shape and orientation of the picture to adjust. to move the picture sides to the factory setting. 10 Customizing Your Monitor Using the GEOM (Geometry) Onscreen Display The GEOM (geometry) settings allow you want to the left KEYSTONE / . . . to rotate the picture counterclockwise 2 Press the ¨...
Operating Instructions
Page 11
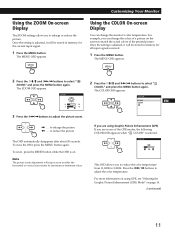
MENU Using the COLOR On-screen Display You can change the monitor's color temperature. The COLOR OSD appears. COLOR 9300K 5000K EN F ES C If you are using GPE, see "Selecting the Graphic Picture Enhancement (GPE) Mode" on ... to reduce the picture The OSD automatically disappears after about 30 seconds. MENU 2 Press the ¨./> and >?// buttons to enlarge or reduce the picture. GCeuttsitnogmSiztianrgteYdour Monitor Using the ZOOM On-screen Display The ZOOM settings allow you to select " ZOOM," and press the MENU button again. To close the OSD, press...
MENU Using the COLOR On-screen Display You can change the monitor's color temperature. The COLOR OSD appears. COLOR 9300K 5000K EN F ES C If you are using GPE, see "Selecting the Graphic Picture Enhancement (GPE) Mode" on ... to reduce the picture The OSD automatically disappears after about 30 seconds. MENU 2 Press the ¨./> and >?// buttons to enlarge or reduce the picture. GCeuttsitnogmSiztianrgteYdour Monitor Using the ZOOM On-screen Display The ZOOM settings allow you to select " ZOOM," and press the MENU button again. To close the OSD, press...
Operating Instructions
Page 12
... screen. (MOIRE ADJUST)" To reset, press the RESET button while the OSD is reset to select the color temperature. The MENU OSD appears. Customizing Your Monitor 3 Press the ¨./> buttons to the factory settings. There are 9,300K and 5,000K.
... screen. (MOIRE ADJUST)" To reset, press the RESET button while the OSD is reset to select the color temperature. The MENU OSD appears. Customizing Your Monitor 3 Press the ¨./> buttons to the factory settings. There are 9,300K and 5,000K.
Operating Instructions
Page 13
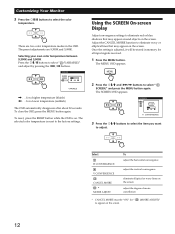
... disappears after about 30 seconds. It also allows you to turn CANCEL MOIRE "ON" OFF ON ? . . . You can also manually degauss the monitor. 1 Press the MENU button. For H CONVERGENCE Press / . . . The selected item is turned on . to manually degauss the screen and adjust... settings such as the OSD position and OSD language. Degaussing the screen The monitor screen is automatically degaussed (demagnetized) when the power is reset to turn CANCEL MOIRE "OFF" OFF ON MOIRE ADJUST / . . ...
... disappears after about 30 seconds. It also allows you to turn CANCEL MOIRE "ON" OFF ON ? . . . You can also manually degauss the monitor. 1 Press the MENU button. For H CONVERGENCE Press / . . . The selected item is turned on . to manually degauss the screen and adjust... settings such as the OSD position and OSD language. Degaussing the screen The monitor screen is automatically degaussed (demagnetized) when the power is reset to turn CANCEL MOIRE "OFF" OFF ON MOIRE ADJUST / . . ...
Operating Instructions
Page 14
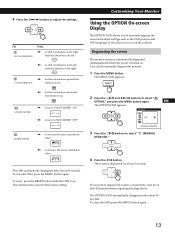
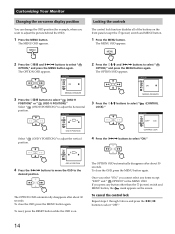
.... MENU Locking the controls The control lock function disables all of the buttons on . To close the OSD, press the MENU button again. Customizing Your Monitor Changing the on the screen. The MENU OSD appears. The MENU OSD appears. The OPTION OSD appears. OPTION ON MANUAL DEGAUSS 3 Press the ¨./> buttons...
.... MENU Locking the controls The control lock function disables all of the buttons on . To close the OSD, press the MENU button again. Customizing Your Monitor Changing the on the screen. The MENU OSD appears. The MENU OSD appears. The OPTION OSD appears. OPTION ON MANUAL DEGAUSS 3 Press the ¨./> buttons...
Operating Instructions
Page 15
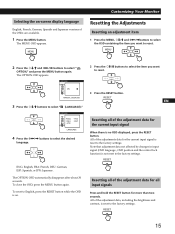
... for all of the adjustments data for the current input signal C When there is reset to the factory settings. The OPTION OSD appears. MENU GCeuttsitnogmSiztianrgteYdour Monitor Resetting the Adjustments Resetting an adjustment item 1 Press the MENU, ¨./> and >?//buttons to select the OSD containing the item you want to select " (LANGUAGE...
... for all of the adjustments data for the current input signal C When there is reset to the factory settings. The OPTION OSD appears. MENU GCeuttsitnogmSiztianrgteYdour Monitor Resetting the Adjustments Resetting an adjustment item 1 Press the MENU, ¨./> and >?//buttons to select the OSD containing the item you want to select " (LANGUAGE...
Operating Instructions
Page 16
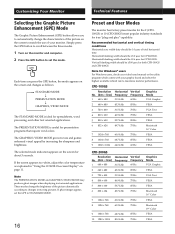
..., set the mode. Note for presentation programs that require vivid colors. GPE Each time you to maximize monitor performance. Vertical blanking width should be ≥500 µsec for CPD-200GS. CPD-100GS Resolution No. (dots × lines) 1 640 × 480 Horizontal Frequency 31.5 kHz Vertical... be ≥3.0 µsec for both CPD-100GS and CPD-200GS. The GRAPHICS/VIDEO MODE gives movies and games enhanced visual appeal by increasing the sharpness and brightness. These modes change the characteristics of the picture on the monitor and computer. 2 Press the GPE button to...
..., set the mode. Note for presentation programs that require vivid colors. GPE Each time you to maximize monitor performance. Vertical blanking width should be ≥500 µsec for CPD-200GS. CPD-100GS Resolution No. (dots × lines) 1 640 × 480 Horizontal Frequency 31.5 kHz Vertical... be ≥3.0 µsec for both CPD-100GS and CPD-200GS. The GRAPHICS/VIDEO MODE gives movies and games enhanced visual appeal by increasing the sharpness and brightness. These modes change the characteristics of the picture on the monitor and computer. 2 Press the GPE button to...
Operating Instructions
Page 17
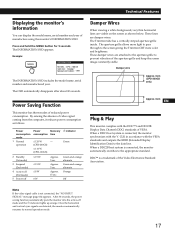
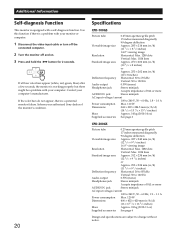
... consumption. Press and hold the MENU button for 5 seconds. Power Saving Function This monitor has three modes of manufacture using the monitor's INFORMATION OSD. Approx. 5 sec. Damper wire Approx. 6cm (CPD-200GS only) Approx. 6cm EN F ES Plug & Play C This monitor complies with the DDC™1 and DDC2B Display Data Channel (DDC) standards of the...
... consumption. Press and hold the MENU button for 5 seconds. Power Saving Function This monitor has three modes of manufacture using the monitor's INFORMATION OSD. Approx. 5 sec. Damper wire Approx. 6cm (CPD-200GS only) Approx. 6cm EN F ES Plug & Play C This monitor complies with the DDC™1 and DDC2B Display Data Channel (DDC) standards of the...
Operating Instructions
Page 18
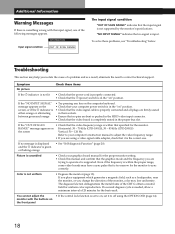
...RANGE The input signal condition "OUT OF SCAN RANGE" indicates that specified for the monitor to your graphics board manual for the best result. Horizontal: 30 - 70 kHz (CPD-100GS), 30 - 85 kHz (CPD-200GS) Vertical: 50 - 120 Hz Refer to sync correctly. The degauss function demagnetizes ...the metal frame of 20 minutes for the proper monitor setting. • Check this manual and confirm that the ...
...RANGE The input signal condition "OUT OF SCAN RANGE" indicates that specified for the monitor to your graphics board manual for the best result. Horizontal: 30 - 70 kHz (CPD-100GS), 30 - 85 kHz (CPD-200GS) Vertical: 50 - 120 Hz Refer to sync correctly. The degauss function demagnetizes ...the metal frame of 20 minutes for the proper monitor setting. • Check this manual and confirm that the ...
Operating Instructions
Page 19
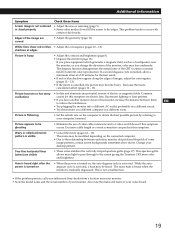
... weak connection can produce this symptom C occurs. If you place equipment which generates a magnetic field, such as a loudspeaker, near your monitor. • Note the model name and the serial number of some image patterns, certain screen backgrounds sometimes show red or blue •... the autodegauss cycle is not a malfunction. • If the problem persists, call your authorized Sony dealer from a location near the monitor, or you have another monitor close to ES your monitor. Change your video board. 19 This is activated, a hum may be heard. The moire ...
... weak connection can produce this symptom C occurs. If you place equipment which generates a magnetic field, such as a loudspeaker, near your monitor. • Note the model name and the serial number of some image patterns, certain screen backgrounds sometimes show red or blue •... the autodegauss cycle is not a malfunction. • If the problem persists, call your authorized Sony dealer from a location near the monitor, or you have another monitor close to ES your monitor. Change your video board. 19 This is activated, a hum may be heard. The moire ...
Operating Instructions
Page 20
...appear, there is working properly but there might be a problem with your computer. Contact your authorized Sony dealer of the monitor's condition. 20 Specifications CPD-100GS Picture tube 0.25 mm aperture grille pitch 15 inches measured diagonally 90-degree deflection Viewable image size... mm (w/h/d) (14 1/2 × 15 1/2 × 15 1/4 inches) Mass Approx. 14 kg (30 lb 14 oz) Supplied accessories See page 6 CPD-200GS Picture tube 0.25 mm aperture grille pitch 17 inches measured diagonally 90-degree deflection Viewable image size Approx. 327 × 243 mm (w/h) (12 7/8 ×...
...appear, there is working properly but there might be a problem with your computer. Contact your authorized Sony dealer of the monitor's condition. 20 Specifications CPD-100GS Picture tube 0.25 mm aperture grille pitch 15 inches measured diagonally 90-degree deflection Viewable image size... mm (w/h/d) (14 1/2 × 15 1/2 × 15 1/4 inches) Mass Approx. 14 kg (30 lb 14 oz) Supplied accessories See page 6 CPD-200GS Picture tube 0.25 mm aperture grille pitch 17 inches measured diagonally 90-degree deflection Viewable image size Approx. 327 × 243 mm (w/h) (12 7/8 ×...


