Operating Instructions
Page 2
... any changes or modifications not expressly approved in this manual could void your dealer regarding this product meets the ENERGY STAR guidelines for USA/Canada only. Refer servicing to USA/Canada, install only a UL LISTED/CSA LABELLED power supply cord meeting the following two conditions: (1) This device may cause harmful interference to 47CFR Parts 2 and 15 for help. This...
... any changes or modifications not expressly approved in this manual could void your dealer regarding this product meets the ENERGY STAR guidelines for USA/Canada only. Refer servicing to USA/Canada, install only a UL LISTED/CSA LABELLED power supply cord meeting the following two conditions: (1) This device may cause harmful interference to 47CFR Parts 2 and 15 for help. This...
Operating Instructions
Page 3
... Your Monitor Adjusting the Picture Brightness and Contrast 8 Introducing the On-screen Display System 8 Using the CENTER On-screen Display 9 Using the SIZE On-screen Display 9 Using the GEOM (Geometry) On-screen Display 10 Using the ZOOM On-screen Display 11 Using the COLOR On-screen Display 11 Using the SCREEN On-screen Display 12 Using the OPTION On-screen Display 13 EN Resetting the Adjustments 15 Selecting the Graphic Picture Enhancement (GPE) Mode 16 F ES Technical Features Preset and User Modes ...16 C Displaying the Monitor's Information 17 Power Saving...
... Your Monitor Adjusting the Picture Brightness and Contrast 8 Introducing the On-screen Display System 8 Using the CENTER On-screen Display 9 Using the SIZE On-screen Display 9 Using the GEOM (Geometry) On-screen Display 10 Using the ZOOM On-screen Display 11 Using the COLOR On-screen Display 11 Using the SCREEN On-screen Display 12 Using the OPTION On-screen Display 13 EN Resetting the Adjustments 15 Selecting the Graphic Picture Enhancement (GPE) Mode 16 F ES Technical Features Preset and User Modes ...16 C Displaying the Monitor's Information 17 Power Saving...

Operating Instructions
Page 4
... within 180° horizontally and 20° vertically. This generates a strong magnetic field around the metal frame, which generates magnetism, such as this monitor can be installed near the bezel. Transportation When you do not use the appropriate cord, this monitor will not conform to discharge. • After the power has been turned on the CRT display surface to mandatory FCC...
... within 180° horizontally and 20° vertically. This generates a strong magnetic field around the metal frame, which generates magnetism, such as this monitor can be installed near the bezel. Transportation When you do not use the appropriate cord, this monitor will not conform to discharge. • After the power has been turned on the CRT display surface to mandatory FCC...

Operating Instructions
Page 5
... lights up in green when the monitor is turned on or off. F Side ES C AUDIO IN !º AUDIO IN jack Inputs audio signals when connected to the computer's audio out jack. !¡ 2 Headphones jack Outputs audio signals to the factory settings. 3 GPE button (page 16) Selects the Graphic Picture Enhancement (GPE) mode. 4 MENU button (pages 7 -15, 17) Displays the MENU OSD. 5 > (contrast) (?//) buttons (pages 7 - 15, 20) Adjust the contrast. Front Getting StarGtedtting Started Rear 1 MUTING button (page 7) Mutes the sound. 2 RESET button...
... lights up in green when the monitor is turned on or off. F Side ES C AUDIO IN !º AUDIO IN jack Inputs audio signals when connected to the computer's audio out jack. !¡ 2 Headphones jack Outputs audio signals to the factory settings. 3 GPE button (page 16) Selects the Graphic Picture Enhancement (GPE) mode. 4 MENU button (pages 7 -15, 17) Displays the MENU OSD. 5 > (contrast) (?//) buttons (pages 7 - 15, 20) Adjust the contrast. Front Getting StarGtedtting Started Rear 1 MUTING button (page 7) Mutes the sound. 2 RESET button...
Operating Instructions
Page 6
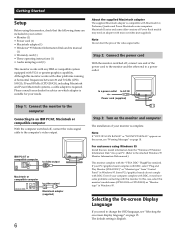
... 2: Connect the power cord With the monitor switched off , connect the video signal cable to AC IN Power cord (supplied) Step 3: Turn on page 15. If your PC/graphics board complies with DDC, select "Plug and Play Monitor (VESA DDC)" as "Monitor type" in Windows 95. Selecting the On-screen Display Language If you need an adapter with micro switches (not supplied). Note If "OUT OF SCAN RANGE" or "NO INPUT SIGNAL" appears on the screen, see "Selecting the on-screen display language...
... 2: Connect the power cord With the monitor switched off , connect the video signal cable to AC IN Power cord (supplied) Step 3: Turn on page 15. If your PC/graphics board complies with DDC, select "Plug and Play Monitor (VESA DDC)" as "Monitor type" in Windows 95. Selecting the On-screen Display Language If you need an adapter with micro switches (not supplied). Note If "OUT OF SCAN RANGE" or "NO INPUT SIGNAL" appears on the screen, see "Selecting the on-screen display language...

Operating Instructions
Page 7
...'s sound card using the SOUND OSD. No sound comes from your computer using the speaker in the SOUND OSD instead of the screen. The speaker turns off when headphones are connected to adjust the volume. The mark appears at the bottom of the Á mark. Connecting Your Monitor's Speaker You can listen to the audio signals from the speaker. The OSD automatically disappears after about 30 seconds. To close the OSD, press the MENU button again...
...'s sound card using the SOUND OSD. No sound comes from your computer using the speaker in the SOUND OSD instead of the screen. The speaker turns off when headphones are connected to adjust the volume. The mark appears at the bottom of the Á mark. Connecting Your Monitor's Speaker You can listen to the audio signals from the speaker. The OSD automatically disappears after about 30 seconds. To close the OSD, press the MENU button again...

Operating Instructions
Page 8
...OSD for adjusting the OSD position, degaussing the screen, selecting the OSD language, etc. 6 SIZE Displays the SIZE OSD for adjusting the picture size. 7 ™ SOUND Displays the SOUND OSD for adjusting the sound. 8 GEOM Displays the GEOMETRY OSD for all input signals received. 1 Press the ¨ (brightness) ./> or > (contrast) ?// buttons. MENU MENU OK MENU COLOR CENTER SCREEN GEOM EXIT ZOOM SOUND SIZE OPTION Horizontal Vertical Frequency* Frequency* 2 For brightness adjustment Press the ¨./> buttons. > . . . Customizing Your Monitor Before adjusting • Connect...
...OSD for adjusting the OSD position, degaussing the screen, selecting the OSD language, etc. 6 SIZE Displays the SIZE OSD for adjusting the picture size. 7 ™ SOUND Displays the SOUND OSD for adjusting the sound. 8 GEOM Displays the GEOMETRY OSD for all input signals received. 1 Press the ¨ (brightness) ./> or > (contrast) ?// buttons. MENU MENU OK MENU COLOR CENTER SCREEN GEOM EXIT ZOOM SOUND SIZE OPTION Horizontal Vertical Frequency* Frequency* 2 For brightness adjustment Press the ¨./> buttons. > . . . Customizing Your Monitor Before adjusting • Connect...
Operating Instructions
Page 9
... input signal. 1 Press the MENU button. SIZE 73 3 For horizontal adjustment Press the >?// buttons. 26 EN F ES / . . . to move the picture right ? . . . to move the picture left For vertical adjustment Press the ¨./> buttons. > . . . To close the OSD, press the MENU button again. The SIZE OSD appears. to select " SIZE," and press the MENU button again. GCeuttsitnogmSiztianrgteYdour Monitor Using the CENTER On-screen Display The CENTER settings allow you to decrease picture size C For vertical adjustment Press the ¨./> buttons. > . . . The MENU OSD...
... input signal. 1 Press the MENU button. SIZE 73 3 For horizontal adjustment Press the >?// buttons. 26 EN F ES / . . . to move the picture right ? . . . to move the picture left For vertical adjustment Press the ¨./> buttons. > . . . To close the OSD, press the MENU button again. The SIZE OSD appears. to select " SIZE," and press the MENU button again. GCeuttsitnogmSiztianrgteYdour Monitor Using the CENTER On-screen Display The CENTER settings allow you to decrease picture size C For vertical adjustment Press the ¨./> buttons. > . . . The MENU OSD...
Operating Instructions
Page 10
... press the MENU button again. To close the OSD, press the MENU button again. All other adjustments will be stored in memory for the current input signal. 1 Press the MENU button. PINCUSHION / . . . to move the top of the picture. The MENU OSD appears. For ROTATION Press / . . . To reset, press the RESET button while the OSD is reset to the factory setting. 10 Customizing Your Monitor Using the GEOM (Geometry) Onscreen Display The GEOM...
... press the MENU button again. To close the OSD, press the MENU button again. All other adjustments will be stored in memory for the current input signal. 1 Press the MENU button. PINCUSHION / . . . to move the top of the picture. The MENU OSD appears. For ROTATION Press / . . . To reset, press the RESET button while the OSD is reset to the factory setting. 10 Customizing Your Monitor Using the GEOM (Geometry) Onscreen Display The GEOM...
Operating Instructions
Page 11
... the RESET button while the OSD is adjusted, it will stop as soon as either the horizontal or vertical size reaches its maximum or minimum value. 2 Press the ¨./> and >?// buttons to match the actual colors of a picture on . Once the setting is on the screen to select " COLOR," and press the MENU button again. The MENU OSD appears. The ZOOM OSD appears. MENU Using the COLOR On-screen Display You can change the monitor's color...
... the RESET button while the OSD is adjusted, it will stop as soon as either the horizontal or vertical size reaches its maximum or minimum value. 2 Press the ¨./> and >?// buttons to match the actual colors of a picture on . Once the setting is on the screen to select " COLOR," and press the MENU button again. The MENU OSD appears. The ZOOM OSD appears. MENU Using the COLOR On-screen Display You can change the monitor's color...
Operating Instructions
Page 12
... the factory settings. for a higher temperature (bluish) ? . . . COLOR 9300K 5000K 50 VARIABLE / . . . To close the OSD, press the MENU button again. To reset, press the RESET button while the OSD is reset to adjust. 12 Select H CONVERGENCE V CONVERGENCE CANCEL MOIRE * MOIRE ADJUST To adjust the horizontal convergence adjust the vertical convergence eliminate elliptical or wavy lines on the screen. Once the setting is adjusted, it will be "ON" for all input signals...
... the factory settings. for a higher temperature (bluish) ? . . . COLOR 9300K 5000K 50 VARIABLE / . . . To close the OSD, press the MENU button again. To reset, press the RESET button while the OSD is reset to adjust. 12 Select H CONVERGENCE V CONVERGENCE CANCEL MOIRE * MOIRE ADJUST To adjust the horizontal convergence adjust the vertical convergence eliminate elliptical or wavy lines on the screen. Once the setting is adjusted, it will be "ON" for all input signals...
Operating Instructions
Page 13
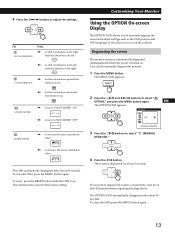
... down ? . . . to the factory setting. EN The OPTION OSD appears. To reset, press the RESET button while the OSD is reset to turn CANCEL MOIRE "ON" OFF ON ? . . . MENU 2 Press the ¨./> and >?// buttons to lock the controls. If you to the left ? . . . to shift red shadows to manually degauss the screen and adjust settings such as the OSD position and OSD language. to turn CANCEL MOIRE "OFF" OFF ON MOIRE ADJUST / . . . The selected...
... down ? . . . to the factory setting. EN The OPTION OSD appears. To reset, press the RESET button while the OSD is reset to turn CANCEL MOIRE "ON" OFF ON ? . . . MENU 2 Press the ¨./> and >?// buttons to lock the controls. If you to the left ? . . . to shift red shadows to manually degauss the screen and adjust settings such as the OSD position and OSD language. to turn CANCEL MOIRE "OFF" OFF ON MOIRE ADJUST / . . . The selected...
Operating Instructions
Page 14
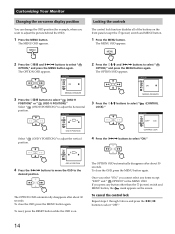
... "ON." To close the OSD, press the MENU button again. To reset, press the RESET button while the OSD is on the front panel except the u (power) switch and MENU button. 1 Press the MENU button. OSD V POSITION 4 Press the >?// buttons to move the OSD to select "OFF." 14 If you want to select " (OSD H POSITION)" or " (OSD V POSITION)." The OPTION OSD appears. Customizing Your Monitor Changing the on the screen. To cancel the control lock Repeat steps 1 through...
... "ON." To close the OSD, press the MENU button again. To reset, press the RESET button while the OSD is on the front panel except the u (power) switch and MENU button. 1 Press the MENU button. OSD V POSITION 4 Press the >?// buttons to move the OSD to select "OFF." 14 If you want to select " (OSD H POSITION)" or " (OSD V POSITION)." The OPTION OSD appears. Customizing Your Monitor Changing the on the screen. To cancel the control lock Repeat steps 1 through...
Operating Instructions
Page 15
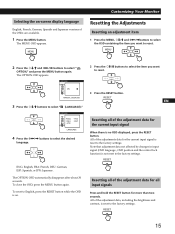
... to reset. MENU 2 Press the ¨./> and >?// buttons to select the desired language. To reset to English, press the RESET button while the OSD is not reset to the factory settings. RESET EN F ES Resetting all input signals Press and hold the RESET button for the current input signal C When there is no OSD displayed, press the RESET button. The MENU OSD appears. Note that adjustment data not affected by changes in input signal (OSD language , OSD position and the control lock function) is on -screen display language English, French...
... to reset. MENU 2 Press the ¨./> and >?// buttons to select the desired language. To reset to English, press the RESET button while the OSD is not reset to the factory settings. RESET EN F ES Resetting all input signals Press and hold the RESET button for the current input signal C When there is no OSD displayed, press the RESET button. The MENU OSD appears. Note that adjustment data not affected by changes in input signal (OSD language , OSD position and the control lock function) is on -screen display language English, French...
Operating Instructions
Page 16
... white, adjust the color temperature as explained in moving pictures. Horizontal blanking width should be ≥3.6 µsec for Windows® users For Windows users, check your video board manual or the utility program which comes with your monitor. Note for CPD-100GS. The selected mode indication appears on the screen to match the use of your graphic board and select the highest available refresh rate to automatically change the brightness of total horizontal...
... white, adjust the color temperature as explained in moving pictures. Horizontal blanking width should be ≥3.6 µsec for Windows® users For Windows users, check your video board manual or the utility program which comes with your monitor. Note for CPD-100GS. The selected mode indication appears on the screen to match the use of your graphic board and select the highest available refresh rate to automatically change the brightness of total horizontal...
Operating Instructions
Page 17
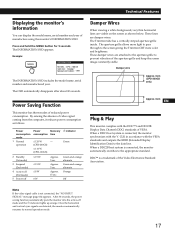
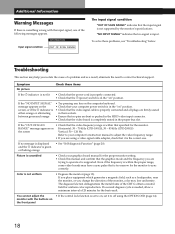
... Display Identification Data) to the screen giving the Trinitron CRT more color and brightness. By sensing the absence of manufacture using the monitor's INFORMATION OSD. Power consumption mode 1 Normal operation Power Recovery consumption time ≤ 120 W - (CPD-200GS) ≤ 110 W (CPD-100GS) u indicator Green 2 Standby (1st mode) 3 Suspend (2nd mode) 4 Active-off (3rd mode) 5 Power-off mode and the u indicator lights up orange. Approx. 15 sec. - Note If the video signal cable is connected, the monitor...
... Display Identification Data) to the screen giving the Trinitron CRT more color and brightness. By sensing the absence of manufacture using the monitor's INFORMATION OSD. Power consumption mode 1 Normal operation Power Recovery consumption time ≤ 120 W - (CPD-200GS) ≤ 110 W (CPD-100GS) u indicator Green 2 Standby (1st mode) 3 Suspend (2nd mode) 4 Active-off (3rd mode) 5 Power-off mode and the u indicator lights up orange. Approx. 15 sec. - Note If the video signal cable is connected, the monitor...
Operating Instructions
Page 18
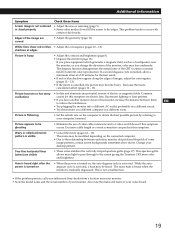
... OF SCAN RANGE" message appears on " position. Horizontal: 30 - 70 kHz (CPD-100GS), 30 - 85 kHz (CPD-200GS) Vertical: 50 - 120 Hz Refer to your graphics board manual for the proper monitor setting. • Check this manual and confirm that specified for uniform color reproduction. Picture is scrambled • Check your computer's instruction manual to obtain a neutral field for the monitor. If you are using a video signal cable adapter, check that your computer power switch is in...
... OF SCAN RANGE" message appears on " position. Horizontal: 30 - 70 kHz (CPD-100GS), 30 - 85 kHz (CPD-200GS) Vertical: 50 - 120 Hz Refer to your graphics board manual for the proper monitor setting. • Check this manual and confirm that specified for uniform color reproduction. Picture is scrambled • Check your computer's instruction manual to obtain a neutral field for the monitor. If you are using a video signal cable adapter, check that your computer power switch is in...
Operating Instructions
Page 19
... wires stabilize the vertically striped aperture grille (page 17). Change your video board. 19 Hum is heard right after the power is turned on • When the power is turned on, the auto-degauss cycle is not centered • Adjust the size or centering (page 9). Also note the make and name of some image patterns, certain screen backgrounds sometimes show red or blue • Adjust the convergence...
... wires stabilize the vertically striped aperture grille (page 17). Change your video board. 19 Hum is heard right after the power is turned on • When the power is turned on, the auto-degauss cycle is not centered • Adjust the size or centering (page 9). Also note the make and name of some image patterns, certain screen backgrounds sometimes show red or blue • Adjust the convergence...
Operating Instructions
Page 20
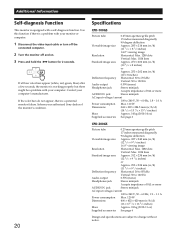
... four color bars appear (white, red, green, blue) after a few seconds, the monitor is working properly but there might be a problem with your computer's manufacturer. Contact your computer. Additional Information Self-diagnosis Function This monitor is equipped with your authorized Sony dealer of the monitor's condition. 20 Specifications CPD-100GS Picture tube 0.25 mm aperture grille pitch 15 inches measured diagonally 90-degree deflection Viewable image size...
... four color bars appear (white, red, green, blue) after a few seconds, the monitor is working properly but there might be a problem with your computer's manufacturer. Contact your computer. Additional Information Self-diagnosis Function This monitor is equipped with your authorized Sony dealer of the monitor's condition. 20 Specifications CPD-100GS Picture tube 0.25 mm aperture grille pitch 15 inches measured diagonally 90-degree deflection Viewable image size...

Operating Instructions
Page 57
Sony Corporation Printed in Japan
Sony Corporation Printed in Japan


