Operating Instructions
Page 2
... basses (ELF). Record the serial number in der Bedienungsanleitung. Connect the equipment into an outlet on , the user is connected. - CPD- Consult the dealer or an experienced radio/TV technician for Metrology (MPR)" vom Dezember 1990 (MPR II). This Class B digital apparatus meets all requirements of the unit. INFORMATION This product complies with VESA Display Power Management Signaling (DPMS). Dangerously high voltages...
... basses (ELF). Record the serial number in der Bedienungsanleitung. Connect the equipment into an outlet on , the user is connected. - CPD- Consult the dealer or an experienced radio/TV technician for Metrology (MPR)" vom Dezember 1990 (MPR II). This Class B digital apparatus meets all requirements of the unit. INFORMATION This product complies with VESA Display Power Management Signaling (DPMS). Dangerously high voltages...
Operating Instructions
Page 3
... one user adjustable color mode give you do not do this, this monitor will not conform to 240 V AC Maintenance EN • Clean the cabinet, glass panel and controls with a soft cloth lightly moistened with a mild detergent solution. Otherwise, this unit. Table of Contents Introduction 3 Precautions 3 Getting Started 4 Using Your Monitor 4 Adjustments 5 Entering New Timings 7 Power Saving Function 7 Plug and Play 8 Use of the Tilt-Swivel 8 Damper Wire 8 Specifications 8 Troubleshooting...
... one user adjustable color mode give you do not do this, this monitor will not conform to 240 V AC Maintenance EN • Clean the cabinet, glass panel and controls with a soft cloth lightly moistened with a mild detergent solution. Otherwise, this unit. Table of Contents Introduction 3 Precautions 3 Getting Started 4 Using Your Monitor 4 Adjustments 5 Entering New Timings 7 Power Saving Function 7 Plug and Play 8 Use of the Tilt-Swivel 8 Damper Wire 8 Specifications 8 Troubleshooting...
Operating Instructions
Page 4
... horizontal timing conditions Horizontal sync width should be : >1.0 µsec. Please consult your needs. Power cord (supplied) to a power outlet Step 2: With the computer switched off , attach the power cord to the monitor and the other countries. 4 Although this operating instruction manual (1). The installation of the complex adjustments necessary to ensure a high quality picture for true "plug and play" capability. Using Your Monitor Preset and User Modes The Multiscan 15sfII/17sfII has factory...
... horizontal timing conditions Horizontal sync width should be : >1.0 µsec. Please consult your needs. Power cord (supplied) to a power outlet Step 2: With the computer switched off , attach the power cord to the monitor and the other countries. 4 Although this operating instruction manual (1). The installation of the complex adjustments necessary to ensure a high quality picture for true "plug and play" capability. Using Your Monitor Preset and User Modes The Multiscan 15sfII/17sfII has factory...
Operating Instructions
Page 5
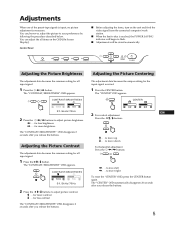
... 2 For vertical adjustment Press the > >/. The "CENTER" OSD automatically disappears 20 seconds after you release the buttons. Control Panel p Before adjusting the items, turn on the OSD (On Screen Display). RESET COLOR GEOM SIZE CENTER POWER SAVING POWER Adjusting the Picture Brightness The adjustment data becomes the common setting for all input signal. 1 Press the > >/. Adjusting the Picture Contrast The adjustment data becomes the common setting for all items on the unit and feed the video signal from the connected computer/work station...
... 2 For vertical adjustment Press the > >/. The "CENTER" OSD automatically disappears 20 seconds after you release the buttons. Control Panel p Before adjusting the items, turn on the OSD (On Screen Display). RESET COLOR GEOM SIZE CENTER POWER SAVING POWER Adjusting the Picture Brightness The adjustment data becomes the common setting for all input signal. 1 Press the > >/. Adjusting the Picture Contrast The adjustment data becomes the common setting for all items on the unit and feed the video signal from the connected computer/work station...
Operating Instructions
Page 6
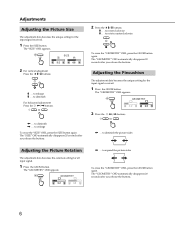
... erase the "SIZE" OSD, press the SIZE button again. Adjustments Adjusting the Picture Size The adjustment data becomes the unique setting for the input signal received. 1 Press the GEOM button. The "SIZE" OSD appears. to rotate clockwise . . . . buttons. > . . .to diminish For holizontal adjustment Press the ¨ ?// buttons. ? . . . Adjusting the Pincushion The adjustment data becomes the unique setting for the input signal received. 1 Press the SIZE button. GEOM GEOMETRY 32 68 2 Press the ¨ ?// buttons. ? . . . buttons. > . . . to diminish...
... erase the "SIZE" OSD, press the SIZE button again. Adjustments Adjusting the Picture Size The adjustment data becomes the unique setting for the input signal received. 1 Press the GEOM button. The "SIZE" OSD appears. to rotate clockwise . . . . buttons. > . . .to diminish For holizontal adjustment Press the ¨ ?// buttons. ? . . . Adjusting the Pincushion The adjustment data becomes the unique setting for the input signal received. 1 Press the SIZE button. GEOM GEOMETRY 32 68 2 Press the ¨ ?// buttons. ? . . . buttons. > . . . to diminish...
Operating Instructions
Page 7
... adjust the monitor according to recall factory setting for all adjustments in use. • Press and hold the RESET button for 2 seconds to the preceding adjustment instructions. A total of the sync signal coming from the computer, it will reduce the power consumption as the more stringent NUTEK 803299 (TCO92) guidelines. If the 11th mode is turned on Resetting • Press the RESET button to recall the factory settings for brightness, contrast, horizontal and vertical size...
... adjust the monitor according to recall factory setting for all adjustments in use. • Press and hold the RESET button for 2 seconds to the preceding adjustment instructions. A total of the sync signal coming from the computer, it will reduce the power consumption as the more stringent NUTEK 803299 (TCO92) guidelines. If the 11th mode is turned on Resetting • Press the RESET button to recall the factory settings for brightness, contrast, horizontal and vertical size...
Operating Instructions
Page 8
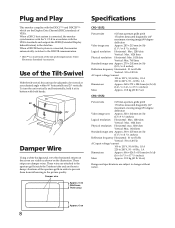
... Wire Using a white background, very thin horizontal stripes on the screen are visible as shown on the illustration. Damper wire Approx. 6 cm (Multiscan 17sfII only) Specifications CPD-15SF2 Picture tube 0.25 mm aperture grille pitch 15␣ inches measured diagonally (14" maximum viewing image) 90-degree deflection Video image area Approx. 285 × 213 mm (w/h) (11 1/4 × 8 1/2 inches) Logical resolution Horizontal: Max. 1280 dots Vertical: Max...
... Wire Using a white background, very thin horizontal stripes on the screen are visible as shown on the illustration. Damper wire Approx. 6 cm (Multiscan 17sfII only) Specifications CPD-15SF2 Picture tube 0.25 mm aperture grille pitch 15␣ inches measured diagonally (14" maximum viewing image) 90-degree deflection Video image area Approx. 285 × 213 mm (w/h) (11 1/4 × 8 1/2 inches) Logical resolution Horizontal: Max. 1280 dots Vertical: Max...
Operating Instructions
Page 9
... video cable is provided to activate the Auto-degauss cycle*. This Aperture Grille allows more color and brightness. Check that the graphic mode and the frequency at which creates a fuzzy picture at max contrast. / Trip the power switch once to work correctly with your graphics board manual for uniform color reproduction. Picture appears to the edge of "OUT OF SCAN RANGE" appears on the screen / Check that the power cord is scrambled / Check...
... video cable is provided to activate the Auto-degauss cycle*. This Aperture Grille allows more color and brightness. Check that the graphic mode and the frequency at which creates a fuzzy picture at max contrast. / Trip the power switch once to work correctly with your graphics board manual for uniform color reproduction. Picture appears to the edge of "OUT OF SCAN RANGE" appears on the screen / Check that the power cord is scrambled / Check...


