

Operating Instructions (primary manual)
Page 1
SONY I 0-542-035-31 (1) Trinitron® Color Computer Display Operating Instructions EZ CPD-110GS CPD-210GS a 1998 by Sony Corporation
SONY I 0-542-035-31 (1) Trinitron® Color Computer Display Operating Instructions EZ CPD-110GS CPD-210GS a 1998 by Sony Corporation
Operating Instructions (primary manual)
Page 2
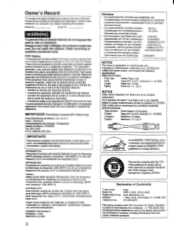
... Conformity Trade Name: Sony Model No.: CPD-110GS, CPD-210GS Responsible Party: Sony Electronics Inc. Owner's Record The model and serial numbers are present inside the unit. Do not open the cabinet. These limits are cautioned that interference will not occur in a particular installation. Increase the separation between the equipment and receiver. - Connect the equipment into an outlet on , the user is encouraged to...
... Conformity Trade Name: Sony Model No.: CPD-110GS, CPD-210GS Responsible Party: Sony Electronics Inc. Owner's Record The model and serial numbers are present inside the unit. Do not open the cabinet. These limits are cautioned that interference will not occur in a particular installation. Increase the separation between the equipment and receiver. - Connect the equipment into an outlet on , the user is encouraged to...
Operating Instructions (primary manual)
Page 3
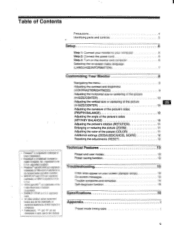
...user modes Power saving function Troubleshooting If thin lines appear on -screen menu language (LANGUAGE/INFORMATION) Customizing Your Monitor Navigating the menu Adjusting the contrast and brightness (CONTRAST/BRIGHTNESS) Adjusting the horizontal size or centering of the picture (H-SIZE/CENTER) Adjusting the vertical size or centering of the picture (V-SIZE/CENTER) Adjusting the curvature of the picture's sides (PIN/PIN BALANCE) Adjusting the angle of the picture's sides (KEY/KEY BALANCE) Adjusting the picture's rotation (ROTATION) Enlarging or reducing the picture (ZOOM) Adjusting the color...
...user modes Power saving function Troubleshooting If thin lines appear on -screen menu language (LANGUAGE/INFORMATION) Customizing Your Monitor Navigating the menu Adjusting the contrast and brightness (CONTRAST/BRIGHTNESS) Adjusting the horizontal size or centering of the picture (H-SIZE/CENTER) Adjusting the vertical size or centering of the picture (V-SIZE/CENTER) Adjusting the curvature of the picture's sides (PIN/PIN BALANCE) Adjusting the angle of the picture's sides (KEY/KEY BALANCE) Adjusting the picture's rotation (ROTATION) Enlarging or reducing the picture (ZOOM) Adjusting the color...

Operating Instructions (primary manual)
Page 4
... places: • ( a surfaces blankets. this monitor for repair or shipment, use a different power cord. the screen is compatible with a mild detergent solution. This generates a strong magnetic field around the screen which generates magnetism. Be sure to severe temperature changes • in a scratched picture tube. • Clean the cabinet, panel and controls with a soft cloth lightly moistened with your local power supply. and disks away from the...
... places: • ( a surfaces blankets. this monitor for repair or shipment, use a different power cord. the screen is compatible with a mild detergent solution. This generates a strong magnetic field around the screen which generates magnetism. Be sure to severe temperature changes • in a scratched picture tube. • Clean the cabinet, panel and controls with a soft cloth lightly moistened with your local power supply. and disks away from the...

Operating Instructions (primary manual)
Page 5
... AC power to the monitor. or lights up in green when the monitor is turned on and off. buttons (page 9) These buttons display the CONTRAST/BRIGHTNESS menu and function as the +1- E Video input connector (HD15) (page 6) This connector inputs RGB video signals (0.700 Vp-p, positive) and sync signals. ®®®®O) ©DI®®© Pin No. Front Rear 0 ooo,nBAAAAAA9AAAAAAAj I 3 4 0 MENU button (page 9) This button displays the MENU OSD. 0 ENTER button (page 9) This button selects the menu and adjustment items. [I] 0 (contrast...
... AC power to the monitor. or lights up in green when the monitor is turned on and off. buttons (page 9) These buttons display the CONTRAST/BRIGHTNESS menu and function as the +1- E Video input connector (HD15) (page 6) This connector inputs RGB video signals (0.700 Vp-p, positive) and sync signals. ®®®®O) ©DI®®© Pin No. Front Rear 0 ooo,nBAAAAAA9AAAAAAAj I 3 4 0 MENU button (page 9) This button displays the MENU OSD. 0 ENTER button (page 9) This button selects the menu and adjustment items. [I] 0 (contrast...
Operating Instructions (primary manual)
Page 6
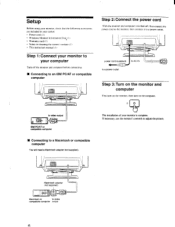
.../AT or compatible computer -■ Connecting to adjust the picture. i41101389000801i Macintosh adapter (not supplied) L Macintosh or to AC IN O0) Step 3: Turn on the monitor and computer First turn on the monitor, then turn on cleaning the screens surface 1 1 • This instruction manual I I Step 1: Connect your monitor to your monitor is complete. Il o.• 4 o oa i•6•RHUMB gad power cord (supplied) O to a power outlet to video compatible computer output Setup Before using your monitor, check that...
.../AT or compatible computer -■ Connecting to adjust the picture. i41101389000801i Macintosh adapter (not supplied) L Macintosh or to AC IN O0) Step 3: Turn on the monitor and computer First turn on the monitor, then turn on cleaning the screens surface 1 1 • This instruction manual I I Step 1: Connect your monitor to your monitor is complete. Il o.• 4 o oa i•6•RHUMB gad power cord (supplied) O to a power outlet to video compatible computer output Setup Before using your monitor, check that...
Operating Instructions (primary manual)
Page 7
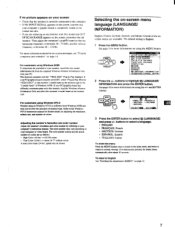
... ENTER button to the Windows NT4.0 instruction manual for further details on using the MENU button. To reset to your PC/graphics board has difficulty communicating with the "VESA DDC" Plug & Play standard. If your computer's instruction manual. Adjusting the monitor's rasolution and color number Adjust the monitor's resolution and color number by referring to English See "Resetting the adjustments (RESET)" on -screen messages. The color number may be slower. German. buttons to your monitor, install the new model information file from Windows 95...
... ENTER button to the Windows NT4.0 instruction manual for further details on using the MENU button. To reset to your PC/graphics board has difficulty communicating with the "VESA DDC" Plug & Play standard. If your computer's instruction manual. Adjusting the monitor's rasolution and color number Adjust the monitor's resolution and color number by referring to English See "Resetting the adjustments (RESET)" on -screen messages. The color number may be slower. German. buttons to your monitor, install the new model information file from Windows 95...

Operating Instructions (primary manual)
Page 8
....0Hz 1024X768 EXI [11 H-SIZE/CENTER (page 10) Select the H-SIZE/CENTER menu to adjust the picture's rotation. ZOOM GB EH ZOOM on using the +/- AoN 6500K MobK 0 so 0 so 0 5o T-.00 EX I T4Calal RESET (page 12) Select the RESET menu to reset the adjustments. the resolution of the current input signal CONTRAST 0 26 a k z/ 1024X768 SELECT EXIT 4 the horizontal and vertical frequencies of the current input signal are displayed in the CONTRAST/BRIGHTNESS menu.
....0Hz 1024X768 EXI [11 H-SIZE/CENTER (page 10) Select the H-SIZE/CENTER menu to adjust the picture's rotation. ZOOM GB EH ZOOM on using the +/- AoN 6500K MobK 0 so 0 so 0 5o T-.00 EX I T4Calal RESET (page 12) Select the RESET menu to reset the adjustments. the resolution of the current input signal CONTRAST 0 26 a k z/ 1024X768 SELECT EXIT 4 the horizontal and vertical frequencies of the current input signal are displayed in the CONTRAST/BRIGHTNESS menu.
Operating Instructions (primary manual)
Page 9
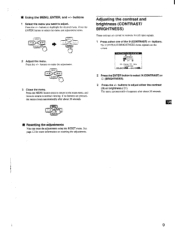
... in memory for more information on the screen. Press the MENU button once to return to the main menu, and twice to return to adjust. buttons to select the menu and adjustment items. - 0+ ENTER 2 Adjust the menu. buttons. Press the ENTER button to make the adjustment. TER 4 3 Close the menu. c II Resetting the adjustments You can reset the adjustments using the RESET menu. Press the +/- CONTRAST/BRIGHTNESS 0 ia CONTRAST 26 C 60.0kHz/70.0Hz 1024X768...
... in memory for more information on the screen. Press the MENU button once to return to the main menu, and twice to return to adjust. buttons to select the menu and adjustment items. - 0+ ENTER 2 Adjust the menu. buttons. Press the ENTER button to make the adjustment. TER 4 3 Close the menu. c II Resetting the adjustments You can reset the adjustments using the RESET menu. Press the +/- CONTRAST/BRIGHTNESS 0 ia CONTRAST 26 C 60.0kHz/70.0Hz 1024X768...

Operating Instructions (primary manual)
Page 10
... current input signal. 1 Press the MENU button. Select H-SIZE H-CENTER To adjust the horizontal size adjust the horizontal centering Adjusting the vertical size or centering of the screen n Then press the +/- buttons to select the desired adjustment item. IR button. The KEY/KEY BALANCE menu appears on the screen. 3 First press the ENTER bt to make the adjustment. The PIN/PIN BALANCE menu Nears on the screen. 3 First press the ENTER button to make the adjustment...
... current input signal. 1 Press the MENU button. Select H-SIZE H-CENTER To adjust the horizontal size adjust the horizontal centering Adjusting the vertical size or centering of the screen n Then press the +/- buttons to select the desired adjustment item. IR button. The KEY/KEY BALANCE menu appears on the screen. 3 First press the ENTER bt to make the adjustment. The PIN/PIN BALANCE menu Nears on the screen. 3 First press the ENTER button to make the adjustment...
Operating Instructions (primary manual)
Page 11
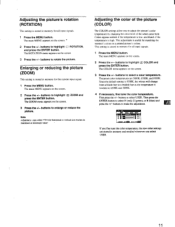
... input signals. 1 Press the MENU button. The main MENU appears on the screen. 3 Press the +/- Since the default setting is 9300K, the whites will change from a bluish hue to a reddish hue as the temperature is useful for matching the monitor's colors to 6500K and 5000K. 4 If necessary, fine tune the color temperature. buttons to rotate the picture. buttons to select USER. This adjustment is lowered to a printed picture's colors. buttons to make the adjustment. buttons...
... input signals. 1 Press the MENU button. The main MENU appears on the screen. 3 Press the +/- Since the default setting is 9300K, the whites will change from a bluish hue to a reddish hue as the temperature is useful for matching the monitor's colors to 6500K and 5000K. 4 If necessary, fine tune the color temperature. buttons to rotate the picture. buttons to select USER. This adjustment is lowered to a printed picture's colors. buttons to make the adjustment. buttons...

Operating Instructions (primary manual)
Page 12
.... button. The MODE item is degaussed for the current input signal (MODE) Press the - With the exception of the USER settings in the COLOR menu, all of the monitor. Adjust the selected item according to the following instructions. The screen is selected. To adjust the amount of the adjustment data for the best result. The ALL item is turned on your screen. Then press the 44- Moire is reset...
.... button. The MODE item is degaussed for the current input signal (MODE) Press the - With the exception of the USER settings in the COLOR menu, all of the monitor. Adjust the selected item according to the following instructions. The screen is selected. To adjust the amount of the adjustment data for the best result. The ALL item is turned on your screen. Then press the 44- Moire is reset...
Operating Instructions (primary manual)
Page 13
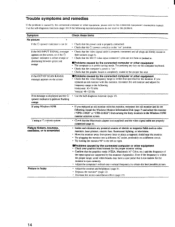
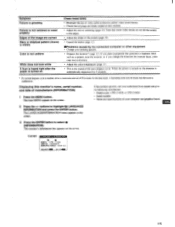
... the connected computer or other equipment • Check your graphics board manual for the monitor to sync correctly. • Adjust the computer's refresh rate (vertical frequency) to the left or right. Even if the frequency is within that the computer's power is "on " position. If the NO INPUT SIGNAL message appears on a different circuit. • Try turning the monitor 90° to obtain the best possible picture. • Adjust the contrast and brightness...
... the connected computer or other equipment • Check your graphics board manual for the monitor to sync correctly. • Adjust the computer's refresh rate (vertical frequency) to the left or right. Even if the frequency is within that the computer's power is "on " position. If the NO INPUT SIGNAL message appears on a different circuit. • Try turning the monitor 90° to obtain the best possible picture. • Adjust the contrast and brightness...
Operating Instructions (primary manual)
Page 14
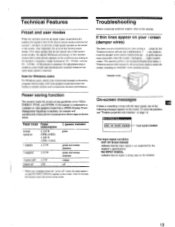
... of the screen. (See Appendix for Windows users For Windows users, check your video board manual or the utility program which comes with the input signal, one of the factory preset modes, the digital Multiscan technology of the following messages appears on the screen. Power saving function This monitor meets the power-saving guidelines set by the monitor's specifications. To solve the problem. vertical: 48 - 120 Hz) . If the monitor is cut and NO INPUT SIGNAL appears on...
... of the screen. (See Appendix for Windows users For Windows users, check your video board manual or the utility program which comes with the input signal, one of the factory preset modes, the digital Multiscan technology of the following messages appears on the screen. Power saving function This monitor meets the power-saving guidelines set by the monitor's specifications. To solve the problem. vertical: 48 - 120 Hz) . If the monitor is cut and NO INPUT SIGNAL appears on...

Operating Instructions (primary manual)
Page 15
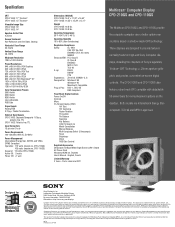
... () (power) indicator will either light up green, the monitor is working properly. If the (1) (power) indicator is in orange. the computer is lit in power saving mode. green. CPD-210GS CRT Viewable image size Resolution Standard image area Deflection frequency* AC input voltage/current Power consumption Dimensions Mass Plug and Play Supplied accessories 0.25 mm aperture grille pitch 17 inches measured diagonally 90-degree deflection Approx. 327 x 243 mm (w/h) (12 7/8 x 9 5/8 inches) 16.0" viewing image Horizontal: Max...
... () (power) indicator will either light up green, the monitor is working properly. If the (1) (power) indicator is in orange. the computer is lit in power saving mode. green. CPD-210GS CRT Viewable image size Resolution Standard image area Deflection frequency* AC input voltage/current Power consumption Dimensions Mass Plug and Play Supplied accessories 0.25 mm aperture grille pitch 17 inches measured diagonally 90-degree deflection Approx. 327 x 243 mm (w/h) (12 7/8 x 9 5/8 inches) 16.0" viewing image Horizontal: Max...
Operating Instructions (primary manual)
Page 16
... the use of video cable extensions and/or video switch boxes. • Check that some video modes do not fill the screen to highlight It) LANGUAGE/ INFORMATION and press the ENTER button. Displaying this is needed, allow a minimum interval of 20 minutes for the best result. call your authorized Sony dealer and give the following information. • Model name: CPD-110GS or CPD-210GS • Serial number • Name and specifications of...
... the use of video cable extensions and/or video switch boxes. • Check that some video modes do not fill the screen to highlight It) LANGUAGE/ INFORMATION and press the ENTER button. Displaying this is needed, allow a minimum interval of 20 minutes for the best result. call your authorized Sony dealer and give the following information. • Model name: CPD-110GS or CPD-210GS • Serial number • Name and specifications of...

Operating Instructions (primary manual)
Page 18
Sony Corporation SonyOline httpJ/www.worid.sony.com/ Printed in Japan
Sony Corporation SonyOline httpJ/www.worid.sony.com/ Printed in Japan

Marketing Specifications
Page 1
... Cabinet Depth Design - Short-neck CRT design allows for overall shorter depth of display on desktop • Comprehensive Digital OSD in a compact design for the demanding corporate professional. Multiscan® Computer Display CPD-210GS and CPD-110GS Superior image performance and reliability in Five languages • Designed for Windows® 98 and Windows® 95 • Macintosh® Compatible • International Energy Star...
... Cabinet Depth Design - Short-neck CRT design allows for overall shorter depth of display on desktop • Comprehensive Digital OSD in a compact design for the demanding corporate professional. Multiscan® Computer Display CPD-210GS and CPD-110GS Superior image performance and reliability in Five languages • Designed for Windows® 98 and Windows® 95 • Macintosh® Compatible • International Energy Star...
Marketing Specifications
Page 2
... VESA 720 x 400 @ 70Hz VGA Text 800 x 600 @ 75Hz VESA 800 x 600 @ 85Hz VESA 832 x 624 @ 75Hz Macintosh® 16" 1024 x 768 @ 75Hz VESA 1024 x 768 @ 85Hz VESA 1280 x 1024 @ 60Hz VESA Color Temperature Presets 5000 Kelvin 6500 Kelvin 9300 Kelvin User-Adjustable RGB Gain Signal Inputs Analog RGB 0.7Vp-p, 75ohm Termination External Sync Signals CPD-210GS: Separate/Composite 1-5Vp-p, polarity-free TTL CPD-110GS: Polarity-free TTL Input Connectors 15 pin mini D-sub Power...
... VESA 720 x 400 @ 70Hz VGA Text 800 x 600 @ 75Hz VESA 800 x 600 @ 85Hz VESA 832 x 624 @ 75Hz Macintosh® 16" 1024 x 768 @ 75Hz VESA 1024 x 768 @ 85Hz VESA 1280 x 1024 @ 60Hz VESA Color Temperature Presets 5000 Kelvin 6500 Kelvin 9300 Kelvin User-Adjustable RGB Gain Signal Inputs Analog RGB 0.7Vp-p, 75ohm Termination External Sync Signals CPD-210GS: Separate/Composite 1-5Vp-p, polarity-free TTL CPD-110GS: Polarity-free TTL Input Connectors 15 pin mini D-sub Power...


