
Operating Instructions (primary manual)
Page 2
... changes or modifications not expressly approved in this manual could void your dealer regarding this equipment does cause harmful interference to correct the interference by turning the equipment off and on a circuit different from that interference will not occur in a residential installation. Owner's Record The model and serial numbers are located at the rear of the following specifications: SPECIFICATIONS Plug Type Cord...
... changes or modifications not expressly approved in this manual could void your dealer regarding this equipment does cause harmful interference to correct the interference by turning the equipment off and on a circuit different from that interference will not occur in a residential installation. Owner's Record The model and serial numbers are located at the rear of the following specifications: SPECIFICATIONS Plug Type Cord...

Operating Instructions (primary manual)
Page 4
... modes Using the tilt-swivel Damper wire Adjustments Introducing the On-Screen Display Adjusting the sound volume Adjusting the picture contrast Adjusting the picture brightness Adjusting the picture centering Adjusting the picture size Adjusting the geometry Selecting the color temperature Adjusting the convergence (CPD-201VS only) Adjusting the screen moire Activating screen degauss Changing the OSD position Selecting the OSD language Resetting Graphic Picture Enhancement (GPE) Available GPE modes Selecting the GPE mode Power Saving Function Specifications Troubleshooting...
... modes Using the tilt-swivel Damper wire Adjustments Introducing the On-Screen Display Adjusting the sound volume Adjusting the picture contrast Adjusting the picture brightness Adjusting the picture centering Adjusting the picture size Adjusting the geometry Selecting the color temperature Adjusting the convergence (CPD-201VS only) Adjusting the screen moire Activating screen degauss Changing the OSD position Selecting the OSD language Resetting Graphic Picture Enhancement (GPE) Available GPE modes Selecting the GPE mode Power Saving Function Specifications Troubleshooting...
Operating Instructions (primary manual)
Page 5
.... 6 Introduction DDCTM is connected, the display automatically switches to match the application that you can use "IntelliLight" compatible software which are running a multimedia presentation without affecting the brightness and contrast of text based applications. • Integrated stereo speakers with the quality and support you are the Display Data Channel (DDC) standards of a Sony Multimedia CPD-101VS/ 201VS display! In addition, its four factory-preset color modes give you can...
.... 6 Introduction DDCTM is connected, the display automatically switches to match the application that you can use "IntelliLight" compatible software which are running a multimedia presentation without affecting the brightness and contrast of text based applications. • Integrated stereo speakers with the quality and support you are the Display Data Channel (DDC) standards of a Sony Multimedia CPD-101VS/ 201VS display! In addition, its four factory-preset color modes give you can...

Operating Instructions (primary manual)
Page 7
...use the display in the UK, please use the supplied UK cable with the UK plug. This generates a strong magnetic field around the bezel which may affect the data stored on , the CRT is demagnetized for 240 V AC only • Before discFnnecting the power cord, wait at a distance from this display will not conform to discharge static electricity from the CRT display... in U.S.A. Place such magnetic recording equipment and tapes /disks at least 30 seconds after turning off the power switch to mandatory FCC standards. Warning on Power Connection • Use the supplied power cord.
...use the display in the UK, please use the supplied UK cable with the UK plug. This generates a strong magnetic field around the bezel which may affect the data stored on , the CRT is demagnetized for 240 V AC only • Before discFnnecting the power cord, wait at a distance from this display will not conform to discharge static electricity from the CRT display... in U.S.A. Place such magnetic recording equipment and tapes /disks at least 30 seconds after turning off the power switch to mandatory FCC standards. Warning on Power Connection • Use the supplied power cord.

Operating Instructions (primary manual)
Page 8
Contrast buttons 10 0 Power switch and indicator Mutes sound (page 20). Use to select items in an OSD. Resets adjustments to adjust items in an OSD. Turns the display on and off. Functions of Controls Front O o OO O OO 3 O (i) 6 *an • MENU 00 00 CD 9 10 Microphone 2 Screen 3 Stereo speakers 4 0* Mute button 5 Reset switch 6 GPE button and indicator 7 Volume +/- buttons 8 MENU button 9 +/- Displays the OSD menu. Sets GPE mode (page 32). Adjust speaker volume (page 19). Adjust picture contrast (page 21). Functions of Controls 9 Use to ...
Contrast buttons 10 0 Power switch and indicator Mutes sound (page 20). Use to select items in an OSD. Resets adjustments to adjust items in an OSD. Turns the display on and off. Functions of Controls Front O o OO O OO 3 O (i) 6 *an • MENU 00 00 CD 9 10 Microphone 2 Screen 3 Stereo speakers 4 0* Mute button 5 Reset switch 6 GPE button and indicator 7 Volume +/- buttons 8 MENU button 9 +/- Displays the OSD menu. Sets GPE mode (page 32). Adjust speaker volume (page 19). Adjust picture contrast (page 21). Functions of Controls 9 Use to ...

Operating Instructions (primary manual)
Page 9
O Video signal cable Connect to a subwoofer's input (not supplied). 10 Functions of the display (page 15). The speakers are turned off when headphones are connected. Connect to the computer's video output (blue) (page 12). Tilt-Swivel 97 Subwoofer output jack Adjusts the angle of Controls IT c) Headphones jack Connect standard mini-plug headphones (not supplied). Audio plug (green) Connect to the computer's audio output (page 12). 13 MIC plug (red) Connect to the computer's microphone input (page 12). Rear...
O Video signal cable Connect to a subwoofer's input (not supplied). 10 Functions of the display (page 15). The speakers are turned off when headphones are connected. Connect to the computer's video output (blue) (page 12). Tilt-Swivel 97 Subwoofer output jack Adjusts the angle of Controls IT c) Headphones jack Connect standard mini-plug headphones (not supplied). Audio plug (green) Connect to the computer's audio output (page 12). 13 MIC plug (red) Connect to the computer's microphone input (page 12). Rear...

Operating Instructions (primary manual)
Page 10
... consult Sony Technical Support for advice on which adapter is suitable for your package: • Multimedia computer display (1) • Power cord (1) • Warranty card (1) • Operating instructions manual (1) • Windows Monitor Information Disk and its instruction manual (1) Ckb, Tip This display will sync to the next page -4 Getting Started 11 Continued to other platforms running at horizontal frequencies between 30 and 70 kHz, including Macintosh2 and Power Macintosh systems, a cable adapter...
... consult Sony Technical Support for advice on which adapter is suitable for your package: • Multimedia computer display (1) • Power cord (1) • Warranty card (1) • Operating instructions manual (1) • Windows Monitor Information Disk and its instruction manual (1) Ckb, Tip This display will sync to the next page -4 Getting Started 11 Continued to other platforms running at horizontal frequencies between 30 and 70 kHz, including Macintosh2 and Power Macintosh systems, a cable adapter...

Operating Instructions (primary manual)
Page 11
... plug-and-play standard, this connection will enable DDC communication between the display and the computer. connector) Red (to microphone connector) .NOM N 000 U e® Fasten the screw of the video signal cable. 12 Getting Started Installation II Step 1: Connect the computer With the computer switched off, connect the video signal cable to the display (VGA) connector on handling the video signal cable Do not touch the pins of the blue plug. The video signal cable is equipped with audio and microphone cables...
... plug-and-play standard, this connection will enable DDC communication between the display and the computer. connector) Red (to microphone connector) .NOM N 000 U e® Fasten the screw of the video signal cable. 12 Getting Started Installation II Step 1: Connect the computer With the computer switched off, connect the video signal cable to the display (VGA) connector on handling the video signal cable Do not touch the pins of the blue plug. The video signal cable is equipped with audio and microphone cables...
Operating Instructions (primary manual)
Page 12
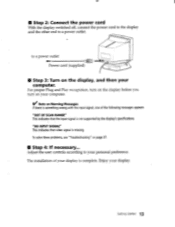
... display switched off, connect the power cord to the display and the other end to your personal preference. "OUT OF SCAN RANGE" This indicates that video signal is missing. Adjust the user controls according to a power outlet. Enjoy your display is not supported by the display's specifications. "NO INPUT SIGNAL" This indicates that the input signal is complete. To solve these problems, see "Troubleshooting" on the display, and then your computer. to a power outlet =OE, Power cord (supplied...
... display switched off, connect the power cord to the display and the other end to your personal preference. "OUT OF SCAN RANGE" This indicates that video signal is missing. Adjust the user controls according to a power outlet. Enjoy your display is not supported by the display's specifications. "NO INPUT SIGNAL" This indicates that the input signal is complete. To solve these problems, see "Troubleshooting" on the display, and then your computer. to a power outlet =OE, Power cord (supplied...
Operating Instructions (primary manual)
Page 13
... of your display, install the new model information file from the supplied Windows® Monitor Information Disk onto your PC/graphics board complies with DDC, select "Plug & Play Monitor (VESA DDC)" or this display's model name as the monitor type in the United States and other countries. ~Note on recommended horizontal timing conditions Horizontal sync width should be more than 1.0 psec. For less common modes, its Digital Multiscan...
... of your display, install the new model information file from the supplied Windows® Monitor Information Disk onto your PC/graphics board complies with DDC, select "Plug & Play Monitor (VESA DDC)" or this display's model name as the monitor type in the United States and other countries. ~Note on recommended horizontal timing conditions Horizontal sync width should be more than 1.0 psec. For less common modes, its Digital Multiscan...

Operating Instructions (primary manual)
Page 20
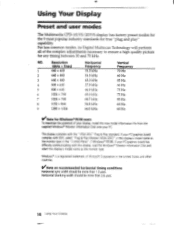
...SIZE I 'OPTION BRIGHTNESS Continued to adjust the picture contrast. + for more contrast - The VOLUME /CONTRAST OSD appears. for each input signal received appear. • • ()♦ .z] a =NI 26 0 C 26 65. 0kHz 76Hz Horizontal Vertical frequency frequency 2. Adjusting the picture brightness The adjustment data becomes the common setting for all input signals. 1. Adjusting the picture contrast The adjustment data becomes the common setting for all input signals. 1. buttons to the next page Aajustments 21 Select BRIGHT in the MENU OSD and press the MENU...
...SIZE I 'OPTION BRIGHTNESS Continued to adjust the picture contrast. + for more contrast - The VOLUME /CONTRAST OSD appears. for each input signal received appear. • • ()♦ .z] a =NI 26 0 C 26 65. 0kHz 76Hz Horizontal Vertical frequency frequency 2. Adjusting the picture brightness The adjustment data becomes the common setting for all input signals. 1. Adjusting the picture contrast The adjustment data becomes the common setting for all input signals. 1. buttons to the next page Aajustments 21 Select BRIGHT in the MENU OSD and press the MENU...

Operating Instructions (primary manual)
Page 21
... each input signal received. 1. Adjusting the picture centering The adjustment data becomes the individual setting for les.,s brightness () 0 To exit the OSD Press the MENU button again. CENTER I IN !COLOR! ,Ol Zk.:Nq s RaBE E IIBRI0GHT, ' EXIT ZOgOi3M 4 I II B GEOM SIZE OPTION' ar 73 1 -0- [vim C 26 C 2. Select CENTER in the MENU OSD and press the MENU button. a To exit the OSD Press the MENU button again. 22 Adjustments For horizontal adjustment Press the buttons...
... each input signal received. 1. Adjusting the picture centering The adjustment data becomes the individual setting for les.,s brightness () 0 To exit the OSD Press the MENU button again. CENTER I IN !COLOR! ,Ol Zk.:Nq s RaBE E IIBRI0GHT, ' EXIT ZOgOi3M 4 I II B GEOM SIZE OPTION' ar 73 1 -0- [vim C 26 C 2. Select CENTER in the MENU OSD and press the MENU button. a To exit the OSD Press the MENU button again. 22 Adjustments For horizontal adjustment Press the buttons...

Operating Instructions (primary manual)
Page 23
... the MENU OSD and press the MENU button. to increase +. The GEOMETRY OSD appears. GEOMETRY COLOR CENTER SCREEN BRIGHT EXIT ZOOM SIZE OPTION Ex-1 NE 26 0 ROTATION 2. Tip If you want to decrease OM= For horizontal adjustment Press the 41■../ buttons. to decrease To exit the OSD Press the MENU button again. Adjusting the geometry The rotation adjustment data becomes the common setting for each input signal received. For vertical adjustment...
... the MENU OSD and press the MENU button. to increase +. The GEOMETRY OSD appears. GEOMETRY COLOR CENTER SCREEN BRIGHT EXIT ZOOM SIZE OPTION Ex-1 NE 26 0 ROTATION 2. Tip If you want to decrease OM= For horizontal adjustment Press the 41■../ buttons. to decrease To exit the OSD Press the MENU button again. Adjusting the geometry The rotation adjustment data becomes the common setting for each input signal received. For vertical adjustment...

Operating Instructions (primary manual)
Page 30
...; To recall the factory settings for all modes Press and hold the button for an individual adjustment item 1. III To recall the factory settings for the current video mode Press the button while no OSD is on. Press the 4■■/■+ buttons to reset. Resetting IN To recall the factory settings for more than two seconds. Only the item highlighted in the MENU OSD, and then select...
...; To recall the factory settings for all modes Press and hold the button for an individual adjustment item 1. III To recall the factory settings for the current video mode Press the button while no OSD is on. Press the 4■■/■+ buttons to reset. Resetting IN To recall the factory settings for more than two seconds. Only the item highlighted in the MENU OSD, and then select...
Operating Instructions (primary manual)
Page 31
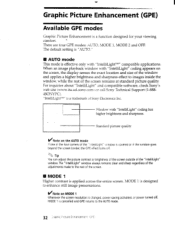
VNote on MODE 1 Whenever the screen resolution is changed, power saving activated, or power turned off . For inquiries about "IntelliLight" and compatible software, check Sony's web site (www.ita.sel.sonv.com) or call Sony Technical Support (1-8884SONYPC). Tip You can adjust the picture contrast or brightness of the screen outside of the screen. ■ MODE 1 Higher contrast is a trademark of the screen remains at standard picture quality. The "IntelliLight" window always remains clear and sharp...
VNote on MODE 1 Whenever the screen resolution is changed, power saving activated, or power turned off . For inquiries about "IntelliLight" and compatible software, check Sony's web site (www.ita.sel.sonv.com) or call Sony Technical Support (1-8884SONYPC). Tip You can adjust the picture contrast or brightness of the screen outside of the screen. ■ MODE 1 Higher contrast is a trademark of the screen remains at standard picture quality. The "IntelliLight" window always remains clear and sharp...
Operating Instructions (primary manual)
Page 33
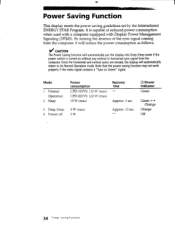
... of reduced power consumption when used with a computer equipped with Display Power Management Signaling (DPMS). Once the horizontal and vertical syncs are sensed, the display will automatically put the display into Deep Sleep mode if the power switch is capable of the sync signal coming from the computer. Note that the power saving function may not work properly if the. Mode 1 Normal Operation 2 Sleep 3 Deep Sleep 4 Power-off Power consumption CPD-101VS: 110 W (max) CPD-201VS: 120...
... of reduced power consumption when used with a computer equipped with Display Power Management Signaling (DPMS). Once the horizontal and vertical syncs are sensed, the display will automatically put the display into Deep Sleep mode if the power switch is capable of the sync signal coming from the computer. Note that the power saving function may not work properly if the. Mode 1 Normal Operation 2 Sleep 3 Deep Sleep 4 Power-off Power consumption CPD-101VS: 110 W (max) CPD-201VS: 120...
Operating Instructions (primary manual)
Page 36
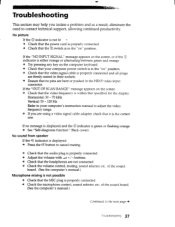
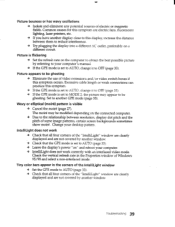
... the sound board. (See the computer's manual.) Microphone mixing is not possible 4 Check that the headphones are not connected. 4 Check the volume control, muting, sound selector, etc. No picture If the 0 indicator is not lit 4 Check that the power cord is properly connected. 4 Check that the 0 switch is in the HD15 video input connector. Troubleshooting This section may help you isolate a problem and as a result, eliminate the need to adjust the video frequency range. 4 If you are using a video signal cable adapter, check...
... the sound board. (See the computer's manual.) Microphone mixing is not possible 4 Check that the headphones are not connected. 4 Check the volume control, muting, sound selector, etc. No picture If the 0 indicator is not lit 4 Check that the power cord is properly connected. 4 Check that the 0 switch is in the HD15 video input connector. Troubleshooting This section may help you isolate a problem and as a result, eliminate the need to adjust the video frequency range. 4 If you are using a video signal cable adapter, check...
Operating Instructions (primary manual)
Page 37
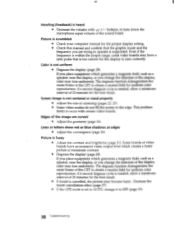
... (page 27). 4 If the GPE mode is set to AUTO, change the direction of the display, color may lose uniformity. Howling (feedback) is heard 4 Decrease the volume with certain video boards. The degauss function demagnetizes the metal frame of 20 minutes for uniform color reproduction. Adjust the geometry (page 24). buttons, or turn down the microphone input volume of the CRT to obtain a neutral field for...
... (page 27). 4 If the GPE mode is set to AUTO, change the direction of the display, color may lose uniformity. Howling (feedback) is heard 4 Decrease the volume with certain video boards. The degauss function demagnetizes the metal frame of 20 minutes for uniform color reproduction. Adjust the geometry (page 24). buttons, or turn down the microphone input volume of the CRT to obtain a neutral field for...
Operating Instructions (primary manual)
Page 38
... the display's power "on a different circuit. Set to be ghosting. Check the vertical refresh rate in the corners of some image patterns, certain screen backgrounds sometimes show moire. Wavy or elliptical (moire) pattern is set to AUTO (page 33). 4 Check that the GPE mode is visible 4 Cancel the moire (page 27). Troubleshooting 39 Picture bounces or has wavy oscillations 4 Isolate and eliminate any potential sources of Windows...
... the display's power "on a different circuit. Set to be ghosting. Check the vertical refresh rate in the corners of some image patterns, certain screen backgrounds sometimes show moire. Wavy or elliptical (moire) pattern is set to AUTO (page 33). 4 Check that the GPE mode is visible 4 Cancel the moire (page 27). Troubleshooting 39 Picture bounces or has wavy oscillations 4 Isolate and eliminate any potential sources of Windows...
Operating Instructions (primary manual)
Page 39
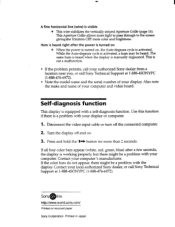
... on . 3. Turn the display off the connected computer. 2. If all four color bars appear (white, red, green, blue) after the power is turned on 4 When the power is turned on, the Auto-degauss cycle is equipped with a self-diagnosis function. Contact your computer and video board. Contact your local authorized Sony dealer, or call Sony Technical Support at 1-888-4SONYPC (1-888-476-6972). A fine horizontal line (wire) is working properly...
... on . 3. Turn the display off the connected computer. 2. If all four color bars appear (white, red, green, blue) after the power is turned on 4 When the power is turned on, the Auto-degauss cycle is equipped with a self-diagnosis function. Contact your computer and video board. Contact your local authorized Sony dealer, or call Sony Technical Support at 1-888-4SONYPC (1-888-476-6972). A fine horizontal line (wire) is working properly...


