

Operating Instructions (primary manual)
Page 2
... is applicable for help. If shipped to USA/Canada, install only a UL LISTED/CSA LABELLED power supply cord meeting the following measures: - Owner's Record 'File model and serial numbers are cautioned that to which can radiate radio frequency energy and, if not installed and used with a computer equipped with VESA Display Power Management Signaling (DPMS). Do not open the cabinet. Model No. Record the serial number in a particular installation. Increase the...
... is applicable for help. If shipped to USA/Canada, install only a UL LISTED/CSA LABELLED power supply cord meeting the following measures: - Owner's Record 'File model and serial numbers are cautioned that to which can radiate radio frequency energy and, if not installed and used with a computer equipped with VESA Display Power Management Signaling (DPMS). Do not open the cabinet. Model No. Record the serial number in a particular installation. Increase the...
Operating Instructions (primary manual)
Page 3
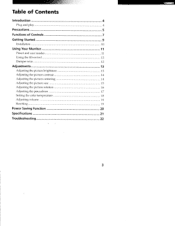
Table of Contents Introduction 4 Plug and play 4 Precautions 5 Functions of Controls 7 Getting Started 9 Installation 10 Using Your Monitor 11 Preset and user modes 11 Using the tilt-swivel 12 Damper wire 12 Adjustments 13 Adjusting the picture brightness 13 Adjusting the picture contrast 14 Adjusting the picture centering 14 Adjusting the picture size 15 Adjusting the picture rotation 16 Adjusting the pincushion 17 Setting the color temperature 18 Adjusting volume 19 Resetting 19 Power Saving Function 20 Specifications 21 Troubleshooting 22 3
Table of Contents Introduction 4 Plug and play 4 Precautions 5 Functions of Controls 7 Getting Started 9 Installation 10 Using Your Monitor 11 Preset and user modes 11 Using the tilt-swivel 12 Damper wire 12 Adjustments 13 Adjusting the picture brightness 13 Adjusting the picture contrast 14 Adjusting the picture centering 14 Adjusting the picture size 15 Adjusting the picture rotation 16 Adjusting the pincushion 17 Setting the color temperature 18 Adjusting volume 19 Resetting 19 Power Saving Function 20 Specifications 21 Troubleshooting 22 3
Operating Instructions (primary manual)
Page 4
... monitor automatically switches to the DDC2B communication. * DDC v1 is connected, the monitor synchronizes with the VESA standards and outputs the EDID (Extended Display Identification Data) to the data line. When a DDC1 host system is a trademark of a Sony Multiscan CPD-100VS monitor! CLK in matching on your purchase of the non-profit organization, Video Electronics Standard Association. 4 Introduction Introduction Congratulations on -screen colors...
... monitor automatically switches to the DDC2B communication. * DDC v1 is connected, the monitor synchronizes with the VESA standards and outputs the EDID (Extended Display Identification Data) to the data line. When a DDC1 host system is a trademark of a Sony Multiscan CPD-100VS monitor! CLK in matching on your purchase of the non-profit organization, Video Electronics Standard Association. 4 Introduction Introduction Congratulations on -screen colors...

Operating Instructions (primary manual)
Page 5
... type of the screen with a mild detergent solution. Maintenance • Clean the cabinet, glass panel and controls with a soft cloth lightly moistened with sharp or abrasive items, like a ball point pen or a screwdriver, as a converter or high voltage power lines. When transporting the unit, use any type of ... Do not install the unit near materials (curtains, draperies) that the unit is properly packaged. Do not place the unit on surfaces (rugs, blankets, etc.) or near heat sources such as radiators or air ducts, nor in a scratched picture tube. Do not use these packing ...
... type of the screen with a mild detergent solution. Maintenance • Clean the cabinet, glass panel and controls with a soft cloth lightly moistened with sharp or abrasive items, like a ball point pen or a screwdriver, as a converter or high voltage power lines. When transporting the unit, use any type of ... Do not install the unit near materials (curtains, draperies) that the unit is properly packaged. Do not place the unit on surfaces (rugs, blankets, etc.) or near heat sources such as radiators or air ducts, nor in a scratched picture tube. Do not use these packing ...

Operating Instructions (primary manual)
Page 6
... this monitor may affect the data stored on Power Connection • Use only the supplied power cord. This generates a strong magnetic field around the bezel which may not conform to mandatory FCC standards. • Before disconnecting the power cord, wait at least 30 seconds after turning off the power switch to discharge static electricity from the CRT display surface. • After the power has been turned...
... this monitor may affect the data stored on Power Connection • Use only the supplied power cord. This generates a strong magnetic field around the bezel which may not conform to mandatory FCC standards. • Before disconnecting the power cord, wait at least 30 seconds after turning off the power switch to discharge static electricity from the CRT display surface. • After the power has been turned...

Operating Instructions (primary manual)
Page 7
The default setting of Controls 7 temperature button 0* Mute button and Mutes sound (page 19). Reset switch 0a Size button Resets adjustments to the next page -> Functions of the volume level is connected. Main speaker Display Displays OSD when adjusting. indicator Volume -/+ buttons Adjusts speaker volume (page 19). L1 00 Color Adjusts color temperature (page 18). Adjusts picture size (pagel5). 10 OO Centering button Adjusts picture centering (page 14). 11 O -1+ Brightness button Adjusts picture brightness (page 13). 12 (!) Power switch and indicator Turns on ...
The default setting of Controls 7 temperature button 0* Mute button and Mutes sound (page 19). Reset switch 0a Size button Resets adjustments to the next page -> Functions of the volume level is connected. Main speaker Display Displays OSD when adjusting. indicator Volume -/+ buttons Adjusts speaker volume (page 19). L1 00 Color Adjusts color temperature (page 18). Adjusts picture size (pagel5). 10 OO Centering button Adjusts picture centering (page 14). 11 O -1+ Brightness button Adjusts picture brightness (page 13). 12 (!) Power switch and indicator Turns on ...

Operating Instructions (primary manual)
Page 8
The speakers are turned off when headphones are connected. 20 \ Microphone jack Connect a microphone (not supplied). Rear - - - 19 15E- 20 16 21 17 18 AC IN connector Connect the supplied power cord (page 10). 16 C; El Tilt-Swivel Adjusts the angle of the display. 8 Functions of Controls Audio plug (green) Connect to the computer's speaker output (page 10). 17 MIC plug (red) Connect to the computer's microphone input (page 10). 18 0 Video signal cable Connect to the computer's video output (page (blue) 10). 19 Headphones jack Connect headphones (not supplied).
The speakers are turned off when headphones are connected. 20 \ Microphone jack Connect a microphone (not supplied). Rear - - - 19 15E- 20 16 21 17 18 AC IN connector Connect the supplied power cord (page 10). 16 C; El Tilt-Swivel Adjusts the angle of the display. 8 Functions of Controls Audio plug (green) Connect to the computer's speaker output (page 10). 17 MIC plug (red) Connect to the computer's microphone input (page 10). 18 0 Video signal cable Connect to the computer's video output (page (blue) 10). 19 Headphones jack Connect headphones (not supplied).
Operating Instructions (primary manual)
Page 9
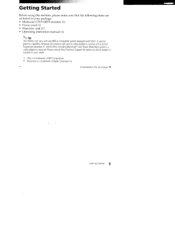
... running at horizontal frequencies between 31 and 65 kHz, including Macintosh2 and Power Macintosh systems, a cable adapter is required. Please consult Sony Technical Support for advice on which adapter is suitable for your package: • Multiscan CPD-100VS monitor (1) • Power cord (1) • Warranty card (1) • Operating instruction manual (1) (k!, Tip This monitor will sync to the next page Getting Started 9 .Getting Started Before using this monitor will sync with any IBM or compatible system...
... running at horizontal frequencies between 31 and 65 kHz, including Macintosh2 and Power Macintosh systems, a cable adapter is required. Please consult Sony Technical Support for advice on which adapter is suitable for your package: • Multiscan CPD-100VS monitor (1) • Power cord (1) • Warranty card (1) • Operating instruction manual (1) (k!, Tip This monitor will sync to the next page Getting Started 9 .Getting Started Before using this monitor will sync with any IBM or compatible system...

Operating Instructions (primary manual)
Page 10
... power cord With the monitor switched off , connect the video signal cable to the display (VGA) connector on your personal preference. Also the video signal cable is complete. to speaker connector Red i/ Note on the monitor and computer. Enjoy your computer. For Sony VAIO series computer users: The color coding on your monitor. 10 Getting Started U Step 4: If necessary... The installation of the video signal cable. Computer Blue Green to display connector to a power outlet L:ciL] Power cord (supplied) ■ Step 3: Turn on handling the video signal cable Do not touch...
... power cord With the monitor switched off , connect the video signal cable to the display (VGA) connector on your personal preference. Also the video signal cable is complete. to speaker connector Red i/ Note on the monitor and computer. Enjoy your computer. For Sony VAIO series computer users: The color coding on your monitor. 10 Getting Started U Step 4: If necessary... The installation of the video signal cable. Computer Blue Green to display connector to a power outlet L:ciL] Power cord (supplied) ■ Step 3: Turn on handling the video signal cable Do not touch...

Operating Instructions (primary manual)
Page 11
mmommurm-L: Using Your Monitor Preset and user modes The Multiscan CPD-100VS monitor has factory preset modes for the 6 most popular industry standards for Windows® 95 users If you cannot find this monitor (CPD-100VS) when you selected "SONY" on recommended horizontal timing conditions Horizontal sync width should be stored automatically and recalled whenever that is a registered trademark of the complex adjustments necessary to the adjustment instructions. Resolution (dots x lines) 1 640 x 350...
mmommurm-L: Using Your Monitor Preset and user modes The Multiscan CPD-100VS monitor has factory preset modes for the 6 most popular industry standards for Windows® 95 users If you cannot find this monitor (CPD-100VS) when you selected "SONY" on recommended horizontal timing conditions Horizontal sync width should be stored automatically and recalled whenever that is a registered trademark of the complex adjustments necessary to the adjustment instructions. Resolution (dots x lines) 1 640 x 350...

Operating Instructions (primary manual)
Page 12
... a vertically striped Aperture Grille inside. Damper wire T Approx. 6 cm (2 3/ 8 inches) 12 Using Your Monitor Using the tilt-swivel With the tilt-swivel, this unit can be adjusted to the screen giving the Trinitron CRT more light to pass through to be viewed at its bottom with both hands. 45° 11-7. 45° Damper wire Using a white background, a very thin horizontal line on the screen is...
... a vertically striped Aperture Grille inside. Damper wire T Approx. 6 cm (2 3/ 8 inches) 12 Using Your Monitor Using the tilt-swivel With the tilt-swivel, this unit can be adjusted to the screen giving the Trinitron CRT more light to pass through to be viewed at its bottom with both hands. 45° 11-7. 45° Damper wire Using a white background, a very thin horizontal line on the screen is...
Operating Instructions (primary manual)
Page 13
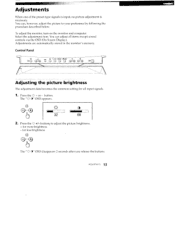
...; - Press the -0 - +1- To adjust the monitor, turn on the monitor and computer. Adjustments are automatically stored in the monitor's memory. O CEO 0 O O O O 0 - 0 0 - 0 (I) Adjusting the picture brightness The adjustment data becomes the common setting for all items except sound controls via the OSD (On Screen Display). The "-0- for more brightness - You can adjust all input signals. 1. button. buttons to your preference by following the procedure described below. Press the -Q- + or - CD" OSD appears. 4- 32 68...
...; - Press the -0 - +1- To adjust the monitor, turn on the monitor and computer. Adjustments are automatically stored in the monitor's memory. O CEO 0 O O O O 0 - 0 0 - 0 (I) Adjusting the picture brightness The adjustment data becomes the common setting for all items except sound controls via the OSD (On Screen Display). The "-0- for more brightness - You can adjust all input signals. 1. button. buttons to your preference by following the procedure described below. Press the -Q- + or - CD" OSD appears. 4- 32 68...

Operating Instructions (primary manual)
Page 15
... vertical adjustment Press the +/- to move down For horizontal adjustment Press the 0 +/- buttons. + to increase - buttons. + to increase - For vertical adjustment Press the :c5: +/- When you don't touch any button, the OSD automatically disappears after 20 seconds. Adjusting the picture size The adjustment data becomes the individual setting for each input signal received. 1. to decrease Continued to move up - to the ncxt page Adjustments 15 2.. buttons. + to decrease 8 68 For horizontal adjustment...
... vertical adjustment Press the +/- to move down For horizontal adjustment Press the 0 +/- buttons. + to increase - buttons. + to increase - For vertical adjustment Press the :c5: +/- When you don't touch any button, the OSD automatically disappears after 20 seconds. Adjusting the picture size The adjustment data becomes the individual setting for each input signal received. 1. to decrease Continued to move up - to the ncxt page Adjustments 15 2.. buttons. + to decrease 8 68 For horizontal adjustment...

Operating Instructions (primary manual)
Page 16
Press the O O button. The " 0 O " OSD appears. The OSD of the selected item appears. 16 Adjustments When you want to adjust another item, press the button of the item. When you want to adjust another item, press the button of the item. Adjusting the picture rotation The adjustment data becomes the common setting for all input signals. 1. Oo O 9 =NM 32 68 2. The OSD of the selected item...
Press the O O button. The " 0 O " OSD appears. The OSD of the selected item appears. 16 Adjustments When you want to adjust another item, press the button of the item. When you want to adjust another item, press the button of the item. Adjusting the picture rotation The adjustment data becomes the common setting for all input signals. 1. Oo O 9 =NM 32 68 2. The OSD of the selected item...

Operating Instructions (primary manual)
Page 19
O- Adjusting volume Adjust with the a +/- To recall the factory settings for the current mode Press the •• buttons. + to the sound. • Excessively high volume may cause howling. ■ To mute the sound Press the o* button. Resetting F2. to decrease volume Tips •The 0* indicator flashes while adjusting volume. • The default setting of the volume level is 30 %. • No indicator about volume level appears. • Adjust the volume while listening to increase volume - The 05'4< indicator lights. Press again to cancel muting.
O- Adjusting volume Adjust with the a +/- To recall the factory settings for the current mode Press the •• buttons. + to the sound. • Excessively high volume may cause howling. ■ To mute the sound Press the o* button. Resetting F2. to decrease volume Tips •The 0* indicator flashes while adjusting volume. • The default setting of the volume level is 30 %. • No indicator about volume level appears. • Adjust the volume while listening to increase volume - The 05'4< indicator lights. Press again to cancel muting.

Operating Instructions (primary manual)
Page 20
... audio circuitry will constantly be active as long as follows: V CAUTION The Power Saving function will automatically put the monitor into Active-off state if the power switch is turned on without any video signal input. Once the horizontal and vertical syncs are sensed, the monitor will not be automatically turned off (2nd step of reduced power consumption when used with a computer equipped with Display Power Management Signaling (DPMS). State Power...
... audio circuitry will constantly be active as long as follows: V CAUTION The Power Saving function will automatically put the monitor into Active-off state if the power switch is turned on without any video signal input. Once the horizontal and vertical syncs are sensed, the monitor will not be automatically turned off (2nd step of reduced power consumption when used with a computer equipped with Display Power Management Signaling (DPMS). State Power...

Operating Instructions (primary manual)
Page 21
... 1 / 4 x 8 3 / 8 inches) 13.9" viewing image Logical resolution Horizontal: Max. 1280 dots Vertical: Max. 1024 lines Physical resolution Horizontal: Max. 1024 dots Vertical: Max. 768 lines Standard image area Approx. 270 x 202 mm (w/h) (10 3 / 4 x 8 inches) Deflection frequency Horizontal: 31 to 65 kHz Vertical: 50 to 120 Hz Speaker Left, right: 3.5 W x 2, Sub-woofer: 10 W 50 - 20 kHz Microphones Uni-direction, electret condenser microphone Microphones output Miniplug Audio input Stereo miniplug, input...
... 1 / 4 x 8 3 / 8 inches) 13.9" viewing image Logical resolution Horizontal: Max. 1280 dots Vertical: Max. 1024 lines Physical resolution Horizontal: Max. 1024 dots Vertical: Max. 768 lines Standard image area Approx. 270 x 202 mm (w/h) (10 3 / 4 x 8 inches) Deflection frequency Horizontal: 31 to 65 kHz Vertical: 50 to 120 Hz Speaker Left, right: 3.5 W x 2, Sub-woofer: 10 W 50 - 20 kHz Microphones Uni-direction, electret condenser microphone Microphones output Miniplug Audio input Stereo miniplug, input...
Operating Instructions (primary manual)
Page 22
... (±) switch of the sound board. (See the computer's manual.) 22 Troubleshooting No sound from speaker If the 'I ) indicator is flashing in orange • Check that your computer power switch is in the "ON" position. No picture If the CDI indicator is not lit 4 Check that the power cord is properly connected. 4 Check that the OD switch is within that the video sync signal is in the "ON" position. • The monitor may help you...
... (±) switch of the sound board. (See the computer's manual.) 22 Troubleshooting No sound from speaker If the 'I ) indicator is flashing in orange • Check that your computer power switch is in the "ON" position. No picture If the CDI indicator is not lit 4 Check that the power cord is properly connected. 4 Check that the OD switch is within that the video sync signal is in the "ON" position. • The monitor may help you...
Operating Instructions (primary manual)
Page 23
... sources of the sound board. The Aperture Grille allows more light to pass through to be ghosting or 4 Eliminate the use videc; Some brands of the monitor. extension cables and/or video switch boxes if this symptom. Continued to sync correctly. Picture is scrambled 4 Check your graphics board manual for the proper monitor setting on the monitor. • Check this problem to occur on the OSD (pages 16, 17). 4 Some video modes...
... sources of the sound board. The Aperture Grille allows more light to pass through to be ghosting or 4 Eliminate the use videc; Some brands of the monitor. extension cables and/or video switch boxes if this symptom. Continued to sync correctly. Picture is scrambled 4 Check your graphics board manual for the proper monitor setting on the monitor. • Check this problem to occur on the OSD (pages 16, 17). 4 Some video modes...

Operating Instructions (primary manual)
Page 24
... relationship between resolution, monitor Aperture Grille pitch and the pitch of the CRT to obtain a neutral field for the best result. • If the problem persists, call your authorized Sony dealer from a location near you, or call Sony Technical Support at 1-800-326-9551. • Note the model name and the serial number of your monitor. While the Auto-degauss cycle is needed, allow...
... relationship between resolution, monitor Aperture Grille pitch and the pitch of the CRT to obtain a neutral field for the best result. • If the problem persists, call your authorized Sony dealer from a location near you, or call Sony Technical Support at 1-800-326-9551. • Note the model name and the serial number of your monitor. While the Auto-degauss cycle is needed, allow...


